How Tall Do Autoflowers Get?
- 1. Average size for autoflowers
- 2. The perfect growing conditions
- 3. Easy-to-fix problems that can affect growth
- 4. Major factors that can affect growth
- 5. Choosing a pot size
- 6. Light distance and cycle
- 6. a. The perfect light type and distance
- 6. b. Light cycle for autoflowers
- 7. Nutrients for autoflowers
- 7. a. Organic or synthetic nutrients?
- 8. Plant training techniques for height control and maximum yield
- 8. a. Low-stress training (lst)
- 8. b. High-stress training (hst)
- 9. In conclusion
If you are new to growing autoflowers, you might be curious about the average size of autoflowering plants. Just as with any type of gardening, the final height of autoflowering cannabis plants can be affected by a bunch of different variables - from pot size, nutrient schedule, and quality, the type, and distance of lighting, how much stress it is put under, and if there are any pests or disease issues.
In general, autoflowers grow around 50 to 100cm but some can grow as tall as 150 cm, despite their genetics. It is possible to have some level of control over the plants final height by using the right light cycle and pot size. It’s natural for a first-time grower to ask how tall would the plant be considering he has to prepare his grow space. In this article we’ll explain everything you need to know to prepare for your cycle.
1. Average Size for Autoflowers
A grower has to understand the space required for his autoflowers in order to be able to set up a comfortable place for his plants to grow. While a typical autoflower usually grows between 50 to 100 cm (1.5 to 3 feet), here at Fast Buds you can find strains that can grow up to 150cm (59in), like Orange Sherbet Auto or Original Auto Amnesia Haze.
Of course, in both cases, they may grow shorter or taller depending on growing conditions and specific phenotypes. There are a variety of factors that can affect your plant, we’ll explain the main factors thoroughly in the next topics.
Tip: If you’re having problems with your autoflower growing too tall, you can use low stress training techniques to control stretching.
Average Autoflower Height During The Vegetative Stage
As you will read further along, autoflower height will depend on how the genetics expresses its traits when exposed to the growing conditions such as pot size, temperature, humidity, light spectrum, nutrients etc. Because of this, it’s impossible to say exactly how much an autoflower will grow during the vegetative stage but, as a guideline, you can estimate that a certain plant will grow around 40-60% of its height during the vegetative stage.
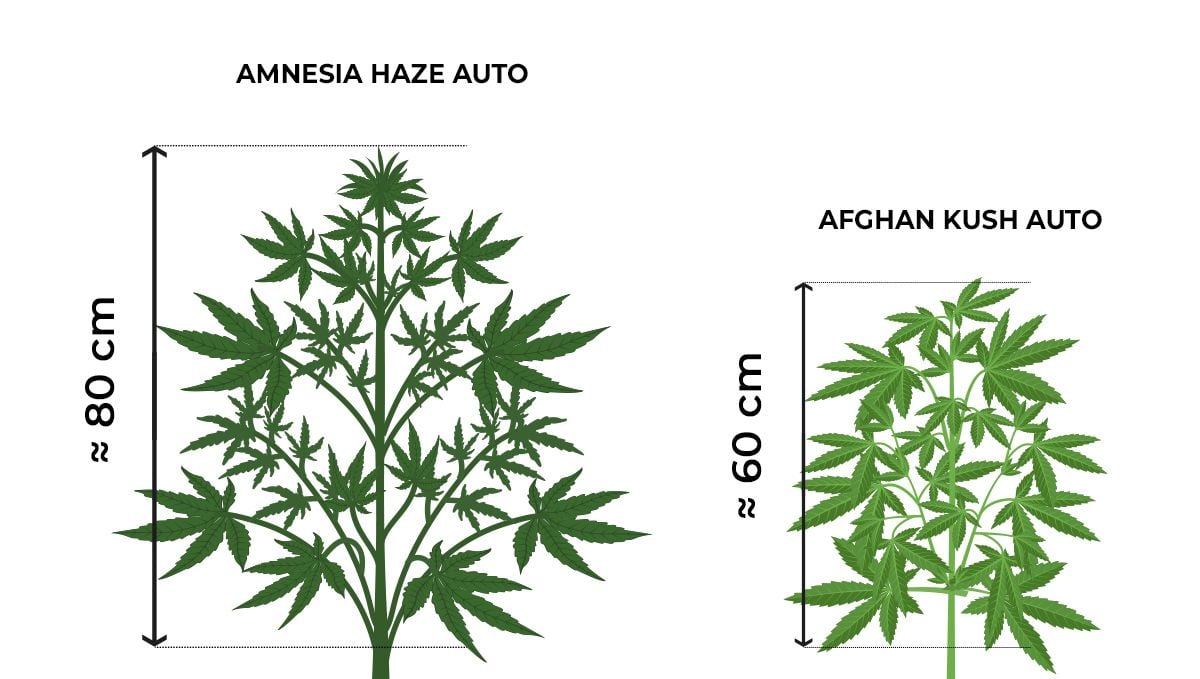
This means that, for example, a Sativa-dominant autoflower will be taller than an Indica-dominant auto from seed. So, to give you an idea let’s have a comparison between one of our tallest and one of our shortest autoflowers, they’re Amnesia Haze Auto and Afghan Kush Auto which present a huge difference when talking about plant height.
Our Amnesia Haze Auto grows from 90-150 cm while our Afghan Kush Auto ranges from 60-90 cm, this means that if you were to germinate both at the same time, the Afghan Kush Auto seedling would start way smaller than the Amnesia Haze Auto and the difference in plant height would continue throughout the whole vegetative stage, with the Amnesia Haze Auto reaching around 80 cm until the last week of the vegetative stage and the Afghan Kush Auto around 50 cm.
| Average Autoflower Growth During The Vegetative Stage | ||
|---|---|---|
| Growth Stage | Minimum | Maximum |
| Vegetative Stage | 40% of total plant growth | 60% of total plant growth |
Average Autoflower Height During The Flowering Stage
Once both plants have entered the pre-flowering stage, and up to the second or third week of flowering, both plants will stretch and continue to grow but maintaining the difference in height; This means that both the Amnesia Haze Auto will almost double in size, reaching around 150 cm by the end of flowering while the Afghan Kush Auto will also double in size, but will stay around 90 cm tall.
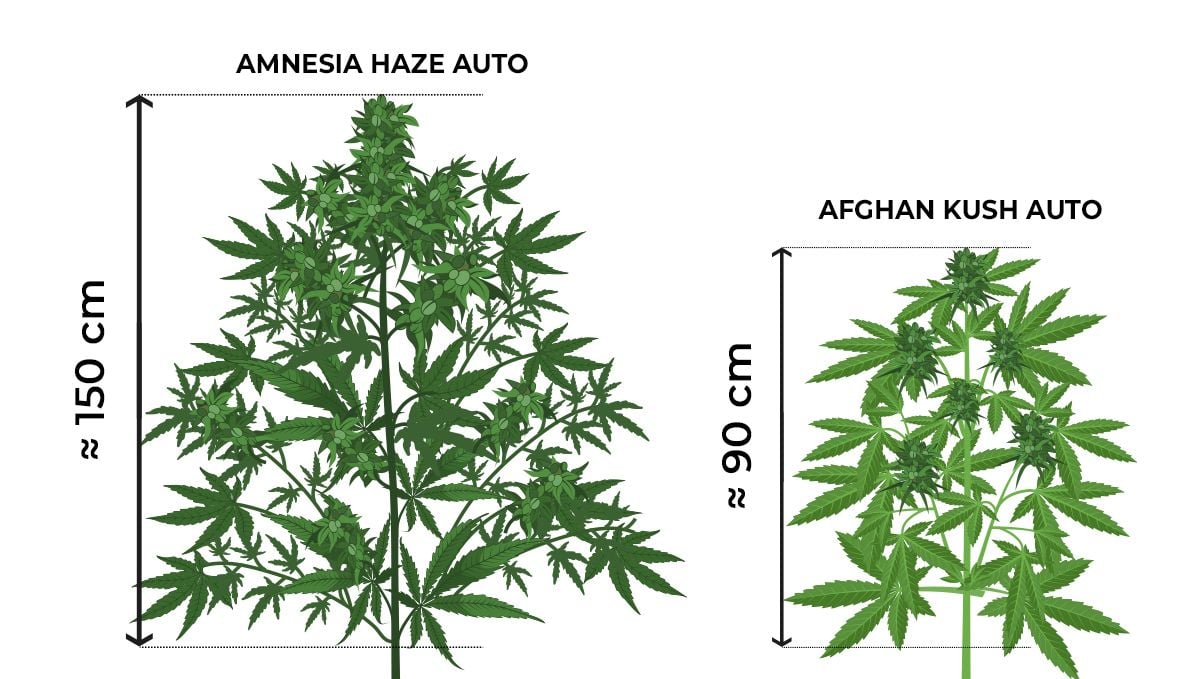
Have in mind that all strains are different and it’s possible that your plant doesn’t stretch as much as the plants in the example given but all cannabis plants stretch during the first weeks of flowering so, as a guideline, you can calculate that your plants will grow around 40-60% of their size during veg and the remaining 60-40% during flowering.
2. The Perfect Growing Conditions
Just like photoperiod strains, the optimal environment for autoflowers is temperatures between 20-25 Celsius (68-77in) and relative humidity in the 50-70% range. Remember that each strain may react differently, so you should follow this information as a guideline. Always pay attention to your plant’s reaction and adjust accordingly.
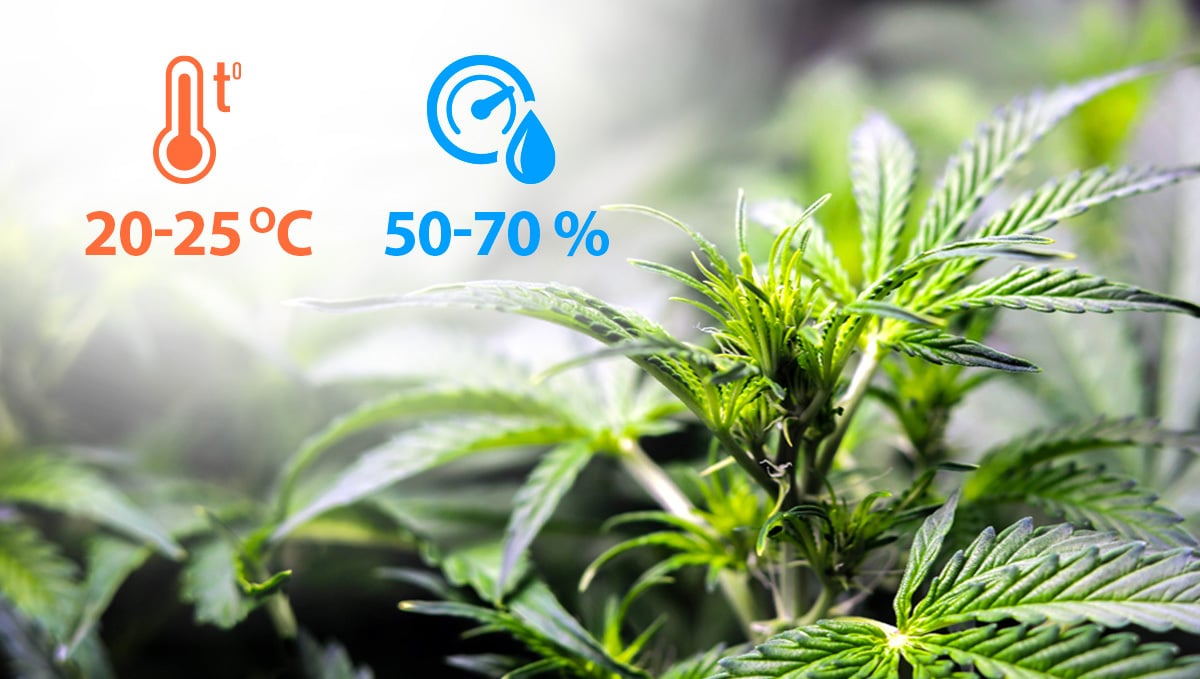
By keeping a good environment your autoflower can grow to her full potential. We have strains that can easily grow up to 130cm (51in) like Wedding Cheesecake Auto, as long as she’s in the right environment. It all depends on having the perfect growing conditions for each specific cultivar.
3. Easy-To-Fix Problems That Can Affect Growth
These are (relatively) easy to fix problems that can affect your plant’s growth:
- Climate;
- Bug Problems;
- pH level;
- And Watering Frequency.
These minor factors can affect growth in a bad way, stunting growth and affecting yield. If left untreated for too long, they may ultimately kill your plant.
Luckily these problems can be fixed by waiting for the medium to dry before watering, adjusting pH levels before watering, by being on the lookout for bugs daily, and adjusting humidity and/or air circulation. Caught on time, you can fix these problems quickly and they are relatively easy to fix so we’ll focus on the major factors.
Note: Bug problems can become really hard to deal with if left untreated for too long, by noticing them early you prevent any problems. If you get to the point where you need to apply any kind of plague controller (preferably natural) remember, you should NEVER apply any kind of plague controller during flowering, only if it’s extremely needed. This will STRONGLY affect your final product, mainly the flavor and smell of your bud.
4. Major Factors That Can Affect Growth
These are major factors that can affect growth, either in a good or a bad way. They can seriously affect your autoflower, and unlike the minor factors, they affect your plant faster therefore they can kill it very quickly.
Major factors are primarily the following:
- Pot Size;
- Light Distance and Cycle;
- And Nutrients.
5. Choosing a Pot Size
Pot size is a very important aspect for your autoflowering plant’s size and determines the limit to where she can grow. If the pot is too small your plant will become root-bound (this means the roots don’t have any more space to grow) affecting nutrient intake. Your plant won’t be able to breathe properly and is more likely to die or yield almost nothing if you don’t transplant it quickly.
We strongly recommend following the breeder’s information, usually, they give an approximate height and you can work from that. Ultimately you can use these guidelines (remember this is an estimate and may differ):
- Around 60cm (23in) - 7L (1.8 gal) pot;
- Up to 100cm (40in) - 8-10L (2.1 - 2.6 gal) pot;
- 100cm (40in) and up - 12L (3.1 gal) pot.
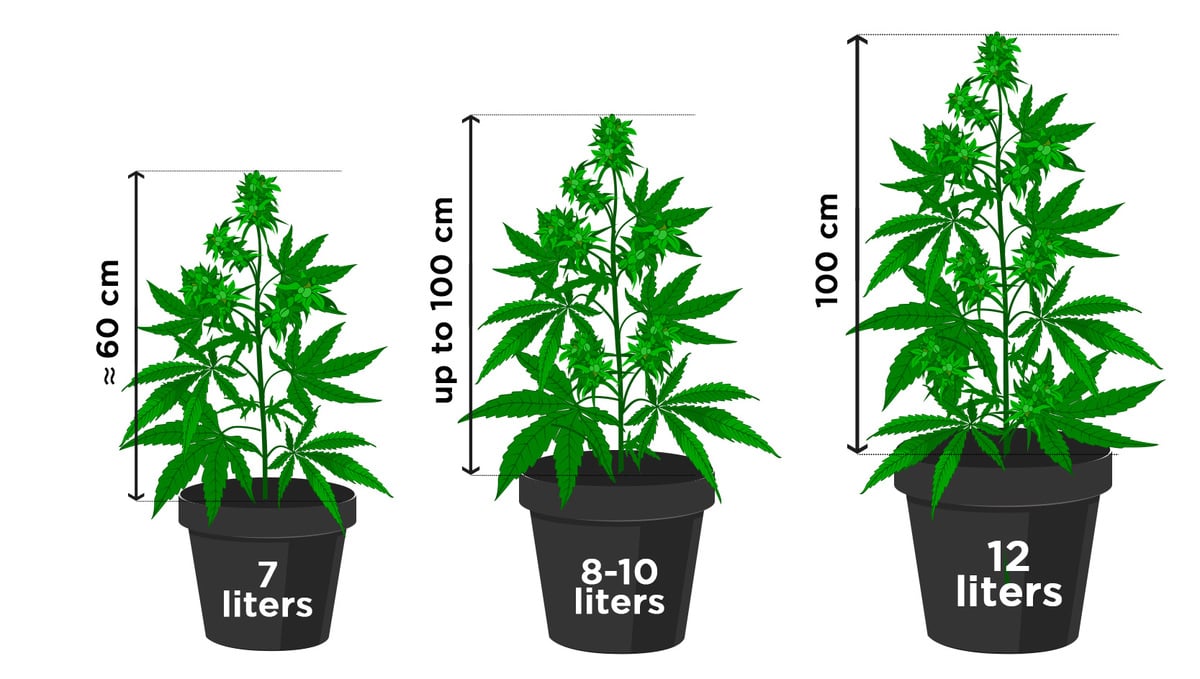
Tip: If you’re still in doubt, go for the 12L (3.1 gal) pot and you’ll be safe, the downside is you’ll be using way more medium and nutrients than you need. Going for a bigger pot also prevents stress from transplanting.
You can also grow a tall autoflower in a small pot sometimes they adapt and sometimes they don’t, the best way is to experiment with different strains and test it.
6. Light Distance and Cycle
All plants depend on light to live, autoflowers are no different. When growing outdoors that won’t be a problem. But if you’re an indoor grower, this is one of the most common problems people encounter. It’s very hard to replicate the sun's light artificially, and an autoflowers size is tremendously affected by light distance and light cycle.
The Perfect Light Type and Distance
If the light is too far away, your plant will stretch too much and produce aery buds. If it’s too close your plant can get heat burns that will stunt growth and won’t give you the yield you were expecting.
You should always start by following the brand’s recommendations and adjust accordingly to ensure you have your lights at a perfect distance.
Tip: Having your grow lights at a perfect distance and adjusting along your plant's stages is the key factor for allowing your plant to grow it’s fullest. Keep the lights higher or decrease their intensity during the vegetative stage, and keep them lower or increase their intensity during the flowering stage.
You also need to consider what type of lighting you are going to use. There are a few different options.
- CFL or fluorescent lighting - By far the cheapest option available to indoor cannabis cultivators. CFL lights are fine for seedlings and are easy and cheap to set up. They use a low amount of electricity and are readily sourced, but they lack the oompf needing to grow large healthy plants that offer the dense and sticky buds we all know and love.
- HID lighting - High-Intensity Discharge or HID lights were the gold standard for cannabis cultivation for decades. They offer excellent yield possibilities, are super reliable and produce consistent lighting, and are pretty straightforward to operate. But they do come with some downsides. They produce huge amounts of heat which can cause temp spikes and burn your crop, they suck a lot of energy, and the bulbs need replacing yearly.
- LED lighting - LED grow lights are then new kids on the block. For years they were thought of as the inferior younger siblings of HID lights, but these days the technology has reached the point where they have truly overtaken all other options. They are much more energy-efficient than HID lights, they run at a much cooler temp meaning they can be placed closer to the canopy without the chance of light burn issues, and produce huge yields with amazing terpene results. They do come at a price though and beware of cheap panels that have flooded the online market. Look for products from well-known companies like Mars Hydro, Spider Farms, Bloomspect, and Viparspectra.
Have in mind an autoflower can yield as low as 10g (0.3oz) if not given the light she needs, and can yield well over 150 grams (5 ounces) or more given the ideal environment.
Light Cycle for Autoflowers
Autoflowering plants can be placed in cycles of 24/0, 18/6, or 12/12 (where the first number means hours of light and the second means hours of darkness; light/darkness). We recommend giving your autoflowers at least 4hs of darkness for your plant to rest. The effect may vary depending on the strain’s genetics.

Tip: More light doesn’t always mean more growth. Some strains will thrive in a 24/0 cycle and others can get stressed. If you’re not sure, we recommend going with an 18/6 light cycle. A plant’s ability to stand 24/0 depends on its genetics.
7. Nutrients for Autoflowers
Autoflowering plants are not picky eaters. They just need the right combination of nutrients to be able to grow healthy and strong, resulting in bigger yields and an overall happier plant. Failing to provide the correct combination and amount of nutrients for each stage will damage your plant.
Providing too much nutrients will burn your plant. She will start showing signs of nutrient toxicity and start struggling to absorb nutrients. This will make her sick, growing smaller and underperforming.
If the amount of nutrients is too little your autoflower will show signs of nutrient deficiency. Without nutrients, your plant can’t grow and there will be similar results as nutrient toxicity, stunted growth, and small yield. If left without nutrients for too long your plant will die.
ORGANIC OR SYNTHETIC NUTRIENTS?
This is one of the more difficult choices to make when you first decide to start cultivating cannabis, but it is a decision that needs to be made early nonetheless.
Organic options feed the microbial life that is contained within the soil which then breaks everything down, releasing the nutrients in a form that the plants can absorb. Organic fertilizing options are usually significantly less complicated to use, they work in a slow-release fashion which heavily reduces the chances of overfeeding or nutrient burn issues, and the microbial life within the substrate acts as a healthy natural barrier to pests, fungal, and disease issues. There is some anecdotal evidence that points towards organic options producing better terpene profiles in the final yield than synthetic options, although this has not been studied fully.
Synthetic nutrient options over fine-tuned nutrient options for any style of cultivation give growers much greater control over the timing and concentrations of the dosage that is given to the crop. Cannabis plants require different ratios of the main three macro nutrients depending on the stage of growth, and with mineral nutrients, you can give the plant exactly what it needs when it needs it. Synthetic nutrients are also much more budget-friendly, and once you get used to mixing up a nutrient solution they are straightforward to use.
But which option offers more rapid growth?
Well, that comes down to the style of growing as much as the nutrients that you supply. In almost all cases, hydroponic setups will offer the fastest and most robust growth with the largest yields. But some growers find they do better with soil cultivation, so it is a bit of a hard question to fully answer. In general, for beginner growers, we recommend synthetic nutrients with coco-coir as the main substrate. Coco-coir offers most of the advantages of both soil and hydro cultivation while still being easy and forgiving to work with.
When buying fertilizers, we recommend organic feeding. Always follow the recommended amount detailed on the package.
Tip: Sometimes manufacturers recommend feeding way more than the plant actually needs. We recommend starting with half the amount or even less, and always prefer organic over inorganic. With organic nutrients chances of burning your plant are way lower.
8. Plant Training Techniques for Height Control and Maximum Yield
Growers use a wide selection and assortment of plant training techniques for various reasons, the two most common being to control height and maximize yield. By manipulating the way a plant grows, and the shape that plant grows into, we can trick the plant into more effectivity spreading the nutrient density and growth hormones throughout the entire structure. This promotes much more even bud growth and helps keep the plants in check. Let’s explore the three main plant training techniques growers use to achieve these goals... These plant training techniques are broken up into two main categories - Low-Stress Training (LST) and High-Stress Training (HST).
Low-Stress Training (LST)
LST involves techniques that slowly change the shape of the overall structure without stunting any growth. There are a few ways to achieve this, with the most common being the 'Tie-Down Method'. It works exactly like it sounds - as the plant develops, you slowly tie the branches down and re-direct them toward the desired shape. This is usually done by tieing off the main stem with string, twine, or twist ties. If you're using a cheap plastic pot you can drill some small holes in the rim to attach the ties onto, and as the plant grows you slowly add more ties and spiral them around the pot. This forces the plant to grow on the horizontal plane and allows the branches to grow to the same level as the main cola.
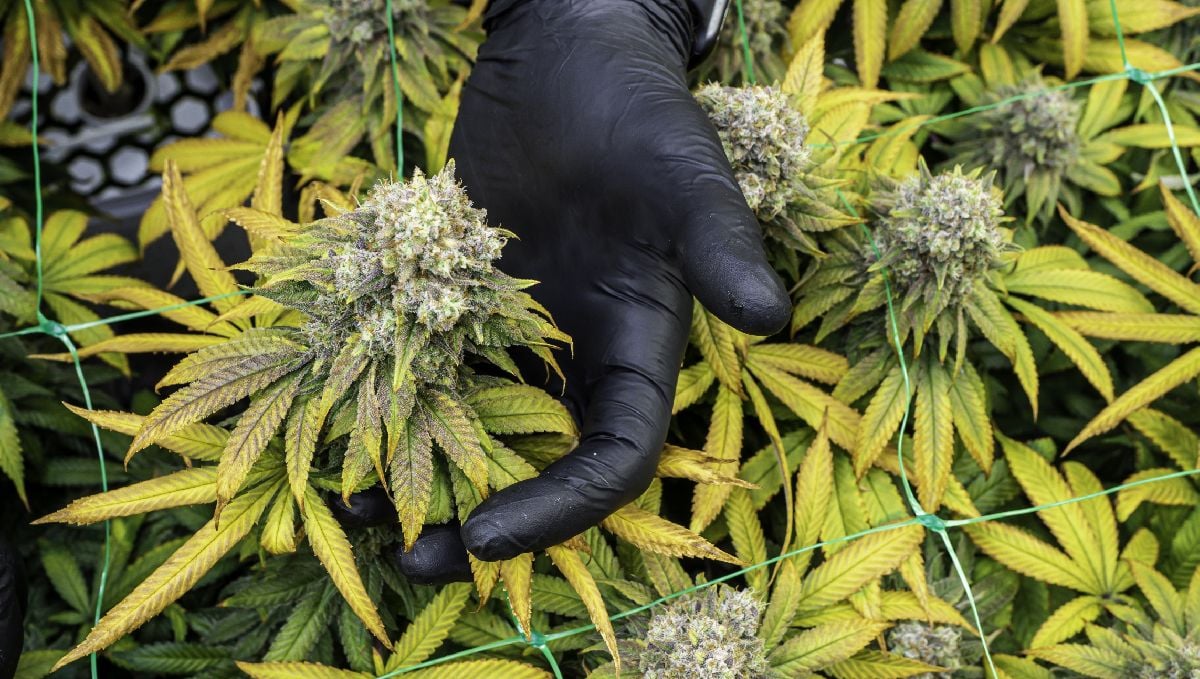
Then we have SCROGging. SCROG stands for 'Screen Of Green' or, in other words, a training technique that uses a screen and trellising system to help keep the plant all growing on one horizontal plane. This works in a very similar way to tieing down, and when both methods are employed at the same time the best results are achieved. The netting makes it really easy to control the height. Setting up a SCROG screen is super simple. You will need some frames that your screen can be attached to, preferably made of wood, metal, or PVC. Then you'll need screening material - plastic fencing works, so does chicken wire, or even a fishing net. PCV is the easiest to work without needing any power tools. Just grab some corner connectors and cut the pipes to size, connect them up to make a square, and wrap the screen over. Then bolt three or four legs around the pot and connect the screen about 50 to 70 cm above the soil level.
High-Stress Training (HST)
The list of HST techniques is much longer, and the techniques themselves are much more intense. HST relies on training methods that use quick and brutal changes in the plant's structure to make drastic differences in the growth patterns. These training techniques can cause permanent damage if done incorrectly, and the vast majority are not suitable for autoflowering strains. Thanks to the inbuilt timer that all autos are genetically blessed with, the vegetative growth period is predetermined and so there just isn't time for the plants to bounce back from the growth stunting that is almost certain to happen with HST techniques. Some common HST techniques are:
- Topping
- Fimming
- Super Cropping
- Monster Cropping
- Mainlining
- Defoliation
Fimming
Fimming works in a very similar way to Topping. With Fimming, instead of cutting the crow carefully right at the base, you cut the apical cola in half. This induces enough stress to stop this cola growing, and promotes the secondary branches to take over. While this usually produces two colas, like topping, if done perfectly you can end up with four new main colas.
Super Cropping
Super Cropping involves manipulating the branches in a pretty extreme way to mimic the damage that can happen to a plant when left outside in high wind or storm situations. Outdoor cultivators will be able to attest to the fact that branches that have been bent will usually grow back bigger and stronger than before, and this is what Super Cropping takes advantage of.
Topping
Topping is a common plant training technique used by growers looking to control the height of their plants while still maximizing yield. This is done by removing the top part of the stem, right above where the newest branches are growing. This is called the crown, and by removing it you force the plant to develop two colas instead of one, thus reducing the overall height while increasing yield.
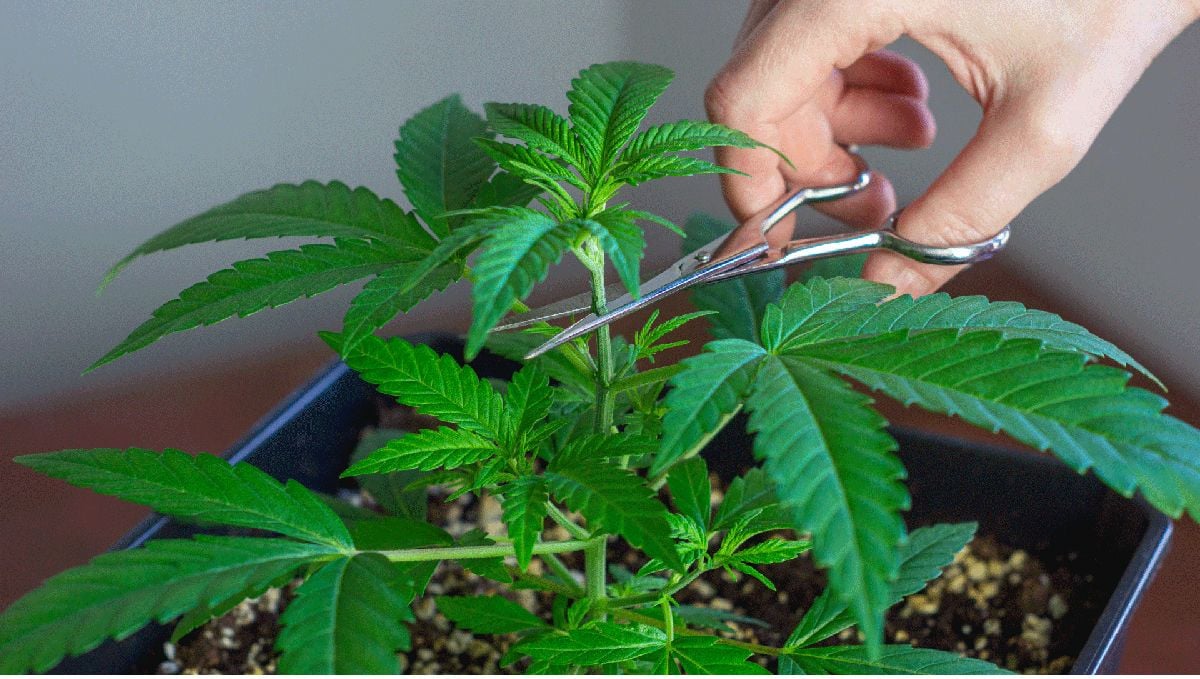
It can be done multiple times to continue the trend of doubling the main colas, and keeping the growth mo vertical.
Monster cropping
This training technique also makes use of manipulation, but rather than stressing the branches to induce multiple colas, it focuses on creating many more low-growing secondary buds that would normally be untapped. This training technique involves taking clones from branch tips that have already begun flowering and placing them back into the vegetative growth light schedule. This can cause ridiculously intense growth, and while it's not a training technique suitable for novices, it can provide some really interesting bud formations and effects, and sometimes huge yields.
Mainlining
Mainlining is a training technique that involves removing the apical cola altogether, instead training the lower branches to become main colas. This training technique works best with Indica strains or strains that tend to grow wider than they do tall. This training technique is one of the most stressful for the plant, so it's very important to make sure a steady training schedule is in place and that all branches are roughly even in length otherwise you risk creating an uneven canopy with random growth patterns.
Defoliation
Defoliation is the process of removing fan leaves, and it deserves a full post... so here's one!
9. In Conclusion
Understanding these factors is crucial to all growers. Plants are very delicate and even a little bit of stress can affect them. Always be careful and pay special attention to the signs your plant gives. These little details will make a huge difference in the harvest. Nurture your plants and always treat them with love, we assure you they will respond in a very good way. Remember plants are living beings.
If you have any tricks to help control plant height, feel free to help fellow growers by leaving a comment in the comment section below!


Comments