Orange Sherbet Auto Cannabis Strain Week-by-Week Guide

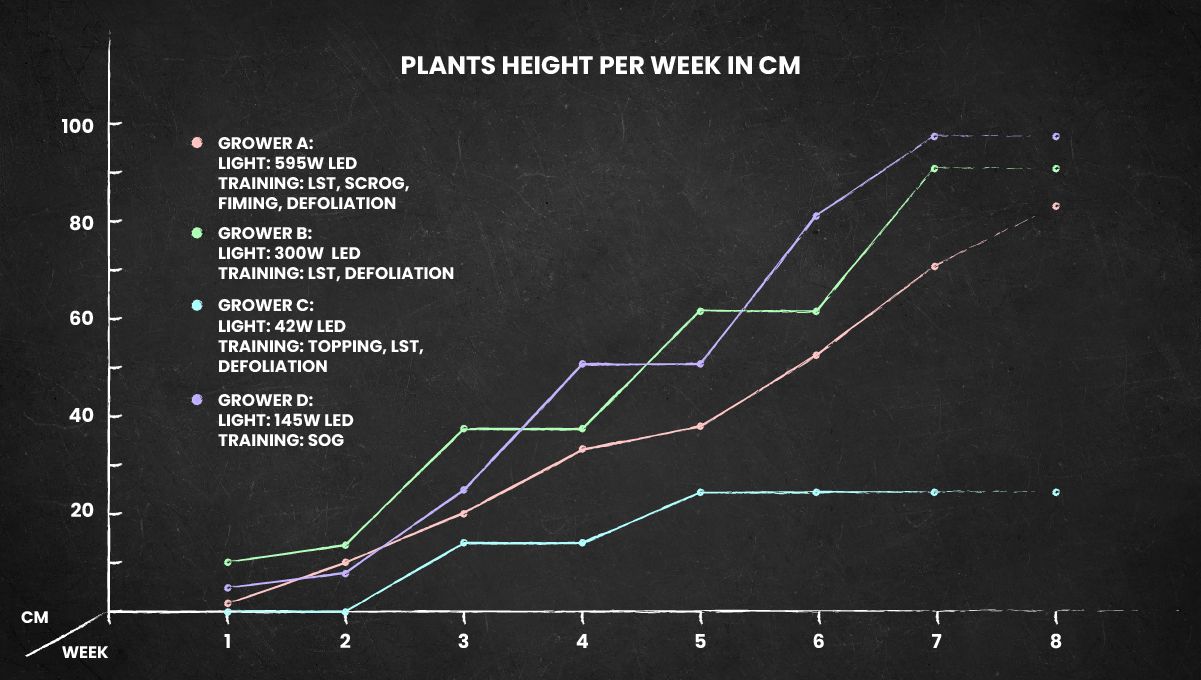
- 1. Grow specifications
- 2. Grow set up
- 2. a. Grower a: gwsd82
- 2. b. Grower b: the_canna_scientist
- 2. c. Grower c: truenorth
- 2. d. Grower d: silverback_guerilla
- 3. Germination and seedling stage | week 1
- 4. Early veg | week 2
- 5. Mid veg | weeks 3-4
- 6. Transition (pre-flower) | week 5
- 7. Early flower | weeks 6-7
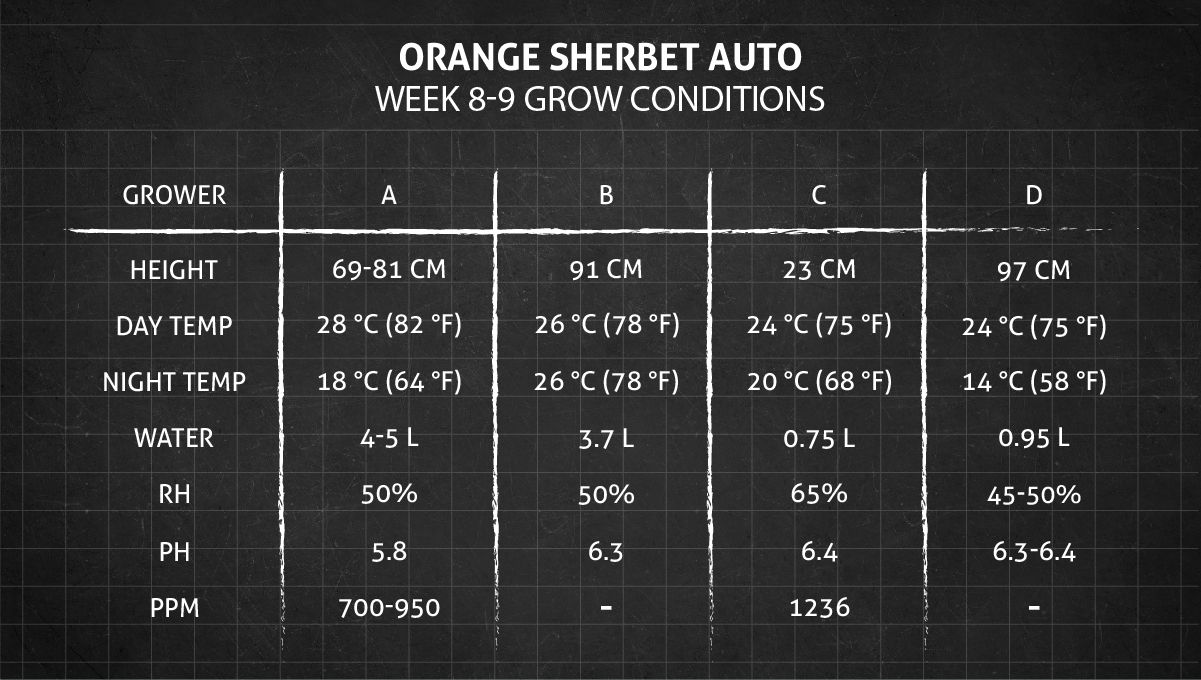
- 8. Mid flower (bulk phase) | weeks 8-9
- 9. Ripening and harvest | week 10
- 10. How to properly trim, dry, and cure your orange sherbet cannabis harvest
- 10. a. Trimming your orange sherbet cannabis harvest
- 10. b. Wet trimming orange sherbet cannabis
- 10. c. Dry trimming orange sherbet cannabis
- 10. d. Drying rooms for cannabis
- 10. e. How to dry orange sherbet cannabis
- 10. f. Curing orange sherbet cannabis flowers
- 10. g. How to cure orange sherbet cannabis flowers
- 10. h. Burping the curing jars
- 10. i. Top tips for storing cannabis flowers
- 11. The outcome
- 11. a. Orange sherbet auto yield
- 11. b. Orange sherbet auto smoke report
- 12. Orange sherbet auto faqs
- 13. In conclusion
Orange Sherbet Auto belongs to the next generation of autoflowers where the insane amounts of cannabinoids are a given—24% THC in this particular case. So, to stand out from the crowd, breeders aim at something else: delectable terpene profiles and a one-of-a-kind effect.
As the name suggests, Orange Sherbet Auto’s flavor reminds one of orange juice, with its intense citrusy aroma, sweet-and-sour taste, and the pungent tang of essential oils. There are notes of cream as well. This mouth-watering extravaganza ushers in an uplifting, motivating, and invigorating high that is perfect for high-flyers and go-getters. 70% sativa make sure that you stay happy, alert, and creative for hours after a couple of tokes. Not bad for a strain that requires so little love and care from you and gives so much in return. Stay tuned!
1. Grow Specifications
The first thing that needs to be mentioned is Orange Sherbet Auto’s great size and bushy structure. This weed has a tendency to grow tall—up to 150 cm (5 ft)—with long side branches and spacy internodes. Understandably, she also has a lot of girth.
As you may guess, all this translates into bountiful yields: 500–650 gr/m2 (1.6–2.1 oz/ft2) indoors. Outdoors, she has as much yield potential and can bring in 90–300 grams (3–11 ounces) per plant. Such generosity, coupled with only a 70-day progress from seed to harvest, makes Orange Sherbet Auto extremely appealing to commercial growers. And for the first-time gardeners, this means respectable results even after every textbook rookie mistake.
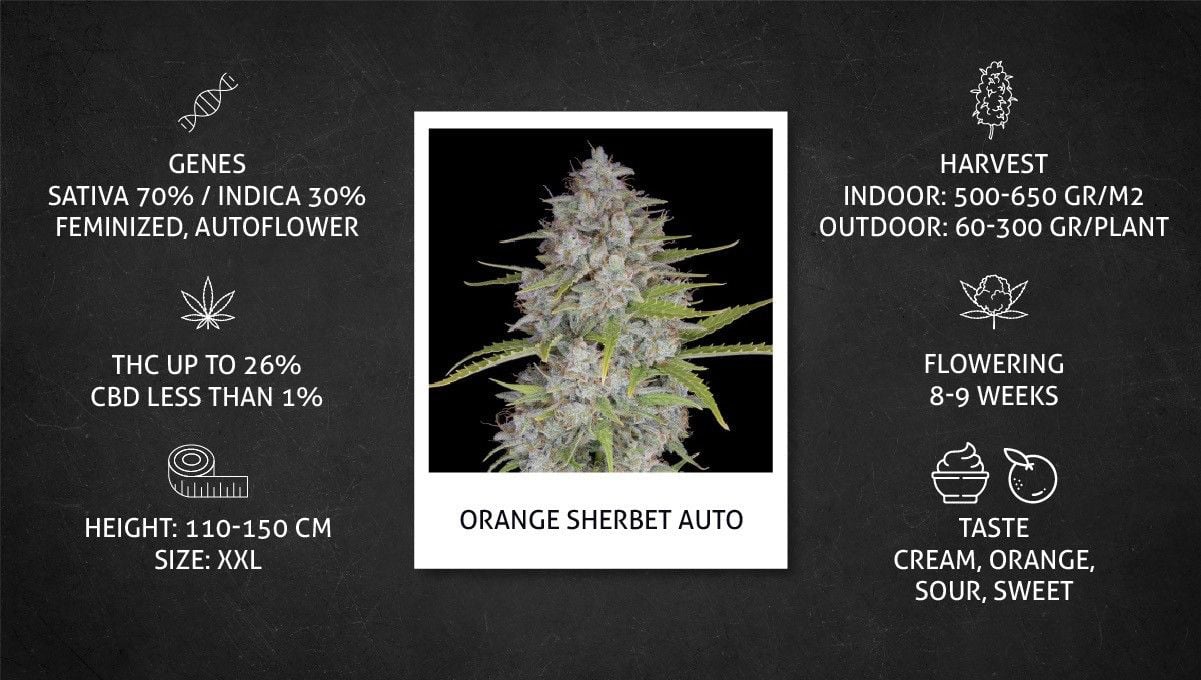
Another feature is the strain’s low-maintenance. Perfect for ‘absent fathers’ who’d prefer to only show up for ‘graduation’. How about guerilla growing? Because yes, Orange Sherbet Auto can move through all grow stages totally unattended. And if you’re one of those people who smother their cannabis with love and care, channel your energy into LST and other forms of training. This will give you something to occupy yourself with and then make your hands full again at the end of the life cycle—with propping up and trellising all those humongous buds. Besides, tying your plants down will ensure you don’t run out of space in smaller indoor setups.
2. Grow Set Up
We were lucky to find on Growdiaries four reports whose authors show much talent in the art of weed cultivation and also the willingness to share it with us. We enjoyed their beautiful photos and their detailed comments. These four journals also give the opportunity to see how Orange Sherbet Auto deals with different setups, cultivation techniques, and levels of experience
Grower A: GWSD82
At the time of writing, GWSD82 had only 3 finished cycles, and Orange Sherbet Auto was his first strain ever. He uses a medium-sized (3’x3’) (90cm x 90cm) tent where he raises two autoflowers at a time.
His LED light in the first month was a cheap off-brand previous generation type that gives off pinkish/purplish spectrum and draws only 130W.
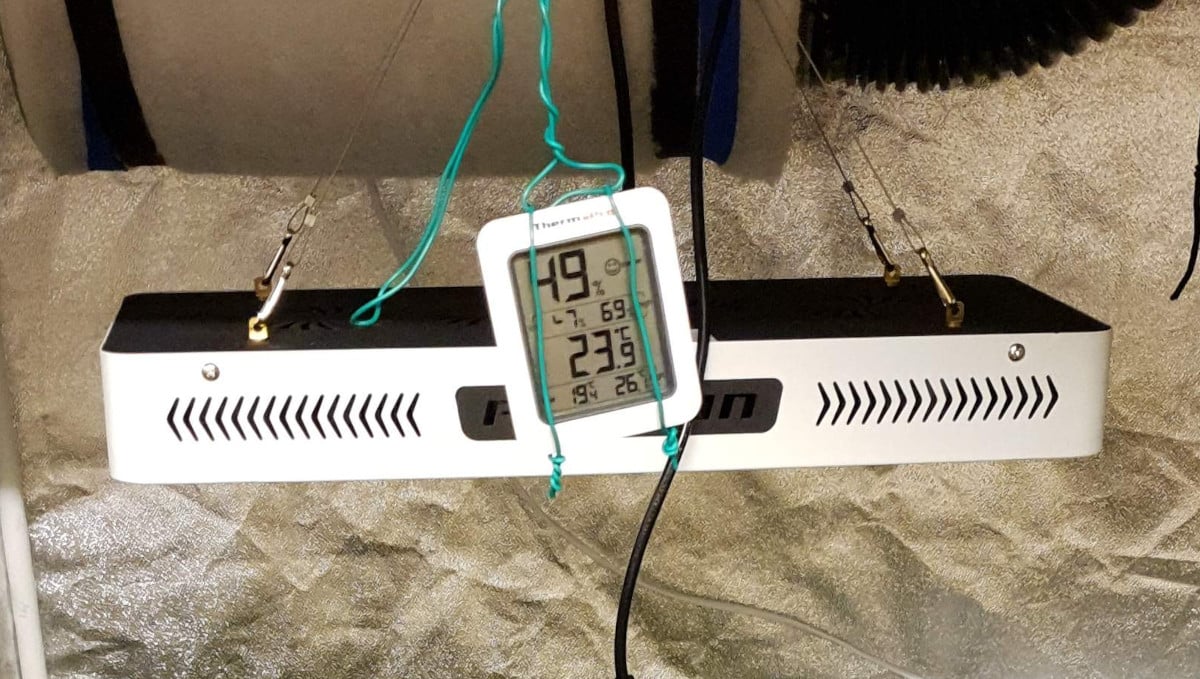
Later in the cycle, he invested in a more advanced LED light with a more efficient spectrum and drawing as much as 595W. It was a lucky move because his garden now could receive a more generous wattage and better spectrum for the most important of the grow stages, i.e. flowering time. As a result, Orange Sherbet Auto rewarded the gardener with an amazing result. As we shall presently see.
Grower B: the_canna_scientist
The_canna_scientist has considerably more experience. Although he’s been only active on GD for less than a year, he managed to harvest 14 strains, garner 1405 likes, and earn the title of ‘Master’. There’s even a Diary of the Month cup in his trophy cabinet—one received for FastBuds’ Purple Lemonade.
For his most recent grow cycles, the_canna_scientist has upgraded his equipment: he threw away his old flimsy Vivosun tent with its many pin-hole light leaks and replaced it with a much better and bigger Quictent GT.
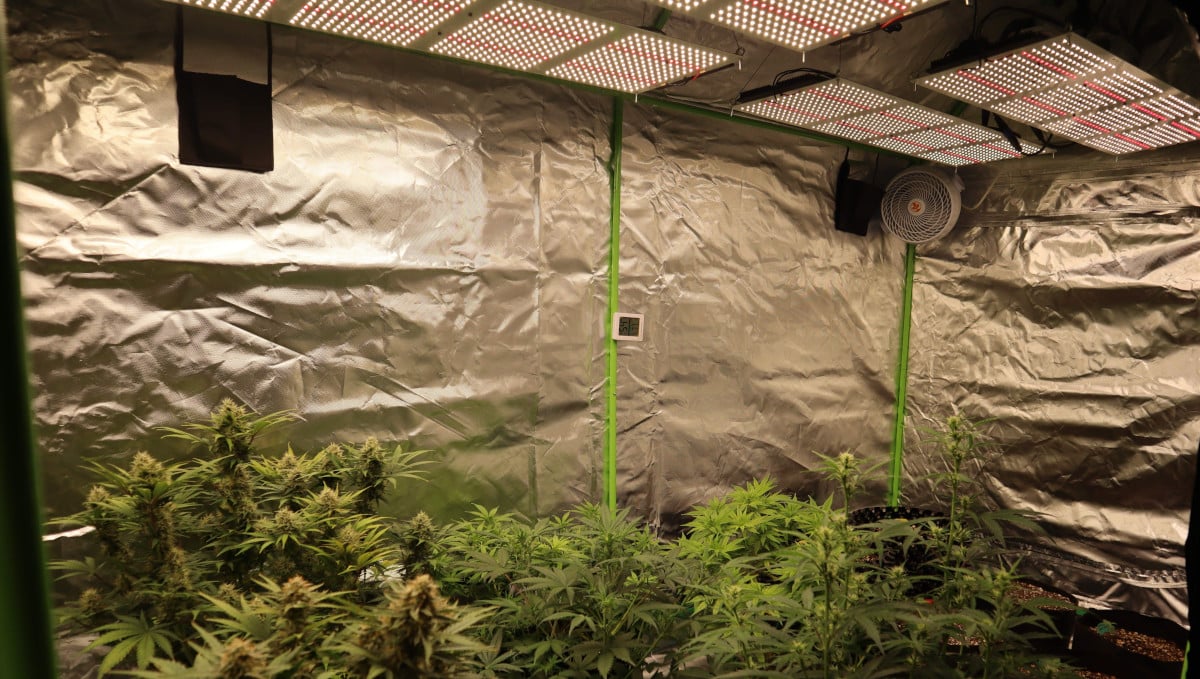
This tent is 96x48x71 and works beautifully with an advanced AC Infinity Cloudline extractor fan. For those who’re looking for a quiet and efficient high-CFM duct fan, this model comes equipped with temperature, humidity, and fan speed control, as well as many other advanced programmable functions.
Bigger tents also require more powerful lights, and the_canna_scientist has installed two custom-made LED quantum boards, 600W each. The gardener’s medium of choice is 100% soil, and this grow is no exception.
Grower C: TrueNorth
TrueNorth has been publishing his journals on GD going on for two years now. Stangely, he’s still an ‘Apprentice’, despite 8 impressive harvests. And don’t forget his two cups, including a trophy for Pets & Pot Contest 2020 by FastBuds.
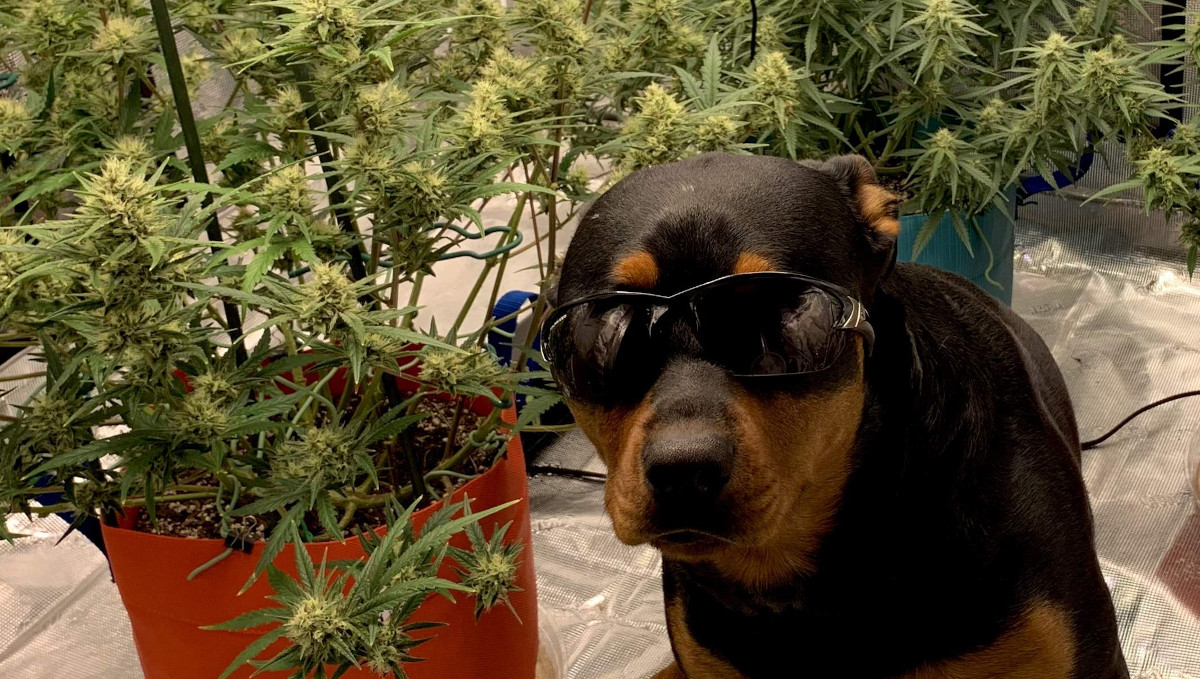
If you follow his progress, the only constant is the fact that he always cultivates in soil. The rest of the setup is subject to constant change. TrueNorth has tried out two different Gorilla grow tents and liked both. For Orange Sherbet Auto, though, he used a 48”X36”X72” Vivosun 2-In-1 GT. He said it disappointed him because of missing parts and many light leaks. It remains unclear whether he took out the central wall dividing the tent into 2 compartments (like many horticulturalists do).
Funny thing: the grower uses the same AC Infinity Cloudline fan as the_canna_scientist. However, his lights are different — two Budget LED’s Series 2 Veg, 250W each. More than enough for either 3’x’3’ or 3’x4’ area. Commenting on these lights, TrueNorth said he was happy with how fast his plants grew and how frosty they got.
Grower D: Silverback_Guerilla
The only ‘Grandmaster’ in our competition, Silverback_Guerilla is a very prolific gardener. In 2.9 years that he’s been active on Growdiaries, he’s finished 49 journals. More than half of his plants are autoflowers, and, among those, FastBuds creations make the bulk. Obviously, the guy loves our genetics.
Silverback_Guerilla has a big grow-op, and, in this particular instance, Orange Sherbet Auto occupies only a modest place in a large multi-strain grow. It would be hardly educational to describe his grow tent which is choke-full of custom-made LEDs and other equipment.
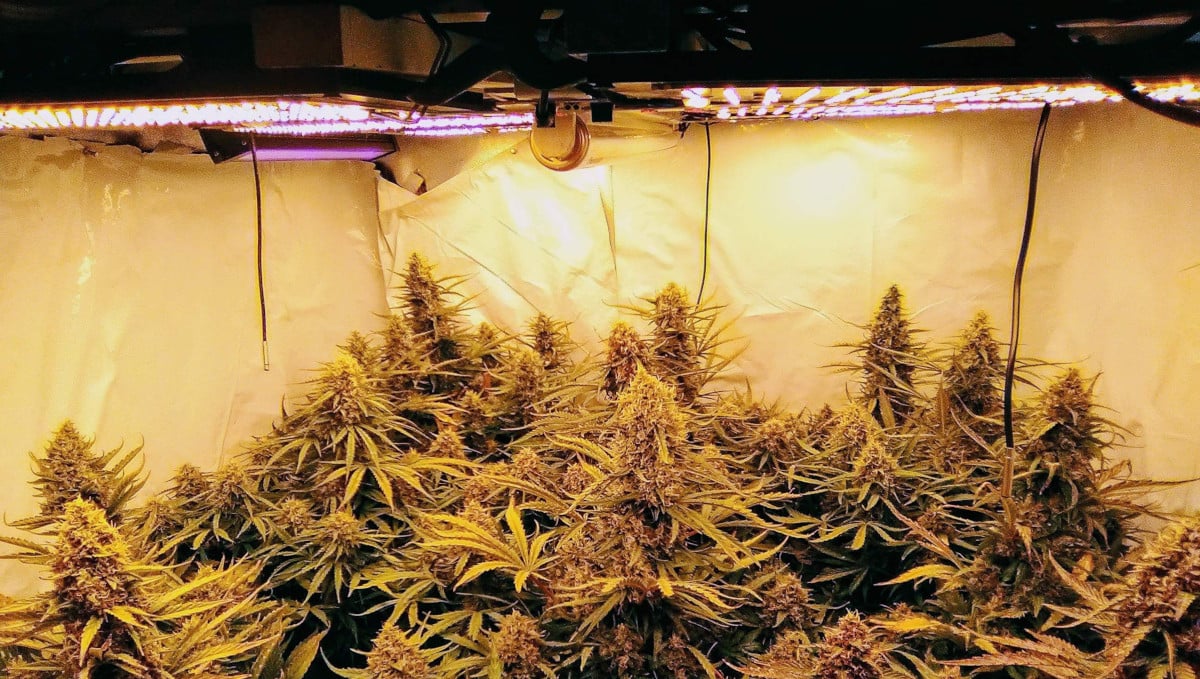
This experienced horticulturalist prefers to raise many smaller plants SOG-style. So, his per-plant yields may not be too impressive, but the buds are bulging and dense and a pleasure to look at.
3. Germination And Seedling Stage | Week 1
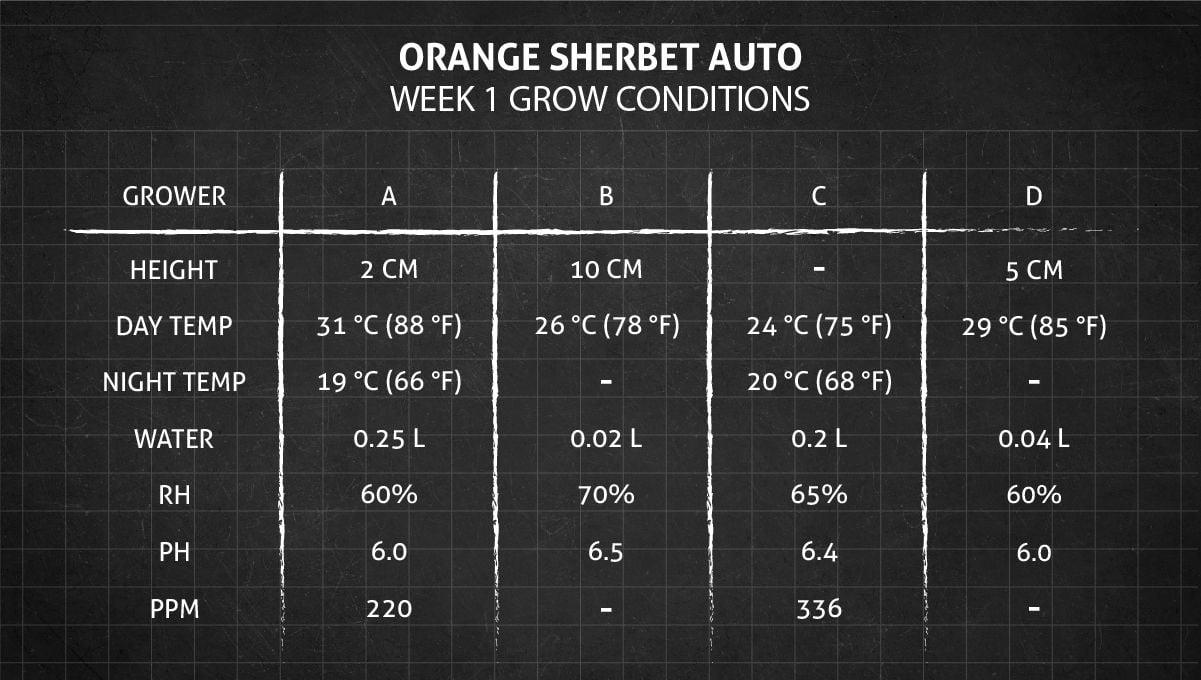
In the first week, each of the gardeners showed his own level of skill: from having no idea of what to expect to doing everything on automatic pilot to expertly tweaking the tiniest aspects of the grow. Strangely, the results wouldn’t be that different at the end of Orange Sherbet Auto life cycle. This low-maintenance variety proved universally rewarding.
A: Tentative First Steps
Being a first-timer, Grower A chose the most nerve-racking germination method — the straight-into-the-medium one.
He purchased the most ordinary plastic pots money can buy and inserted them into mismatched containers for drainage. This feat of color-blindness looked a bit out of place in an otherwise neat setup, but such things never prevent you from raising very healthy plants.
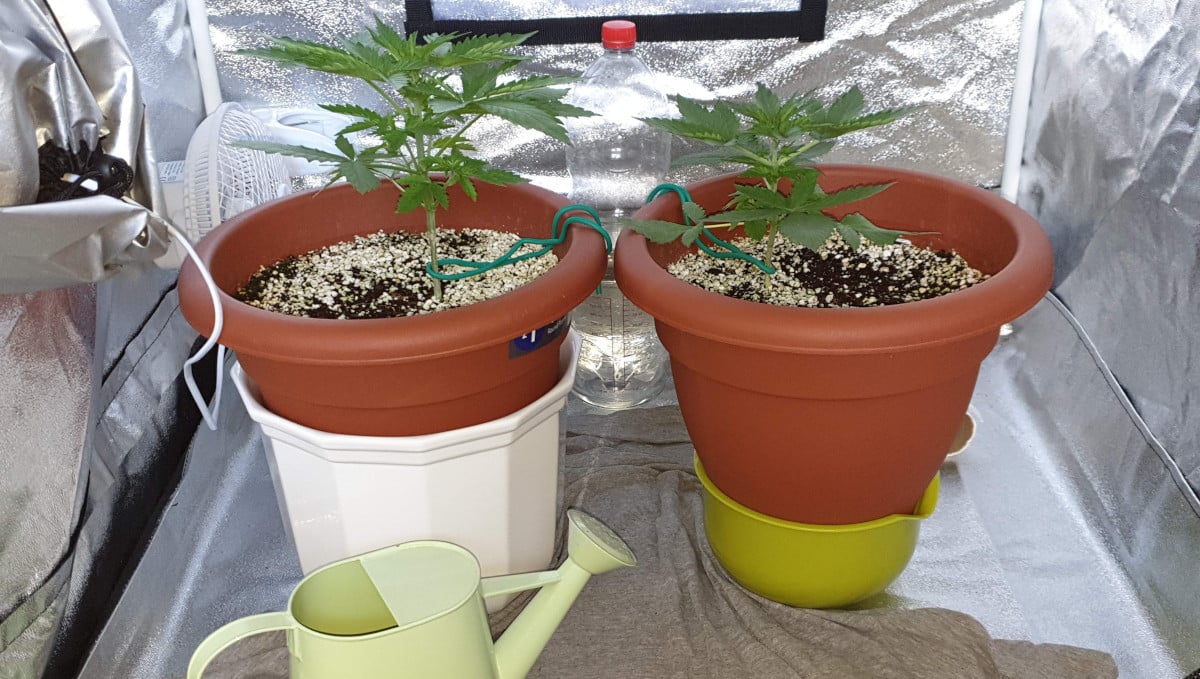
The pots were filled with Ecothrive Coco-Perlite Lite 70/30 mix. In some respects, it’s quite a run-of-the-mill product where coco coir retains a lot of water and perlite creates air pockets for roots to breathe. The mixture also comes pre-washed and buffered, like many others do.
What sets Ecothrive‘s medium apart is that it contains a proprietary ‘Charge’ component. Basically, it’s beetle droppings — 100% natural and organic and filled to the brim with slow-release nutrients and other substances that activate plants’ immune response.
The grower made sure to soak these 10L pots with at least 10L of water with plenty of runoff and then left them alone for 24 hours for the organics to ‘cook’. He then put 3 seeds into the medium when it still was ‘nice and damp’ (his words).
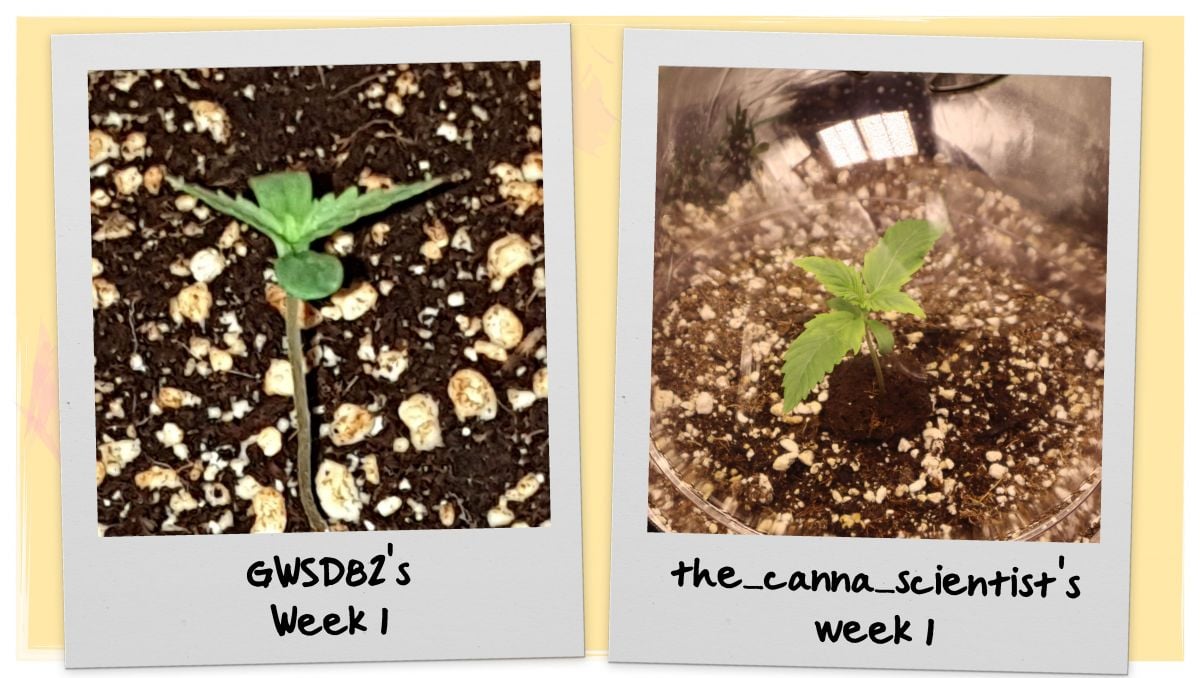
Now, this method usually has a very good germination rate, but the medium should never be TOO ‘nice and damp’. Otherwise, you risk losing your seedlings to damping off. Another problem with the straight-into-the-medium method is that you can’t check on your seeds. One day you just lose your patience and decide to excavate (well, exhume in some cases). And this is what happened here. Out of the three Orange Sherbet Autos—named Annie, Bella, and Carrie—one never made it. RIP, Anny! The other two came up in time. And although one of the girls didn’t look very healthy, she would eventually overcome her growing pains and turn out a gorgeous lady.
The air was a bit too dry for the seedling stage (40%), and the guy tried a bedside humidifier he had. Although this cheap gadget had done a very poor job on the nightstand, it proved to be quite effective in the tent and raised RH to the comfortable and steady 60-65%.
B: High-Tech from the Very Start
Grower B pre-soaked his two Orange Sherbet Auto seeds and then put them into something that looks like Root Riot plugs to germinate. And when they did and poked up through the surface, he inserted the plugs into the final 3 gal fabric pots filled with a soil/perlite mixture.
The lights in his big 4’x8’ tent were on 24 hours, and he used stylish-looking humidity domes to locally raise RH to 70-75% for the young seedlings. He was also in control of CO2 levels inside the tent. When a gardener really knows what he’s doing, this makes an obvious impact:
C: A 9-Week Dash for the Finish Line Begins
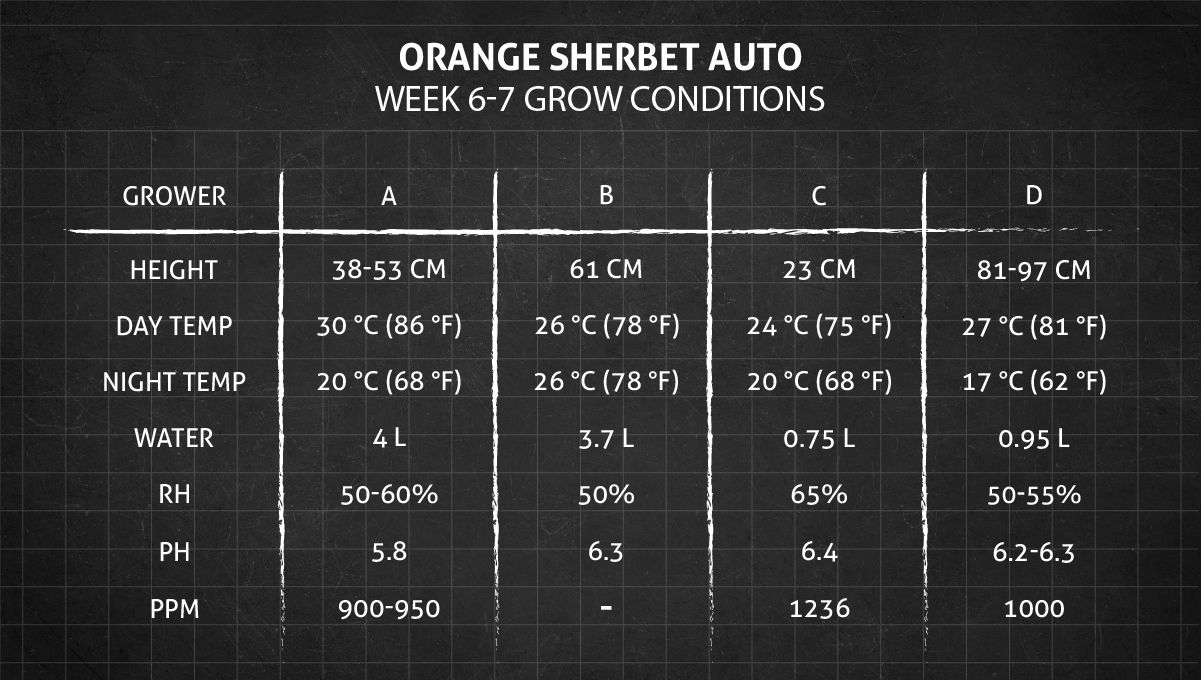
Grower C germinated his single Orange Sherbet Auto in a 1L starter pot, and the seedling was out of the soil in the first 24 hours. She received the classic 18 hours of light a day, with a very comfortable temperature of 24°C (75°F) during the day and 20°C (68°F) at night. The relative humidity was also close to perfect — at 65%. She needed nothing else really, apart from 200ml of pH-balanced water every day. In this large Gorilla 5’x5’ tent, Orange Sherbet Auto was just one of a whole lineup of plants. Some of those were vegging, others had entered the pre-flowering stage, yet others were in the different stages of flowering.
D: Organics as an Exact Science
Grower D’s germinated his three Orange Sherbet Autos along with 14 other FastBuds seeds. Such numbers call for some sophisticated germination kit. In this case, it was a DWC cloner. The seeds were inserted into rapid rooters, with water in the reservoir barely touching the bottom parts of the rooters. The water contained a hefty dose of Endoboost Hydro (which is an endomycorrhizal inoculant) and 1/4 tsp/gal of Superthrive (a vitamin solution).
Four days later, all three Orange Sherbets were up, and, the next day, the whole batch was transplanted into half-gallon biodegradable starter bags.
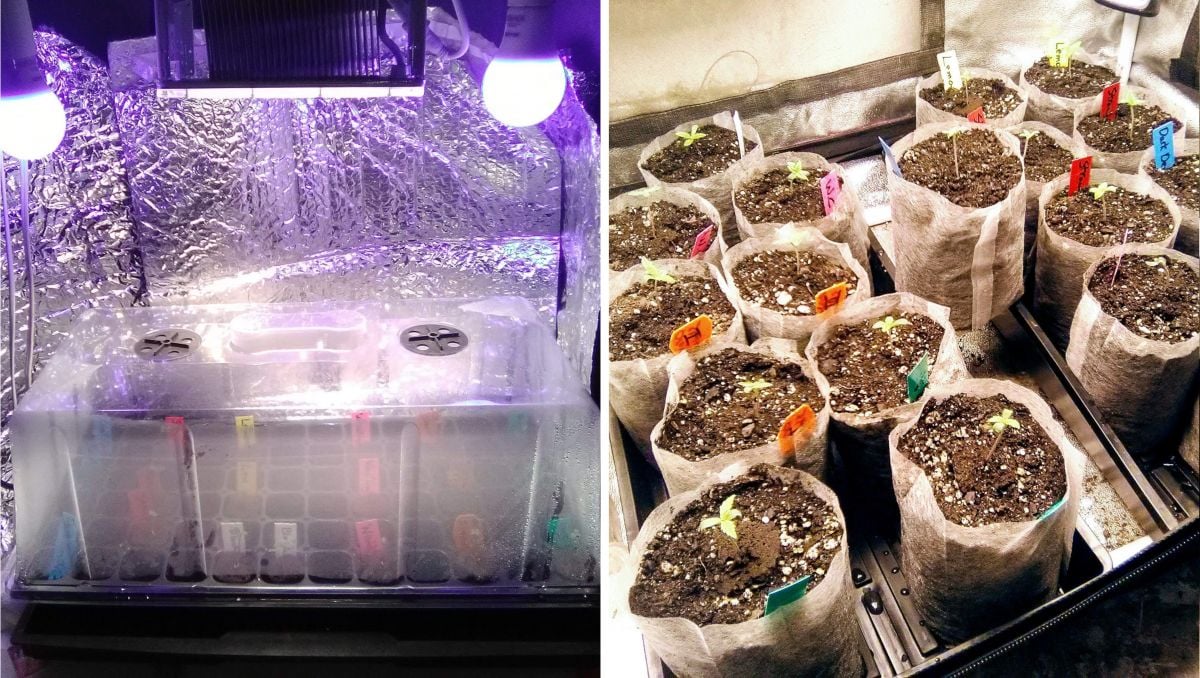
These bags, as well as the final 3-gallon fabric pots, had been filled with organic soil a half year earlier and left to build a nice and healthy rhizosphere. Such a forward-looking approach always pays off. Besides, the soil was amended with the following small-caliber weapons of organic pest control:
- Beauveria Bassiana, a fungus that preys on insects and their larvae,
- Metarhizium Anisopliae, another pest-killing fungus,
- Azamax, a broad-spectrum natural insecticide.
Yeah, you don’t get the title of Grandmaster for no reason. So watch and learn, folks!
4. Early Veg | Week 2
Week 2 is the period when many gardeners—even those who choose soil as their medium—start to introduce nutrients. So here we mostly look at the feeding schedules for the vegetative phase or throughout the whole Orange Sherbet Auto timeline.
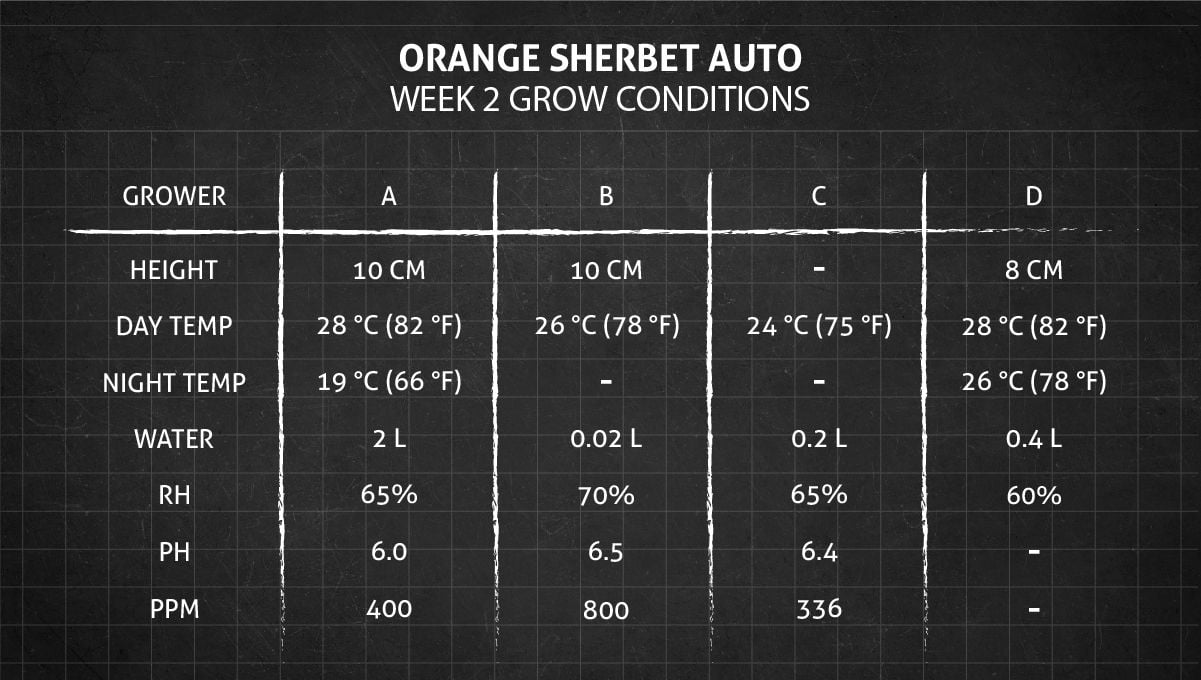
A: Dealing with a Heatwave
The problems with too high temps had begun the week before because the tent had been initially set up in the attic. The attic is great if you want to get your garden out of the way or hide it from visitors, but, in summer, it gets hot as hell. With the outside temperature climbing to the nice and comfortable 27°C (81°F), it can be 38°C (100°F) easily in the tent.
All this was a total surprise to the grower, but luckily he found a spare room on the ground floor. The moving per se didn’t make the problems go away though. Besides leaf tips and edges curling up from heat stress, the plants basically stopped absorbing nutrients, sending EC levels in the medium through the roof. And due to enhanced evaporation, pH got too high, too.
The only way to deal with all this in coco is to flush abundantly with a new and balanced nutrient solution. Also very helpful is the high-frequency fertigation when you don’t wait for the coco/perlite mix to dry out, but replace it with a new portion of res and make sure you get plenty of runoff.
The grower also had to deal with too hard tap water—350 PPM even after filtering. Eventually, he gave up and worked out a way of making distilled water. You may imagine how busy he was. After a bad start of week 2, his seedlings recovered, resumed the growth, and gratefully took first 25%, then 50%, and finally 75% of the recommended dosage of fertilizers. And now it’s probably as good time as any to look at the feeding schedule on weeks 2 through 10:
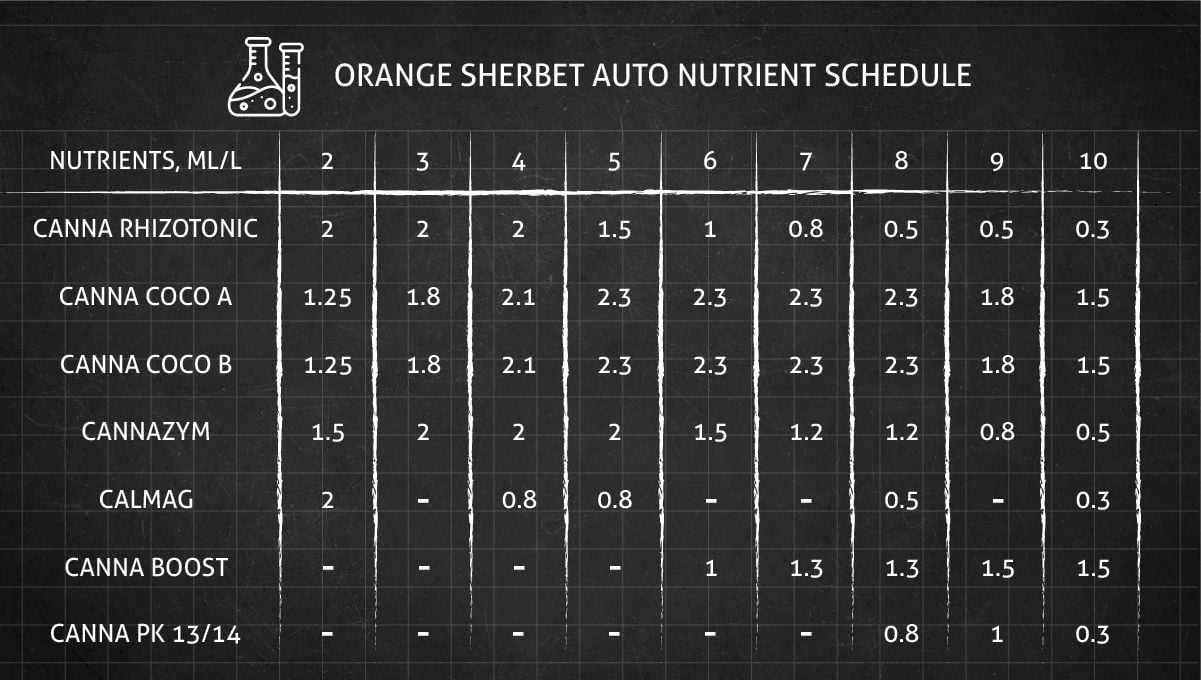
The beauty of this feeding regimen is its simplicity. The same limited set of ingredients is used throughout the life cycle. Only the doses change according to the manufacturer’s instructions. This eliminates the need to make a lot of small decisions and the risk of making just as many mistakes. For newbies, it’s priceless.
CANNA Coco A and B are the staples of this diet. Mixed at different proportions for different stages of flowering and growth, these two formulas provide all the essential nutrients as well as natural chelates, humic and fulvic acids.
Another important thing is a Cal Mag supplement, in this particular case the one by Vitalink. When growing in coco coir, you need to constantly replenish both calcium and magnesium. Even if the medium has been pretreated by the manufacturer, and especially if it hasn’t.
The rest of the components of CANNA line serve the following purposes:
- CANNA RHIZOTONIC. Contains natural algae-based vitamins that help germinate seeds and keep roots happy not only during their growth in veg, but also through all cannabis flowering stages.
- CANNAZYM. An enzyme complex that makes plants better absorb nutrients and makes them more resistant to environmental stresses.
- CANNABOOST Accelerator. Increases the metabolism rate and thus the speed of a plant’s progress. Is especially beneficial for autoflower flowering stages when a lot must be achieved in a very short time.
- CANNA PK 13/14. A source of extra phosphorus and potassium, the two most important nutrients in the flowering stage.
B: Adjusting the Feeding Strategy
In contrast to coco, soil doesn’t require that you add nutrients right away because it comes pre-charged with them. So, you can wait until your plant starts showing deficiencies (which is a clear signal that there are no nutrients left in the root zone). And this is what Grower B used to do. However, he had noted that this lengthened the timeline by a whole week.
This time he decided to top-dress his medium on week 2, so that the roots would be constantly fed small amounts of slow-release nutrients. He set himself an even more ambitious goal—for the future attempts—to pre-amend store-bought soil with enough supplements to last at least 3-4 weeks. Maybe even the whole life cycle.
He had tried a nutrient line by Aurora Innovations before and loved the results (the only supplement that he stopped using was Bloom Booster which he thought caused more problems than good). Let’s look at the whole lineup of products he was using:
- Elemental. A source of two important elements: calcium (an essential building material for plant cells) and magnesium (a key component of chlorophyll molecule).
- Uprising Foundation. Another Cal-Mag formula which also contains iron and is 100% natural and organic.
- Uprising Grow & Bloom. A set of two organic fertilizers with classic NPK ratios for the vegetative and flowering phase, respectively.
- Terp Tea Grow & Bloom. This two-part nutrient system—one component for the vegetative stage, the other for different stages of flowering—is a powerful organic NPK mix. You can use it either alone, or alongside your main fertilizer. In the latter case, it will help make buds richer in terpenes (more aromatic).
- Extreme Serene. A seaweed extract that stimulates the growth of shoots and roots. Can be added to water or foliar-fed.
- Trinity. A rich meal of carbohydrates from various plant sources, including molasses.
- Super Phos Bat Guano. A natural source of phosphorus, as well as calcium.
- Bio-Force. An undisclosed proprietary formula to give your garden a microbial boost.
C: Getting Fat on Plain Water
Grower C did nothing fancy. His single Orange Sherbet Auto was still in the 1L pot and got only plain R/O water with pH at 6.4 and TDS at 336. She obviously received enough food from the soil mix and looked vibrant and perky. And quite big for her age too.
D: One Happy SOG Family
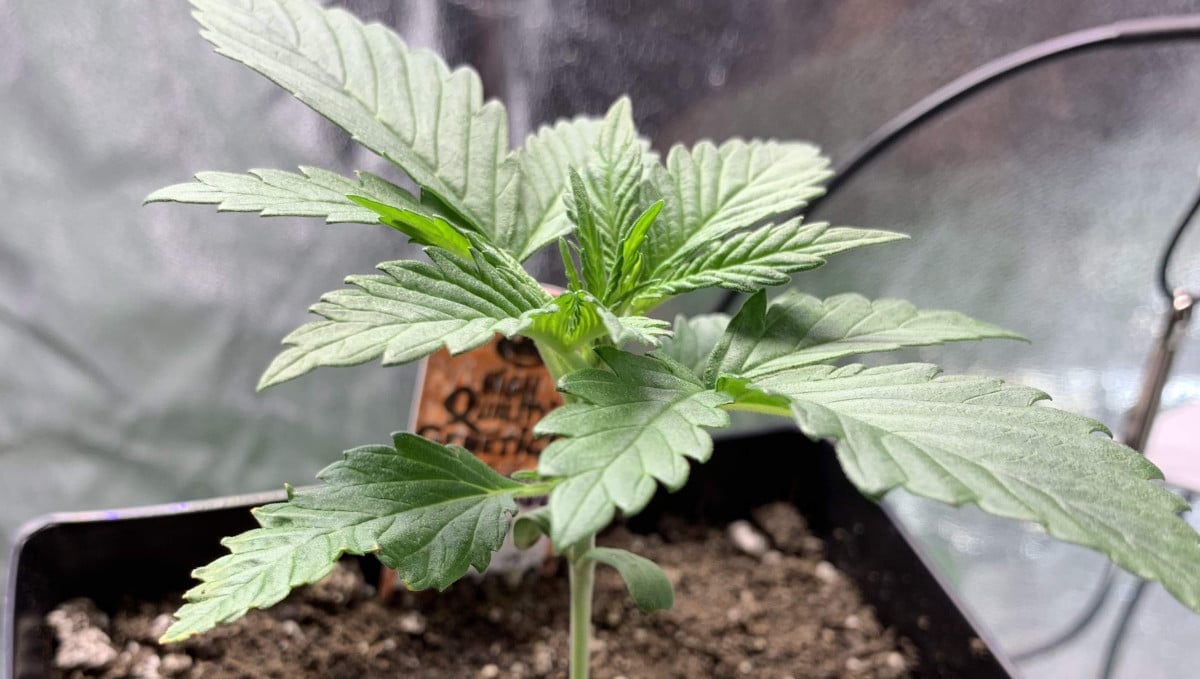
On week 2, the three Orange Sherbet Autos—along with the rest of FastBuds varieties—were settling in their 0.5 gal biodegradable bags. At first, they looked like they found the soil mix too ‘hot’. (Remember that it was pre-amended with organics almost to the point of bursting.) However, by the end of the week, the vegetative growth kicked in, the girls got big and strong, and roots were already coming through the sides of the pots.
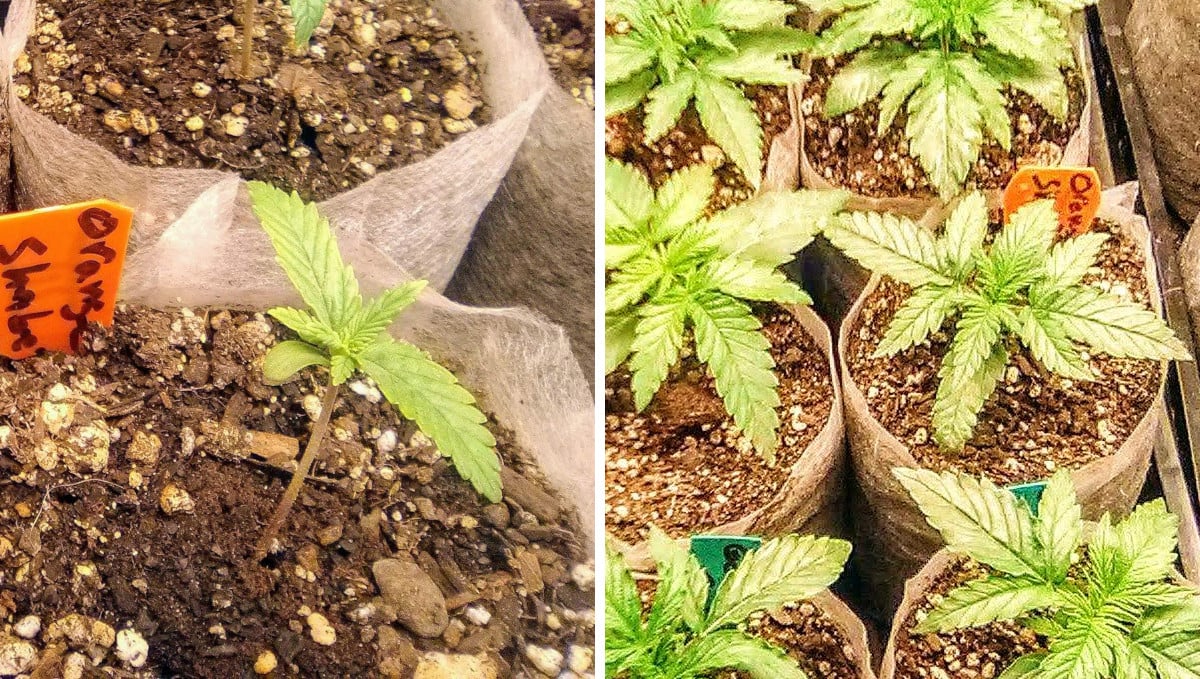
In fact, they did so good, that their happy owner decided that they could handle something other than plain water. And this is the food they received:
- BushDoctor Boomerang, to make roots recover from the stress of repotting and to stimulate vegetative growth,
- True Plant Science One (a classic mix of macro- and micronutrients) and Silica Gold (an extra dose of potassium).
5. Mid Veg | Weeks 3-4
All four gardeners were in a hurry to do what needs to be done in veg and can’t be postponed till cannabis flowering stages. This includes such procedures as topping/FIMing, transplanting, and—in part—LST. Luckily, the pre-flowering stage hasn't really kicked in yet for any of the plants.
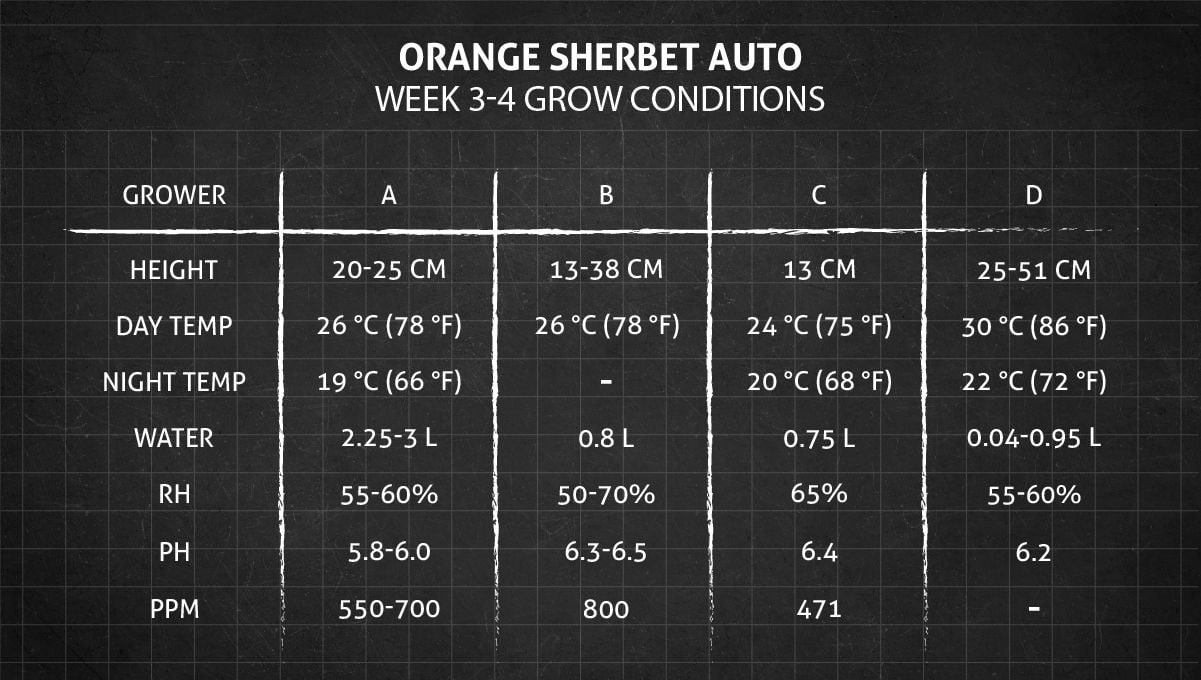
A: Something Finally ‘Clicked’
The heatwave that had been causing so much trouble in the first two weeks was now over, and the grower finally figured out all those newbie questions of when and how much to water and what to feed. He also found the sweet spot for the distance from the light. In short, he learned how to read his plants’ reactions and act accordingly.
He was steadily increasing the volume of daily watering and also the EC of the solution while lowering the relative humidity a little.
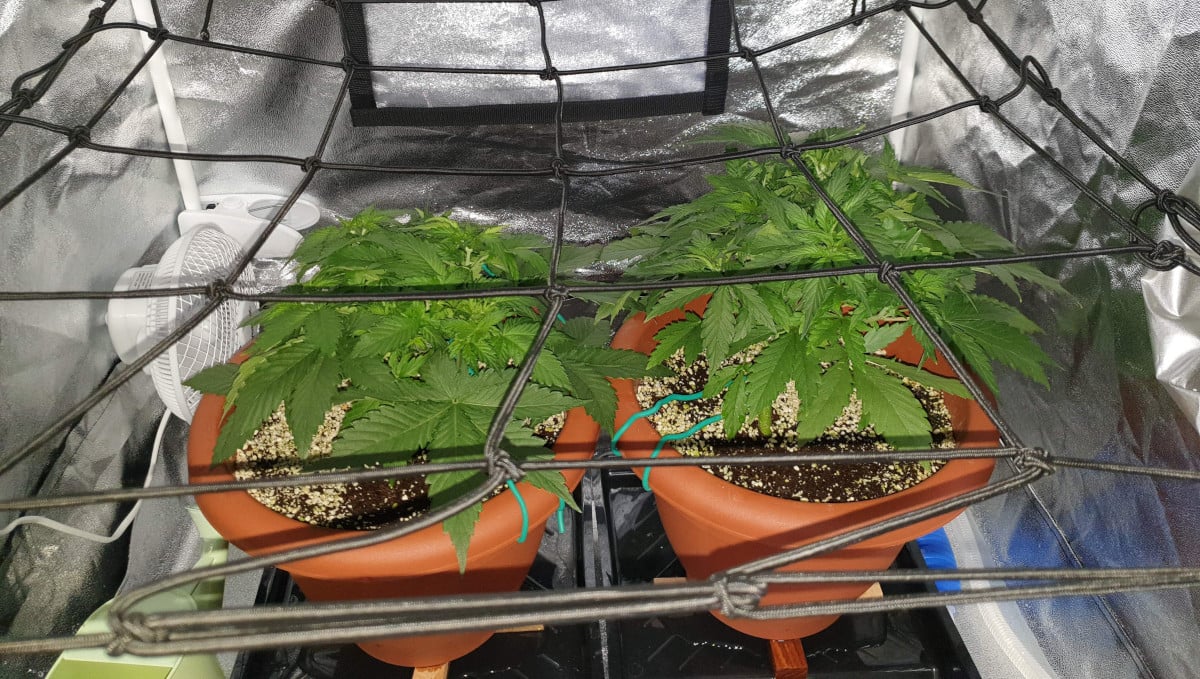
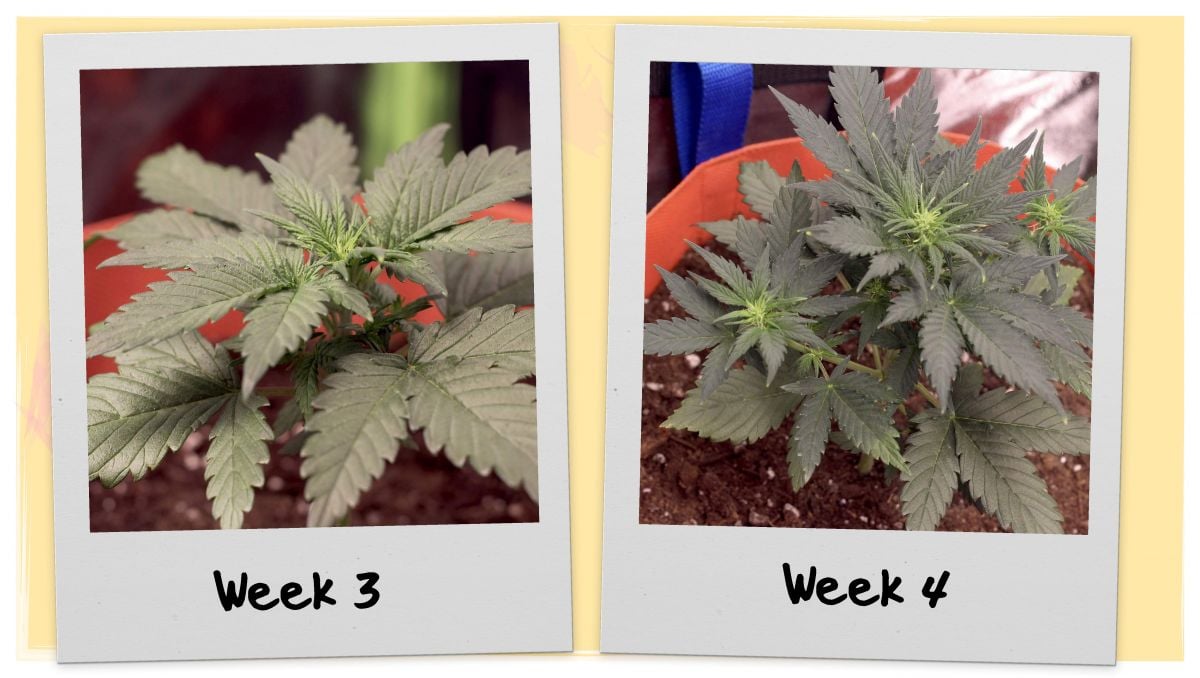
On week 3, the girls were left to grow freely and gained 4 inches (10 cm). However, in the next week, both were LSTed and fimmed and the pattern of the growth changed. Now, instead of growing vertically, they began to develop a lot of side shoots.
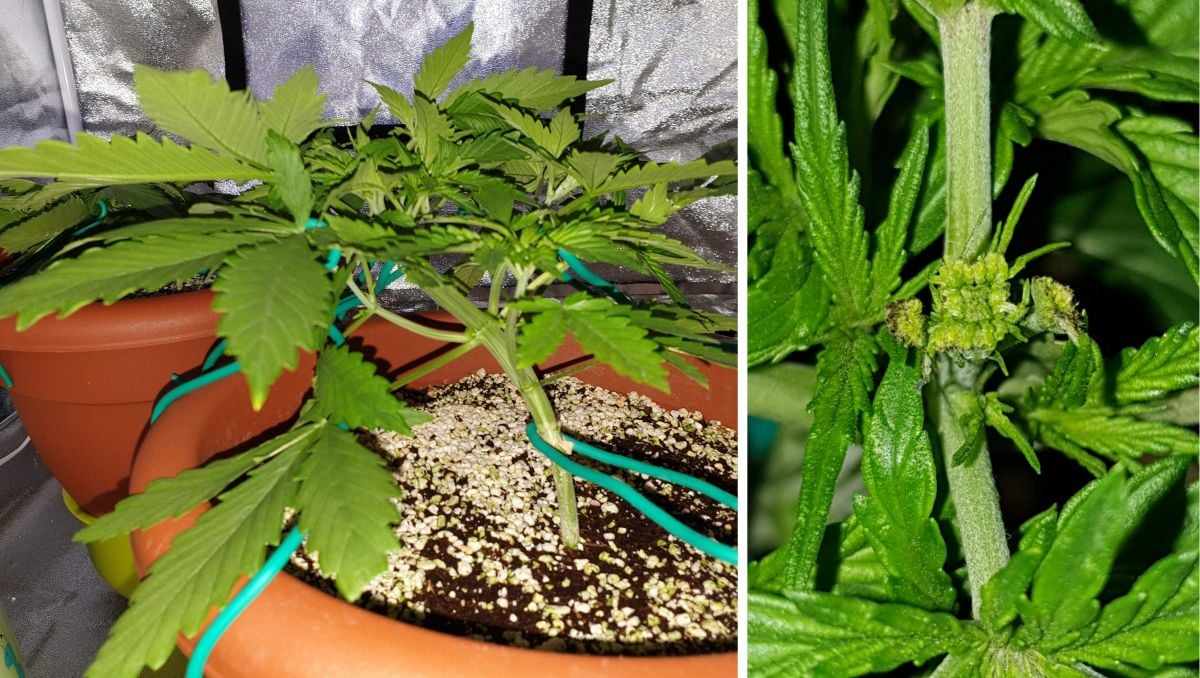
It was time to install the ScrOG net, so that they could be trained in the coming weeks.
B: Healthy Diet to Keep Deficiencies at Bay
All through weeks 3 and 4, the grower continued with the strategy of feeding his Orange Sherbet Auto much heavier than in his previous grows. He liked it much better than constantly playing catch-up with various deficiencies.
It was remarkable how much the plants gained, especially during the fourth week. They were regularly LSTed and, each time, lightly defoliated. Both turned into wide flat bushes with multiple side branches. They still looked flimsy, of course, but a forward-thinking gardener would already start to contemplate trellising them — to support the future oversized colas.
C: Precocious Little Thing
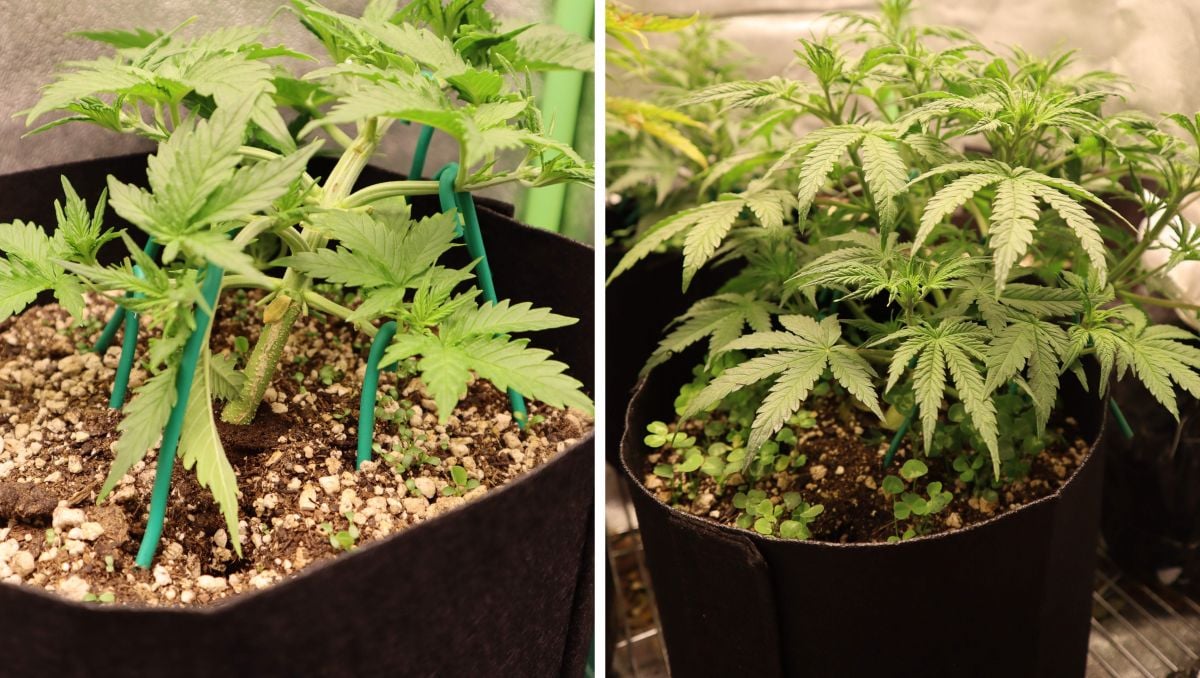
Week 3 started with the transplant from the 1L pot into a 5-gal grow bag. The timing was terrible because this particular Orange Sherbet Auto already looked like she would begin to flower any day. Which she promptly did.
It is a well known fact that the flowering stage is the time when the root system basically stops developing. This means it’s never worth repotting cannabis when it’s already developing buds or is in the pre-flowering stage.
This little Orange Sherbet Auto would probably just as well have been left in her small container and brought the same 31 grams of dry bud. Maybe she’d be bigger if put into a larger pot from day one. Or maybe she’d turn into a superfast dwarf in any case. Who knows!
The final 6-gal grow bag and the soil in it were from the previous non-organic cycle, meaning poor in nutrients. So the grower made the right decision of beginning to fertigate his Orange Sherbet Auto right away.
He chose the Emerald Harvest nutrients. They don’t even pretend to be designed for some other crops. Everything in this line of fertilizers caters to the needs of weed cultivation. Emerald Harvest offers a very wide range of products, but Grower C used just a few:
- Cali Pro Grow A & B / Bloom A & B. Two easy-to-use formulas: one designed for the vegetative stage, the other perfect for autoflower flowering stages. Both provide all essential macro- and micronutrients.
- Emerald Goddess. A tonic for cannabis extracted from various natural sources, such as alfalfa and seaweed. Contains vitamins and humic acids.
- Honey Chome. A ‘sugary drink’ especially rich in potassium but also phosphorus.
- King Kola. A PK-rich bloom booster for oversized colas.
D: Repotting on the Cusp of the Pre-Flowering Stage
The end of Week 3 was the time for the final transplant of Orange Sherbet Auto Auto and other strains into 3-gallon pots. Since the root balls weren’t disturbed in the process—thanks to the biodegradable starter grow bags—the procedure was stress-free, and all the girls went on growing without skipping a beat.
They received the full dose of One and some Boomerang, as well as regular showers with such microbial and vitamin-rich preparations as Microlife Super Seaweed and Boom Boom Spray.
In the fourth week, the grower began to regret that he hadn’t transplanted earlier: most of the plants had pistils now, and the beginning of flowering is never a good time to repot. He was afraid he wouldn’t see much of a stretch and his autoflowers would remain rather small.
After the fourth week and through all of his autoflower flowering stages, he continued with his singularly sophisticated organic feeding regime that is best represented with a table:
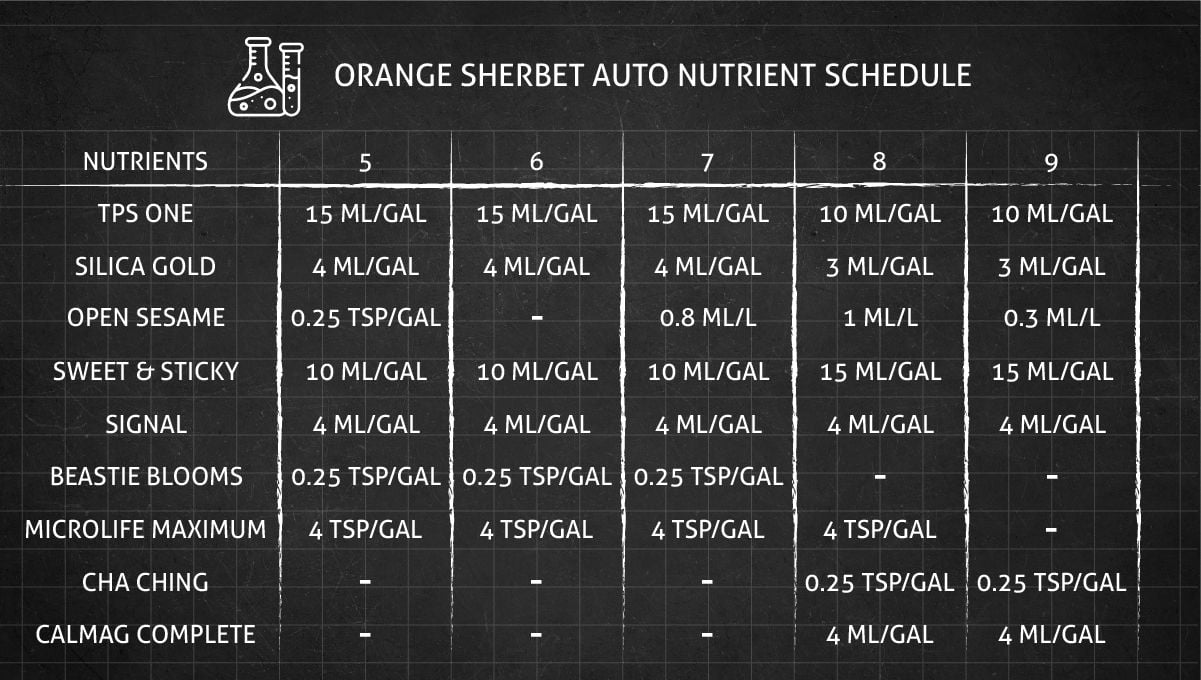
Besides adding nutrients to every fertigation event, he also regularly foliar-fed all his autoflowers. Sometimes, he did it for a quick supplementary boost (e.g. AXIOM Harpin Proteins). At other times, he foliar-sprayed Microlife Maximum Blooms because the medium wasn’t yet dry enough to fertigate with this nutrient in the normal way.
Please note that any foliar feeding stopped on week 6 because it’s dangerous to spray any liquids on flowers. Excess moisture often causes mold!
6. Transition (Pre-Flower) | Week 5
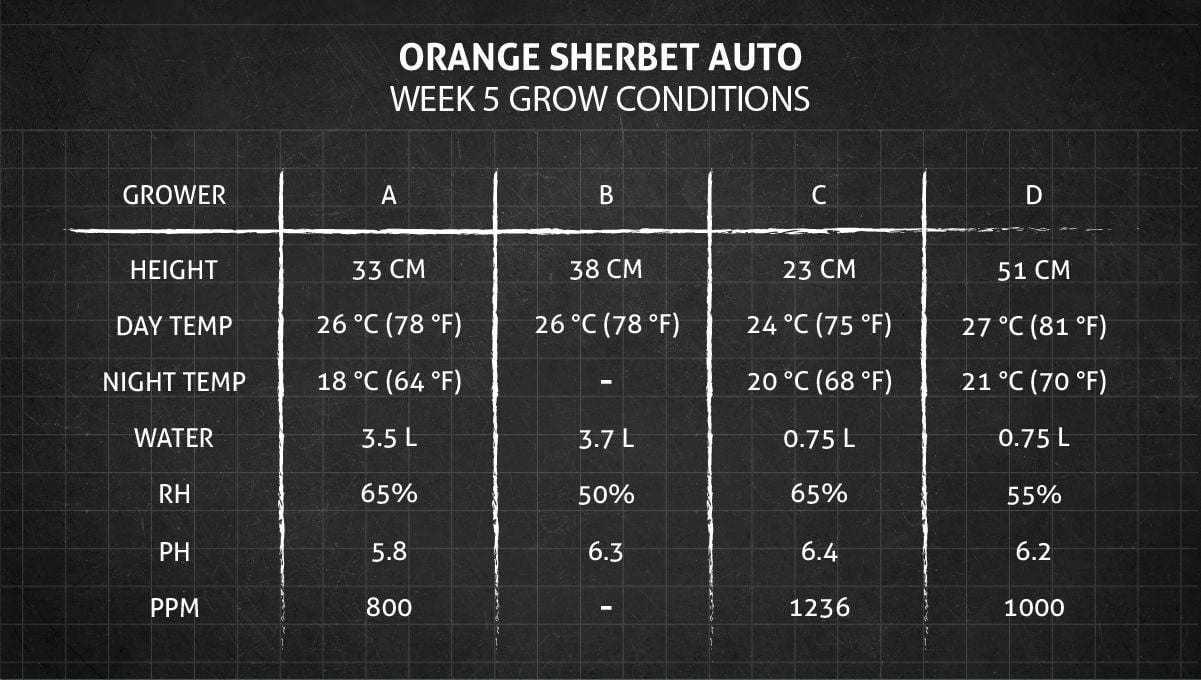
Although it was supposed to be a transition phase in Orange Sherbet Autoflower week by week progress, this turned out to be the start of the full-blown flowering for most of the plants.
A: Canopy Management Can be a Fulltime Job
Though marked as ‘veg’ in the journal, the fifth week was actually the beginning of flowering time for both Orange Sherbet Auto girls. The first pistils appeared, and the branches began to stretch, quickly filling out the ScrOG net. This caused RH in the tent to steadily creep up which always increases the risk of mold during cannabis flowering stages.
To prevent that, the grower lollipopped everything below the ScrOG. This technique allows you to get rid of lower leaves and bud sites that don’t get any direct light and usually don’t amount to anything. Lollipopping also facilitates air exchange below canopy level. It was a surprise for Grower A how time consuming it is to train plants for ScrOG. He had to constantly defoliate and prune and direct growing branches horizontally and tuck the shoots and the leaves under the net. Well, this is the price you pay for increased yields that ScrOG promises.
B: No Runoff for Organics
The grower continued to top dress his pots with organic nutrients and saturate the soil with plain water and nothing else. The microbes in the root zone seemed to be happy with this arrangement, and the two Orange Sherbet Auto were flourishing.
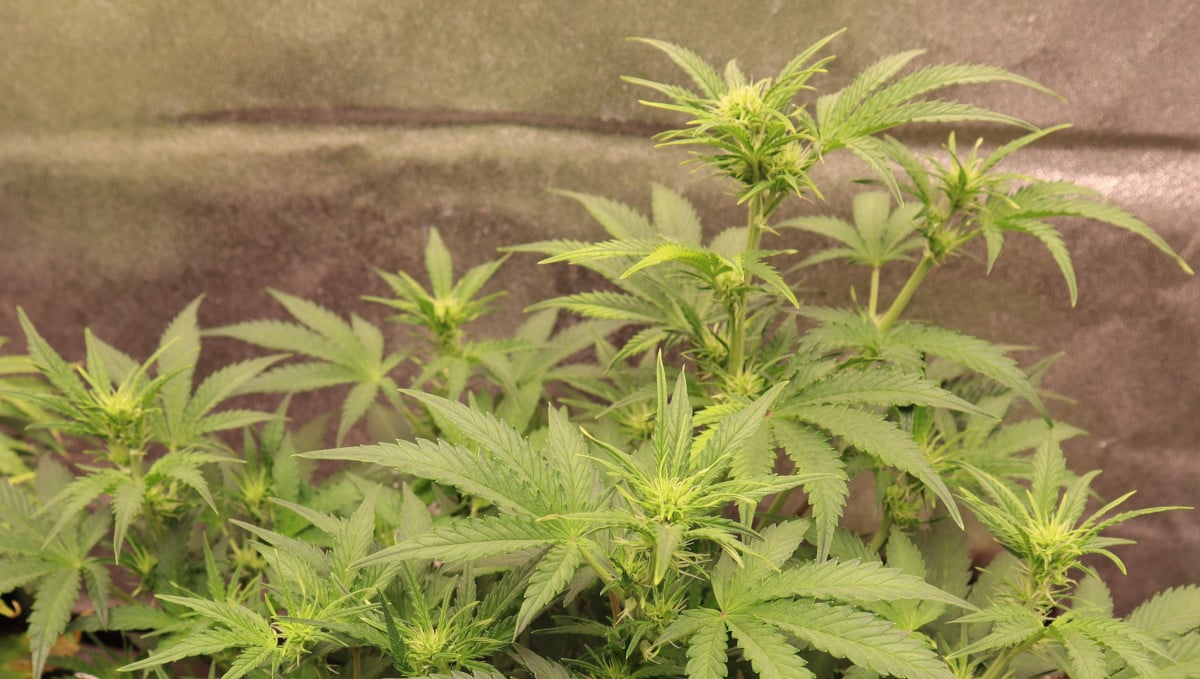
The watering technique that Grower B employed was very interesting. At first, he would bottom feed the pots—with 1.2 liters at this point in the timeline—and then add another 600-800ml from the top with a sprayer. He was making sure that not a drop would run off. This is what you do with organics — you don’t flush (and waste) any nutrients and beneficial bacteria and fungi from the medium.
C: A Poster Child of Low Maintenance
As you have probably guessed already, Orange Sherbet Auto is an impressively fast variety. And this particular baby was forming flowers at an incredible speed.
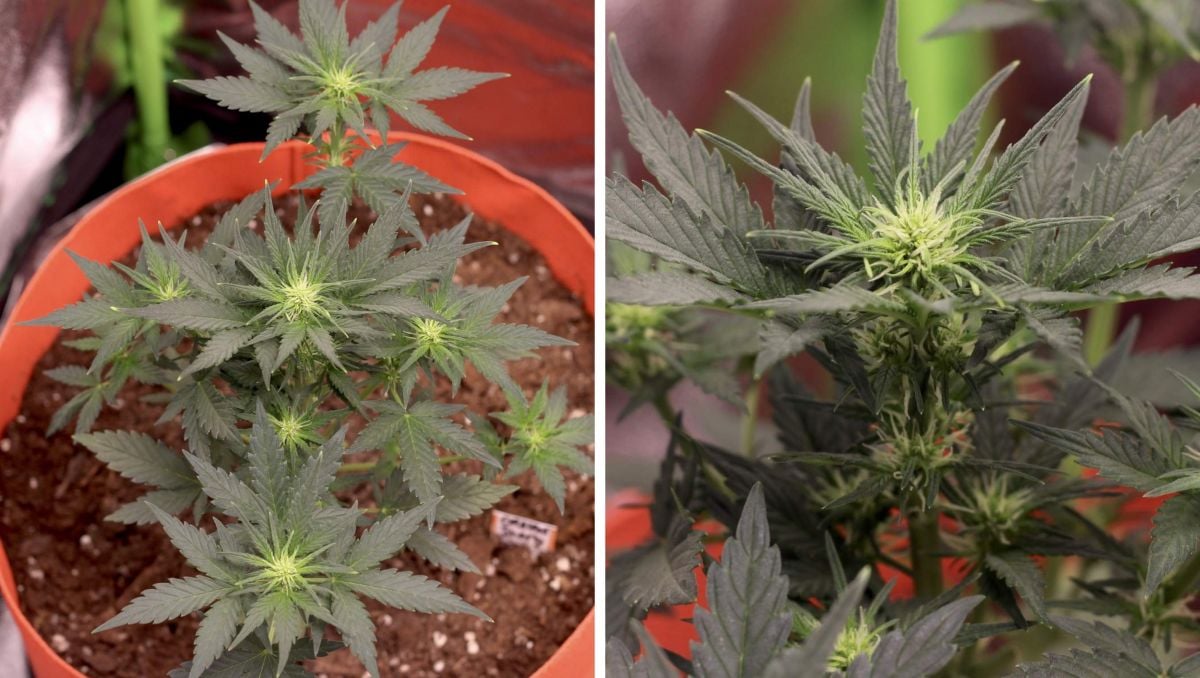
And she required almost no attention from her tender. He was simply mixing and giving her a nutrient solution when the grow bag got light enough. With her diminutive size and probably a tiny root ball, she wasn’t even thirsty that often.
D: No Dwarves in This Garden
Thanks to running a multi-strain grow, Grower D had every opportunity to compare his three Orange Sherbet Autos with each other and many other genetics. He noted that the trio looked like they were clones — they had identical structure and leaf shape. At the same time, they were shorter than the rest, but comfortably bushy.
Remember how worried the grower was because he thought this whole batch would remain stunted due to spending too much time in the starter bags? These worries proved groundless. The whole garden grew considerably and looked lush.
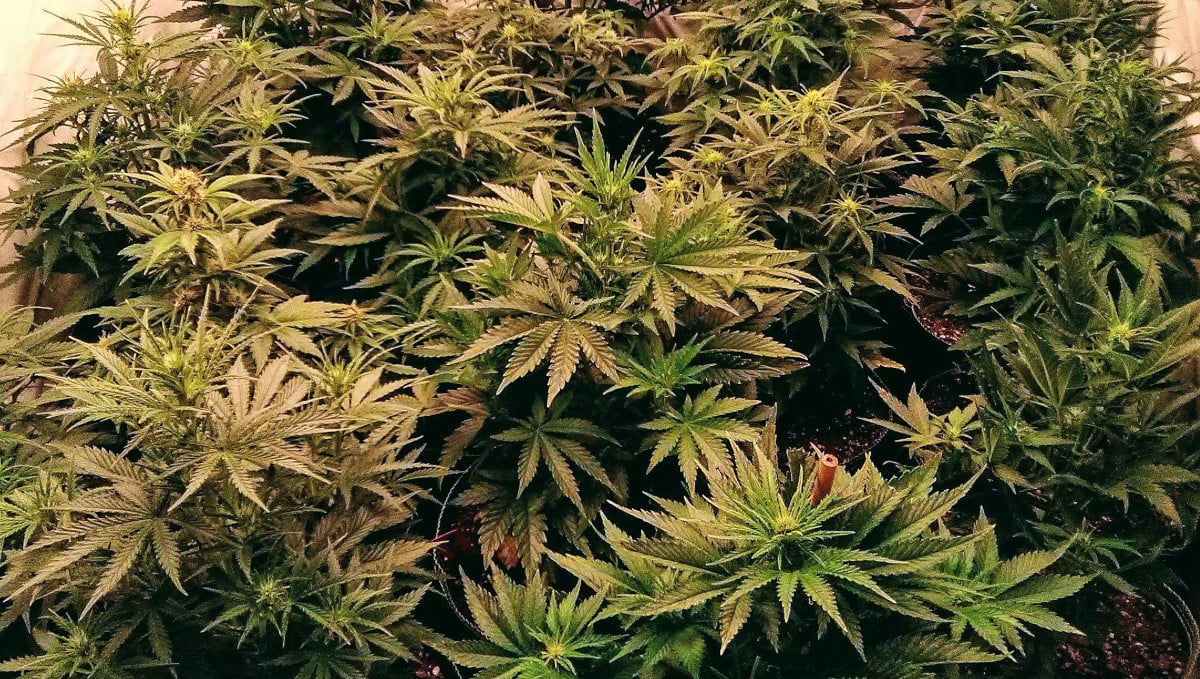
During the subsequent stretch, Orange Sherbet Auto would get taller by a whole foot or even more.
7. Early Flower | Weeks 6-7
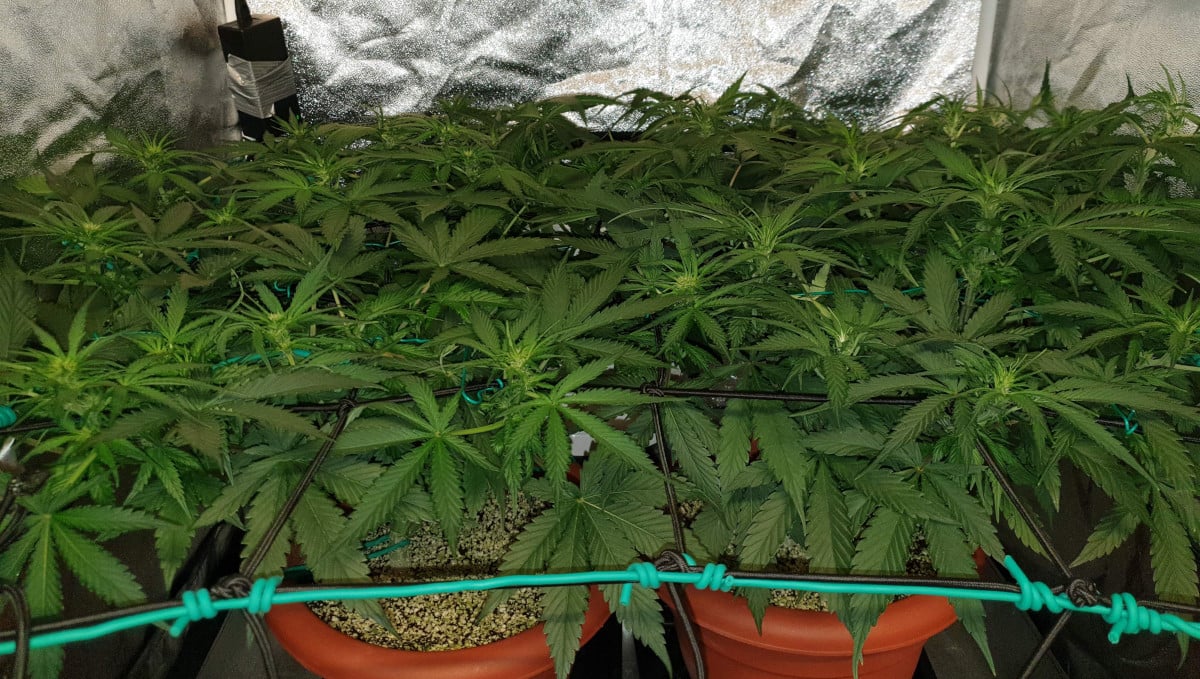
Except for Grower A who was preoccupied with figuring out how to best train his plants, most were simply staying the course and watching the flowers fill out. This is what usually happens 3 or 4 weeks into flowering: all major decisions have already been made and now it’s time to patiently wait for the harvest.
A: Giving Up the ScrOG Idea
The grower spent week 6 tucking the top shoots under the net. He had to do it 2-3 times a day to keep the canopy even. Then, in the seventh week, he decided it was time to give up. One of the branches looked like it would be soon cut in half by one of the mesh threads.
So he removed the net with the intention of maybe installing it later again and much higher up — just to give support to the colas.
He was also busy with balancing his nutrients. The buds were mature enough to call for CANNA Boost Accelerator and PK 13/14, so there was a need to cut down on more growth-oriented macronutrients. The idea was to keep TDS at a comfortable level of 900-950 ppm.
The plants liked whatever he did to them and looked very healthy, with not one spot of deficiency or anything.
B: A Very Branchy Structure
Weeks 6 and 7 were basically more of the same: top dressing and watering, with occasional LST and a lot of defoliation. And, frankly, these Orange Sherbet Auto needed regular haircuts.
Please keep in mind that they weren’t topped or anything, but still developed a formidable amount of side branches. It’s even hard to say with any confidence which is the central one. At least 3 or 4 of them look exactly the same.
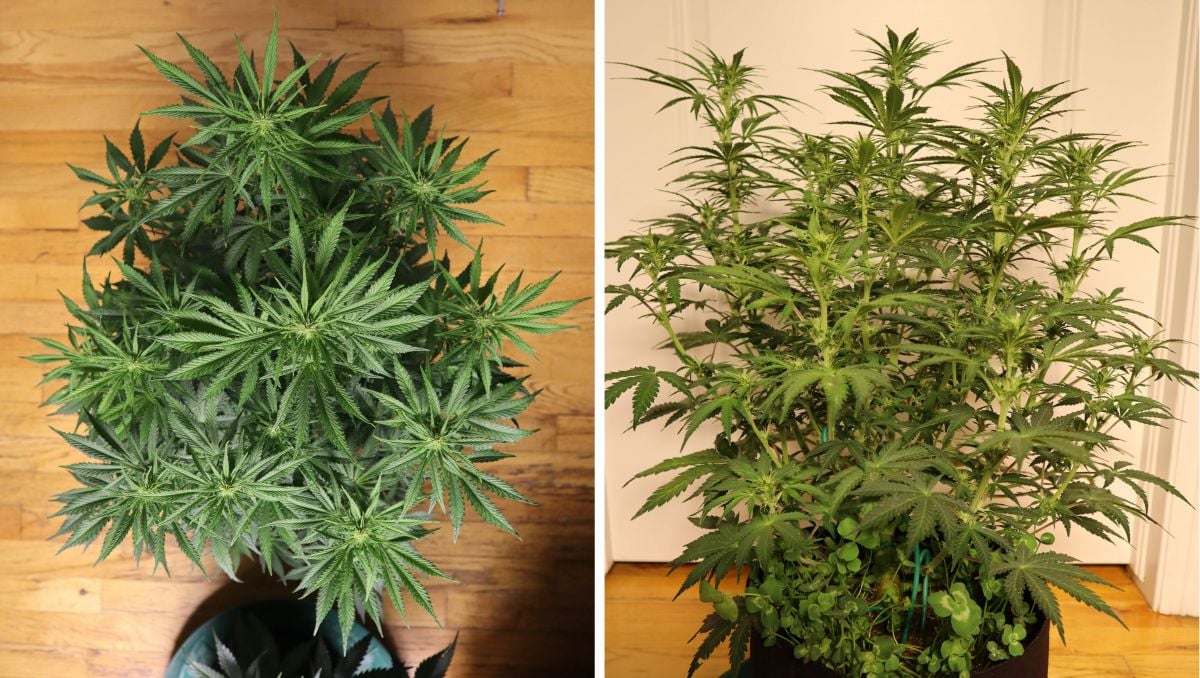
And probably it had been better if some of the lesser branches were pruned and the bottom third of the plant lollipopped completely. This would channel more energy from the lower bud sites (future larf) to the tops (where it really matters).
In any case, by the end of week 7, the gals were stacking up nicely and looked well-fed and happy.
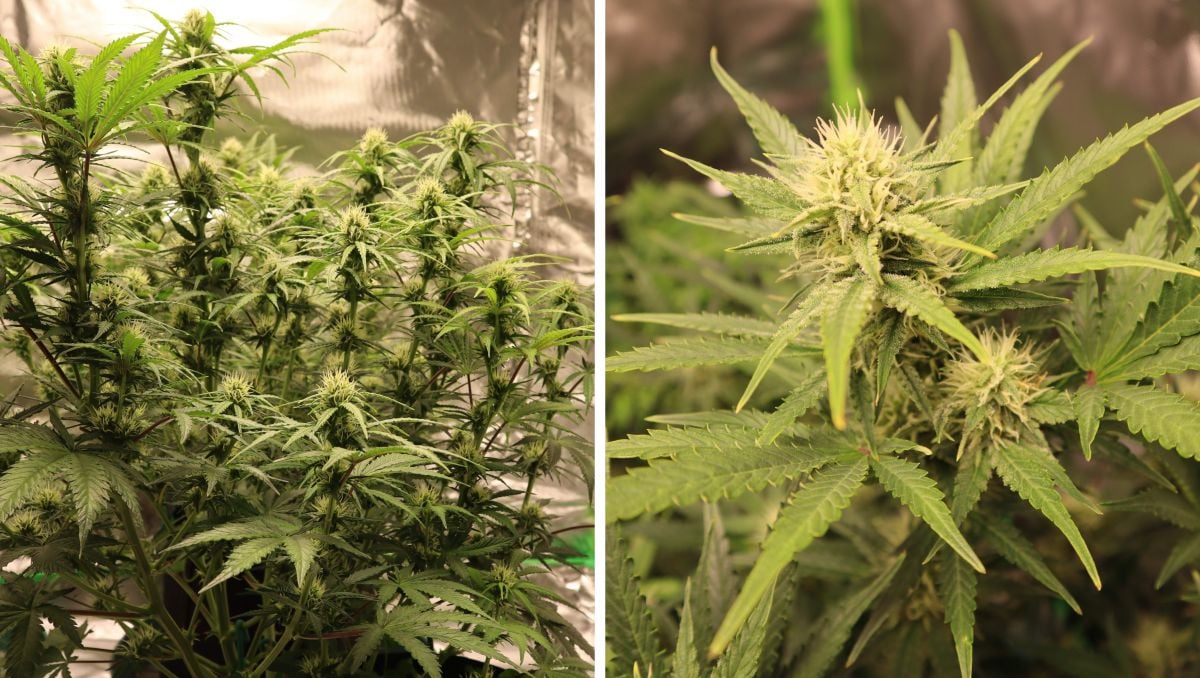
C: When the Process is Boring, but the Result is Not
The fastest and the smallest plant in our review, this Orange Sherbet Auto was already sporting some trichomes on ‘sugar’ leaves by the end of the 7th week.
Even though she was so small and there was no issue with light penetration, the grower decided to pull some branches to the sides. This would further open the canopy and allow the buds to evenly swell up from top to bottom.
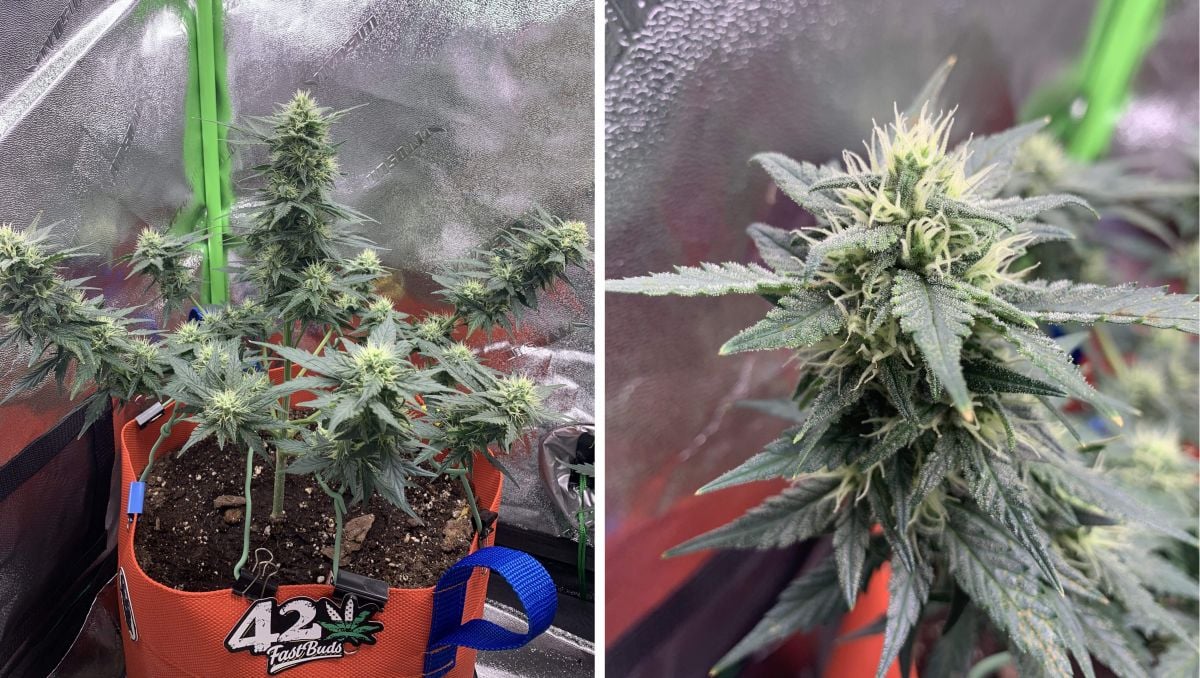
Apart from that, nothing really needed to be done.
D: Ultraviolet Spectrum for Extra Potency
One of the many reasons this grow was so successful was the use of Flower Power UVB lights. These 4-feet long lamps are installed at the rate of two per every 1000W HPS (or its equivalent). The manufacturer promises that they increase the production of THC by at least 20%, but also make buds richer in terpenes and flavonoids.
The grower actually had begun to use his UVB light—turning it on for two hours in the morning and two hours in the evening—on week 4, right after the final transplant. By week 6, the old lamp needed to be replaced with a new one. This seems to be a drawback of these lamps — a rather short life span (only two flowering cycles in some extreme cases).
All plants in the garden, including Orange Sherbet Auto, were flourishing and, though untrained, had many long side branches and a lot of bud sites.
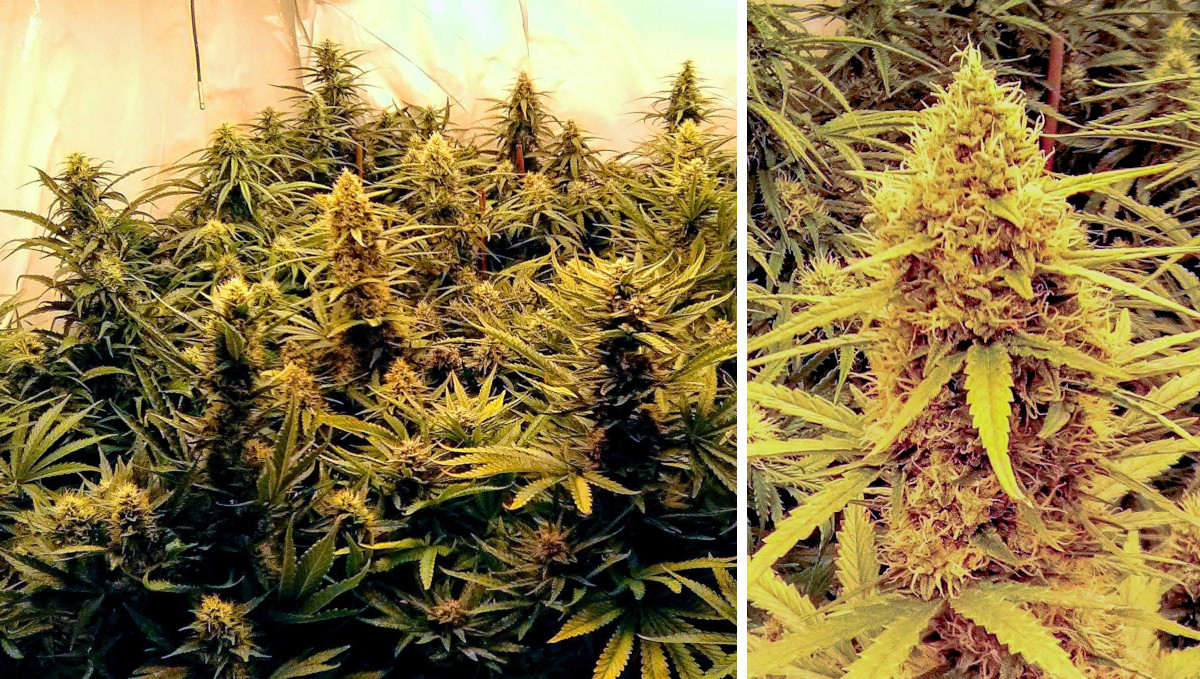
8. Mid Flower (Bulk Phase) | Weeks 8-9
There were no laggards among Orange Sherbet Autos in this review. Most could have been chopped on week 9, and three of them actually were. Those that were still standing looked vibrant and not really faded, but their trichomes were already turning milky.
A: Filling Out Despite a Minor Deficiency
Starting from week 8, first trichomes appeared on the flowers and sugar leaves and both Orange Sherbet autoflowers became sticky to touch.
Up until that moment, they had no deficiencies, but now the grower noticed mottled brown spots on the newer leaves. Fearing it was a magnesium and calcium deficiency, he started to add a bit of CalMag to every other feed.
Maybe it WAS a calcium deficiency, made worse by temperatures climbing up as high as 34°C (93°F) on a few occasions, but, whatever it was, the issue wouldn’t progress further, and buds were filling out nicely.
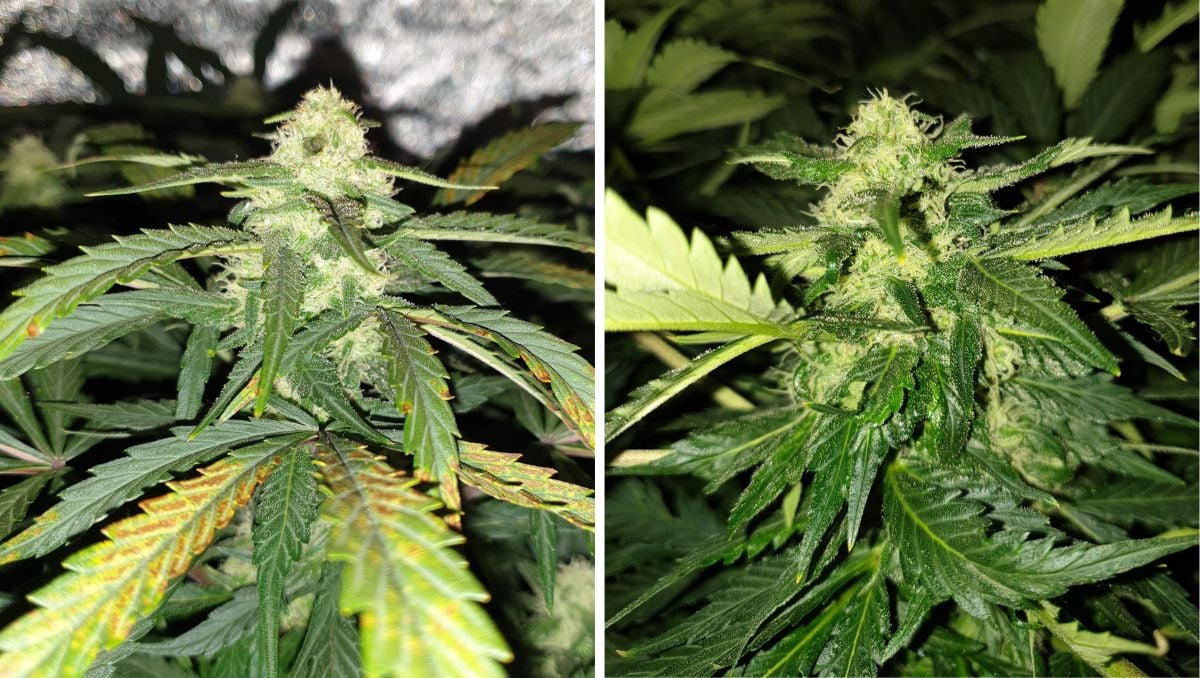
If the garden had a very weak smell on week 8, it got much stronger in the next one. It wasn’t an overwhelming skunky presence. Orange Sherbet Auto smelled as one would expect — of freshly squeezed orange juice.
Trichome inspection revealed a mixture of clear and cloudy ones, no amber yet. Nevertheless, the grower backed off the nutrients a bit because harvest was approaching, and it’s always best to start cleaning buds of built-up salts in time.
B: Weaned Off Nutrients and Almost Ready for Harvest
Another calm two weeks for Grower B. He moved his two Orange Sherbet autoflowers into a bigger tent with stronger lights and defoliated a bit here and there for better air circulation and light penetration.
He top dressed the pots for the last time in the 8th week and, from then on, only gave his girls fresh water. Please note that neither he, nor Grower D ever mentioned TDS. When you grow autoflowers organically, there’s really no need to worry about such things. Nor monitor the pH levels.
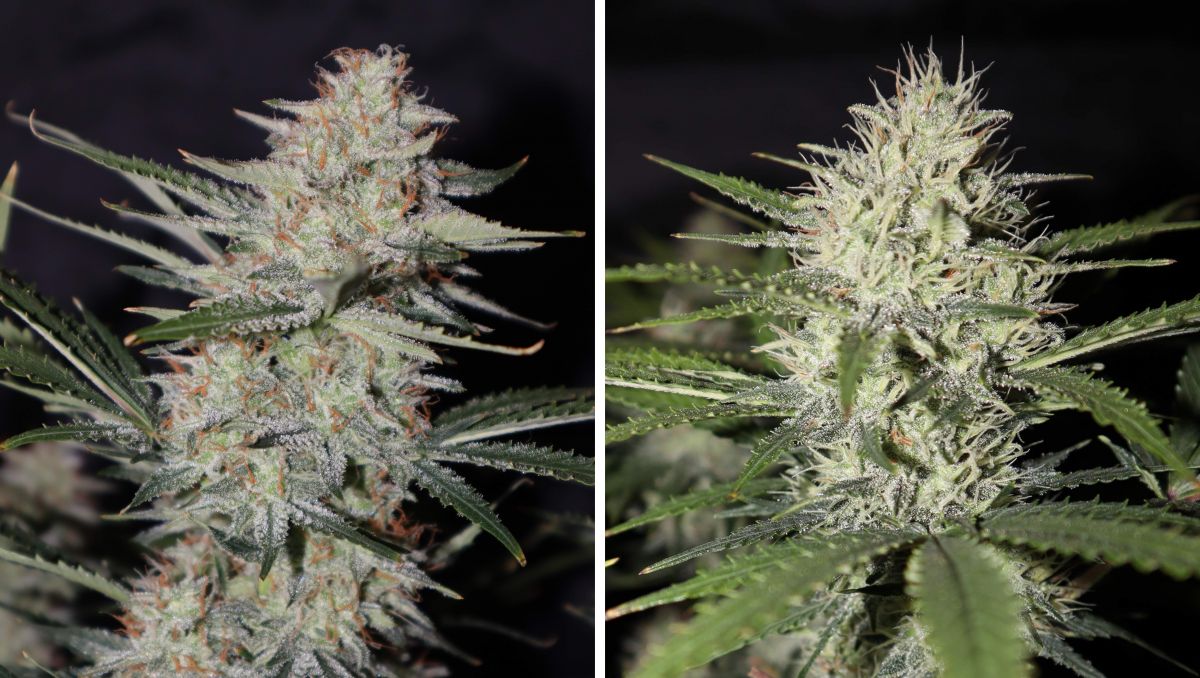
The buds were slowly filling out and looked so frosty that they appeared less mature than they actually were (too white). But harvest time was fast approaching. One of the girls was scheduled to go by the end of week 9, and the other one lagged by probably only a week or so.
C: Last Meals and Then Flushing
Grower C’s little Orange Sherbet Auto hadn’t too many fan leaves to begin with, but, by week 8, she looked like she’d received the pre-harvest trim and there was nothing left to do but chop her.
Nevertheless, the buds were still chunking out, and, in the 8th week, the grower was still heavily feeding her. Moreover, he even added some CalMag to the diet when he noticed yellow spots on some sugar leaves. But on week 9, it was only Advanced Nutrients Flawless Finish and then flushing with lots of fresh water.
For those of you who have never tried any flush product before, Flawless Finish contains a class of substances known as chelates. Chelates bind to excessive nutrient salts both in the medium and inside plants themselves and remove at least 85% of them. Thus the final product becomes very clean, without a harsh taste, and doesn’t irritate your throat and lungs.
After a flush in a tub—the grower continued with it until the drainage water ran clear—this particularly fast little thing got 48 hours of total darkness and then harvested.
D: The First One Chopped at 9 Weeks from Seed
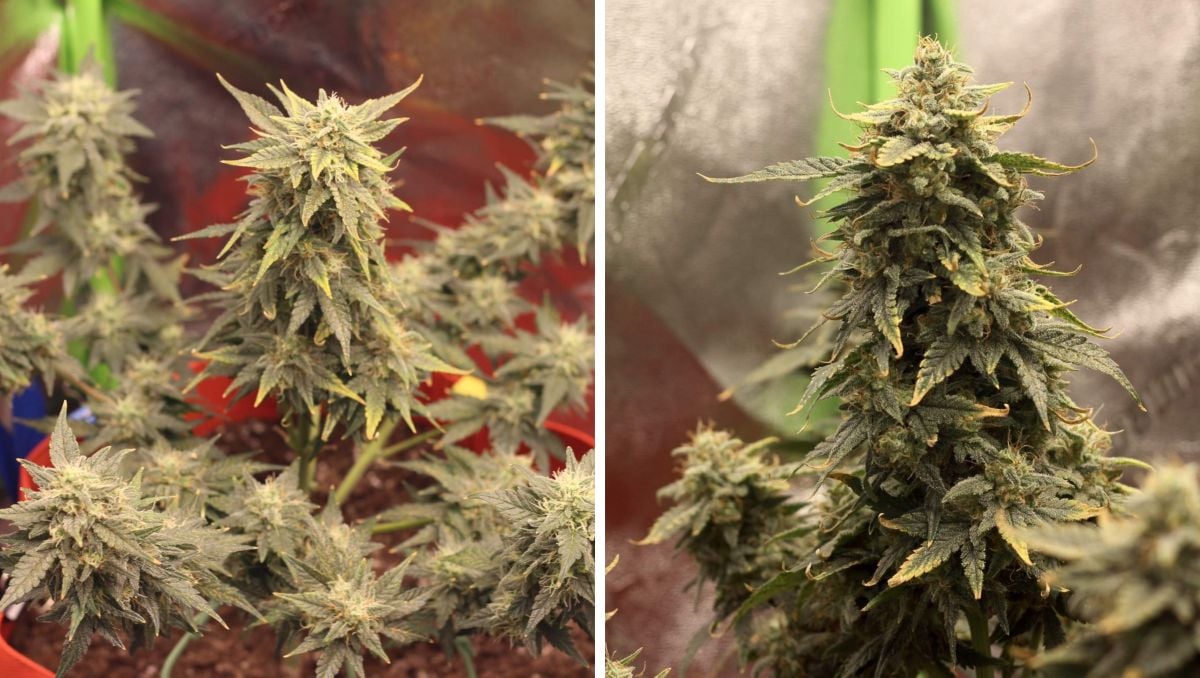
Now, 4 weeks into flowering, Orange Sherbet Auto was the smelliest strain in the garden and also had the fattest—if not the heaviest—colas. One of them was also almost mature and scheduled for a final flush.
So, 8 weeks from seeds, the faster of the three Orange Sherbet Autos received her last feeding, and, in the beginning of week 9, she was flushed with 8 gallons of warm water and True Plant Science LiquidSOIL Remediator.
This organic formula binds excessive salts in the medium, so that you can re-use it for future grows. Besides, it helps cleanse the plants, too. The thing is that even organically grown cannabis benefits from a good flush.
Shortly before the harvest day, the grower watered for the last time. The idea was to make buds and leaves turgid for a rough trim. Her last 24 hours the fastest Orange Sherbet Auto was to spend in total darkness and then chopped.
So, the total seed to harvest timeline fit snugly into 9 weeks. Quite impressive.
9. Ripening And Harvest | Week 10
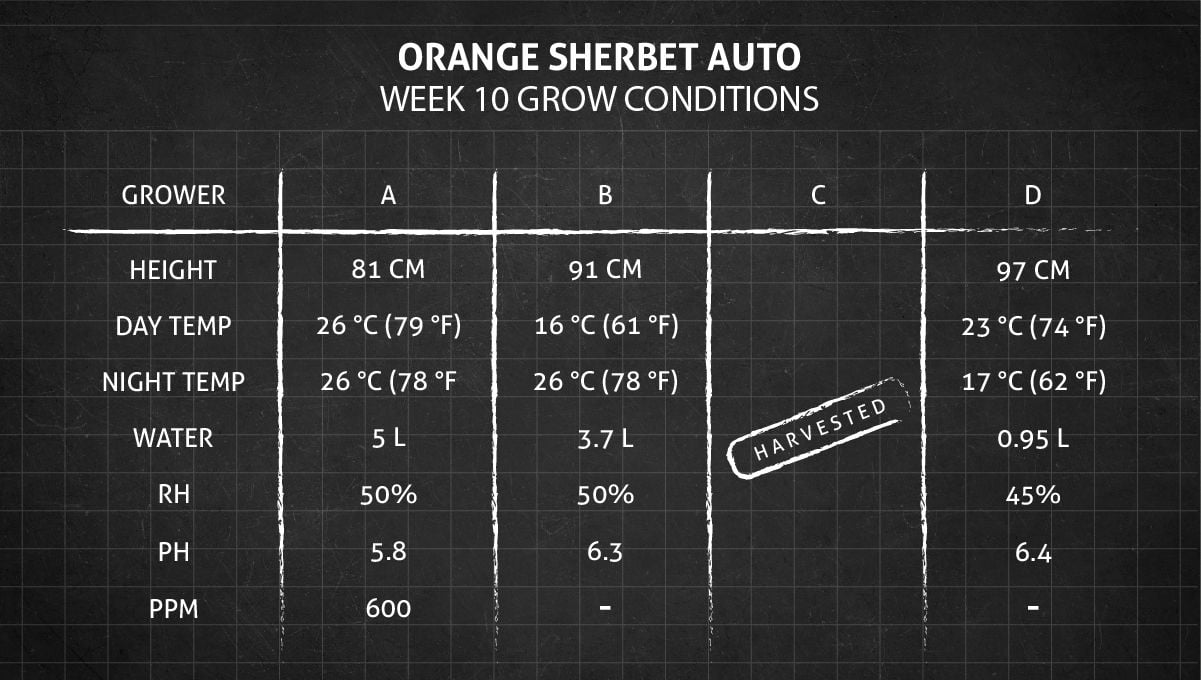
Only two plants in our review took 73 days from seed to harvest. The rest were ready within 9-10 weeks. This makes Orange Sherbet Auto an amazingly fast variety, with very consistent results in terms of flowering time.
A: Waiting for a Bit More Fade
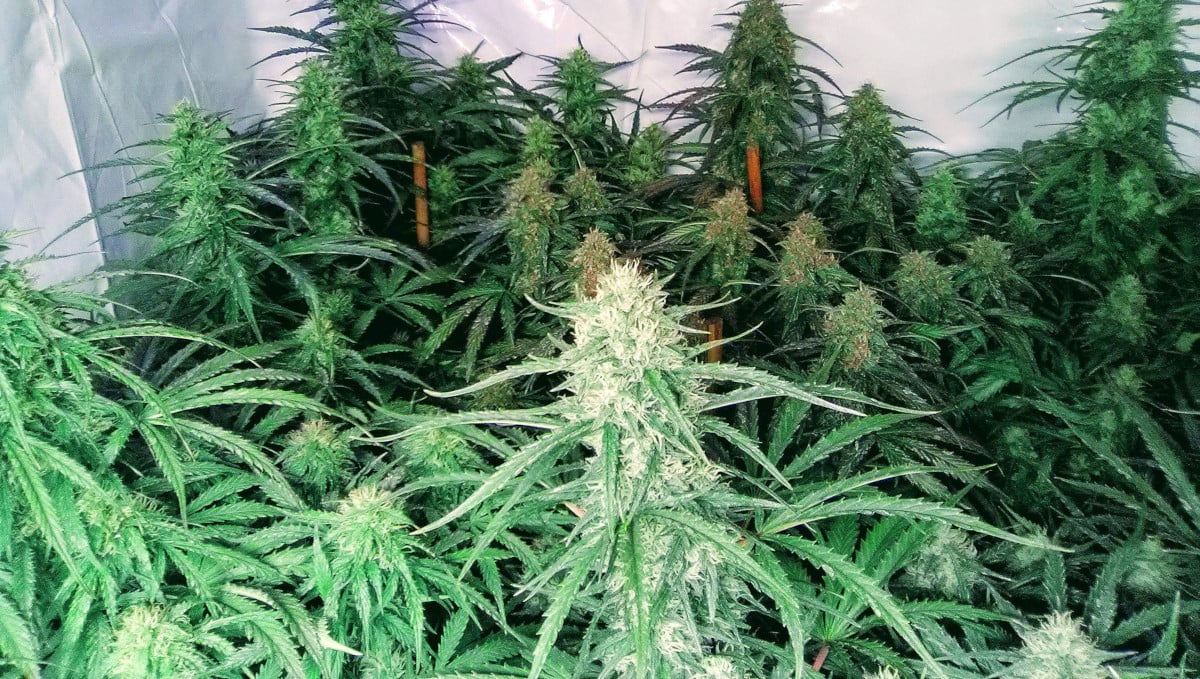
Truth be told, the two Orange Sherbet Autos in this grow could have been harvested the previous week. However, the grower was waiting for more trichomes to turn amber. The sugar leaves—more like brown sugar in this case—were already 50% amber. Calyxes — about 10-20%.
Usually, if people wait for a greater percentage of amber trichs, they do it to get a more sedating, sleepy effect. Didn’t happen in this case. The high would turn out to be all in the head, with only a slight body buzz.
The grower couldn’t decide on whether he wanted to flush or not. So he was flushing one of the plants throughout the last week and kept feeding the other one at 600 ppm. Unfortunately, he didn’t mention if it made any difference taste- and potency-wise.
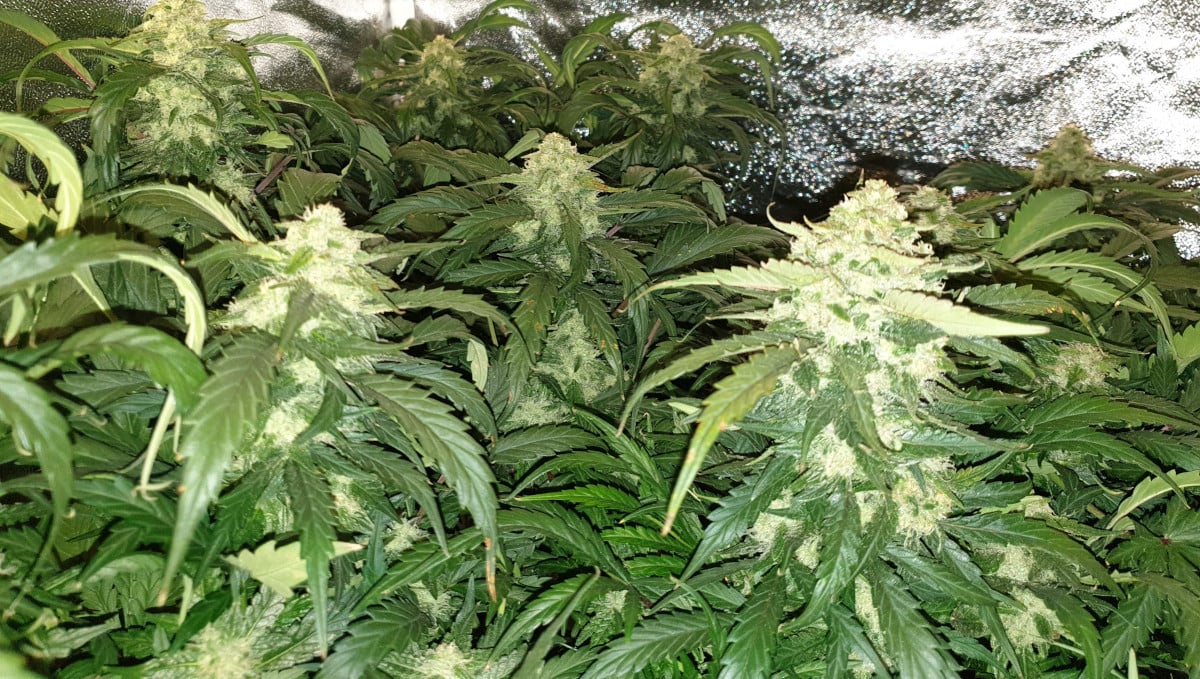
The buds kept swelling and looked like ears of corn — long, thick, and heavy. They would be harvested before the week was over.
B: The Most Mature Looking of the Bunch
Out of two Orange Bud autoflowers, only one was still standing now. The extra week didn’t really bulk up the colas noticeably, but the autumn colors on the leaves came through and the trichomes ripened.
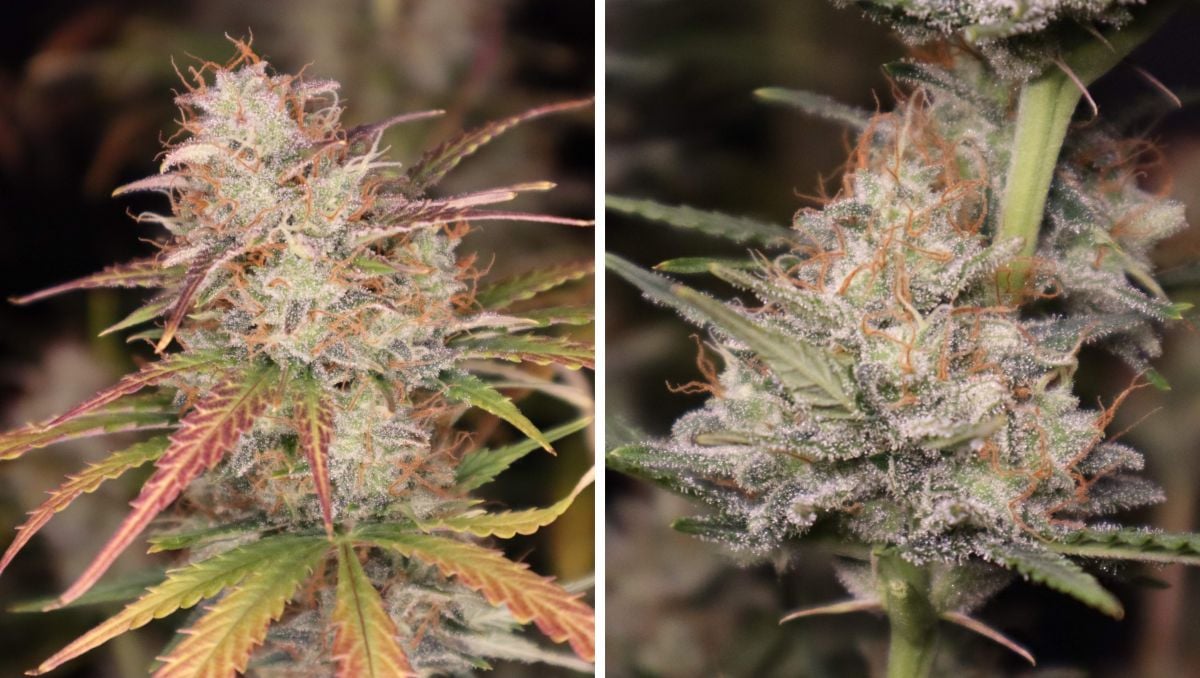
With hues like this, there’s no need to wait any longer, and so this beauty was promptly harvested.
C: Already Chopped and Drying
On week 10, when his fellow gardeners were harvesting their Orange Sherbet Auto one by one, Grower A was already drying the buds and enjoying the way they smelled. But let's not get ahead of ourselves...
D: The Frost Queen and Princess
The two remaining Orange Sherbet autoflowers in this garden were fast approaching harvest. They were first flushed with 8 gallons of LiquidSOIL Remediator solution each and after a few days received another flushing, but this time with less water.
The flowering tops were very close to the quantum board now (only 9 inches), so they were getting the maximum PAR and pounded with a lot of heat. The grower had to install a portable AC to blow cool air across the tops. This kept the temps at the canopy below 80°F (26°C). He’s also increased UVB exposure by an additional hour a day.
Amazingly, even now the plants kept reaching higher, getting as close as 6-8 inches to the QB. But this didn’t matter anymore because both Orange Sherbets were almost ready.
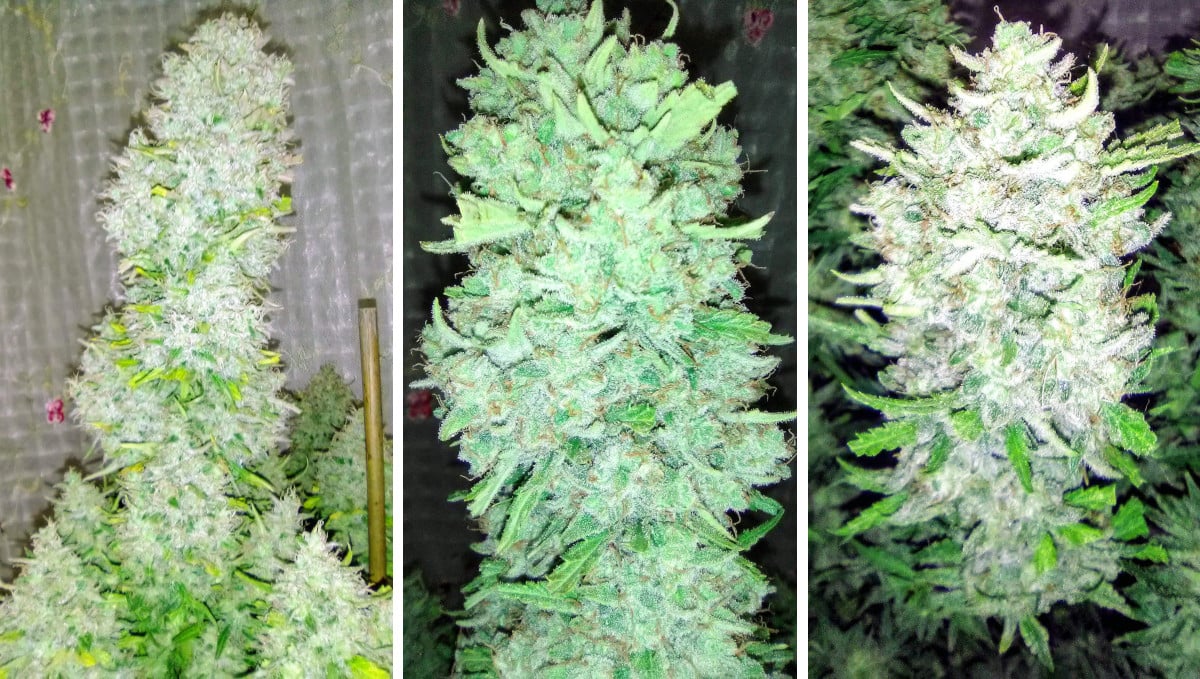
They barely crossed over into week 11 and were harvested in their full glory. Their proud father called them the Frost Queen and Princess.
10. How to Properly Trim, Dry, and Cure your Orange Sherbet Cannabis Harvest
After harvesting your cannabis plants it’s essential you go through some vital processes that help preserve the terpenes and cannabinoids, responsible for the flavors, aromas, and effects found in cannabis flowers while at the same time eliminating the harsh taste caused by chlorophyll.
This means that chopping down your plant is not the last step of cannabis cultivation. After harvesting your beautiful plants you’ll still have to trim, dry, and cure your harvest as these processes are extremely important not only to preserve the flavors and aromas but also to stop moisture loss and keep your cannabis flowers fresh.
Trimming Your Orange Sherbet Cannabis Harvest
Trimming cannabis flowers refers to the practice of removing the small sugar leaves (and big fan leaves) from the cannabis plant and buds, and it’s one of the most important post-harvest practices as this will not only give you harvest a better appearance but also prevent your flowers from getting mold and improving the overall experience when consuming your harvest. Trimming can be done in two different ways:
- Trimming cannabis plants before drying (known as wet trimming)
- Trimming cannabis plants after drying (known as dry trimming)
Wet Trimming Orange Sherbet Cannabis
As mentioned above, wet trimming consists of removing the big fan leaves and small sugar leaves before drying your cannabis harvest. This method is not recommended as it can cause your harvest to overdry, which can affect the flavor and high negatively.
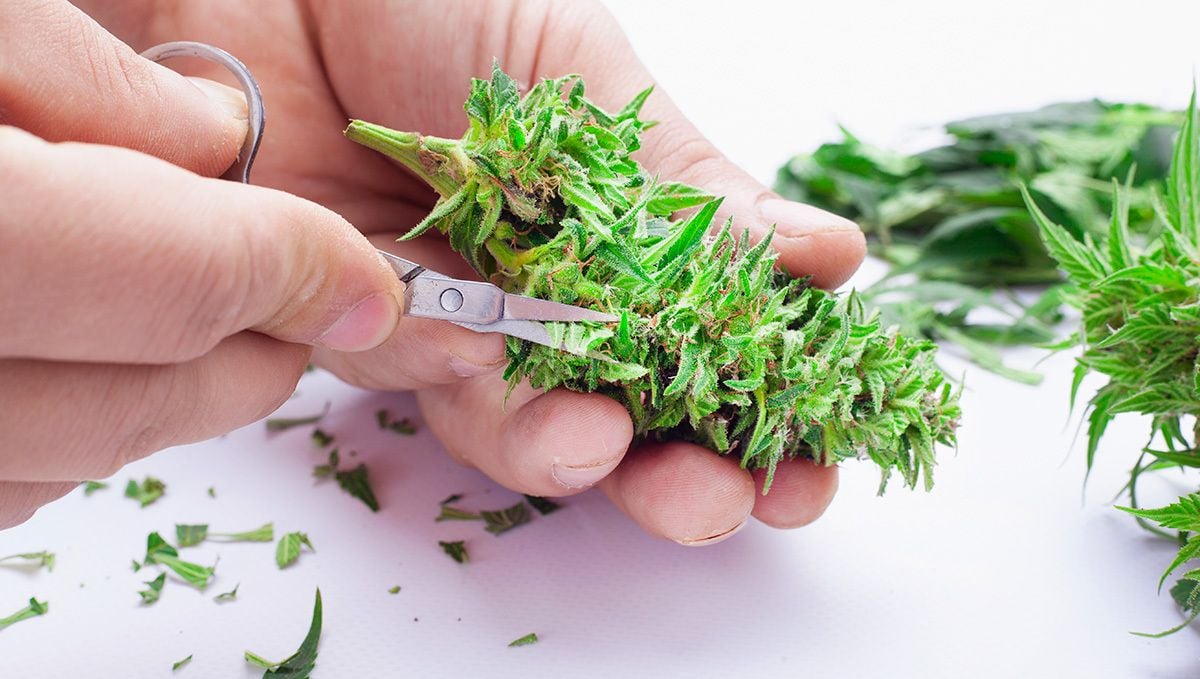
But, if you’re dealing with higher humidities in your drying room, it may be better to wet trim because cannabis leaves will release moisture while drying which can result in mold.
Wet Trimming: Pros
- Helps prevent moldy flowers in rooms with high humidity;
- Your harvest will dry faster;
- Dry more flowers in the same space with the help of drying racks.
Wet Trimming: Cons
- It’s a messier process because the leaves are still fresh;
- Cannabis flowers can dry too fast, resulting in the loss of terpenes and cannabinoids.
Dry Trimming Orange Sherbet Cannabis
As you may imagine by now, dry trimming consists of removing leaves from the cannabis plant and cannabis flowers after drying. This is the method used by most growers and even commercial growers as it can help keep proper humidity levels in places with lower humidities and result in better-tasting weed as it allows your harvest to dry slower.
Dry Trimming: Pros
- Helps you maintain the right humidity levels in places with low humidity;
- Allows your harvest to dry slower, resulting in better tasting and smelling cannabis.
Dry Trimming: Cons
- Cannabis leaves release moisture which can cause flowers to get mold;
- Leaves are brittle after drying which can make it harder to remove them.
Drying Rooms for Cannabis
The ideal drying room for cannabis should be completely dark, with the relative humidity levels ranging from 55 to 65% and temperatures between 15 to 21 °C. Depending on where you live, it may be difficult to maintain the right drying conditions so get a hygrometer to know exactly the temperature and humidity levels in your drying room and make the adjustments needed, if necessary.
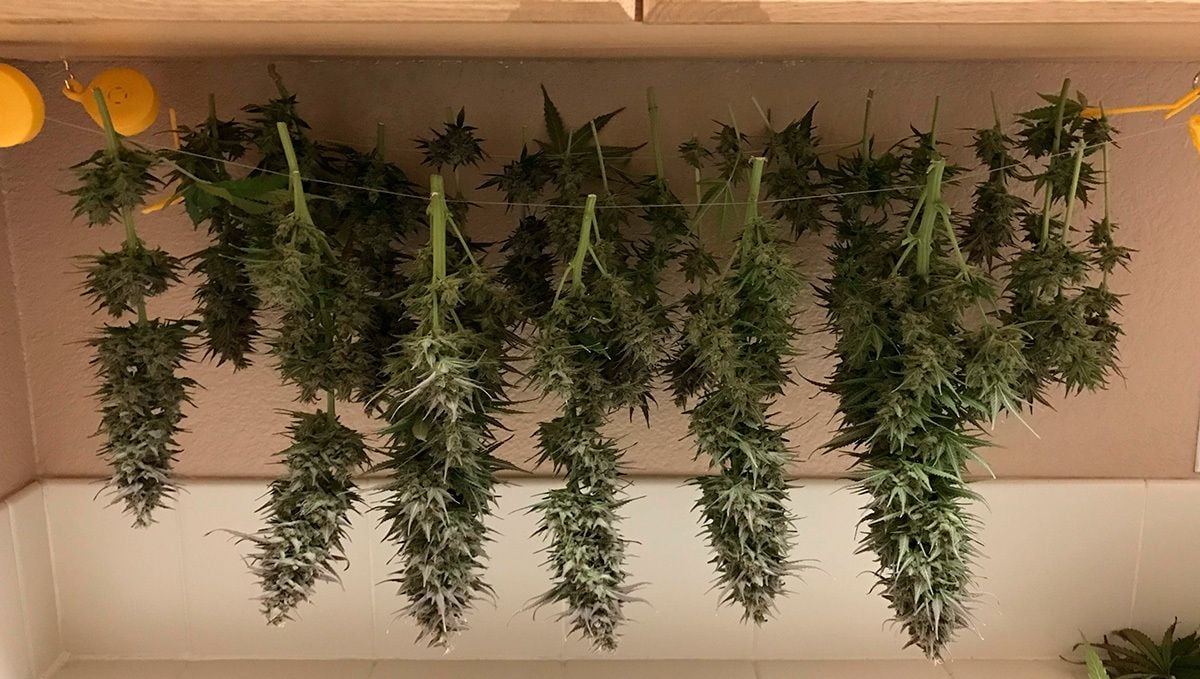
If you need to keep the right conditions to dry your cannabis harvest, you’ll probably need an Air conditioner, a humidifier and dehumidifier, and possibly a small oscillating fan. Now, you can still get good weed without these pieces of equipment but if you’re looking to get the best weed possible, it’s highly recommended to get them as you want to avoid temperature and humidity fluctuations. Also, keep in mind that sunlight or strong light will degrade the cannabinoids and terpenes found in the trichomes so cover all light sources. You can open the door to check on your weed but avoid prolonged exposure.
How to Dry Orange Sherbet Cannabis
After you’ve decided between dry trimming or wet trimming, it’s time to dry your cannabis. All you have to do is hang the whole plant upside down or place the individual cut buds in the drying racks.
Hang Dry Cannabis Buds
Hanging your cannabis plants upside down is extremely easy but takes more space than drying in drying racks. On the other hand, it saves you time as you don’t need to cut each bud or branch individually. With this method, cannabis flowers can take anywhere from one to two weeks because there is more green material to dry.
Drying Racks for Cannabis Buds
If you decide to wet trim, it’s essential to have a flat surface (or drying racks) to place your harvest. Drying racks are circular with a mesh that improves airflow but due to the buds being cut individually, it’s essential to keep an eye on them to prevent them from overdrying as there’s less plant material. With this method, you can expect your harvest to dry anywhere from four to seven days.
Curing Orange Sherbet Cannabis Flowers
After the whole drying process is over, it’s time to cure your weed. If you opted for dry trimming, now would be the time to trim the buds. So after your weed is properly trimmed and cured, make sure to grab glass airtight jars and start curing. Remember to use airtight jars as they will not only prevent moisture loss but also help preserve the flavors and smell. Keep in mind that the curing process can take anywhere from one to eight months (depending on the specific strain) and in order to get your weed cured correctly, you will need to keep the humidity levels in the curing jar between 55 to 65%.
This process consists of drawing moisture from the center of the cannabis flower toward the outside, this is why it’s extremely important to maintain the right humidity levels as failing to do so can cause mold. Remember, properly cured weed can last up to 2 years without losing potency! This means that curing your cannabis is vital as it helps finish off the flowers by removing chlorophyll (which gets rid of the harshness of weed) while improving the aroma and flavors.
How to Cure Orange Sherbet Cannabis Flowers
When curing your cannabis flowers, you should do it in a completely dark room that’s not too humid and with a stable temperature. In order to cure weed properly, you will need:
- Airtight glass jars;
- Small hygrometer for each curing jar.
So start by placing your cannabis flowers in the glass curing jar, make sure to stay away from plastic jars as they can alter the taste. So go ahead and place the weed in the jars without compacting them and seal the jar. Several days into the curing process you’ll notice how the flowers are softer, this is the moisture coming out from the cannabis flowers. If the buds are too dry, they’re overdried so place the hygrometer in the curing jar and make sure it’s between 55 to 65%.
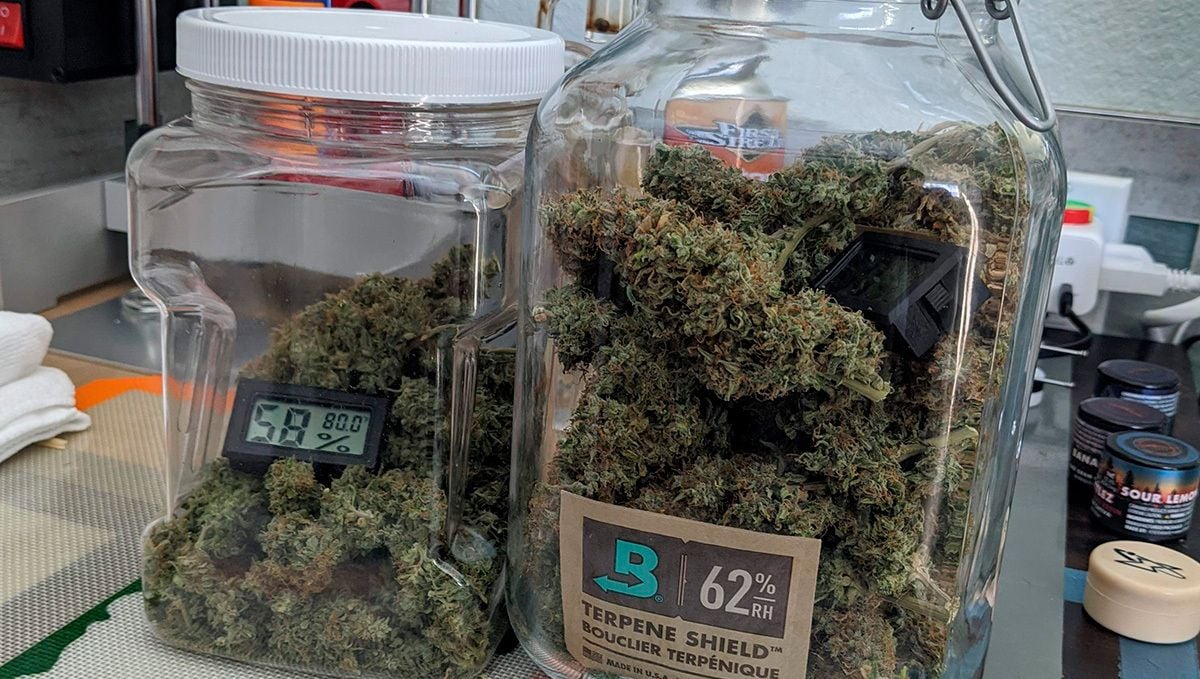
And if the flowers are too dry, grab a humidity pack and rehydrate your flowers. If the flowers are too wet or soft, take the lid off for a couple of hours to remove the moisture and exchange the air inside the jars. The process of removing the lid is called “burping”.
Burping the Curing Jars
For the initial weeks of the curing process, you will have to burp (or open the jars) one or two times a day for approximately 30 minutes or more. As mentioned, burping is used to release the excess moisture and replenish fresh air in the curing jar. After burping the jars daily during the first week, you have to continue burping the curing jars but only once every two to three days. And after another week of burping, your weed should be properly cured and ready for consumption although this depends from strain to strain. If you’re not happy with the result yet, continue curing and burping your flowers until you’re happy with the quality.
Remember that you should smell your weed daily in order to identify mold growth in case it happens. If you happen to smell your curing jars and smell ammonia, it means the flowers are not dry enough and will probably get moldy soon so burp your jars for an entire day and then continue with the curing process. After properly trimming, drying, and curing your cannabis harvest, you can store your weed for up to 2 years or even more so make sure to store the curing jars in a cool place as temperatures ranging from 25 - 30 °C can cause mold!
Top Tips for Storing Cannabis Flowers
Always keep in mind that excessive heat can affect cannabinoids and terpenes negatively so make sure to follow these tips to keep your weed stash at all times:
- Store the curing jars in a cool, dark place away from direct sunlight;
- Always use glass jars and stay away from plastic or wooden jars;
- Use boveda packs and hygrometers to help you keep the right humidity levels and keep your weed fresh.
11. The Outcome
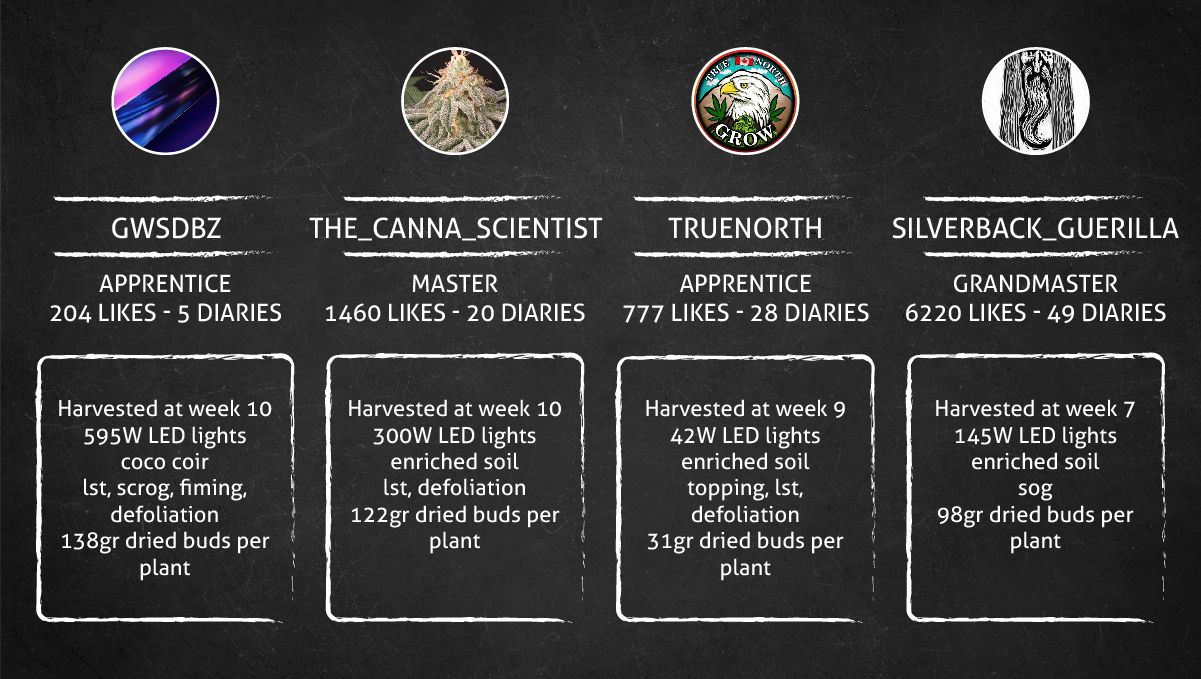
Orange Sherbet Auto Yield
Please take with a grain of salt some numbers in this table. Since grows B, C, and D were large multi-strain operations, we had to take an educated guess for:
- the surface area occupied specifically by Orange Sherbet Autos,
- the wattage apportioned to them,
- the gram-per-watt value.
| Grower | Medium | Weeks | Grow Room | Yield/Plant | Watts Used | g/W |
|---|---|---|---|---|---|---|
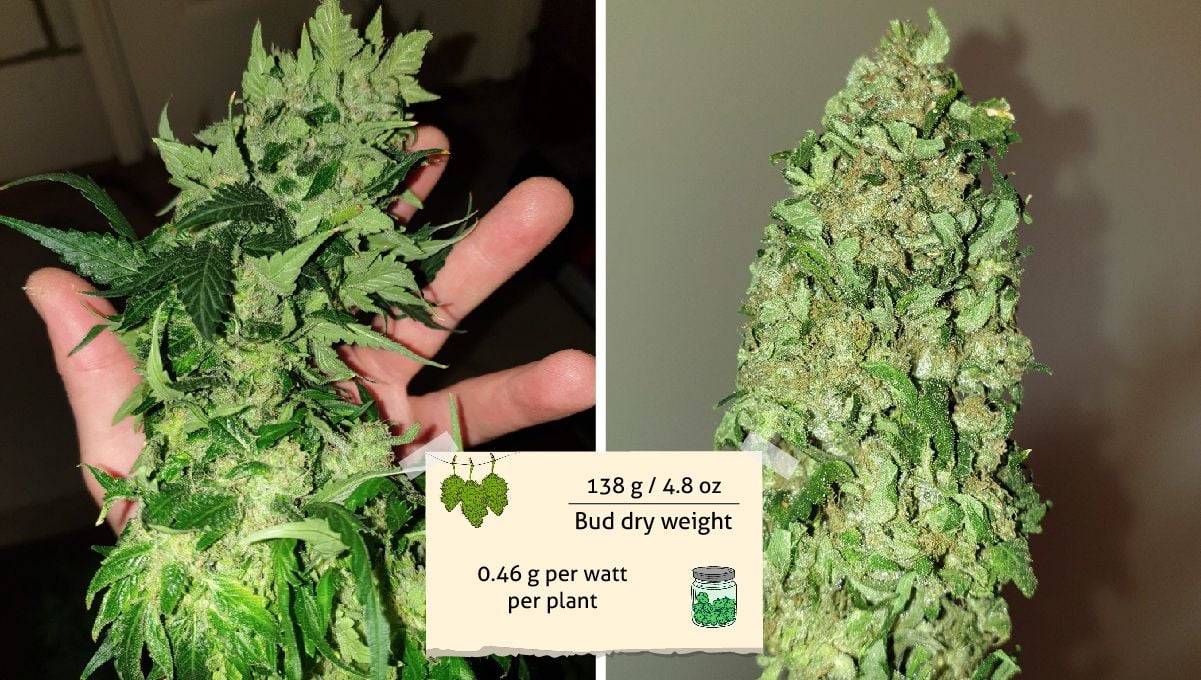
| A | Coco | 10 | 0.80 m2 (3'x3') | 138g (4.88oz) | 595 | 0.46 |
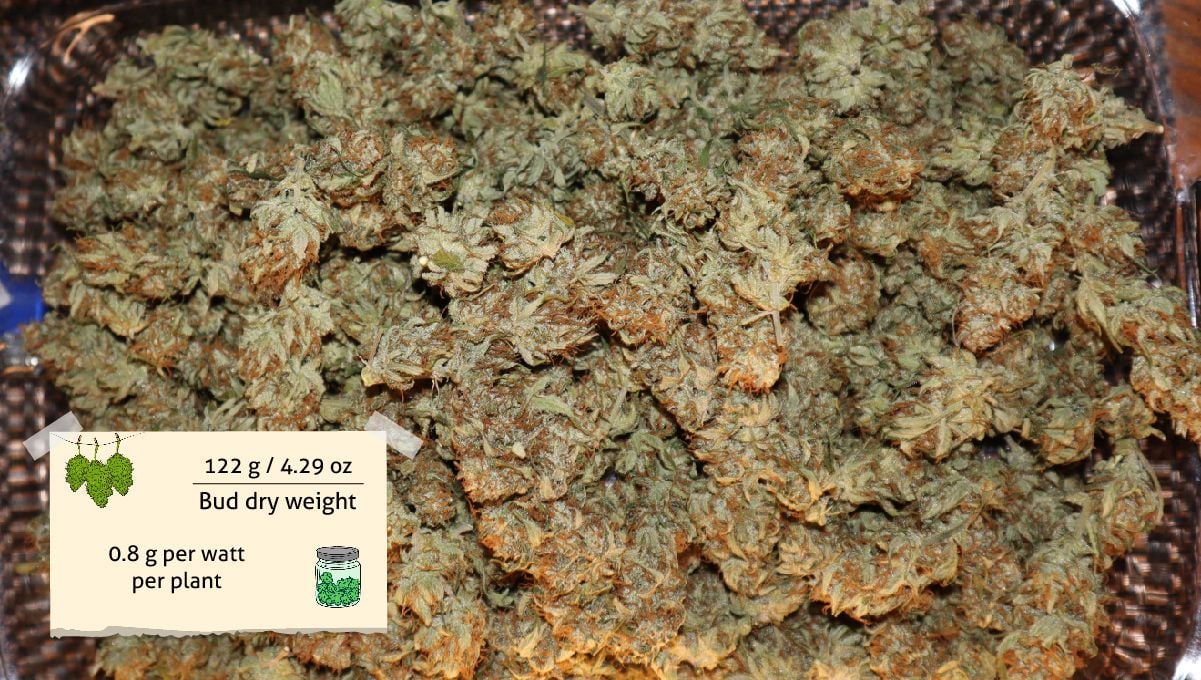
| B | Soil | 10 | 0.72 m2 (2'x4') | 122g (4.3oz) | 300 | 0.81 |
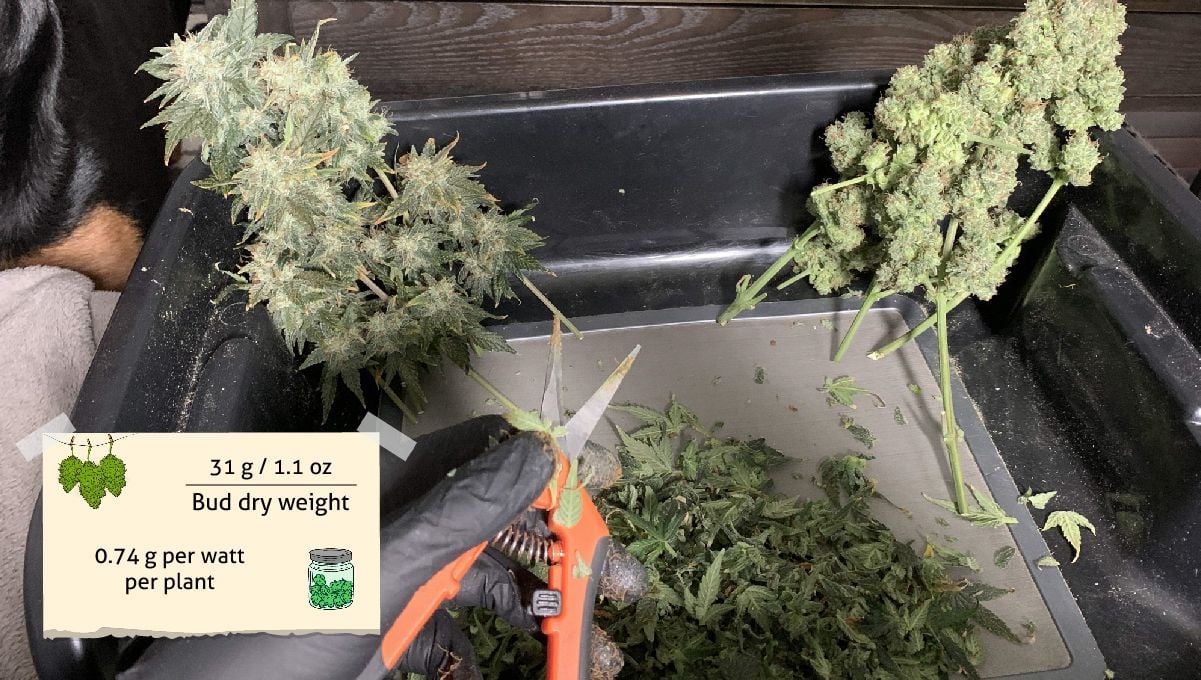
| C | Soil | 9 | 0.09 m2 (1'x1') | 31g (1.09oz) | 42 | 0.74 |
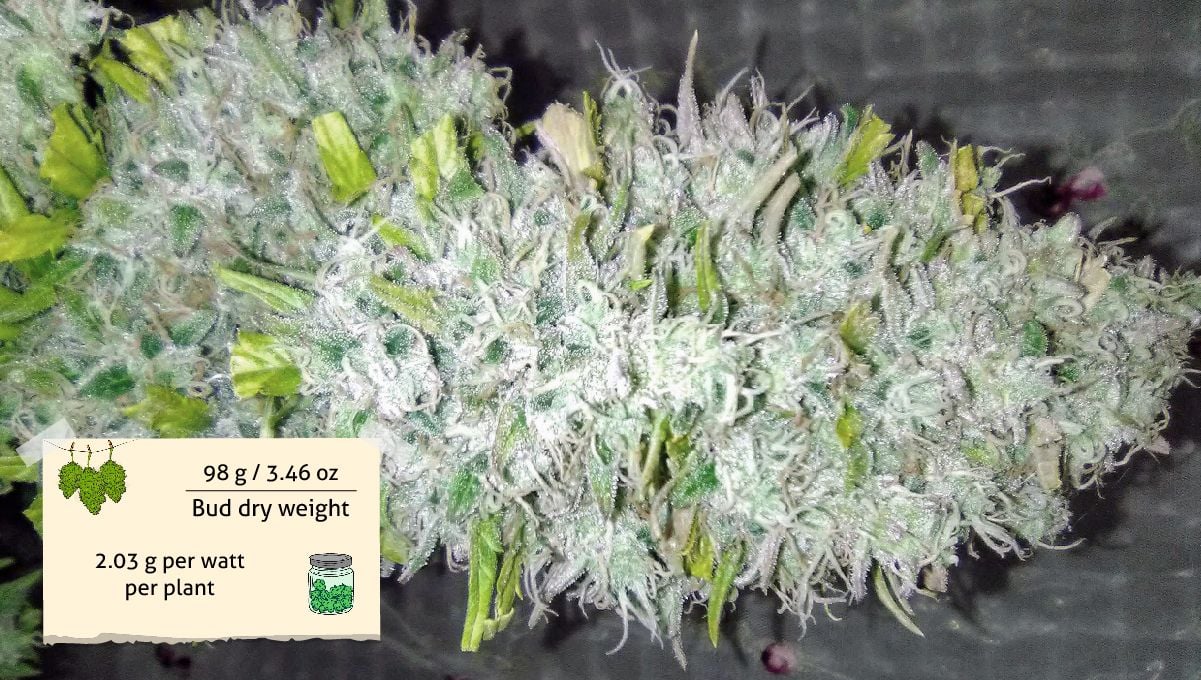
| D | Soil | 10 | 0.27 m2 (1'x3') | 98g (3.46oz) | 145 | 2.03 |
However, the absolute figures, such as yields and duration of grow cycles, are unquestionable and very very impressive.
GWSD82’s yield of 273g (9.75oz) from 2 plants was way beyond what he expected from his first attempt. Orange Sherbet Auto proved a very resilient variety, with great tolerance to high temperatures and a tendency to forgive rookie mistakes.
The_canna_scientist’s haul was just as impressive — 244g (8.59oz) from 2 plants. These were all-natural organically grown buds, and they fully deserved the cure that they got — in CVAULTs with 62% Boveda packs.
CVAULTs are cutting-edge storage containers equipped with a two-way humidity control. They are great for curing and storing your flower, but can also revive old and neglected buds. Boveda packs are a more familiar product which people use to keep humidity at the exact set value, in this case, 62% RH.
TrueNorth found no fault with his 31g (1.09oz) from one small and superfast plant. He loved her compact structure and tight dense nugs and only regretted not topping her. The grower thought that that would have turned her into a beast.
Silverback_Guerilla’s three girls yielded him 294g (10.37oz). One of them was smaller and shorter than the two, but—as so often happens—was better tasting. All three were incredibly resinous compared even to other FastBuds’ strains, and the buds were so huge and had such a dense texture that they took more than a week to dry.
Orange Sherbet Auto Smoke Report
Naturally, everyone noted an overwhelming smell of sweet oranges in the foreground, with subtler notes of other aromas.
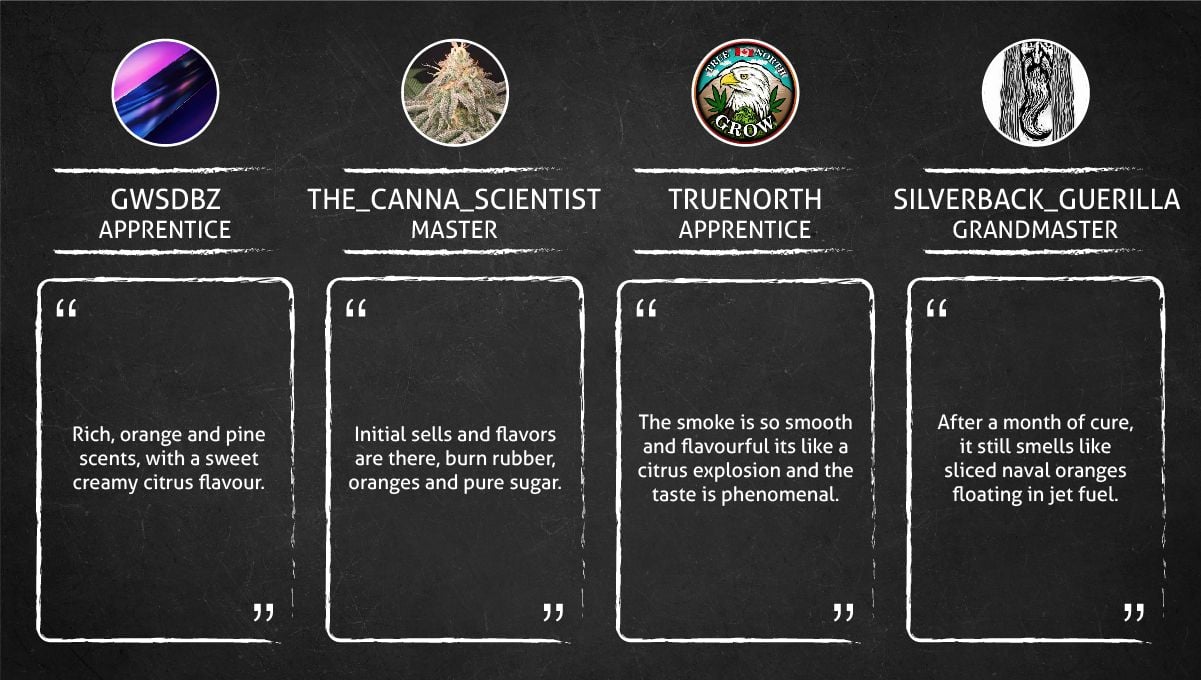
For GWSD82, these additional smells were reminiscent of pine and old-school weed.
The_canna_scientist compared them to burn rubber and hoped they would cure out. Silverback_Guerilla’s buds had an unmistakable undercurrent of mangos and jet fuel. The smoke was described as smooth and creamy, with an initial citrsy explosion followed by sweetness on the exhale. An all-round crowd pleaser.
The effect packed a punch, and even for GWSD82—who made sure to harvest his buds when they had a lot of amber trichomes—the high was very heady. It created only a slight body buzz, perfect to chill any time of day, but never couch locking. And as for TrueNorth, he preferred Orange Sherbet Auto with morning coffee.
12. Orange Sherbet Auto FAQs
Well then, there you have our full, unabridged grow guide for Orange Sherbert Auto. Without a doubt, one of the most comprehensive grow guides not just here at Fast Buds, but anywhere on the internet! A whopping 9000 odd words on everything there is to know about how to succeed with growing this unbelievably gorgeous strain.
But, no matter how much info we cram into these guides, there are always some lingering questions that we hear over and over again. This isn't a complaint, not whatsoever! We love fielding extra questions, and in a field as dynamic as cannabis cultivation there's never such a thing as too much info. So, with that in mind, let's take a look at the most common questions our growers have about Orange Sherbert Auto:
How Long, On Average, Does It Take For Orange Sherbet Auto to Go From Seed to Being Ready for Harvest?
This question is the most asked question, not just regarding Orange Sherbert Auto, but about every single one of our cultivars. And it's also one of the hardest to give a satisfactory answer to, as there are just so many variables that can affect how long a crop run takes.
Cultivation Style
The style of cultivation that you choose has a big effect on the speed of the grow, as does the decision to grow indoors or out. When growing indoors, we have a bunch more control over not just the environmental conditions, but also the light spectrum that the crop is grown under, and how many hours of light the crop receives each day. If you are able to provide the most ideal growing conditions possible, then the speed of the seed to harvest time can be reduced when compared to outdoor crops. We are talking about:
- The perfect temperature range - 21 to 25 degrees Celcius.
- The perfect humidity range - this changes as the growth progresses, starting at around 65 to 70% for seedlings, then dropping down to 55 to 60% during vegetative growth, and finally closer to 45 to 55% for the flowering period.
- A top-quality LED panel, with a full light spectrum that can be tuned for the stage of growth the crop is in.
- 18 hours of light per day for the entire run.
- Proper air exchange in and out of the growing area and sufficient canopy airflow.
On the flip side, outdoor crop runs are often filled with uncertainty, as we don't always have complete control over the conditions that our crops are exposed to. The great thing about outdoor grows is the sheer scale of yields you can achieve, thanks to the power of the sun, but you also need to be prepared for the fact that conditions may not always be ideal. That being said, with a bit of preparation you can create an outdoor grow set-up that performs at the same level as an indoor one.
The Substrate Or Growing Medium
If speed is your number one priority, then there really is no substitute for hydroponics. Hydro comes in a wide variety of forms, from simple wick-based systems to more complex DWC (deep water culture) and top-fed drip irrigation setups. The main benefit of hydro is that it not only offers a much higher oxygenation level than soils, but it always allows you to have a much higher degree of control over the nutrient schedule leading to faster growth and bigger yields. Soil systems are great for beginners and veterans alike, as they are generally much easier to manage than hydro.
Soils come in many forms, from single-component mediums l to more complex multi-part blends tailored specifically for cannabis cultivation. We always recommend either building your own super soil or grabbing a bag or two of a cannabis-specific blend - unless you are lucky enough to live in a super fertile area with amazing soil. And even then, it is suggested that you add a few basic amendments to the soil like perlite and coco-coir to help with drainage and oxygenation. The big benefits of soil is that they tend to be much more forgiving when it comes to mistakes, is much less prone to nutrient and pH issues, and the fact that organically grown weed offers a far superior terpene profile over hydroponically grown buds. That's not to say that hydro weed isn't delicious, just that organic stuff takes the win for flavor and aroma.
The Nutrient Schedule
Getting the nutrient schedule dialed in early on, and ensuring that you are using the right nutrients for each stage of growth, is essential to achieving fast and reliable results. For hydro grows this means that you need to keep a close eye on the pH and EC levels of your reservoir, as well as know what nutrients are best for each stage of the lifecycle. Autos generally need a lighter feed than photoperiodic strains, but this is something that you kind of need to learn hands-on. There is no substitute for experience, but what we usually suggest is starting out with around a quarter dose of what the bottle recommends and slowly increasing from there as the plant or crop develops.
For soil grows, you generally want to focus more on organic feedings rather than synthetic ones. Organic feeds like bat guano and earthworm castings are great for early growth and adding essential micronutrients to the mix. However, as the plant or crop enters the flowering period, it is usually best to add a flower booster that is tailored specifically for the flowering stage. Again, there is no substitute for experience, and as you become more experienced and comfortable with cannabis cultivation you will find that you will be able to dial in the perfect nutrient schedule for each strain and grow.
The Light
The light is perhaps the most important part of any cannabis cultivation setup, as it is the thing that really makes the magic happen. Outdoor grows are a bit more forgiving when it comes to the type of light that you use, as the sun is the ultimate source for all photosynthesis. However, if you want to maximize your yields and speed up the process, then you will want to go with a full spectrum LED light and grow indoors. LEDs offer the best combination of power and efficiency, so they are usually the go-to choice for indoor cultivation.
No matter what type of light you choose, make sure to research it thoroughly and understand the different sections of the spectrum that work best for each stage of the lifecycle.
Phenotype Variation
While we do our absolute best to ensure that Fast Buds' genetics are as stable as possible, there is a certain amount of variation within a batch of seeds that is just purely inherent with cannabis (and all living things). Unless you are growing from clones, this is something that you simply cannot avoid. When it comes time to harvest, you may find that some of your plants have grown differently than others - this is simply a result of the phenotypical variation.
Don't be discouraged if you don't get an exact clone when it comes to flower production and overall structure - this just means that you got some unique genetic traits in your crop and that you can probably expect something special when it comes time to smoke! So, to finally answer the question at hand - how long does Orange Sherbert Auto take to go from seed to harvest - it's usually between 8 to 10 weeks, but that all depend on the above factors.
What is The Expected Yield from Orange Sherbet Auto?
Again, there are a bunch of factors that go into the yield capability of a particular plant or crop, but just like with the speed, if you want to get the best yield possible then you should be growing indoors with a hydroponic system. Again, that's not to say that you cant produce amazing amounts of the stickiest of the icky from other growing styles, just that you give yourself the best chance at big yields with hydro.
Orange Sherbert Auto is one the highest yielding cultivars in our entire catalog, and can offer a pretty wild 500 – 650 gr/m2 with indoor grows, or up to 11 ounces a plant in perfect outdoor conditions.
What are the things you should consider when trying to max out that yield?
We have already mentioned how hydroponics can boost the yield size, but there are a few other ways to get the best bang for your buck (and all the effort of growing). Low-stress plant training can make a huge difference to the final weight. Autos usually don't respond particularly well to high-stress training techniques like topping and super cropping, but you can still use low-stress training to give your plants more structure and shape. This will help you maximize the number of bud sites that you get, which in turn elevates the potential yield size.
The two most commonly used techniques for autos are the tie-down method and ScrOGging. The tie-down method is pretty self-explanatory, but let's run through it quickly. Basically, you take some soft twine or string and tie down the main stem and the branches to create a horizontally planned canopy of bud sites. This technique is great if you want to achieve a flat canopy, as it helps your plants spread out their buds in an even way so that they all receive equal amounts of light. It also allows for much-improved canopy airflow and tricks the plant into spreading the nutrients and growth hormones more evenly throughout all of the bud sites, instead of it focusing the majority of its effort on the main cola.
ScrOGging (Screen Of Green) works in a very similar way to the tie-down method but uses a net or screen to train the plant rather than string or twine. This is a great method if you want to give your plants the best chance at growing horizontally, as the net makes it almost impossible for the canopy to be anything other than even. Another tip is to look into defoliation and combine it with your plant training. This involves removing some of the fan leaves that are blocking light from reaching your bud sites and can often give a little extra energy to the parts of the plant that you want to grow the most.
Is Orange Sherbet a Good Strain to Grow as a Total Beginner?
Honestly. there are a few better strains on the entire market that are better for beginner growers. Orange Sherbet Auto is a resilient, easy-to-grow strain that produces ridiculous amounts of the sticky stuff, and a pretty crazy amount of budding sites - when treated correctly, anyway. It's a great strain for those who don't have loads of time on their hands, as you can get your buds in 8 to 10 weeks, and there's very little maintenance to do during the entire process. It's also a great strain because it almost guarantees results - even for beginners. With the right setup (and a bit of luck), you’ll be able to reap in an impressive harvest filled with fragrant, gooey nuggets that will have you coming back for more.
One of the most important things for new growers (not all, but most) is to have success with the first crop run. If you struggle to produce the types of results that you have been dreaming of, the chances of you not only enjoying the experience but also the chances of you trying again are greatly diminished. So, if you're a total beginner and are looking for an easy strain to grow with a high chance of success, Orange Sherbet Auto is definitely one to consider.
Is This a Sativa or Indica Dominant Strain?
Orange Sherbet Auto is a pretty evenly balanced strain but does sit in the Sativa dominant realm with a split of Sativa 70%/Indica 30% making up her genetics. But, as cannabis legality becomes a reality in more and more places around the world, so does the opportunity to study the plant. And one of the more recent shifts in the thinking is that the traditional ideas about Sativa and Indica may actually be a little outdated. What we are coming to understand is that the effect a particular strain offers may have more to do with the entire cannabinoid and terpene makeup of the plant, and not so much whether she is Indica or Sativa dominant.
In other words, she may lean more toward Sativa but as long as all of the compounds work together in harmony, you could be getting a nice hybridized effect that is neither Sativa or Indica dominant. The bottom line - don’t get too hung up on trying to determine whether a strain is Sativa or Indica dominant as it may not be quite as important as we once thought. All that matters is that you find the right strain for you and that it is grown correctly.
What Are the Effects (psychoactively) that Orange Sherbet Auto Offers?
While we have just gone over how Sativa and Indica aren't the be-all and end-all when it comes to effect, but Orange Sherbet Auto does still fit the Sativa dominant stereotype, to a degree anyway. So, expect an energetic effect that will have you feeling energized and creative. It's perfect for those days when you need to get things done, but need a little bit of an extra boost in order to do so.
She starts out very cerebral, but as the high settles you'll feel that body stone slowly but surely creep in. You won't be couch-locked and you won't get overly lazy, making this strain an ideal daytime smoke. And, as an added bonus, Orange Sherbet is perfect for socializing. Roll one of these up with friends while out at the beach or on a nice day hike and you are sure of a great time!
How About Medicinal Benefits?
Orange Sherbet Auto is a great strain for those who suffer from stress and depression. The uplifting effects of this strain can help to alleviate symptoms of depression and will help to reduce anxiety levels, especially in social scenarios - but, be cautious. This strain packs a huge THC punch, so you definitely do not want to overdo it if you are looking for stress, anxiety, or depression relief. It is best to start with a very light dosage and slowly work your way up until you find the sweet spot.
It can also be helpful for those suffering from chronic pain, as the body stone can help to alleviate pain, while still giving you the energy and motivation that you need. Although the CBD levels are minimal, this strain is still great at alleviating inflammation and nausea. And it is perfect for those looking to increase hunger levels, as the munchies that are brought on by Orange Sherbet Auto are a little hard to contain.
What Sized Tent Should be Used to Grow This Strain?
Well, since she's a tall-growing Sativa dominant strain, we usually recommend growing her in a slightly larger tent or having a plant or two fewer than what you would usually grow in a tent. A 2 x 4 or 2.5 x 5-foot tent should be more than enough to accommodate the size of Orange Sherbet Auto. This will give her enough room to stretch out and reach for the sky. But... If you use some basic plant training techniques like the tie-down method or a ScrOG set up then you can honestly grow this strain in any sized space. She responds really well to pruning and training and you can get a great yield out of her no matter the space.
Just remember, especially if you are new to the game, that weed plants like to have space to breathe. So, if you do decide to go with a smaller space for your Orange Sherbet Auto, make sure that you give her plenty of space, and don't crowd the space. You may think that you can fit 6 plants into that little tent of yours, but once the plants get into the last few weeks you will be regretting the decision to overcrowd the space. Not only will it be difficult to work on the crop, but you might also actually end up with a smaller yield.
Is Orange Sherbet a Good Strain for Hash and Extract Makers?
Hell yeah it is. the ridiculous amount of resin that this strain produces is perfect for any hash or extract maker. She will stick to your scissors and trimming shears like glue and the resin production is consistently heavy and potent. If you are looking for a strain to extract, then Orange Sherbet Auto is definitely the one. If you haven't tried to make homemade rosin hash before, then now is your chance! the result is simply divine.
Home-made Rosin Hash? Never heard of it...
Well then, let's chat. Home-made rosin hash is about as easy as it gets. And you don’t even need any fancy equipment to do it - all you need is some parchment paper, your Orange Sherbet Auto buds, and a hair straightener. This method is great for creating some really pure, potent, and flavourful hash in a hurry. It's a full spectrum, solvent-free option - which makes it perfect for your first go at making an extract.
All you have to do is take your buds and place them on a piece of parchment paper, fold the paper over so that the buds are inside, and press down with your hair straightener for around 10 seconds. Then open your parchment paper and you will have a nice little pile of sticky rosin hash! This method is great for those with minimal experience, and it yields some really great results. Give it a go and see what you think!
Where Can I Grab Some Orange Sherbet Auto Seeds From?
Beware of imitations, as there are a bunch floating around these days. As long as you grab them from our official website, then you can be sure that they are authentic and will produce the same world-renowned Orange Sherbet Auto strain. If you want to get some Orange Sherbet Auto Seeds, then head over to this page and grab yourself a pack. Take advantage of our special offers and discounts and start your growing journey with the amazing Orange Sherbet Auto.
13. In Conclusion
The first impression we got from studying these four grows is how uneventful (bordering on boring) they were. No deficiencies, no other issues of any kind. For experienced gardeners, this means that for once you can sit back and relish the sight of a perfectly healthy garden. For first-time gardeners, it means less anxiety, because Orange Sherbet Auto is tolerant of rookie mistakes. So relax: everything will turn out just fine.
The second thing that grabs your attention is the speed. Many auto breeders promise their creations to finish in 60-70 days, but real-life grows tend to be a bit longer. Not with Orange Sherbet Auto. If you need the fastest sativa-dominant autoflower, this one is your best bet. And at the end of this incredibly fast-paced race to the finish, you get the most delicious prize — fruity, sugary, orange-smelling nuggets with an energizing upbeat high of the utmost potency. So Orange Sherbet Auto is definitely worthy of your attention. Happy growing, everyone!
External References
- Terpenes in Cannabis sativa – From plant genome to humans, Judith K.Booth, JörgBohlmann, Plant Science, Volume 284, July 2019
- Secondary metabolism in Cannabis, Rob Verpoorte, Phytochemistry Reviews, October 2008
- An Update on Plant Photobiology and Implications for Cannabis Production, Frontiers in Plant Science, 2019
- Chemical and Morphological Phenotypes in Breeding of Cannabis sativa L., In book: Cannabis sativa L. - Botany and Biotechnology, May 2017


Comments