Drainage for Cannabis Plants: Why is it Important and How To Improve it
- 1. What to put in the bottom of indoor planter for drainage
- 2. Perfect mediums for cannabis growing
- 2. a. Natural topsoil vs soilless mixes
- 2. b. Coco coir
- 3. Choosing a grow pot for better drainage
- 4. Cannabis soil conditioners/amendments
- 4. a. Perlite
- 4. b. Vermiculite
- 4. c. Other cannabis soil conditioners
- 5. How to test drainage
- 6. Issues that can be caused by ineffective drainage
- 6. a. Root rot
- 7. Drainage for cannabis plants is a fairly easy concept
It is a rare kind of plant that likes its roots to sit in stagnant water. Shoreline plants make an exception, but cannabis is definitely not one of them. It’s not that cannabis seeds don’t like water. On the contrary: cannabis grows very fast and thus is quite a heavy drinker. But its roots also need a lot of oxygen, and that’s the reason drainage for cannabis plants is so important. To improve the drainage for cannabis plants in your indoor garden, you should start with a right growing medium, then choose a type of container that provides the optimal aeration, not forget about drainage holes, and finally, amend your medium with soil conditioners, such as coco coir, perlite, and vermiculite. But first, let’s briefly touch upon such a controversial subject as using a drainage layer for pots.
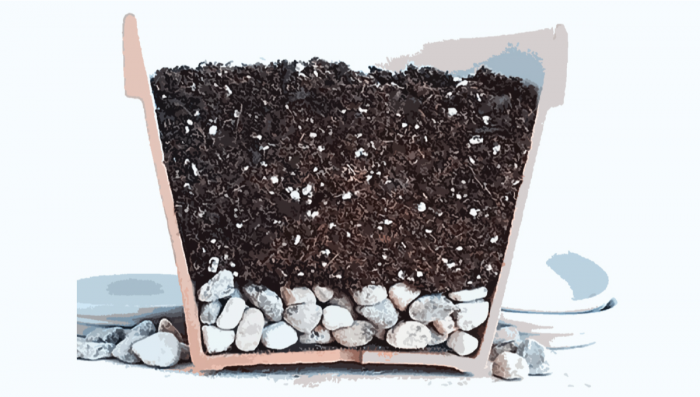
1. What to Put in the Bottom of Indoor Planter for Drainage
To this day, many horticulturalists have no doubt that putting terracotta shards, coarse sand, expanded clay pebbles, or something similar in the bottom of a planter is a good idea. They call it a drainage layer for pots, thinking that it can actually help remove the excess water from the medium. In fact, it doesn’t. Experiments have shown that the water drainage remains exactly the same — with such a layer or without it.

This seems to contradict common sense, but there is actually a very good explanation for this phenomenon. When you water your potted plant, gravity pulls the water down, and some of it will leak through the drainage holes. But not all. There is a force that works in the opposite direction to gravity, meaning upwards. It’s called capillary action, or wicking ability, and makes water climb up between the particles in the medium.
When gravity and capillary action have balanced each other out, the water level settles, and that’s the end of it. It doesn’t matter what sits just beneath the medium — the bottom of the pot or the ‘drainage layer’. The only thing that water retention of the medium depends on is the coarseness of the medium.

You can also think of it as aeration, meaning the presence of air pockets between medium particles. The coarser the medium, the less water it can hold, the better its drainage. And vice versa.And with this myth out of the way, let’s talk about what’s really important.
2. Perfect Mediums for Cannabis Growing
Since cannabis roots like to drink and breathe, the best growing methods are hydroponics and aeroponics — because they provide both water and oxygen at the same time. In hydroponic systems such as DWC (deep water culture), roots constantly float in a nutrient solution but it’s also constantly oxygenated with a water pump. In aeroponics, the situation is exactly reversed — roots are hanging in the air but get constantly misted with a nutrient solution.

With other growing mediums, such as soil or coco coir, you’ll have to take extra measures to ensure good drainage. Let’s start with soil.
Natural Topsoil vs Soilless Mixes
For an indoor grow, never use topsoil from your garden. Besides the risk of infestation with pathogens and pests, topsoil tends to be too compacted and to retain too much water. It’s because there is too much clay and silt in it. Your weed plants will simply suffocate in such a poorly drained medium. In theory, you can try and use some amendments to make topsoil airier, but it’s best to skip natural soil altogether and use a soilless mix. You can find those in any gardening center. They are sold in bags and look very much like soil, but, in fact, they consist mostly of peat moss. Soilless mixes have a lot of coarse particles and fibers which makes them much airier. Some contain amendments like perlite (see more below) which create even more air pockets and make the drainage even better.

Coco Coir
Coco coir is a mass of fibers made from coconuts. It’s one of the most efficient growing mediums for cannabis. Another great advantage over soil is that coco is reusable. However, coco in itself is a medium with rather poor drainage characteristics. To make it perfect for marijuana cultivation, you need to use a mix of coco coir and perlite.

If you look at ready-made mixes available in grow shops or browse through coco grows online, you’ll find that the coco-to-perlite ratio in those mixes is mostly 70/30.
| Example Brands of Coco/Perlite Mixes | ||
|---|---|---|
| Brand | Coco Coir | Perlite |
| Mother Earth | 70% | 30% |
| Platinum | 90% | 10% |
| Envelor | 70% | 30% |
| Terra Aquatica | 75% | 25% |
| Hydro Crunch | 70% | 30% |
| Mr. Stacky | 80% | 20% |
| Growdog | 70% | 30% |
However, with frequent fertigation, especially in automatic drip irrigation setups, you can raise this ratio to 50/50.

3. Choosing a Grow Pot for Better Drainage
You can further improve drainage for weed plants by choosing a proper planter. A plastic container may seem like a good idea to a novice gardener, but its walls are not permeable to air. You’ll get much better results with smart pots, or grow bags. Their sides are made from non-woven breathable material and thus provide the root structure with all the oxygen they need. The same can be said of Air-Pots®. You can find out more about different types of containers for growing cannabis in a separate post.
And whatever pot you end up choosing, don’t forget that the excess water should be able to drain freely. So, for plastic or terracotta containers, make drainage holes in the bottom. And, obviously, you’ll catch the overflow in drainage saucers. Don’t forget to empty them regularly. Your containers should never sit in stagnant water. You can also think of it as aeration, meaning the presence of air pockets between medium particles. The coarser the medium, the less water it can hold, the better its drainage. And vice versa.
The size of the pot is also important. Maybe not so much in terms of proper drainage, but very much so for establishing and keeping a perfect irrigation plan.
4. Cannabis Soil Conditioners/Amendments
If you don’t want to see your cannabis soil staying wet or not draining, make it as airy as possible. There are basically two types of amendments for cannabis soil aeration — perlite and vermiculite. They are not interchangeable, so we’ll talk in more detail about both.
Perlite
This is the most commonly used soil conditioner. It is a part of many store-bought soilless mixes, but cannabis usually requires a greater percentage of it than your regular house plants. So you’ll probably have to add more perlite to improve the drainage of the medium you’ve bought. 15 to 20 percent should be about right, but it’s not an exact science. The ratio can be as low as 10/90 and as high as 50/50. Just remember that with more perlite, you’ll have to water more often (which is not always convenient). With less perlite, water retention of the medium increases, and you can fertigate less frequently, but your marijuana plant may suffer from overwatering due to poor drainage.

So what is perlite exactly? It’s a coarse-grained, white, lightweight material with closed-cell pores. As such, it has the following features:
- can’t hold water inside its particles,
- doesn’t contain nutrients and can’t buffer them,
- is chemically inert and pH-neutral,
- prevents cannabis soil compaction.
As you can see from the list above, perlite basically just sits there and makes your medium airier, thus creating an ideal environment for the roots of your plants.

Vermiculite
Vermiculite is a completely different story. It’s also an expanded, very lightweight material, but its brownish flakes don’t have a closed-cell structure. So—unlike perlite—they do absorb water and nutrients.

The following features of vermiculite are the most important:
- it’s excellent at pH buffering,
- it contains K, Mg, and Ca, absorbs other nutrients from the solution, and then can slowly release them,
- has a high water-retention rate.
Despite its high water holding capacity, vermiculite can still be used as a drainage amendment because its particles are large and create a lot of air pockets on their surfaces.
Other Cannabis Soil Conditioners
There are several other amendments that can improve drainage for marijuana plants, but they aren’t as common as perlite and vermiculite in cannabis gardens. Let’s overview them briefly:
- Coarse sand (0.5–1 mm). A very fast-draining but heavy medium. Sand is best used in greenhouses and outdoors.
- Expanded clay pebbles. Most often used in hydroponic setups, growers use them to cover the surface of the pot but you can also dig them into the soil mix to create large air pockets. The only problem when using this type of product is that it makes it difficult to dig in the soil, although it’s not an issue if you don’t need to dig in the substrate. Remember that clay pebbles could contain rock dust so it’s recommended that you wash them in order to avoid contaminating your grow room.
- Pumice. This is an extremely porous naturally expanded volcanic rock expanded by gases in molten rock. Pumice can hold a lot of air in its foam-like structure that it even floats in water.
- Pea-gravel. These are pea-sized pebbles that are shaped naturally due to exposure to running water. It’s fairly similar to aquarium gravel although a bit bigger.
- Scoria. Scoria is similar to pumice as its volcanic rock expanded by molten rock gases but the pores are smaller than the pores in pumice, making it denser than pumice.

5. How to Test Drainage
Now that you know every soil amendment you can use to improve drainage, let’s learn how to test if it’s working. So once you’ve mixed perlite, pea-gravel, or any amendment of your preference, it’s ideal to test it and see if you need to add more or not. So follow these simple steps to determine if your substrate mix is draining properly:
Step 1
Grab one 1-liter pot and fill it with your amended substrate mix.
Step 2
Grab another 1-liter pot and fill it with the same substrate mix but WITHOUT the substrate amendments.
Step 3
Water each pot with 500 ml of plain water, remember to have a saucer under the pot to collect the drainage.
Step 4
Wait anywhere from 3 to 5 minutes, then collect the drainage water and compare the two.
As a guideline, your substrate mix should drain around half of the water (in this case 250 ml) after 3 to 5 minutes have passed. This means that if your substrate mix is draining less than 50% then you should mix more of the preferred amendment. If your substrate mix is draining more than 60-70% of the water, then it means you’ve added too much. So keep in mind that the more amendments you add, the more water should drain out.
6. Issues That Can Be Caused by Ineffective Drainage
Ok, so we've run through all the best ways to ensure that the pots that hold your cannabis plants have effective drainage, and how to set the pots up for just that. We have also discussed why drainage is so important - namely, for root oxygenation and potential issues that can arise due to stagnant water.
But it is worth mentioning the problems that may arise from ineffective drainage in a bit more in-depth and easy-to-understand terms, and how to fix them. The main cause of concern for pots that have ineffective drainage (and the plants that they hold) is the dreaded root rot.
Root Rot
Root rot. Sounds almost like something from a children's fairy tale, but trust us when we say it is anything but trivial. Root rot is a common issue found in cannabis cultivation, caused by the growth of fungi or bacteria within the root system. It occurs when the roots are either constantly exposed to water, or the moisture in the medium is too high and cannot be evaporated properly. Sound familiar? The first sign that you may be combating root rot is actually not one, easy to identify the problem.
Root rot can present as a range of other issues, such as yellowing leaves, leaf tip burn, relatively slow growth, and/or nutrient deficiencies which can cause a bit of confusion for novice and experienced growers alike. The best thing to do if you have noticed any of these issues is to check the roots of your plants. But how? Well, if you are running a hydroponic system then this should be relatively easy. One of the huge benefits of hydroponics (apart from the obvious boost in growth rates, yield size, and potency) is that the whole plant, roots included, is just so easy to inspect. Open up the root area and check each plant thoroughly to see if the roots look and/or smell a little... weird.
What are the telltale signs of root rot? Root rot will present itself in two ways, either as wet and slimy/mushy roots that easily fall apart when you look at them, or they will appear dry, brown, and stringy (although this second option is less common in general, and almost nonexistent in hydro setups due to the nature of the cultivation style.
Identifying and Treating Root Rot in Hydroponic Systems
If you have identified root rot in one of your hydro plants, there's a good chance it will be affecting every plant hooked up to the same nutrient solution res. Most hydro systems recirculate their nutrient solution, meaning the same water is reused and passed over the roots of each plant. The best thing to do here is to remove each plant from its individual pot or grow tray and prune out any obviously infected roots.
You will then need to replace all of the original nutrient solution with a fresh, sterile nutrient solution that has been pH-balanced and EC-tested. It is also a good idea to sanitize all of your equipment, especially the pumps and drippers (if you are running such a system) before reinstalling everything and replacing the plants. You should also consider the causes of the root rot, and how you can optimize and proof the system to reduce the chances of it recurring. Light leaks are a huge issue, so be sure to use a thick tank with decent seals, and use heavy-duty duct or electrical tape for all the plumbing joints.
Identifying and Treating Root Rot in Non-Hydroponic Systems
This can be a little trickier, as getting a good look at the roots in soil or coco-coir cultivation systems is much trickier. Lift the pots up, and if they feel much lighter than expected then you may have an issue. Dig a little around the edges of the pot and check for any mushy, dark-colored roots that look like they're just about to fall apart. If you do find any, then remove them and study the root profile more in-depth. If you find you do have root rot, it's time to act. First up, you are going to want to let the medium dry out thoroughly, then remove the entire root system and plant from the pot.
Try to carefully shake as much of the medium loose from the roots as possible, then hit it with a mixture of hydrogen peroxide and water, with a ratio of 3 parts water to 1 part peroxide. Once you have done this, wait for the roots to dry out completely before replanting in a fresh medium with plenty of drainages and a healthy dose of beneficial bacteria or mycorrhizal fungi added. You should also consider adjusting your watering habits, as too much moisture can easily lead to this kind of issue.
7. Drainage for Cannabis Plants is a Fairly Easy Concept
There is nothing difficult about the idea of soil drainage for cannabis. Let us repeat the key points here.
Cannabis plants need lots of water, but their roots also need lots of oxygen. So you should not only make drainage holes so that the excess water can run off, but also make sure your medium is constantly oxygenated. Better use special containers with breathable walls and prepare well-drained soil for pots by amending it with perlite or vermiculite or similar drainage material for potted plants. Do all this, and you’ll never run into any issues. Happy growing!
External References
- Effect of soil addition on physical properties of perlite based media and strawberry cv. Camarosa plant growth, Selda Ors, Omer Anapali, Scientific Research and Essays, November 2010
- Influence of Perlite in Peat- and Coir-based Media on Vegetative Growth and Mineral Nutrition of Highbush Blueberry, Patrick H. Kingston et al., HortScience, March 2020