Wedding Cheesecake Auto Cannabis Strain Week-by-Week Guide

- 1. Grow specifications
- 2. Grow set up
- 3. Germination and seedling stage| week 1
- 4. Early veg| week 2
- 5. Mid veg| weeks 3-4
- 6. Preflowering stage | week 5
- 7. Early flower| weeks 6-7
- 8. Mid flower (bulk phase)| weeks 8-9
- 9. Ripening and harvest | week 10 (and beyond)
- 10. How to properly trim, dry, and cure your cannabis harvest
- 10. a. Trimming your cannabis harvest
- 10. b. Wet trimming
- 10. c. Dry trimming
- 10. d. Cannabis drying rooms
- 10. e. How to dry cannabis flowers
- 10. f. Curing cannabis flowers
- 10. g. How to cure cannabis flowers
- 10. h. Burping the curing jars
- 10. i. Top tips for storing cannabis flowers
- 11. The outcome
- 11. a. Wedding cheesecake auto smoke report
- 12. In conclusion
Wedding Cheesecake Auto is one of the most popular autoflower strains in Fastbuds collection, and not only because she’s new, but also due to her incredibly intense and complex aromas and her powerfully relaxing yet motivating high that makes you calm, happy, and willing to get things done. But what about her timeline and what can you expect from her in terms of growing?
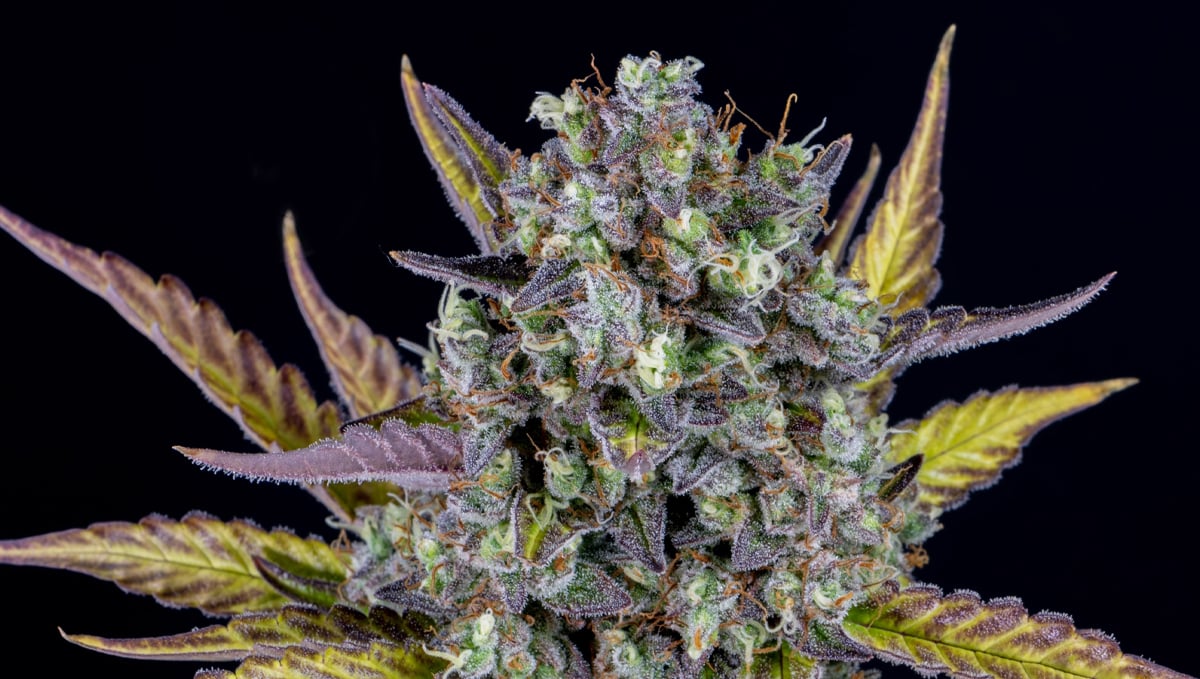
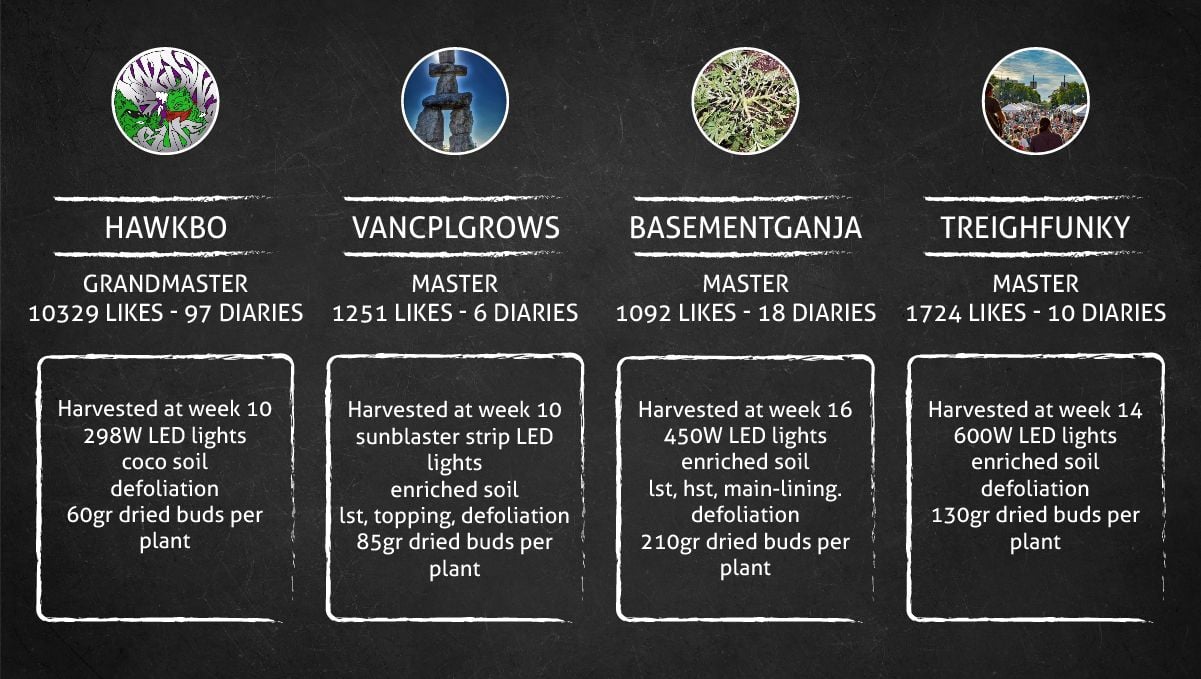
If you’re wondering how to best grow her and how each stage plays out, check out our week-by-week Wedding Cheesecake Auto review. We’ve compared 4 different grow journals, so that you can glean some useful tips and tricks about every phase and get the best possible yield and quality from your grow!
1. Grow Specifications
Wedding Cheesecake Auto grows into a medium-sized bush with many side branches—which stretch quite a bit during the early flowering stage—and one chunky main cola towering above the rest. This is a convenient feature if you plan to grow your seeds SOG-style.
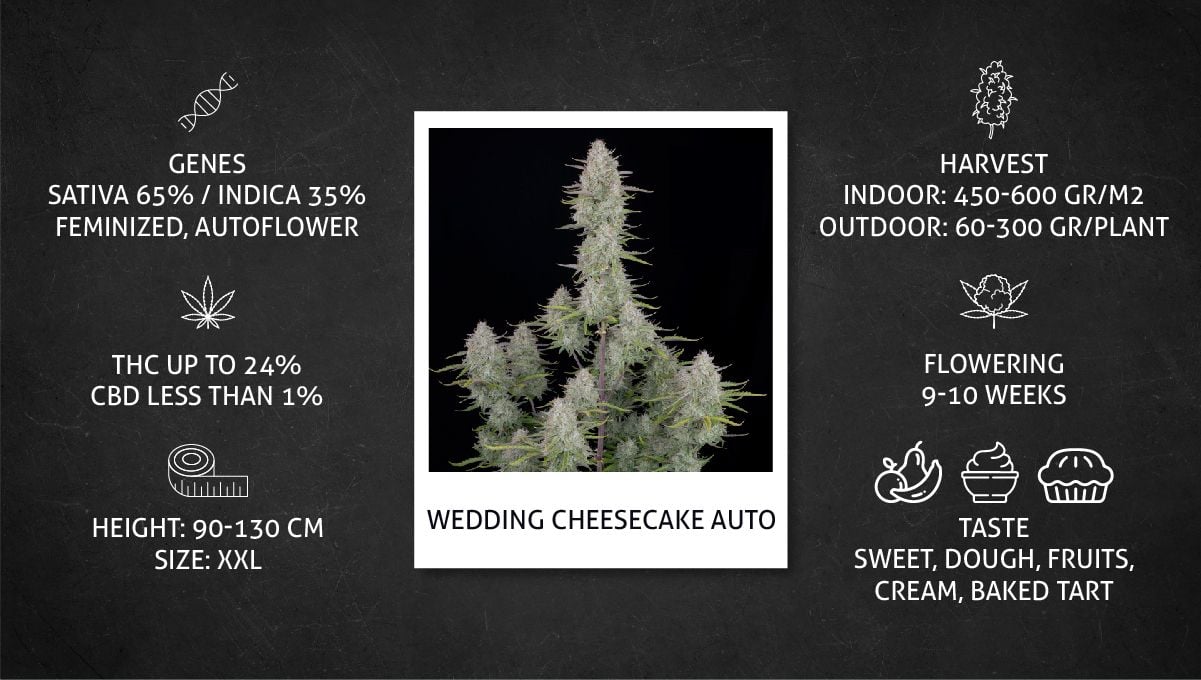
She’s a very low-maintenance auto that is ready to forgive rookie mistakes and can tolerate high-stress training methods in the vegetative stage. This autoflower timeline is quite short, but still, she manages to grow quite tall and produces hefty yields both indoors and out.
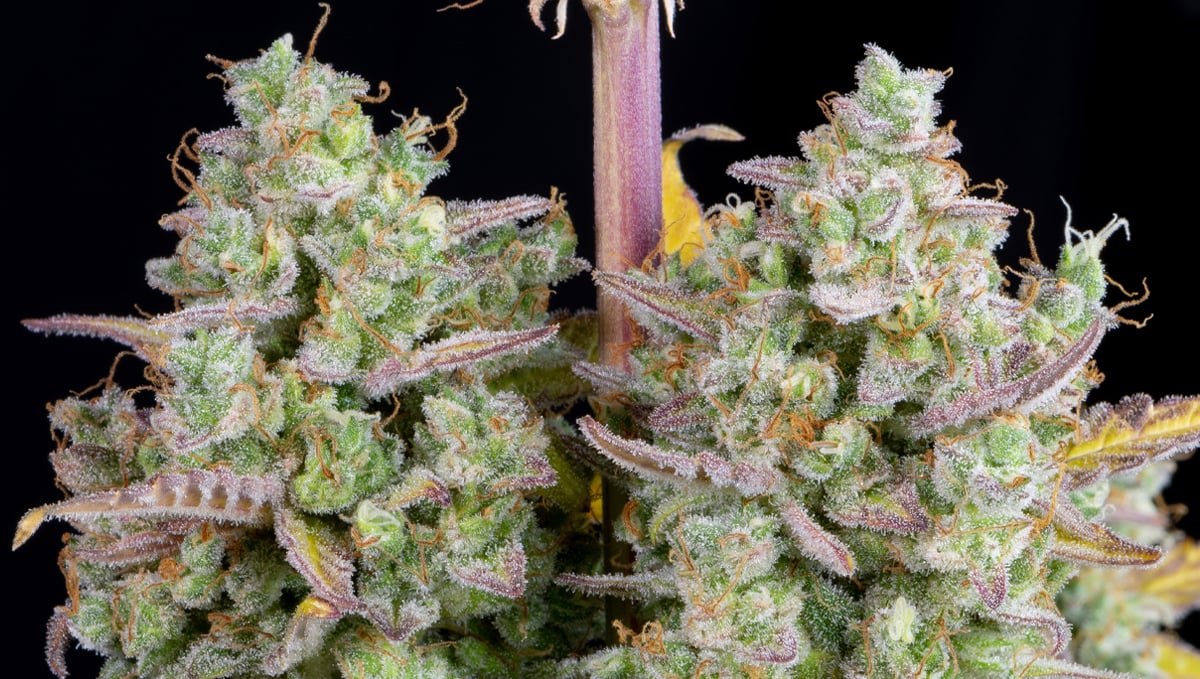
The progress through the whole life cycle takes this autoflower as little as 9-10 weeks, and, by harvest time, the buds get completely ‘frosted’ by 24% THC and smell of sweet creamy dough, vanilla, and fruit cake.
1. Grow Set Up
Let’s start with the introductions. There are dozens of Wedding Cheesecake Auto grow journals available online but, for our review, we have chosen 4 that seem the most interesting and representative.
Grower A: Hawkbo
With close to a hundred published journals so far, Hawkbo is a long-time horticulturist and has received many Diary of the Month awards and also Fast Buds Cover Photo Contest awards. For this particular grow, he germinated several Fastbuds autoflowers, including 2 Wedding Cheesecake Autos.
Hawkbo grows weed in a perpetual cycle in a big tent (probably 4’x4’ or 5’x5’) under Grow Light Science Grow 300 LEDs. This is a very high-rated LED quantum board with optimal light output and spectral distribution not only for the cannabis flowering stage, but also for the whole life cycle.
For the growing of autos, Hawkbo uses 2-gallon grow bags. Doesn’t sound like much, but he fills these grow bags with coco, and, coupled with frequent watering, this is more than enough for the whole autoflower timeline.
Grower B: VanCplGrows
VanCpl has only 5 finished grows under her belt so far, but she has already entered and won several competitions. She uses a 2’x4’ tent equipped with a portable A/C unit. This is enough room for three good-sized autoflowers, and, in this particular grow, she planted 3 Wedding Cheesecake Autos in 3 separate 5-gallon (18.93 l) grow bags.
Her medium of choice is soil. She prefers to make her own soil recipe by mixing three different potting soils and adding some perlite and worm castings. She also inoculated her super soil with NPK Raw Grow Microbes. It's a blend of beneficial bacteria and fungi that promotes root growth and increases the availability of nutrients for the vegetative phase.
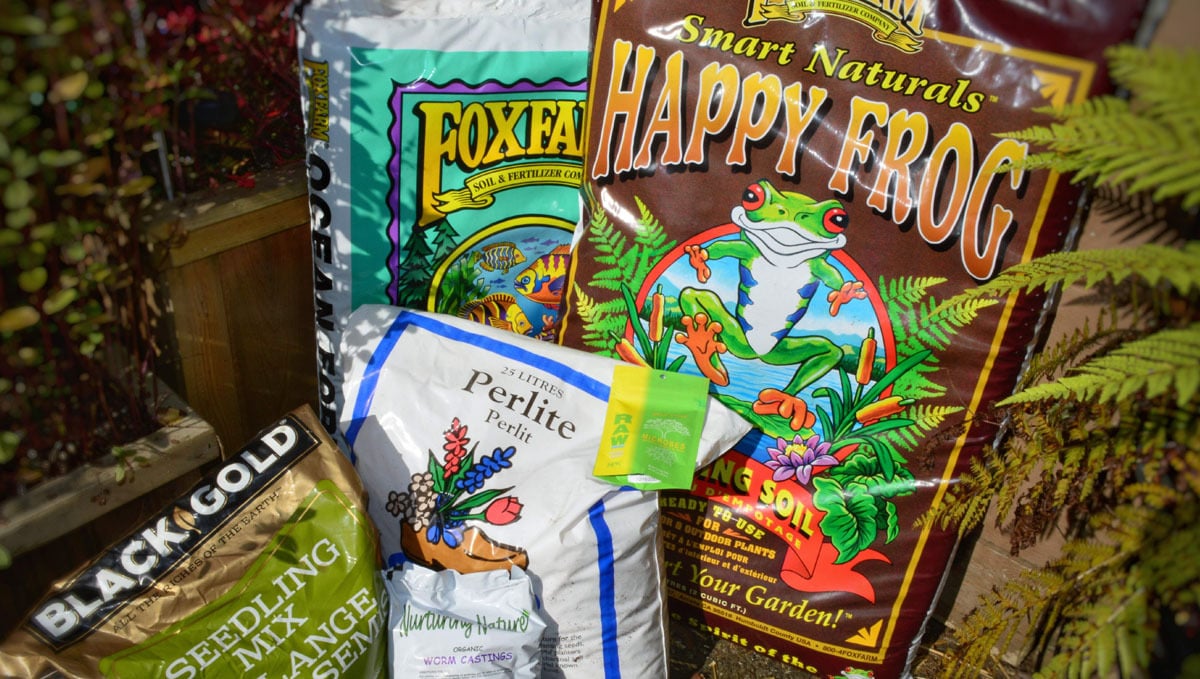
VanCplGrows has two sets of lights:
- Vegetative Stage: 96W Quantum Board Elite V2 by HLG & (2x) SunBlaster 6400K strip lights
- Flowering Stage: 96W Quantum Board Elite V2 by HLG & (2x) SunBlaster 2300K T5HO
The QB96 provides the main lighting power and is basically enough for the area this big, but the grower thinks she gets better results when she supplements it with the Sunblaster fixtures.
Grower C: BasementGanja
Definitely the most unorthodox of the four, BasementGanja trains the hell out of his autos. This involves a lot of work and a lot of waiting for the harvest to finally come, but the results are amazing every time. It’s as if his mission were to show how much abuse a modern autoflower can take and still come out on top.
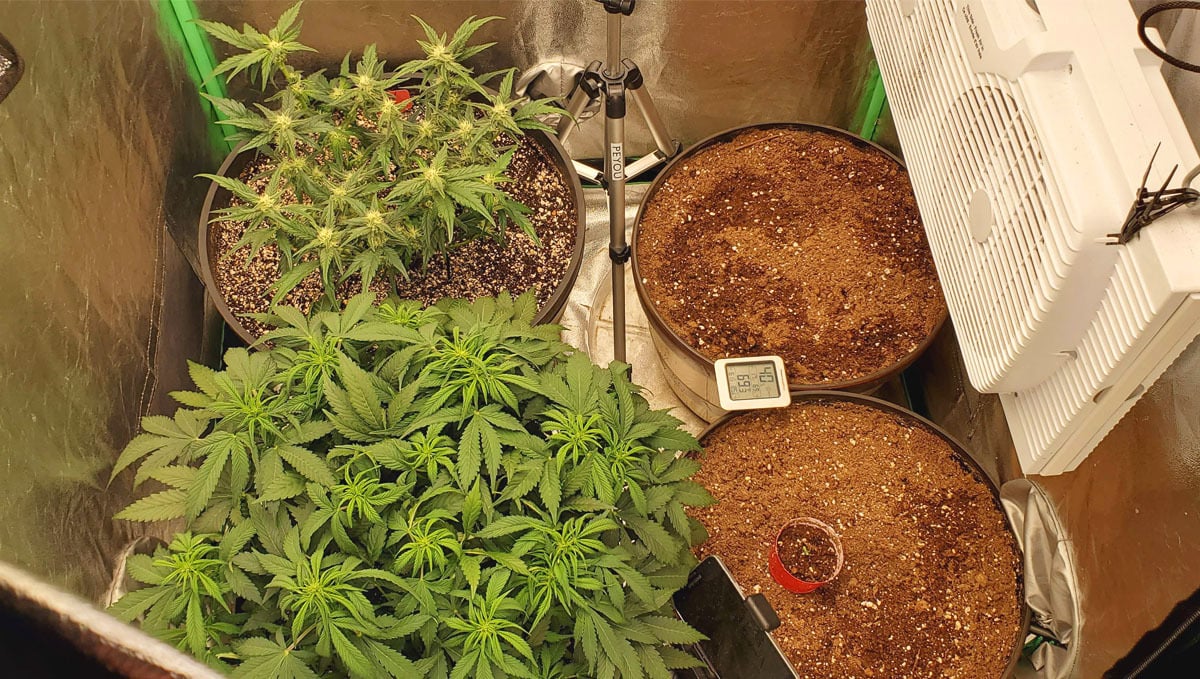
Out of his 18 grows so far, two were featured as the Diary of the Month.
Judging by his photos and time-lapse videos, BG uses a 4’x4’ grow tent and a light that covers this surface area perfectly — Spider Farmer SF4000 which draws 450W and is continuously dimmable.
For his Wedding Cheesecake Auto, BasementGanja chose a 6-gallon (22.71 l) plastic container which he filled with Schultz Premium Potting Soil. A happy choice because this mix contains a lot of organics that slowly release their nutrients and can feed your cannabis for many weeks, if not through the entire autoflower timeline.
Grower D: Treighfunky
Treighfunky is rather new to the game. With only 7 months of experience at the moment of this publication, he was sharing his rookie enthusiasm (and his rookie mistakes) from the day his equipment first arrived. He made himself a nice little cultivation den in his garage. What you see in the picture are two 1.2m² grow tents.
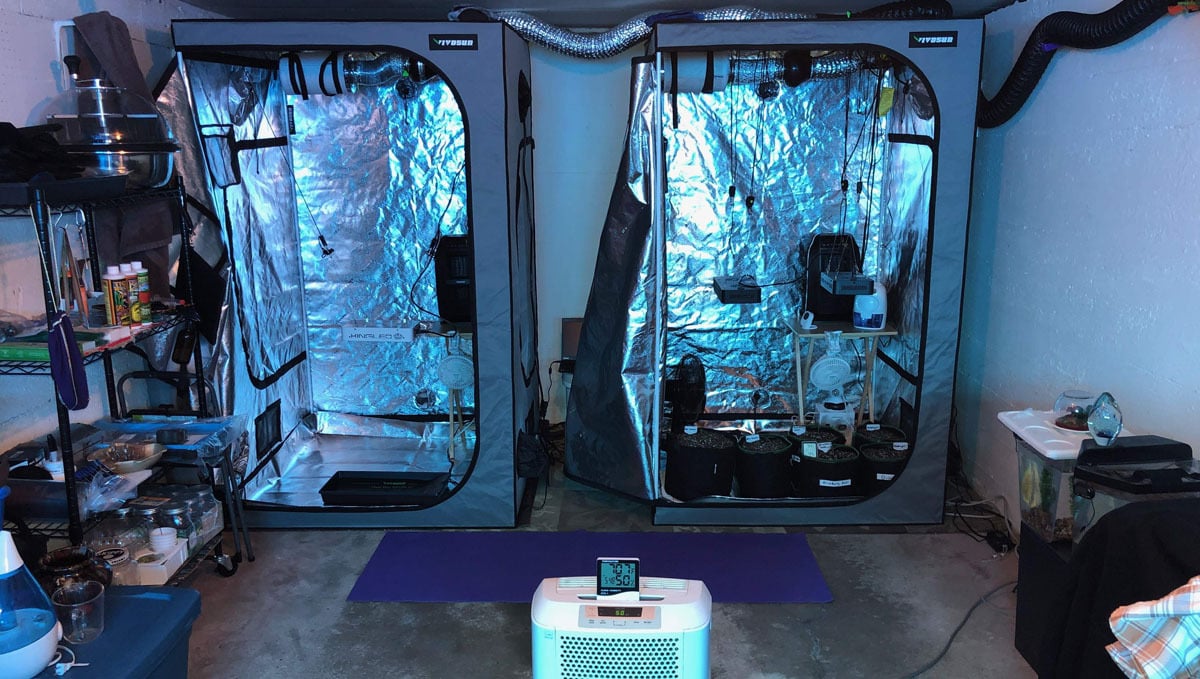
For his Wedding Cheesecake Auto and other cultivars, he was using 3-gallon grow bags filled with a simple soil+perlite mixture. Definitely, the safest bet for a newbie.
Like every other grower in our comparative review, he chose the LED technology: he started with a King Plus 1000 Watt LED, but, halfway through the flowering stage, switched to the more efficient SF4000 — the same that BasementGanja was using.
Let’s compare the lights in each of the four gardens:
| Grower | Grow Room | Watts Used | Type of Light | Brand |
|---|---|---|---|---|
| A | 4'x5' | 298W | LED | Grow Light Science |
| B | 2'x4' | 238W | LED | HLG & SunBlaster |
| C | 4'x4' | 450W | LED | Spider Farmer |
| D | 3'x4' | 450W | LED | King Plus, Spider Farmer |
2. Germination And Seedling Stage | Week 1
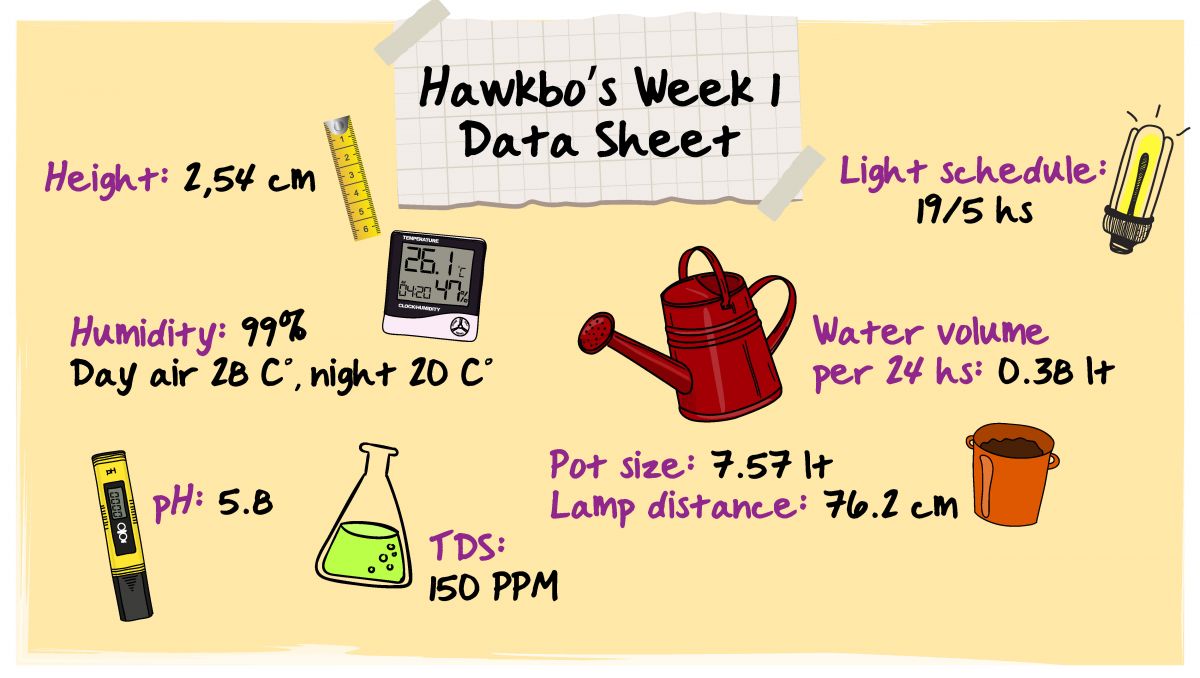
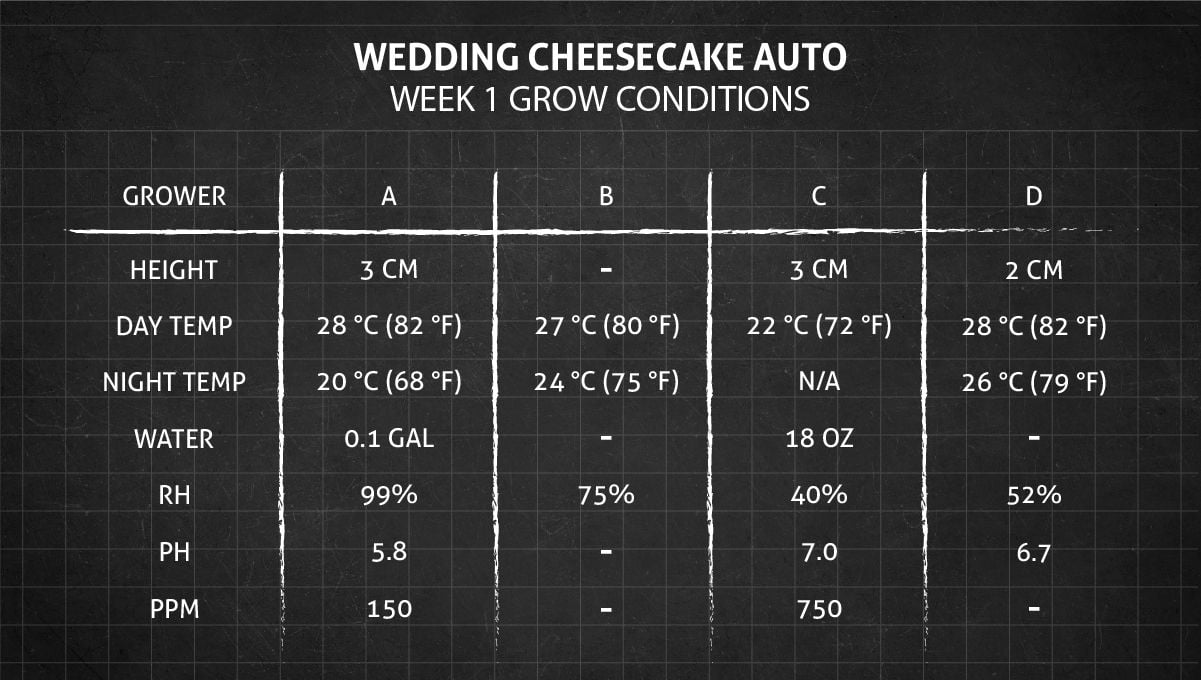
Right out of the gate, there were no differences in size to speak of, but take notice of the environmental conditions: 3 out of 4 growers created nice and mild temperature and humidity — perfect for this vulnerable phase.
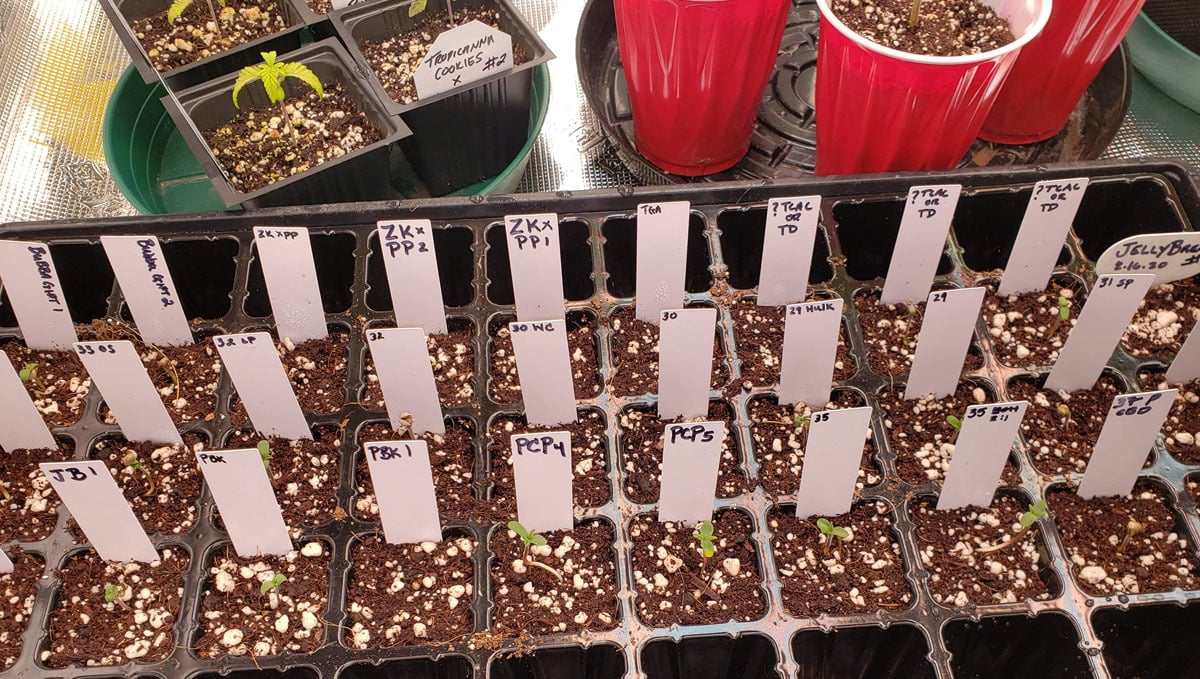
A: Germination In A Cell Tray
When growing autoflowering cannabis, the standard good practice is to put the germinated seeds straight into the final pots because otherwise you’ll have to transplant them and that can lead to stress. However, if you germinate many beans at once, or for other reasons, you simply have to start in smaller containers.
This is exactly what Grower A did.
He had so many different cultivars in this grow that he chose to use a cell tray and filled the cells with a coco/perlite mixture. This mixture serves as a good growing medium for germination. Although it doesn’t contain many nutrients, young seedlings use the nutrients stored within the seeds to fuel their first few days of growth. Adding to this, adding too many nutrients at this early stage can also cause detrimental effects in the form of toxicity. In combination, both coco coir and perlite also offer excellent aeration and drainage. This is key during the seedling phase when plants are susceptible to fungal pathogens that thrive in damp environments that are low in oxygen. If you choose to take this approach, just make sure your seeds don’t dry out too quickly and fail to germinate.
Later, he regretted this decision. When, after a week, he had to transplant, he couldn’t flip the tray upside down to make the seedlings slide out of the cells. Instead, he had to pull them out by the stem, and he damaged the root system of some of them in the process.
The grower gives a valuable piece of advice: if you use a cell tray, split it into separate cells, so that you can later flip them during a transplant. Or else wait before the roots fill out the whole volume of the medium—in this case they are not so easily damaged.
Removing plants from seedling trays can also get tricky when the growing medium is too dry. This causes the block of the growing medium to crumble away during the transplanting process, which can leave roots overly exposed and even broken and damaged. Just before you attempt to transplant each cell, add enough water to allow the growing medium to reach field capacity. This will help to temporarily bind the individual particles together, which will make less of a mess and also take less of a toll on the delicate seedling root system. After you introduce your seedling to its new home, apply a little bit more water to give it a drink and further take the edge off of any transplant shock.
Fully aware that young seedlings prefer warm and humid environments, Grower A maintained a very high humidity (99%) in his grow tent, and the temperature during the day was also comfortably high at 28°C (82°F). We don’t exactly approve of his other decision—to allow nighttime temps to fall by 8°C (14°F). Most marijuana professionals recommend a much more moderate 5° drop. Since Grower A chose to grow his Wedding Cheesecake Auto in coco, he had no other choice but feed her from day one of her life cycle.
So he pre-treated his medium with CALiMAGic as a source of extra calcium and magnesium (an absolute must for any coco grow) and added several organic nutrients in his watering solution:
- Organic Grow Liquid, rich in N and containing molasses, humic and fulvic acids,
- Humic Acid Plus, makes microelements more digestible,
- More Roots, raises the mass of the root system by up to 300%,
- Living Organics, upgrades the microbial life in the root zone.
All four additives are fully organic and definitely the right choice for such a flavourful strain as Wedding Cheesecake Auto.
B: Straight Into The Final Pots
Unlike her counterpart, Grower B didn’t have to give her Wedding Cheesecake Auto any additives because soil and soilless mixes usually contain enough nutrients to last at least the first couple of weeks of the life cycle. Especially in her case because she used 5-gallon grow bags for her three babies.
She started with a light schedule of 24/0 which is a good remedy against stretching. She would then change the schedule to 20/4 for most of the vegetative stage and all of the flowering stage, and decrease the day by another hour (to 19/5) closer to the end of the life cycle.
C: Welcome To The Boot Camp
Grower C’s tough-love approach to raising his Wedding Cheesecake Auto began with his rather austere environmental conditions: both the temperature—22°C (72°F)—and RH—40%— were way off the mark (too cool and too dry). Btw, his temperature was the same around the clock because he gave his plant a 24/0 light cycle. We suppose that this was partly a forced move because, in his case, growing lights probably also served as heaters.
D: A Solo Cup For The Sprouting
Being a novice horticulturist, Grower D simply filled a solo cup with 100% potting soil and sowed his Wedding Cheesecake Auto seed as soon as it showed the taproot.
He made a minor mistake of using a transparent cup. Generally, it’s not recommended because marijuana roots hate to be exposed to light. However, in this case, the seedling was re-potted before the roots reached the sides of the cup, so it was okay.
His air humidity (52%) was a bit low for this vulnerable stage, and he also could have made the temperature difference between day and night a little more comfortable. In his case, it was only 2°C (3°F). But maybe we’re splitting hairs here because all this didn't visibly affect the progress.
In general, Grower D seemed to follow the why-fix-something-that’s-not-broken philosophy. Specifically, he kept to the classical 18/6 schedule throughout the whole timeline and used only pH-balanced water without any nutrients not only in the first week but also for a better part of the cycle. This is logical when you use a container with a lot of soil.
3. Early Veg | Week 2
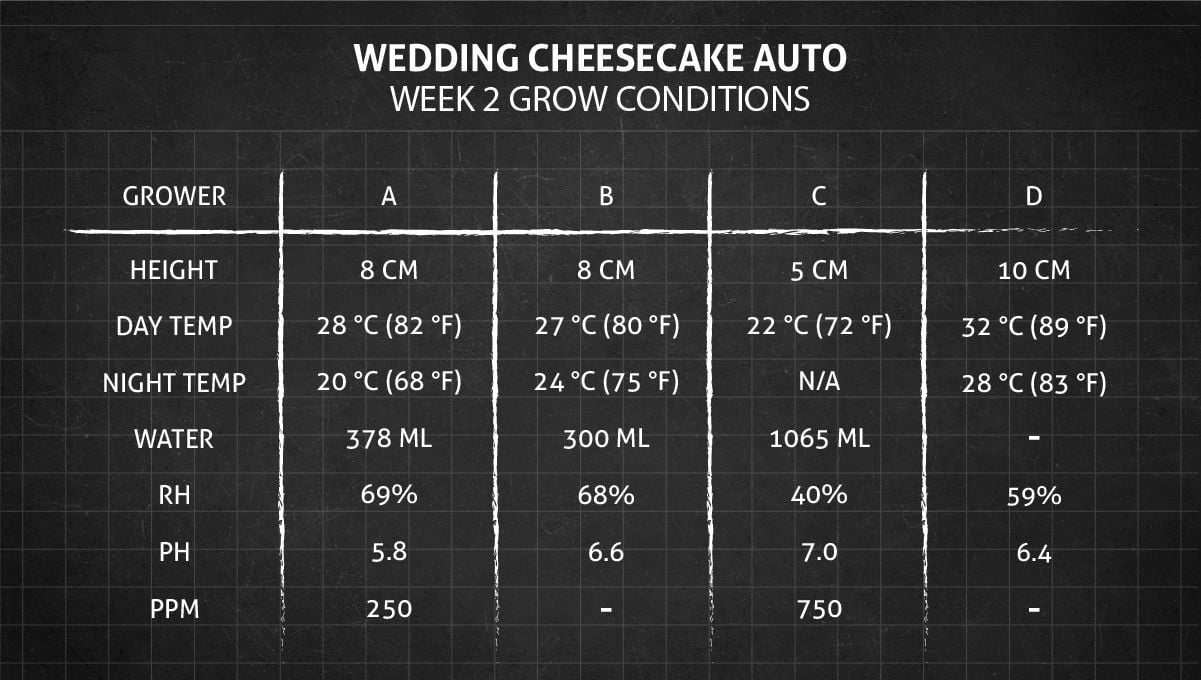
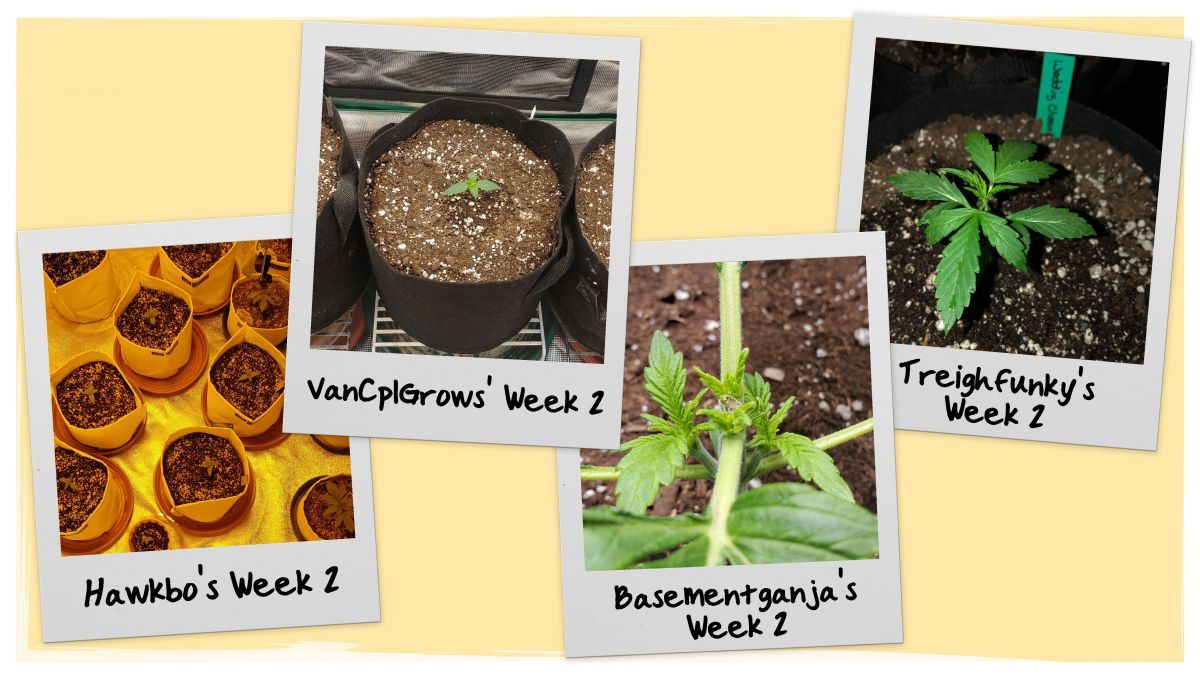
On Week 2, the main progress was happening in the root zone, and the sprouts themselves were still too little to show any variance.
Only one of them was shorter than the rest because of the early training. None of the growers used a lot of water, nor raised their TDS values significantly.
A: The New Coco Home
In the second week from seed, Grower A transplanted his Wedding Cheesecake Auto to the final container — 2-gal Rain Science Grow Bag. The coco/perlite mixture allows for (and, in fact, requires) frequent watering, that’s why you can grow big and high-yielding plants even in such a small amount of medium.
He continued with the same feeding regimen as in the previous week, but increased TDS to 250 ppm.
B: Lowering The Lights
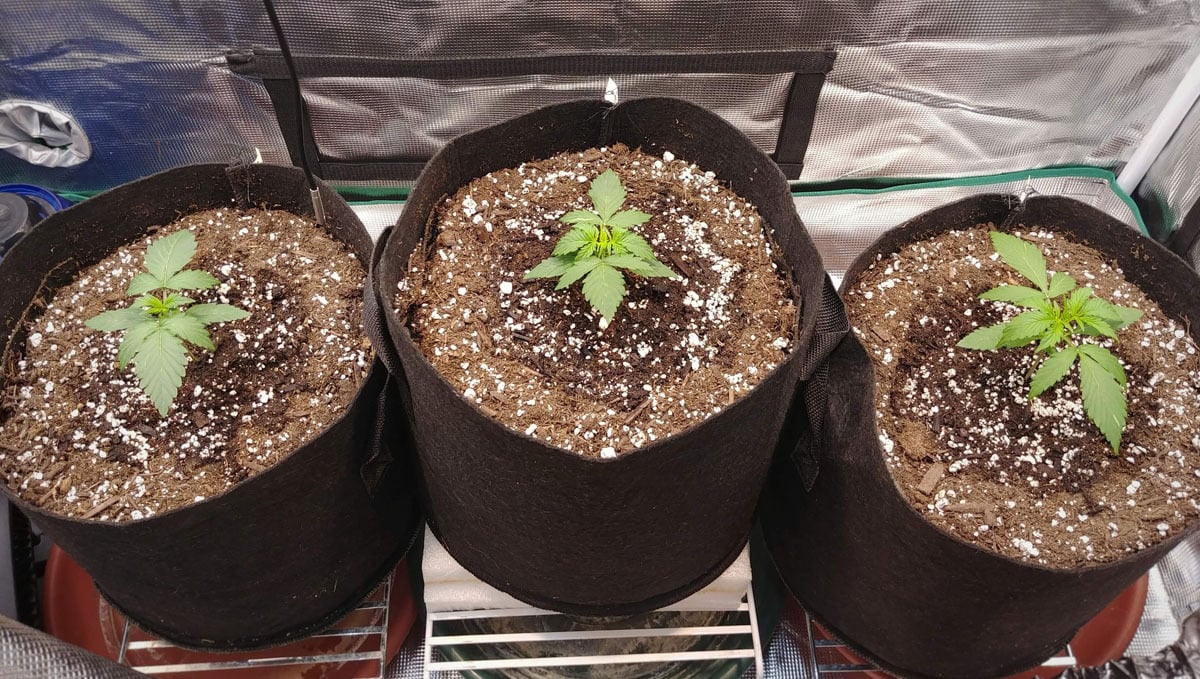
During this phase, Grower B decided to lower the LED fixtures to increase the light intensity - slowly going from 10,000 to 13,000 LUX. She was watering each of her plants with 250-300ml of dechlorinated tap water once every three days, keeping pH at 6.6.
All 3 girls looked quite happy with it, and of all 4 grows I liked her little wards the most.
C: The Lull Before The Storm
Grower C knew that he had provided his Wedding Cheesecake Auto with enough nutrients for a better part of the whole timeline, so all he had to do was give them plain water. He upped the amount to 2 solo cups per day. Have a look at his datasheet for Week 2:
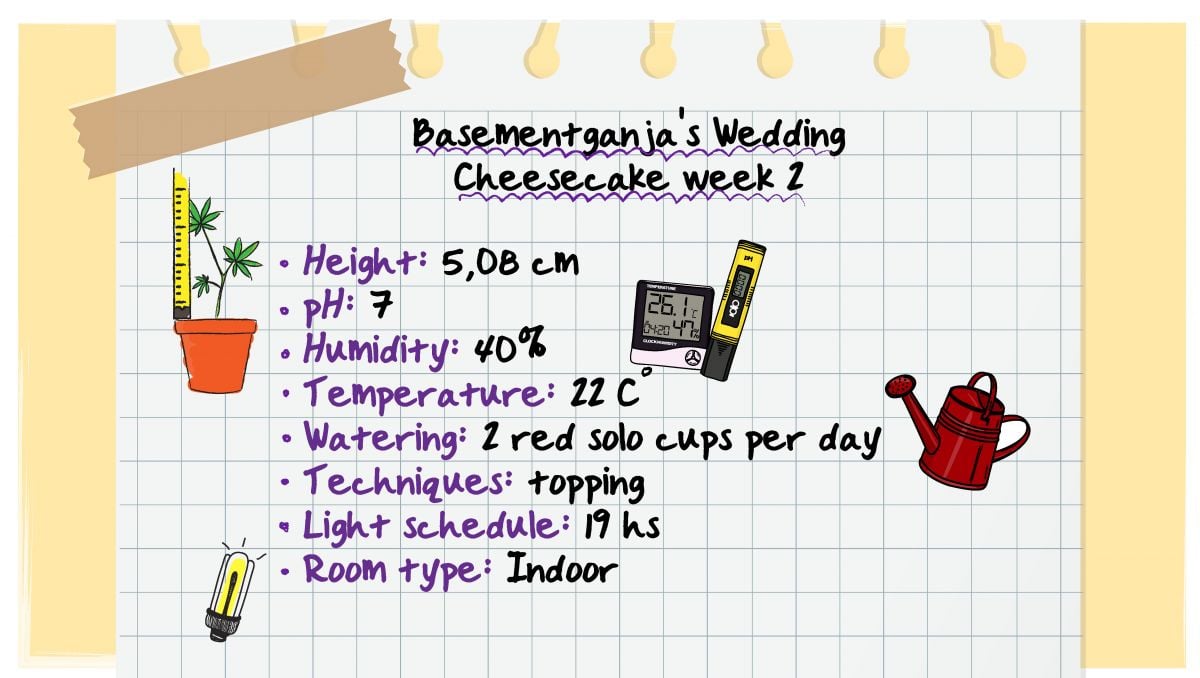
He had so much confidence in Wedding Cheesecake Auto’s hardiness and his growing skills that he began the really hardcore abuse on Day 14:
He topped his plant above the second node, thus finishing the second week of the vegging phase with a bang.
A word of caution: Topping and other high-stress training (HST) methods are generally not advised for autos because their life cycle is too short to spend any part of it on recovery from stress. Try these techniques if you really know what you’re doing or the strain is especially resistant to abuse.
Otherwise, you’ll find success in trying your hand at low-stress training (LST) instead. This technique produces excellent yields with much less risk. Instead of directly inflicting damage on plant tissue, it takes a far more passive approach. Simply take some soft garden ties and attach the growing tip of your plant to the side of your pot, or a stake if you're growing directly in the ground or a raised bed. Ideally, you’ll position your plant so that the main stem is parallel with the soil below. Continue to tie down the other growing tips that form in the coming weeks. By the end of this process, you’ll have created a flat and open canopy that produces a lot of evenly-sized cannabis buds.
D: A Little Extra Nourishment
Although he didn’t really need to introduce liquid nutrients just yet, Grower D decided to try and add some. He used a combination of both mineral and organic fertilizers, specifically Grow Big and Big Bloom, both by FoxFarm. Wedding Cheesecake Auto seemed happy with this feeding.
It also got uncomfortably hot in his tent: 89°F in the day and 83°F in the night. The humidity, on the other hand, rose to a more comfortable level of 59% — almost perfect for this phase.
All in all, this was a calm week for all four growers.
4. Mid Veg | Weeks 3-4
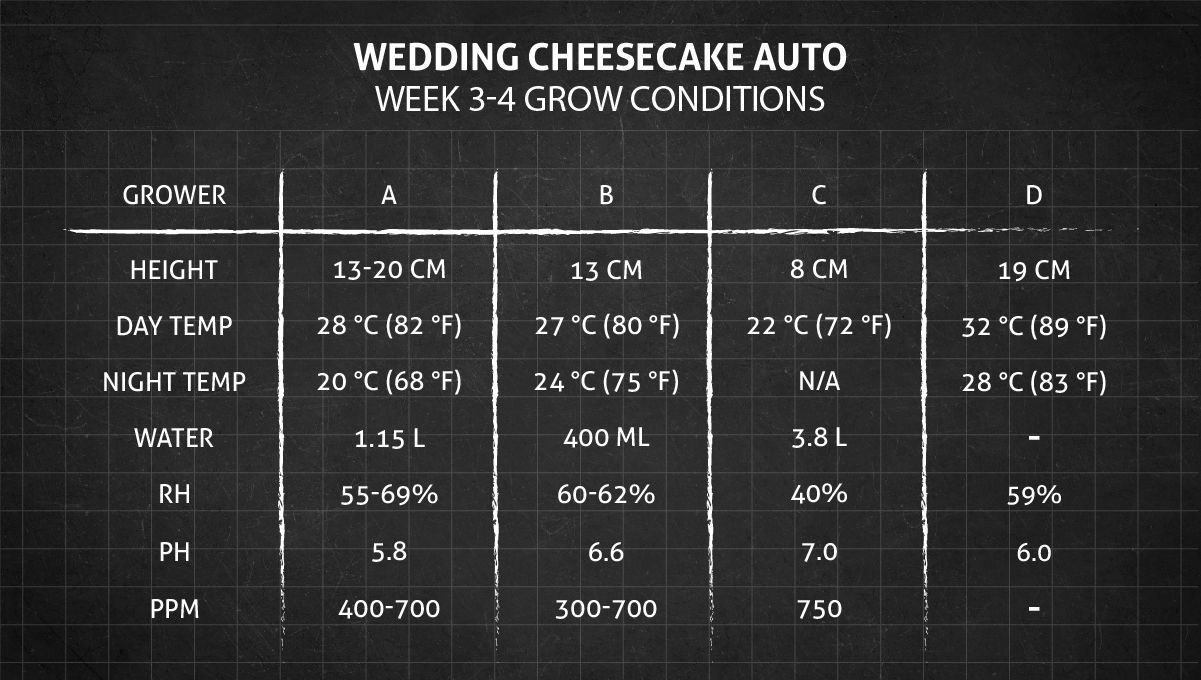
On Week 3, the young plants were steadily increasing height and developing large fan leaves. Those of the growers who had started with high humidity levels in the seedling stage now brought them down a bit. Another week of the vegetative phase brought basically more of the same, except that Grower C’s little baby became even shorter (due to training).
A: Business As Usual
In the third week, Grower A preferred to give his Wedding Cheesecake Auto all the freedom she needed and thus had nothing special to report. This is what you get if you grow in coco and have dialed in all the variables to perfection.
On Week 4, his baby reached the height of 8 inches (20.32 cm) and reacted favorably to the bottom-feeding which the grower did as an experiment. For those of you who are new to this, to bottom-feed means to pour some water/solution into the bottom tray and let the roots suck it from there.
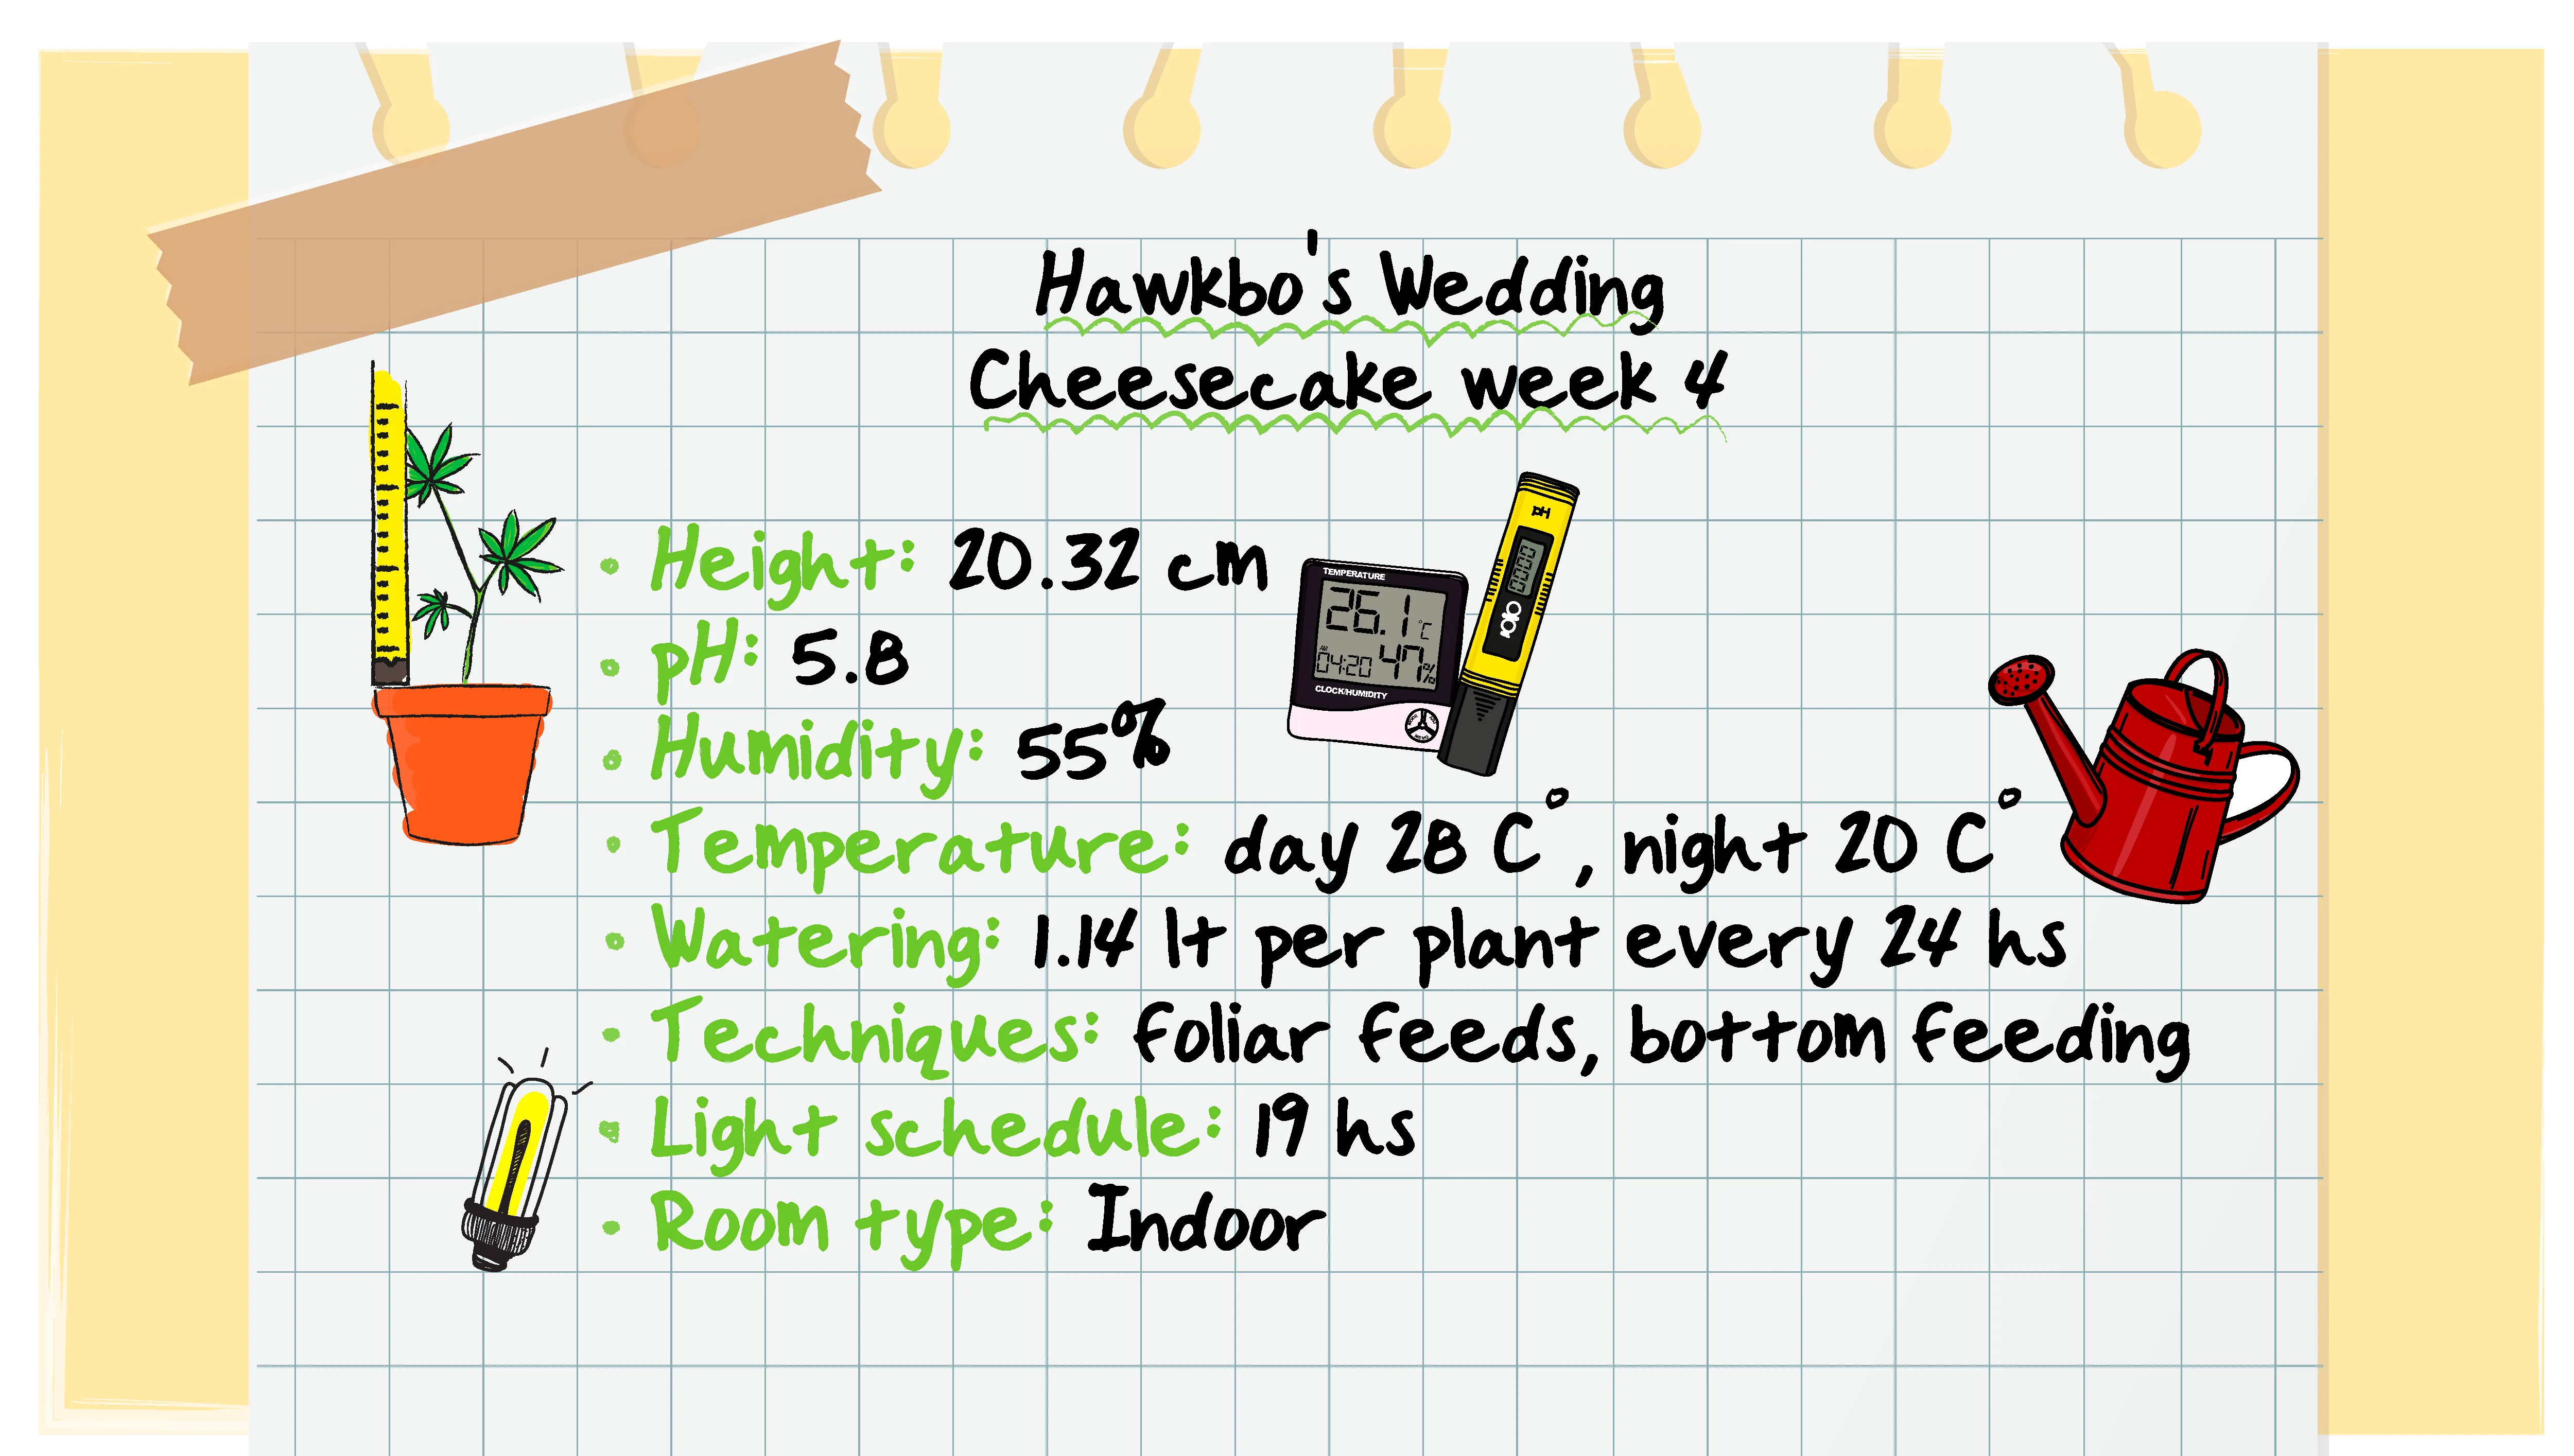
He also foliar-fed his Wedding Cheesecake Auto with Growzyme for a quick boost of vitality and used another product by Green Buzz Liquids—Clean Fruits—which helps clean the medium from excess nutrients.
B: One Topped — Two Left Alone
In the meantime, Grower B went for a trick that worked in her previous grow: she topped one of her 3 plants—the one in the center—because it was the lankiest and had the longest internodes and leaf stalks.
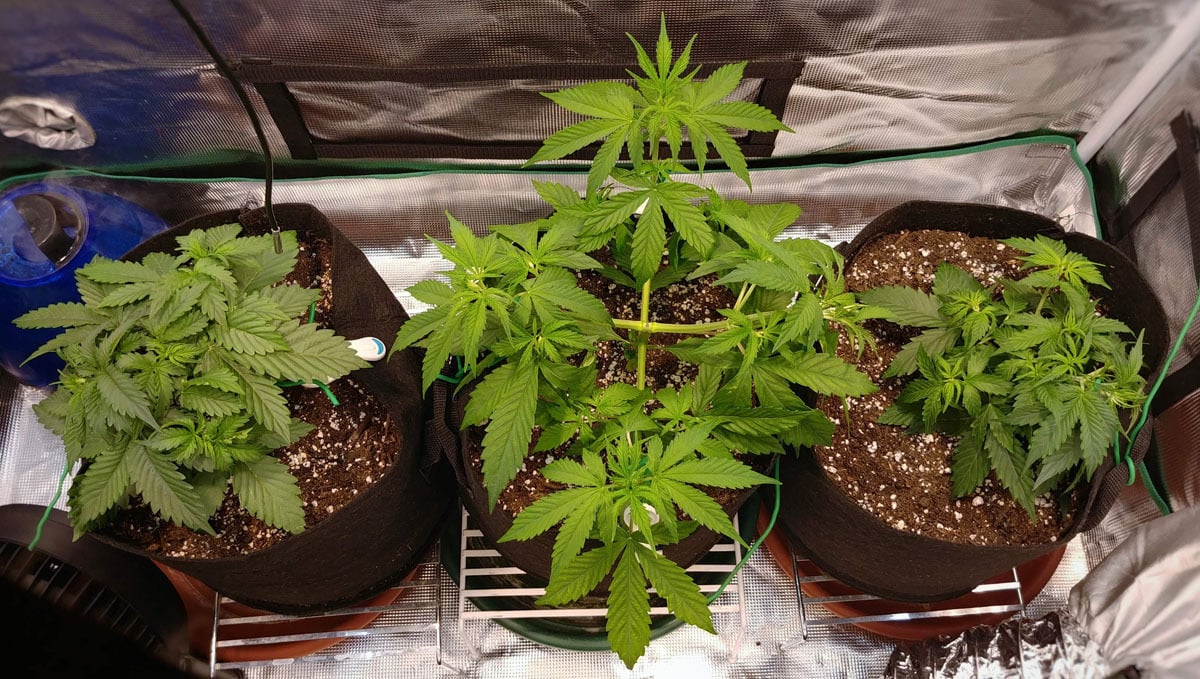
She also trimmed the lowest pair of branches from this plant and another one (on the left), leaving the third one (on the right) unmolested—because it was very short and squat.
This is how the third week in the timeline looked for her. Note that VanCpl lowered a bit both the temperature and the air humidity.
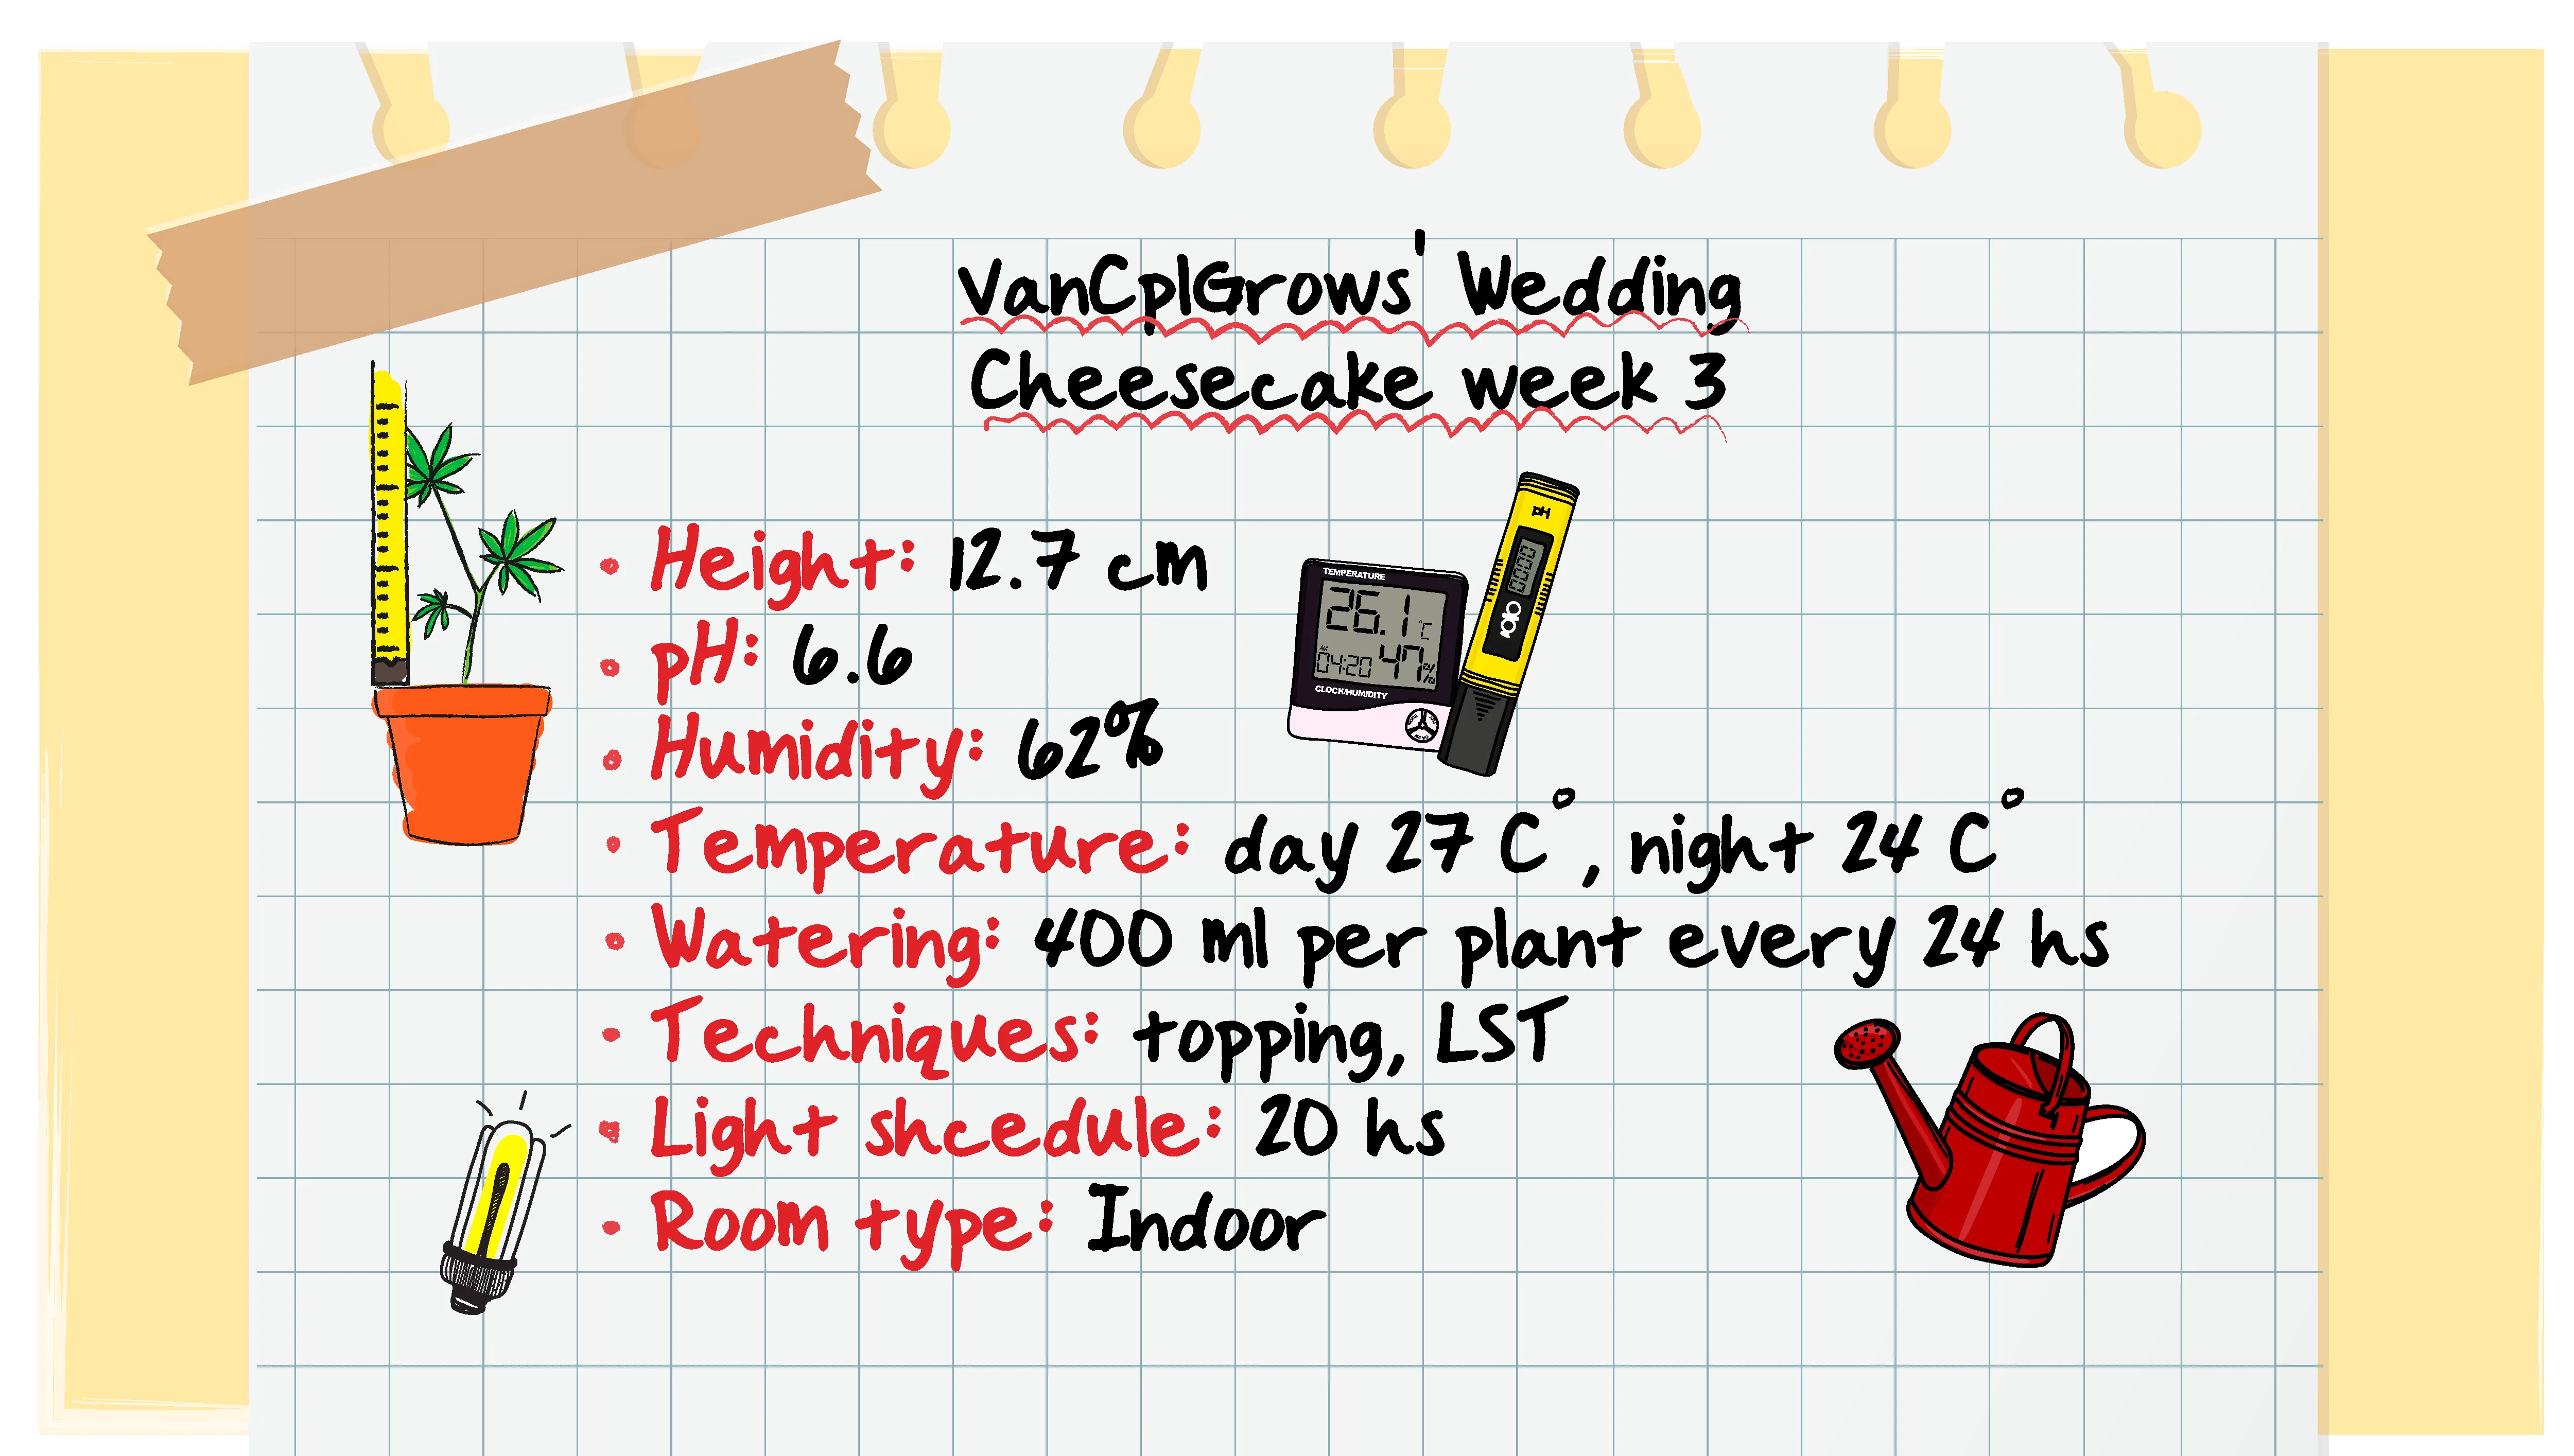
She also increased the amount of water—to 400 ml—and added some Remo Nutrients' "Micro", "Grow" & "Velokelp" because she noticed some discoloration on the leaves. Fearing that this was a magnesium deficiency, she also added some epsom salts and even gave her girls a ‘shower’ with a solution of CALi-MAGic.
The next week, the plant that had been topped started to dominate the other two in the tent. Although it started with rather broad leaves (like Indica), she grew like a Sativa and needed significant training.
VanCpl also gave light training to the shortest one. This dwarf actually made her uneasy: only 2 inches tall, it was quite broad, but its side branches looked underdeveloped. She even decided to raise the lights for this one.
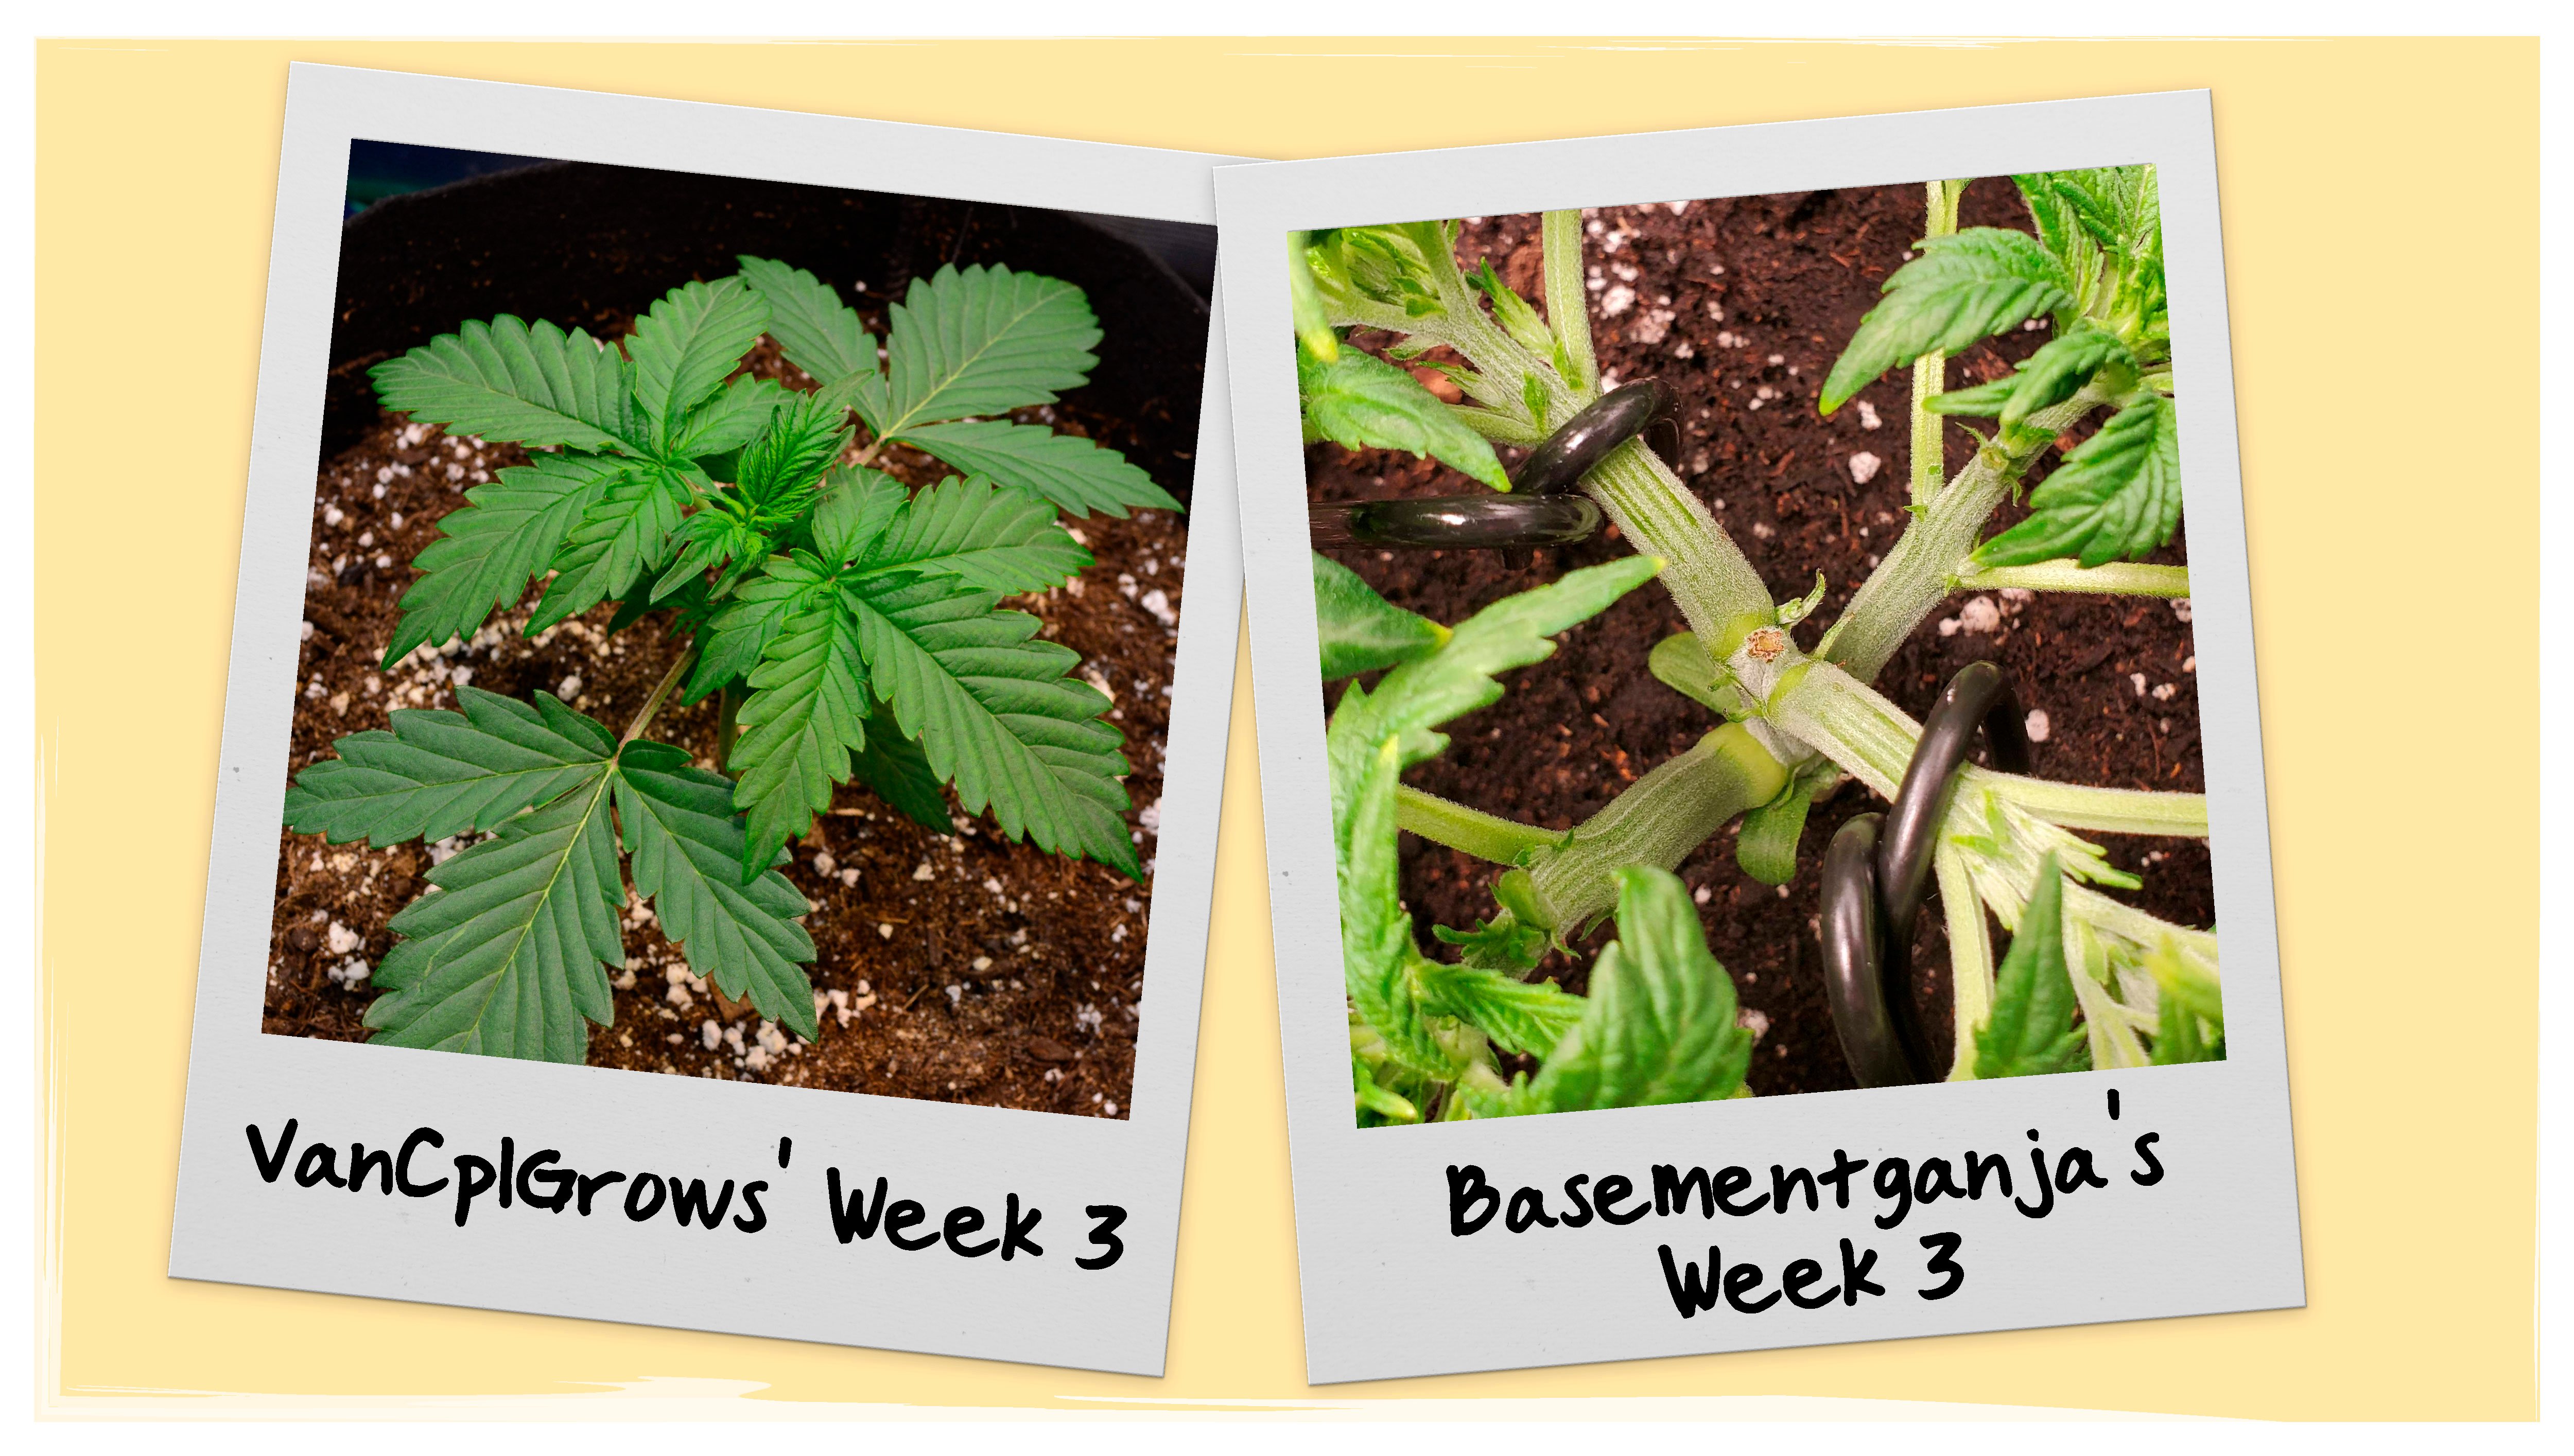
All through the last two weeks, she kept upping the lighting levels until her cell phone app maxed out at 30,000 LUX. The grower also noticed that her Wedding Cheesecake Auto girls developed the most vigorously when the day temperature was around 78-83°F (25.5-28°C), but became sluggish with lower temps.
Week 4 seemed to her like the right moment to extend her feeding with two more products by Remo Nutrients: AstroFlower, a blend of fossilized organics, and Nature’s Candy which is a source of sugars for beneficial bacteria and fungi in the root zone. Feeding these lifeforms sugar might seem bizarre and potentially harmful to beginner growers. However, keeping these populations thriving will directly benefit your cannabis plants, help to suppress disease, and boost overall yields. Why? Because they work in a mutually beneficial way with cannabis plants and help them obtain more nutrients and water.
Another trick that Grower B did and that we recommend anyone during the preflowering stage is tucking fan leaves under the branches. This really exposes the future bud sites to more light.
C: A Spectacle Not For The Faint Of Heart
Grower C (who gave his Wedding Cheesecake Auto a rather rough treatment at the end of the previous week) now went in for the kill by main-lining his singularly hardy little lady.
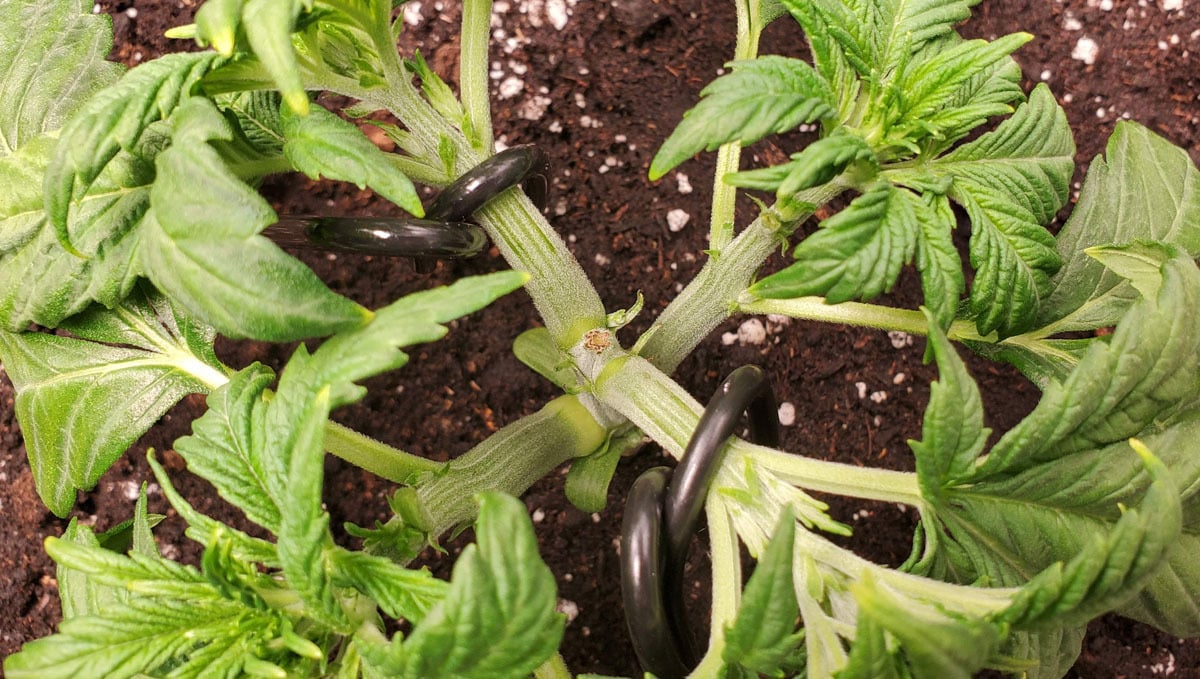
For those of you who aren’t familiar with this technique, mainlining, or mainfolding, means that you give your marijuana 2-3 consecutive toppings during the veg or the preflowering stage to get up to 8 main colas in the end.
Consistent with this method, the grower removed two sets of primary fan leaves and spread flat the remaining 4 branches. His Wedding Cheesecake Auto didn’t look particularly happy—as if she was chronically overwatered—but was very big for this point in the timeline with all those highly developed side branches.
Now let’s contemplate the treatment that the grower gave his ‘guinea pig’ in Week 4. He heavily defoliated the plant, gave her just 3 (!) days to recover, and then performed another light defoliation:
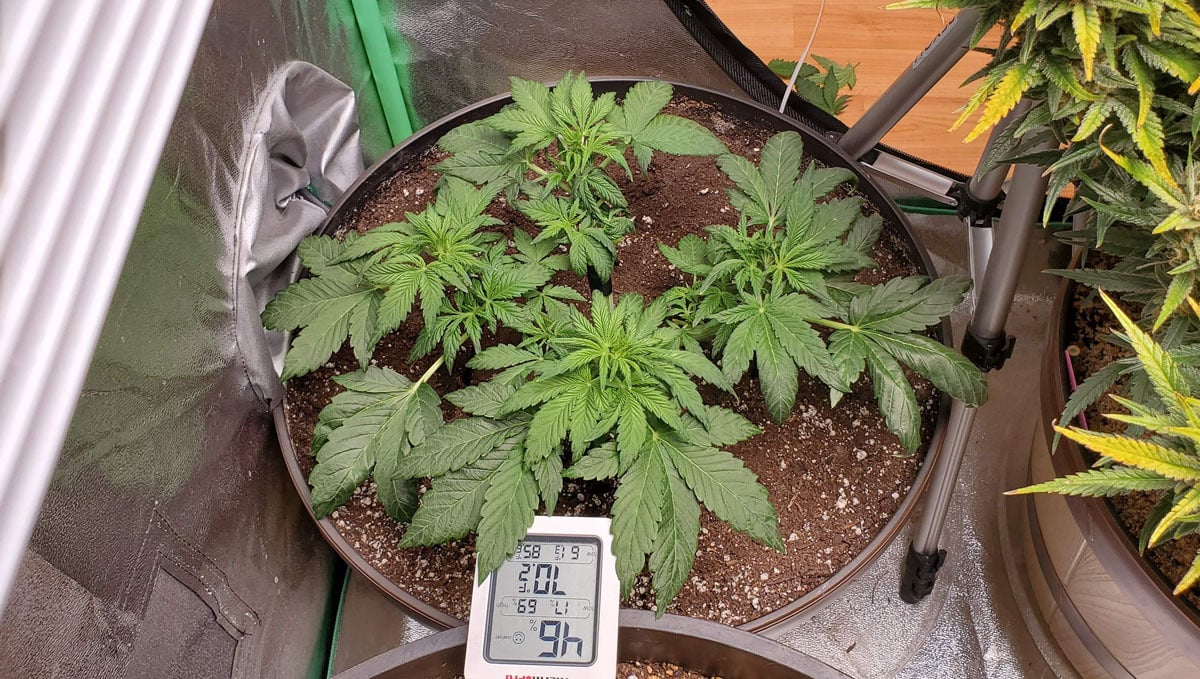
I don’t know what I admire more: the guy’s pluck or Wedding Cheesecake Auto’s will to live? See how unperturbed the plant looks after two defoliations in a row. Amazing!
D: Tall And Vigorous
Even Grower D, though he had been following a very simple approach before, now trained his plant by pulling the main stalk to the side with a piece of wire. However, as soon as she straightened again, he let her grow naturally and made no further attempts at training for the rest of the grow.
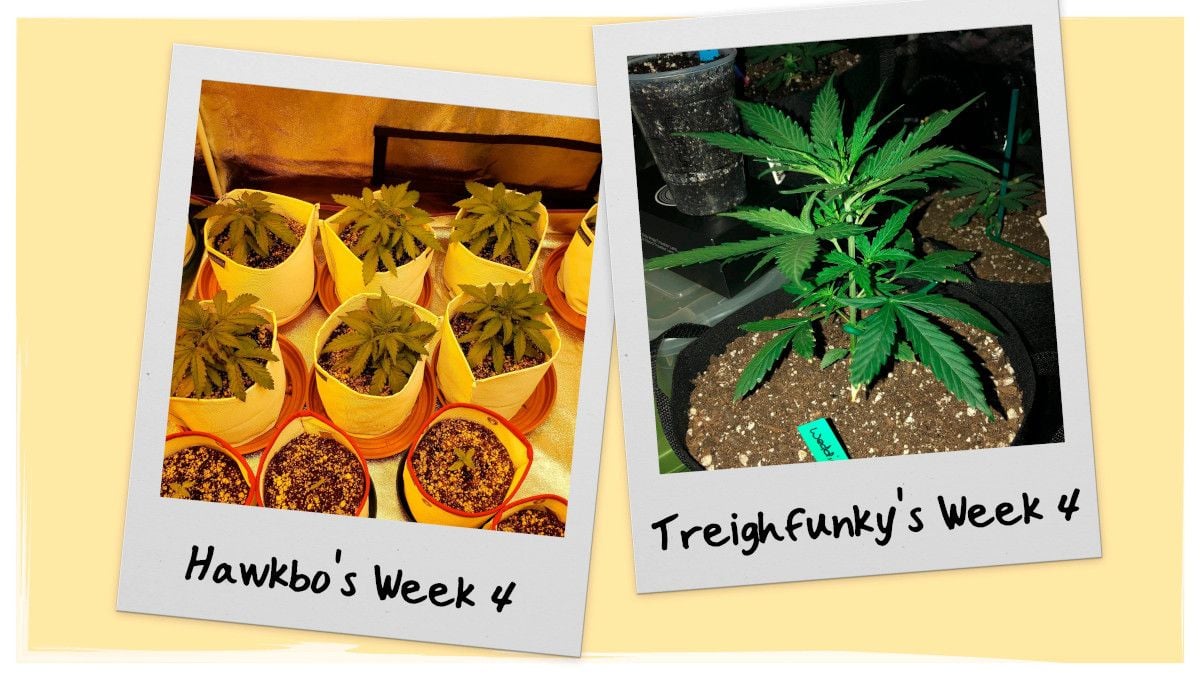
During both the 3d and the 4th week, his grow continued to be hassle-free and uneventful: mostly plain water and occasional Foxfarm feeding. The plant, with her narrowish leaves, spacy internodes, and medium-long side branches, expressed sativa traits probably more than any other in our review (only one of VanCpl’s girls looked similar).
5. Preflowering Stage | Week 5
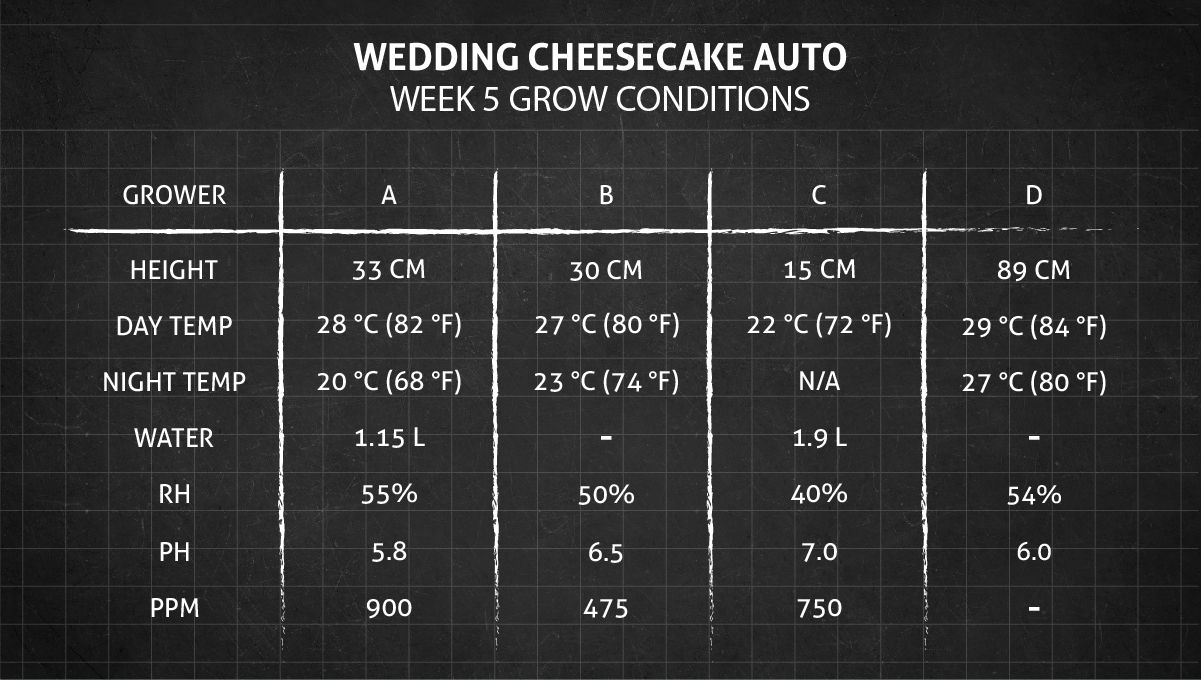
Week 5 is the time when autoflowers are mature enough to form first flowers, or, at least, female pistils at the nodes. Besides, in the preflowering stage, plants begin to stretch a lot, especially those that didn’t receive any training.
A: Coco In Action
On Week 5, Grower A defoliated his Wedding Cheesecake Auto a bit but refrained from training her. Or from doing anything else, for that matter.
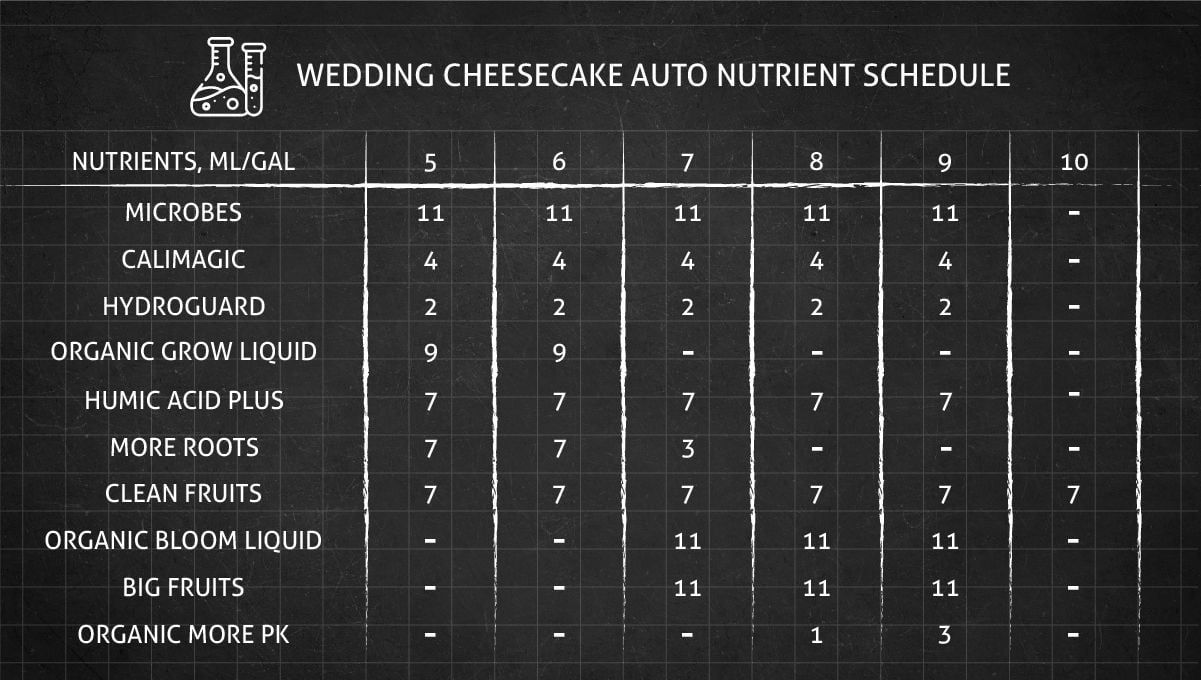
His real magic was never the canopy management, but the clever composition of the feeding solution for the coco medium.
B: Runoff PPM Too High For VanCpl
Grower B (VanCpl) thought about switching to bloom nutrients some time during this phase, but then she measured the runoff PPM and found the readings way too high for two smaller plants. So Week 5 was dedicated to flushing the soil with plain water and to the changing of lights from the veg to bloom spectrum.
There was also a power outage which made one night 10 hours long instead of 4. When the power was back on, the girls looked so rested and perky, that the grower decided to try and shorten the days in the last weeks of the flowering stage.
C: No Foliage Shall Be Tolerated
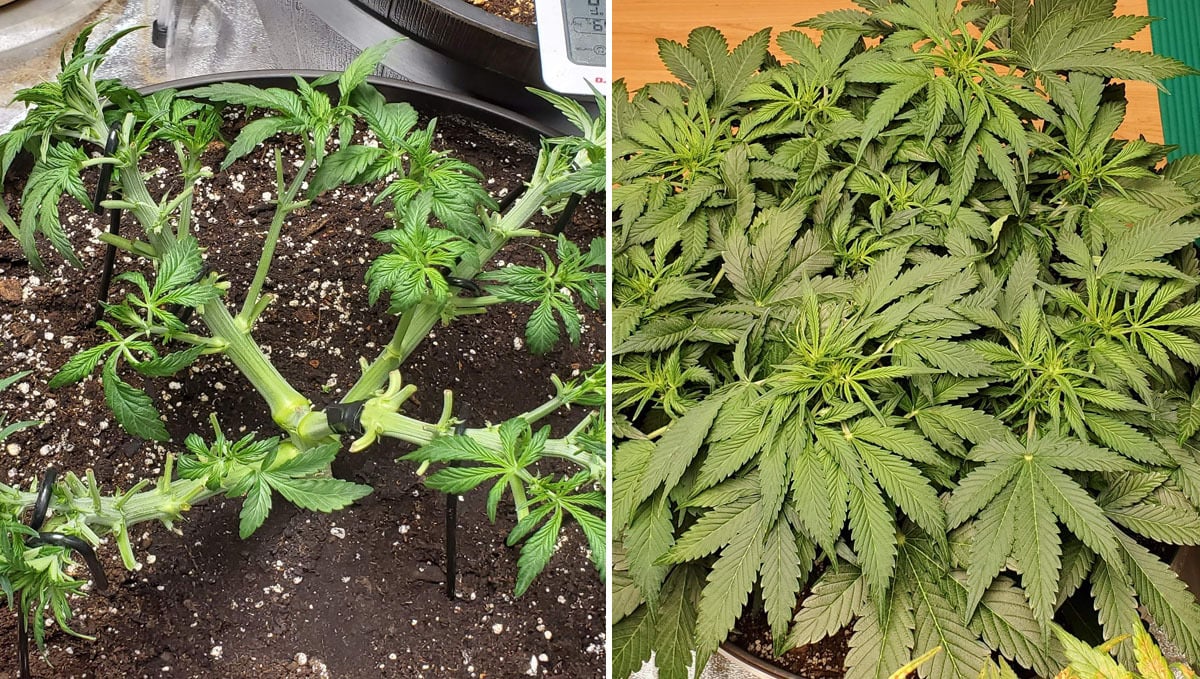
Grower C was up to his old tricks: he defoliated his Wedding Cheesecake Auto mercilessly another two times. The aftermath looks terrible, but the subsequent recovery is all the more amazing:
D: Just Watching The Grass Grow
During the 5th week, Grower D did absolutely nothing, just allowed his girl to freely grow and reach the respectable 35 inches (89 cm). At this time, he was watering his 3 gallons of soil with plain water as needed. Btw, the budding phase had already begun as became evident by the appearance of tiny stringy leaves and white hairs at the top.
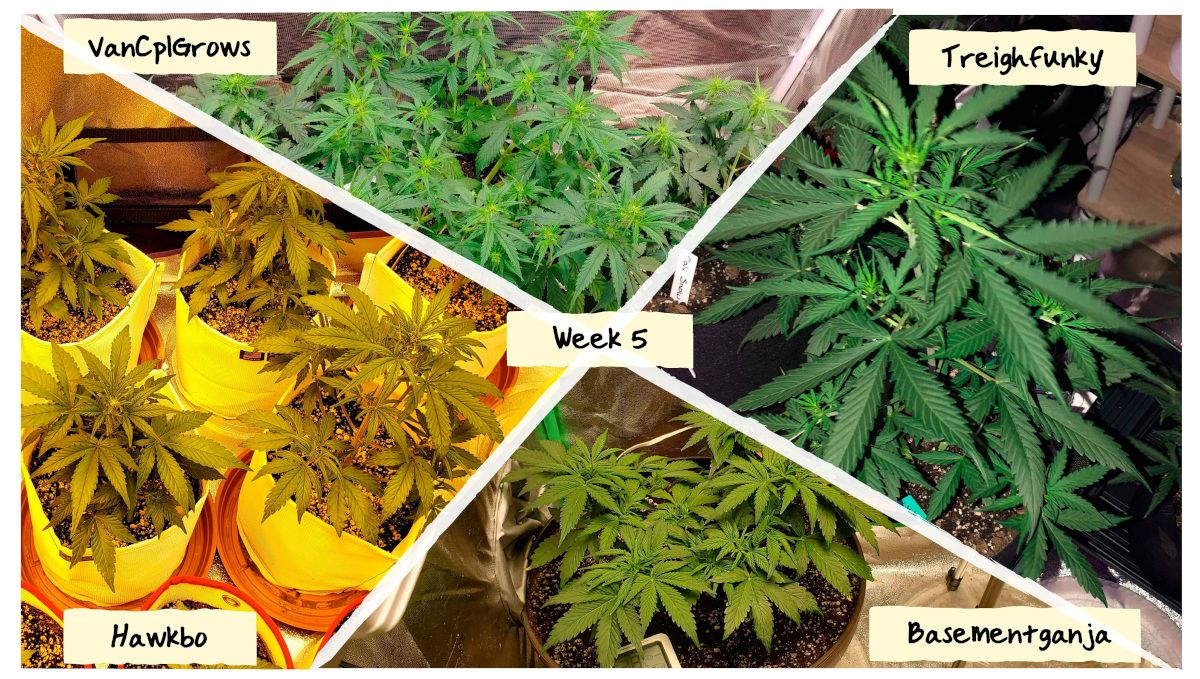
Actually, all Wedding Cakes, except BasementGanja’s, entered the bloom stage, as can be clearly seen in the picture:
6. Early Flower | Weeks 6-7
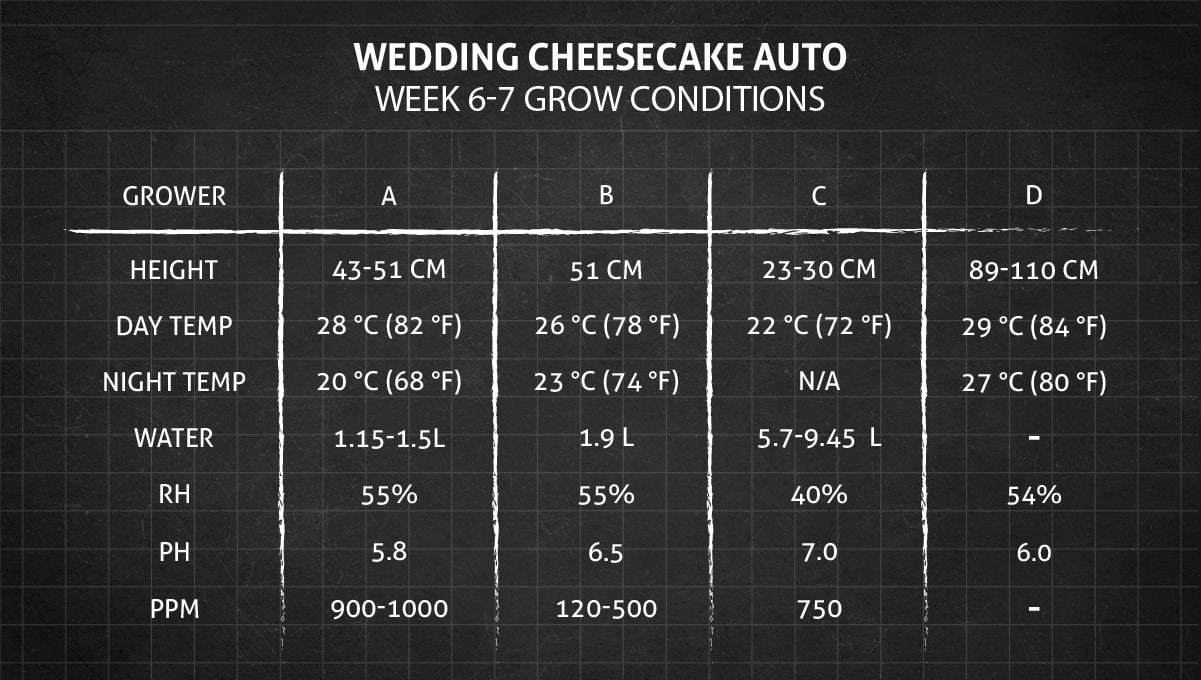
The early cannabis flowering stage is the time when it becomes really thirsty, so growers had to increase their water uptake. Those of them who were using liquid nutrients also raised their TDS levels. In Week 7, the plants were benefiting from increased PPMs of PK-rich fertilizers and from lower RH percentages than during the vegging stage.
Everybody’s ladies now began budding in earnest. Even BasementGanja’s harassment victim showed her first pistils:
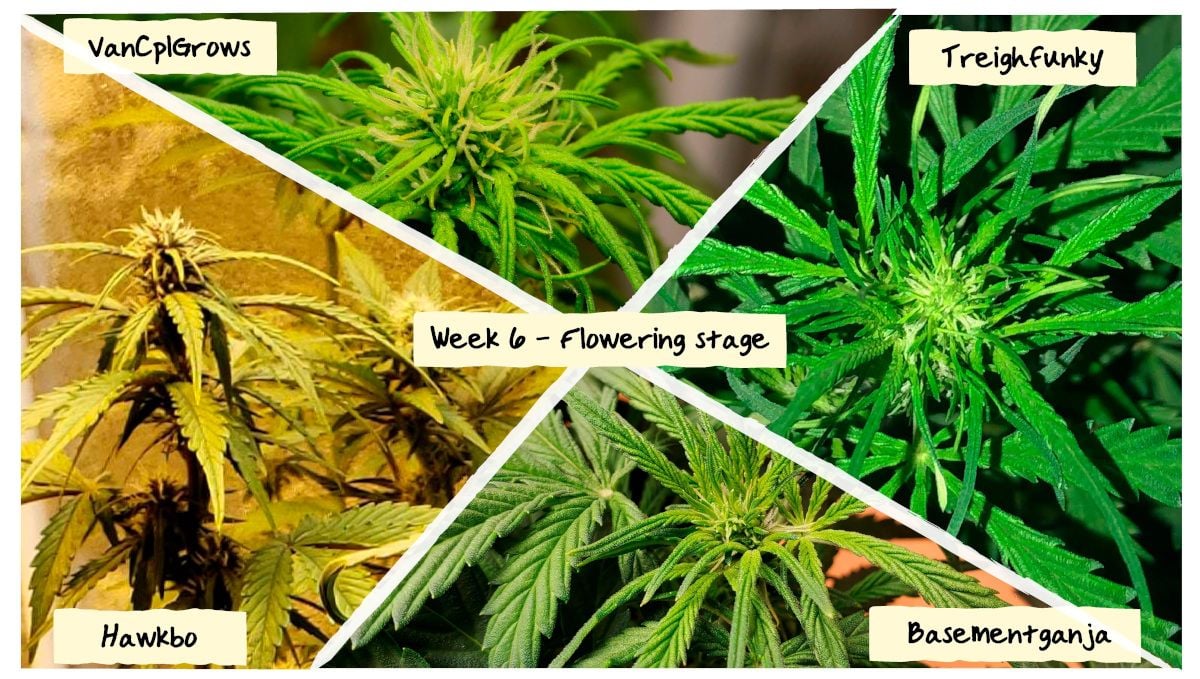
A: Starting To Fill Out
By Week 7, Grower A’s Wedding Cheesecake Auto looked spectacular. If you wonder how he managed to get such fat colas so early on during the autoflower flowering stage, well, maybe the answer is Big Fruits by Green Buzz Liquids which he started using around this time. This amendment is supposed to increase bud production by as much as 25% by facilitating higher auxin production in the buds’ tips.
The other reason must be using coco instead of soil.
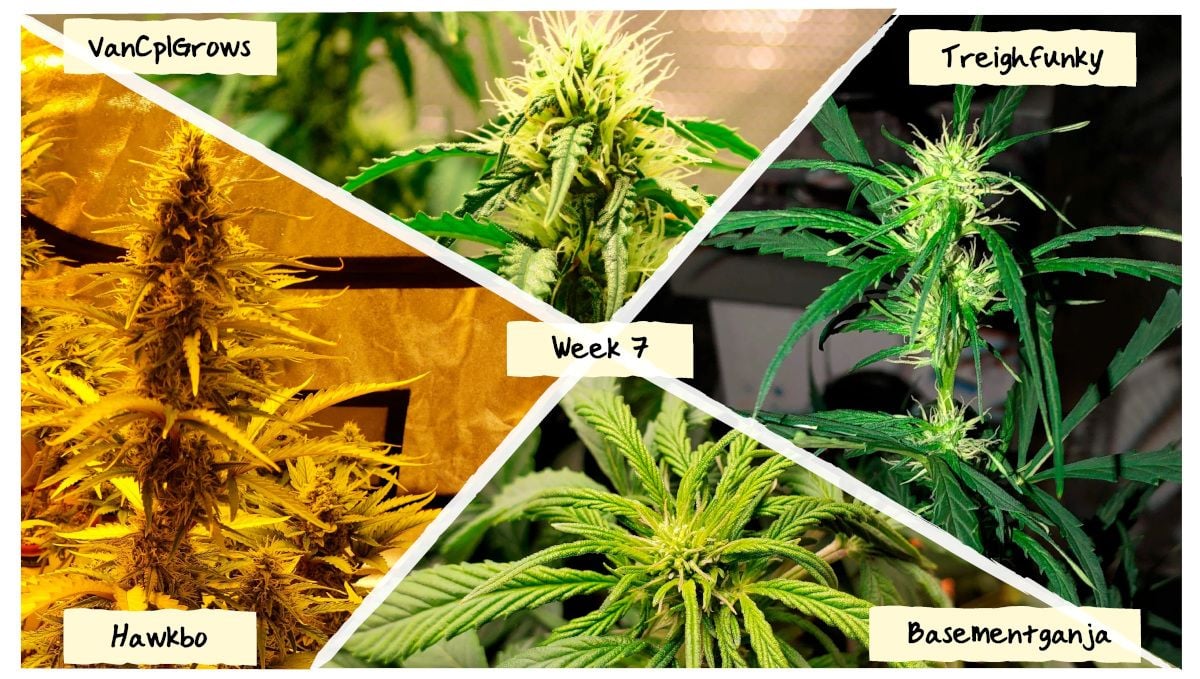
Compare his girl with her peers. Amazing!
B: A Nice Flat Canopy
Structure-wise, my personal favorites were Grower B’s girls (at least on Week 6) because I prefer them lightly trained and sporting a lush even canopy.
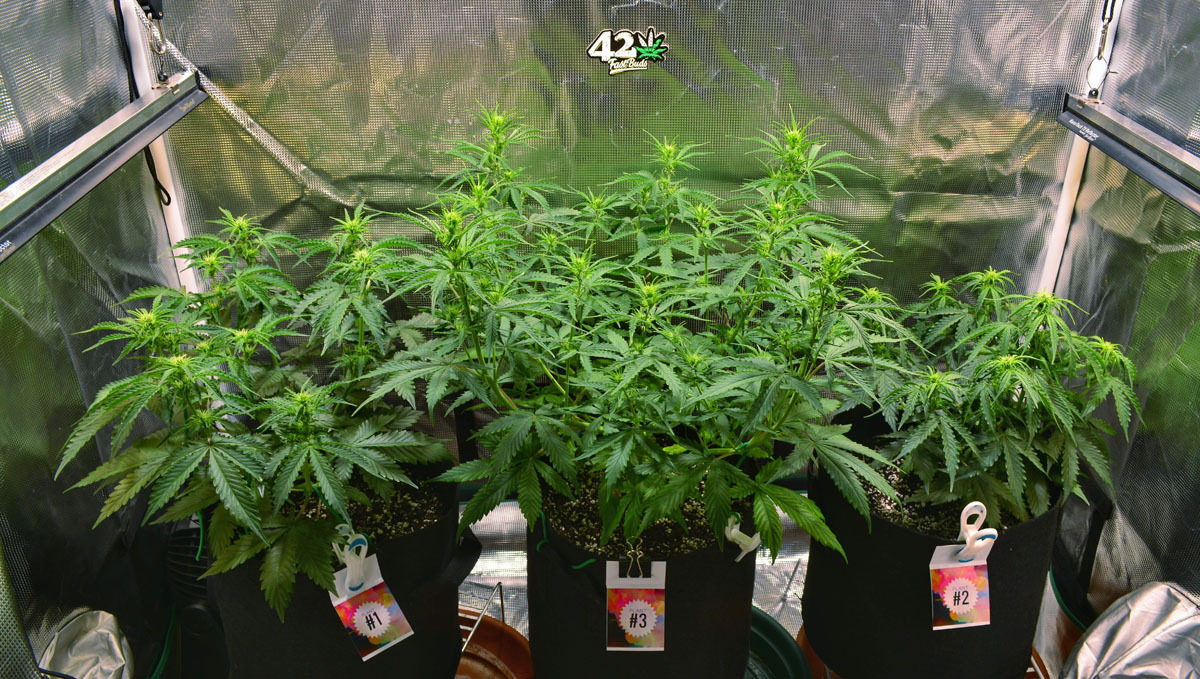
By Week 7, it became evident that VanCpl made the right decision when she topped the taller of her Wedding Cheesecake Autos. Look how many side branches this bush has grown as the result.
Btw, the grower noticed several spots on lower leaves and correctly diagnosed them as phosphorus deficiency. Dark green color, red stalks, bronze discolorations — it all fits:
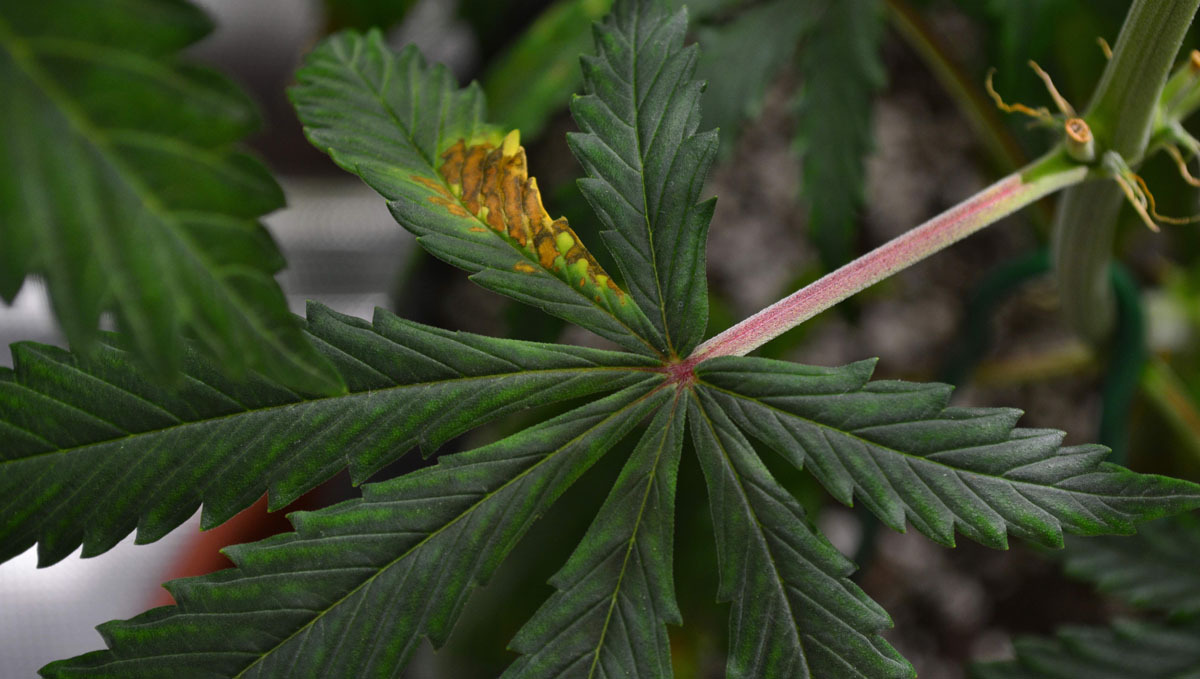
She was afraid it happened because high runoff PPM the week before caused the nutrient lockout. This made her reluctant to give her plants high doses of liquid nutrients. However, she top-dressed some phosphorus-rich dry amendments (Gaia Green "PowerBloom").
C: The Fun Never Stops
For Grower C, Week 6 was as eventful as the previous weeks, only, at this stage, instead of a heavy defoliation, he tried a heavy lollipopping, stripping all bud sites from the lower branches.
This technique helps the flowering marijuana focus all its effort on developing the topmost nuggets.
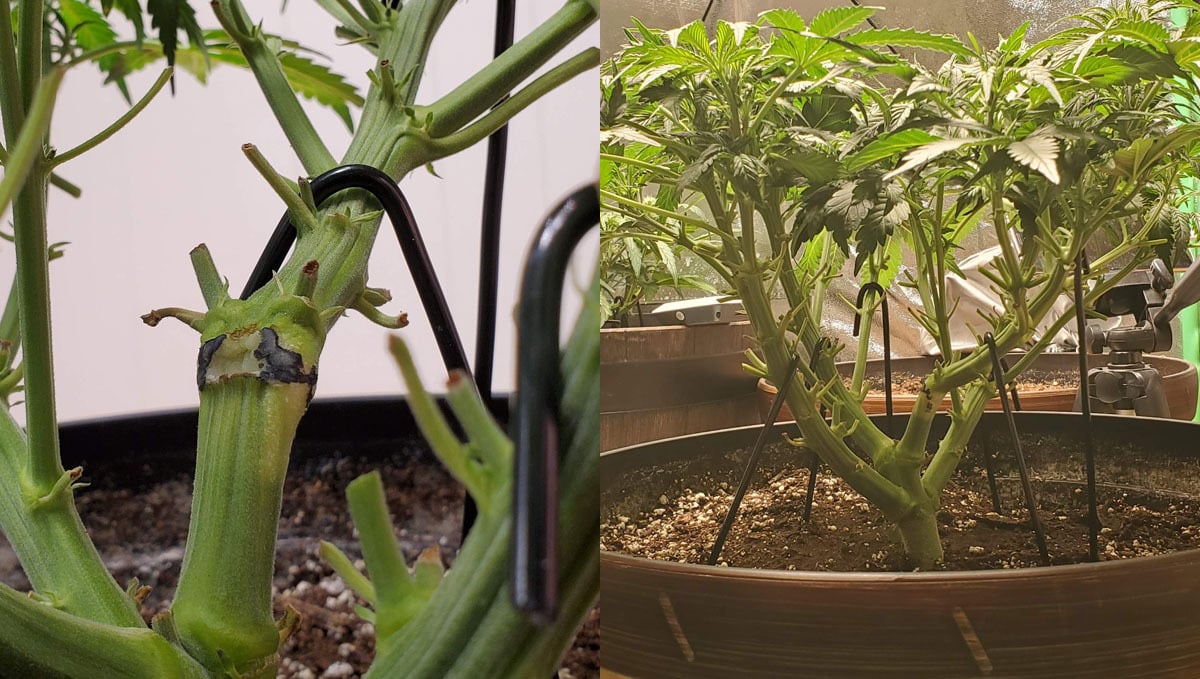
Due to all this high-stress training, this Wedding Cheesecake Auto was still the shortest, measuring only 9 inches (~23 cm) in height.
Only on Week 7, the plant was left alone for once.
The grower commented on how thirsty his squat branchy monster had become recently. Standing in a 6-gallon pot, she easily drank 1.5 gallons of water, and the medium was 90% dry in only 3 days. As an experiment, he gave her 2.5 gallons and saw only 15% of that run off.
D: A Sketchy Plant So Far
It’s Week 6, and Grower D is proud of his 43-inch beast as he has every right to be.
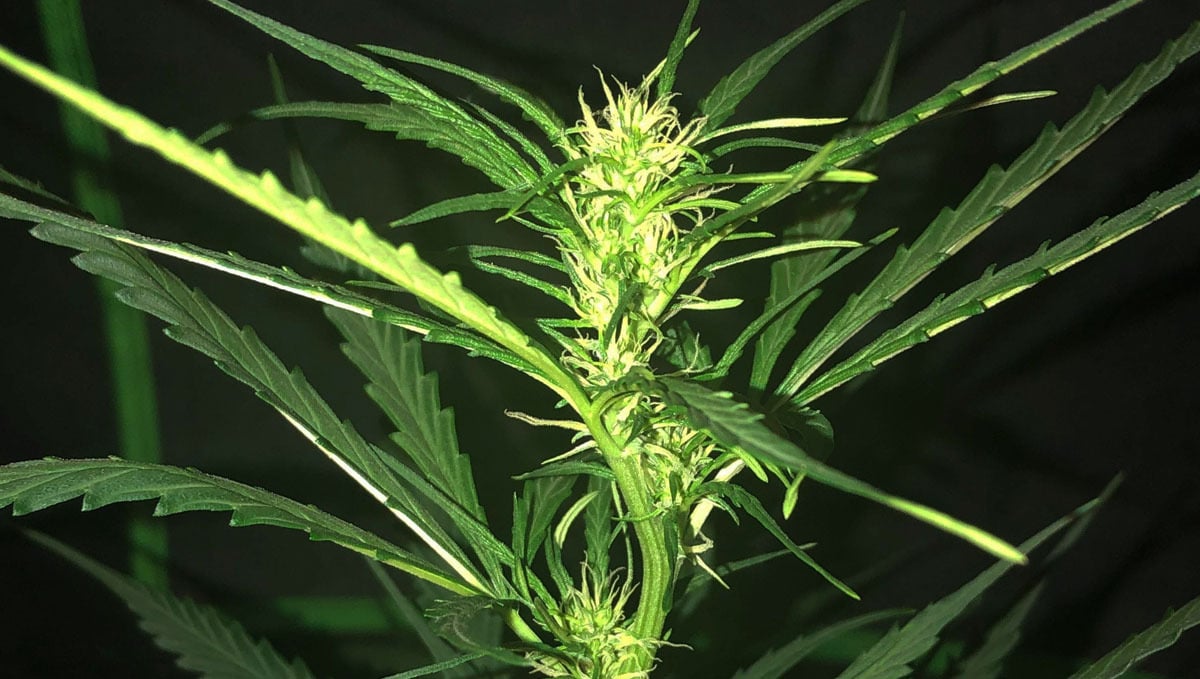
Though not much to look at at the moment, his tall and leggy Wedding Cheesecake Auto promises to be a heavy yielder.
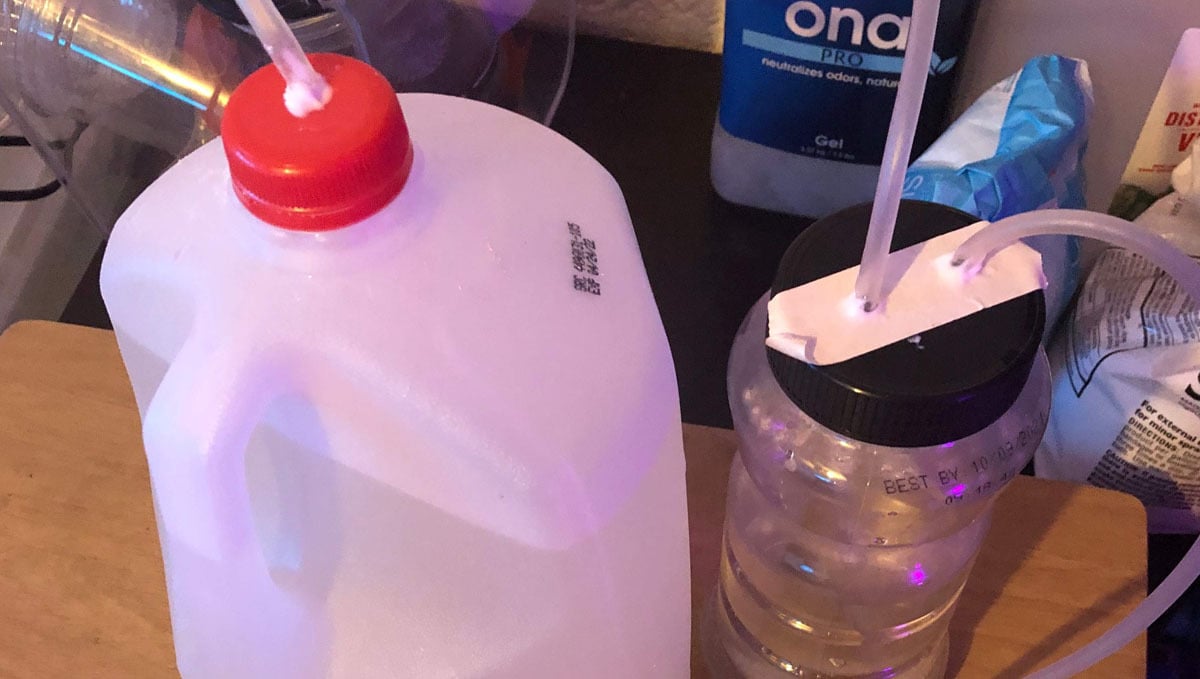
To help her with that, Treigh made a simple CO2 setup. The idea is that, if you infuse your grow room with additional carbon dioxide, you really boost the photosynthesis:
On Week 7, the plant didn’t grow any more: the early flowering stretch seemed to be over. Still tall, spindly, and open-structured, she began to stack up nicely.
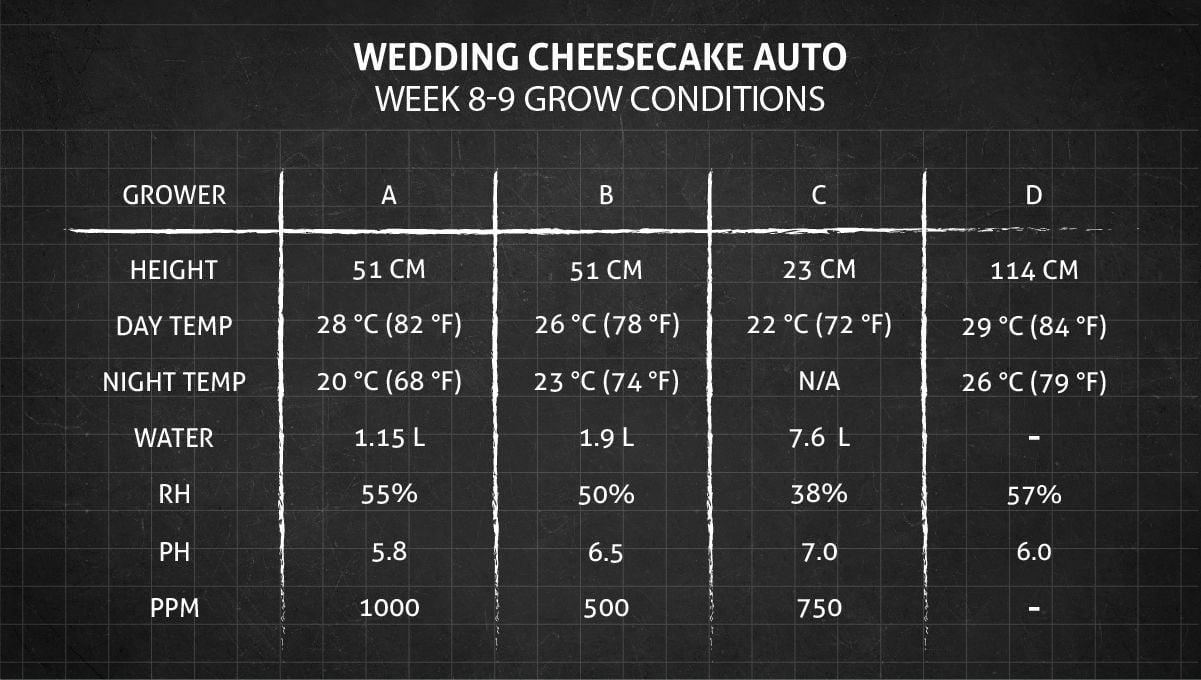
7. Mid Flower (Bulk Phase) | Weeks 8-9
This is the time when the vertical growth slows down to a halt, and all the action is happening at the bud sites which start to fatten for real. The girls are still thirsty and hungry for nutes, but both the volume of water and the TDS volumes remain more or less the same as in the previous week. In the final weeks of the flowering stage, cannabis prefers a slightly cooler air because this helps retain more aromatic substances (terpenes) in the developing buds. Sadly, none of the growers bothered to lower the temps a bit compared to the previous period.
A: Still On Cruise Control
On Weeks 8 and 9 from seed, Grower A did nothing special except some defoliation here and there.
However, he made a new addition to his rich cocktail of nutrients — Organic More PK (Green Buzz Liquids again). A perfectly rational move considering buds need a lot of phosphorus and potassium when they are swelling up.
B: More Causes For Concern
Grower B continued to wonder about the reason why so many leaves on her Wedding Cheesecakes showed deficiencies and went on flushing with plain water.
I honestly don’t know what may have happened there, except that when something goes a LITTLE wrong, I try not to make any sudden moves, so that the situation doesn’t spin out of control.
Yes, her run-off PPM was too high, so what! She could have just watered her plants with a weaker solution or even plain water for a while. But to flush the soil with gallons and gallons of water seemed like an overreaction.
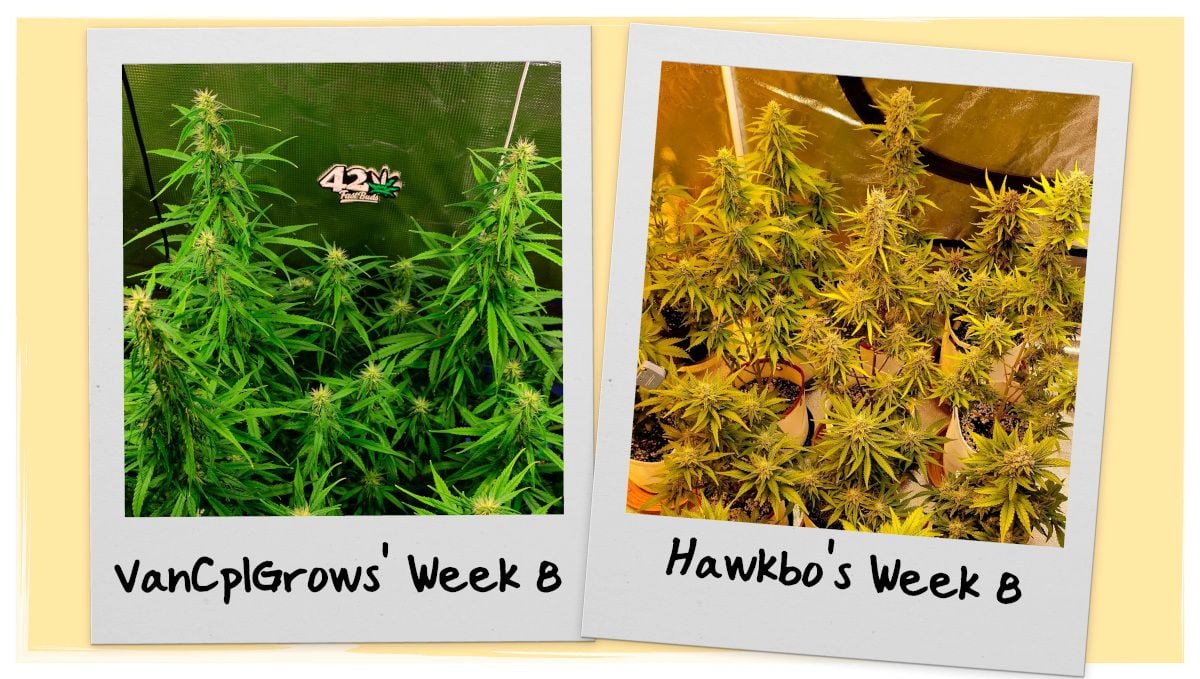
The grower also fretted about the bigger one being too flimsy and low-yielding. In fact, there was nothing wrong with it — it was just the same feral-looking sativa-leaning phenotype that Grower D was so ecstatic about. Plants like this may put off those who got used to indicas, but are great in their own right and can be as high-yielding. Their downside is that they take much longer to mature.
C: Stripped To The Buff Yet Again
On week 8, Grower C who had been itching to defoliate for so long removed another batch of fan leaves that were casting a shade on the bud sites (the umbrella as he called them).
It’s amazing that he still didn’t use any liquid nutrients: all that the plant needed she received from the Schultz Premium Potting Mix. The only thing that the grower gave her from Week 1 was dechlorinated water, now upped to 2 gallons every 5 days.
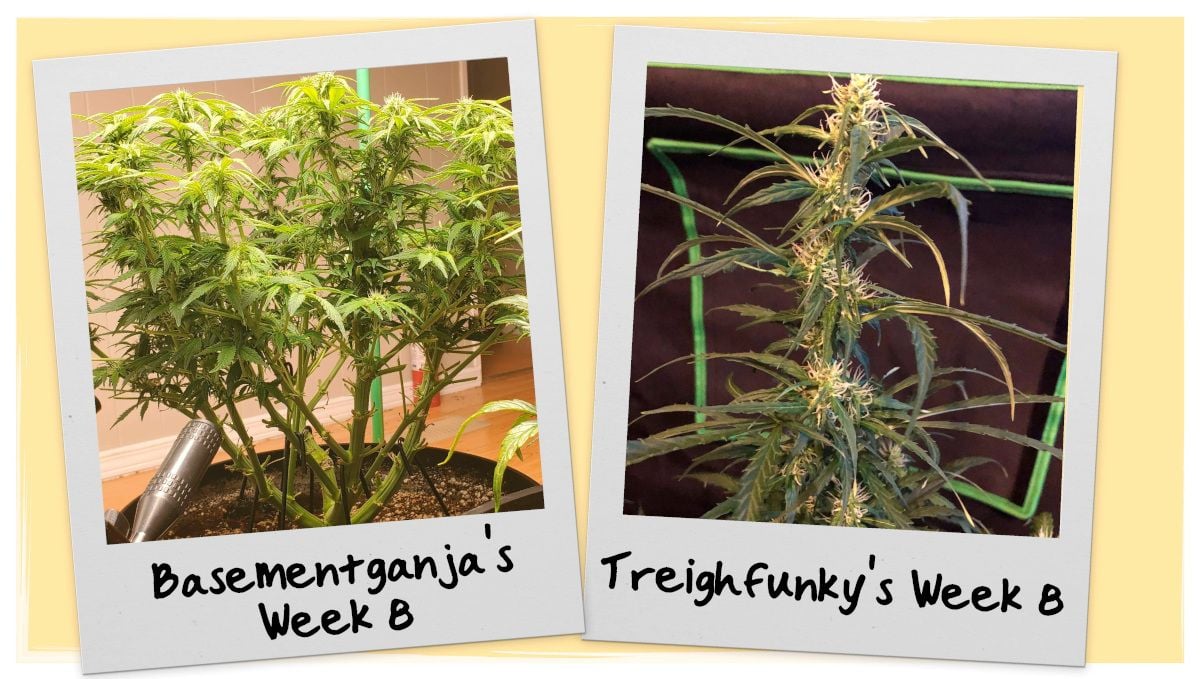
Only on Week 9, he used fertilizer for the first time: a hefty dosage of FloraNova Bloom and also CALiMAGic.
Besides, he performed yet another defoliation.
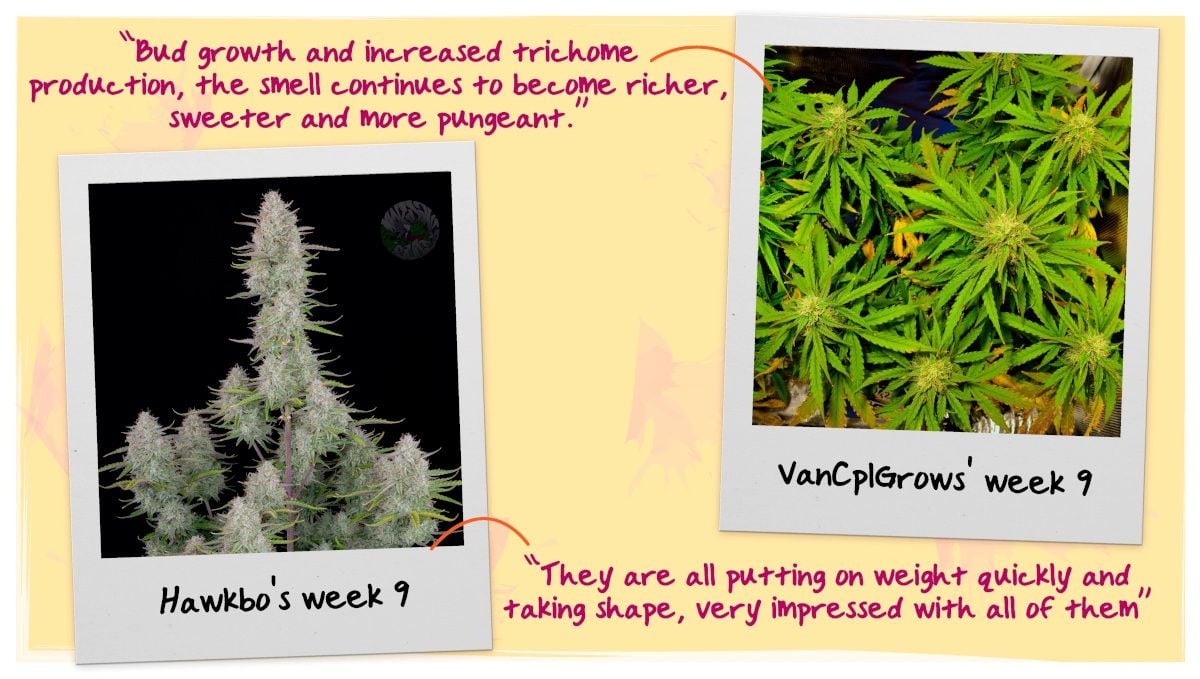
Frankly, I’m not sure why he was so insistent on his Wedding Cheesecake Auto to be foliage-free. After each defoliation, she showed her skin for like only a couple of days, and then was as dense as before.
This proved her to be a real survivor but otherwise seemed only to delay the flowering. In the picture, you can see that BG’s flowers look the least mature of all.
D: Dinner Is Served
In terms of feeding, Grower D followed the same strategy as BasementGanja. His 3 gallons of soil reached him as far as Week 7, and in the eighth week he only added blackstrap molasses as a source of sugars (energy), but probably only because of heavy defoliation before. He would go on using molasses for another 3 weeks at the same dosage (5 tsp/gal).
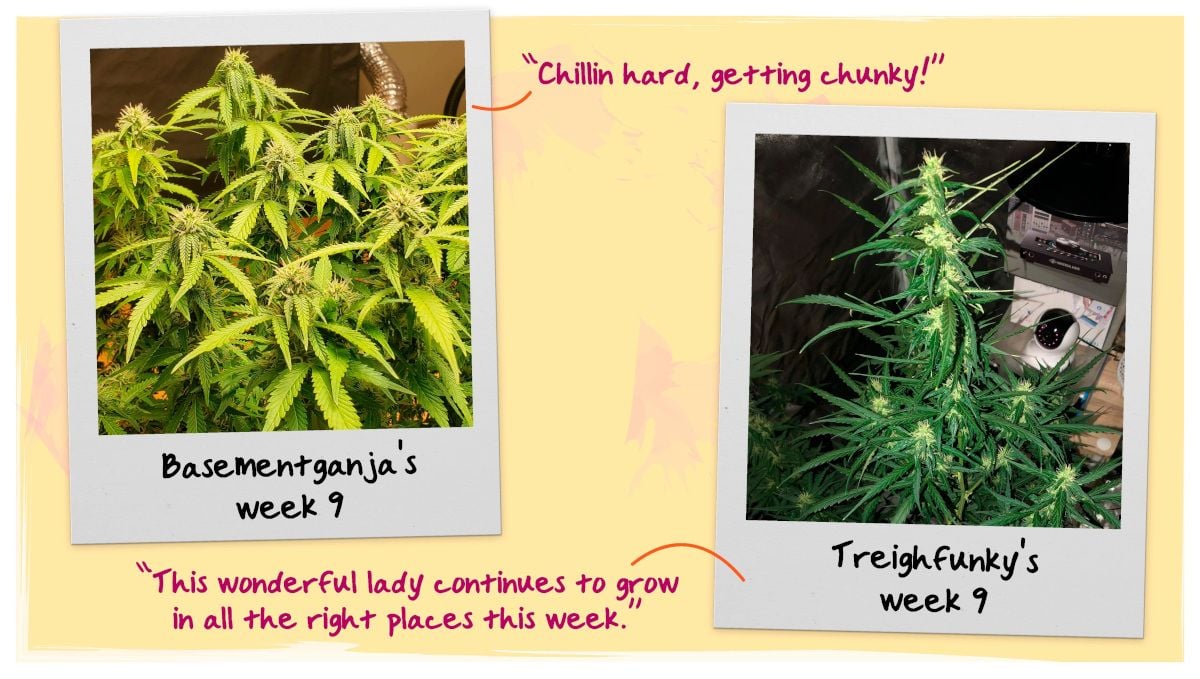
And on Week 9, he began to supplement the nutrients still left in the soil with flowering fertilizers, specifically FloraBloom (not more than one-third of the recommended dose).
8. Ripening And Harvest | Week 10 (And Beyond)
In the last weeks leading up to harvest, the main concern is the relative humidity as the plants take up a major part of the grow space now, evaporate a lot of moisture, and their buds get very big and dense, inviting mold and other fungal infections.
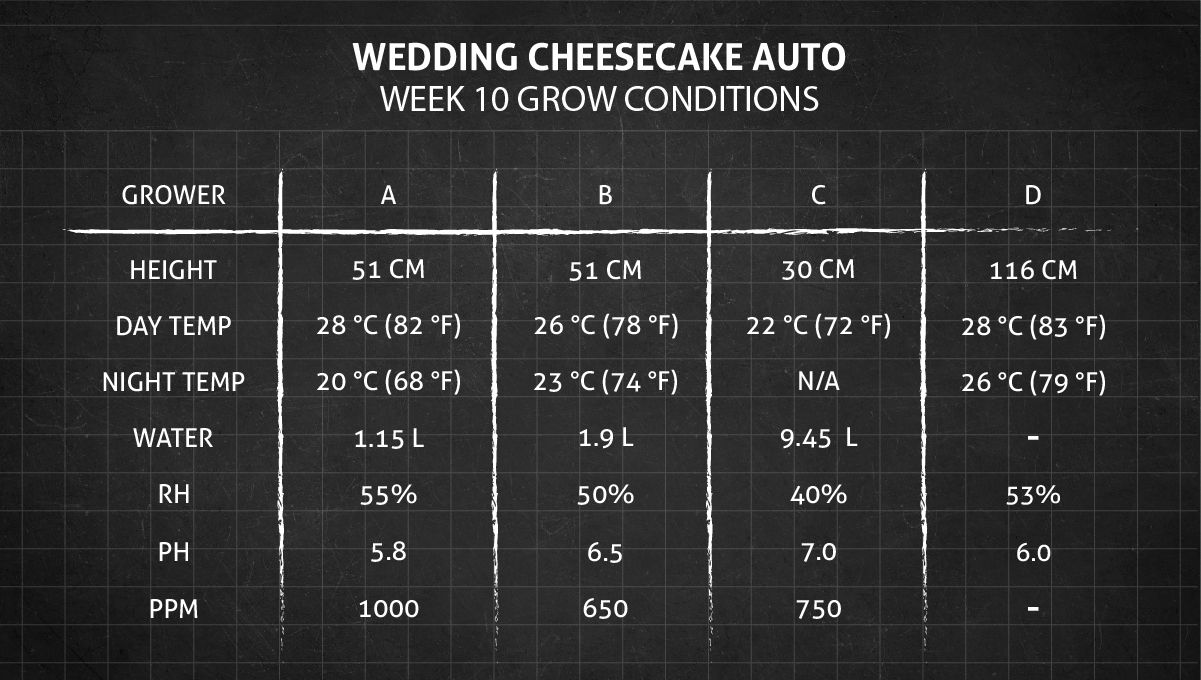
Two of the growers finished the race on Week 10. Let's take this opportunity to look at the final size of their plants and how they got there. Note how much difference training makes, especially such hardcore methods as Grower C used throughout most of the cycle.
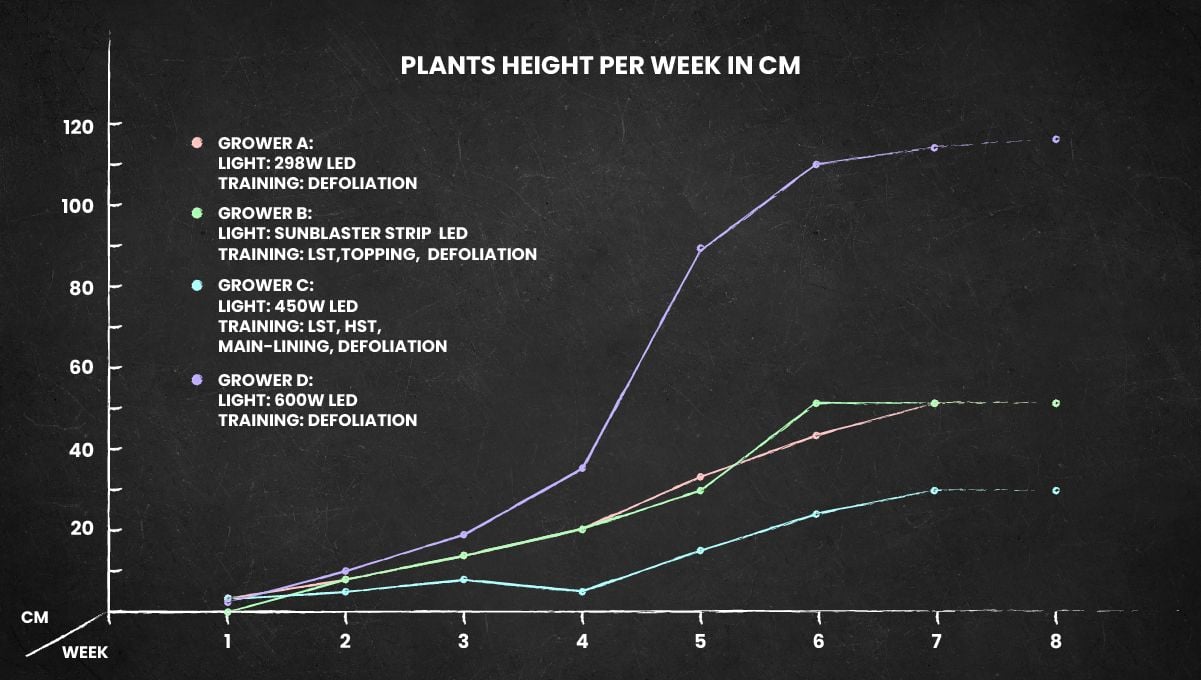
This table also underscores the importance of using at least some milder form of LST for autoflowers with a strong sativa expression. Or else your plant may get very tall (like Grower D's). Fortunately, he had a big grow tent to accommodate an auto of such size.
A: A Frosty Miracle
Grower A chopped his Wedding Cheesecake Auto at the peak of her glory. She looked stunning, with more white in the buds than any other color. A bag appeal to die for!
In the final days, the grower trimmed away all fan leaves.
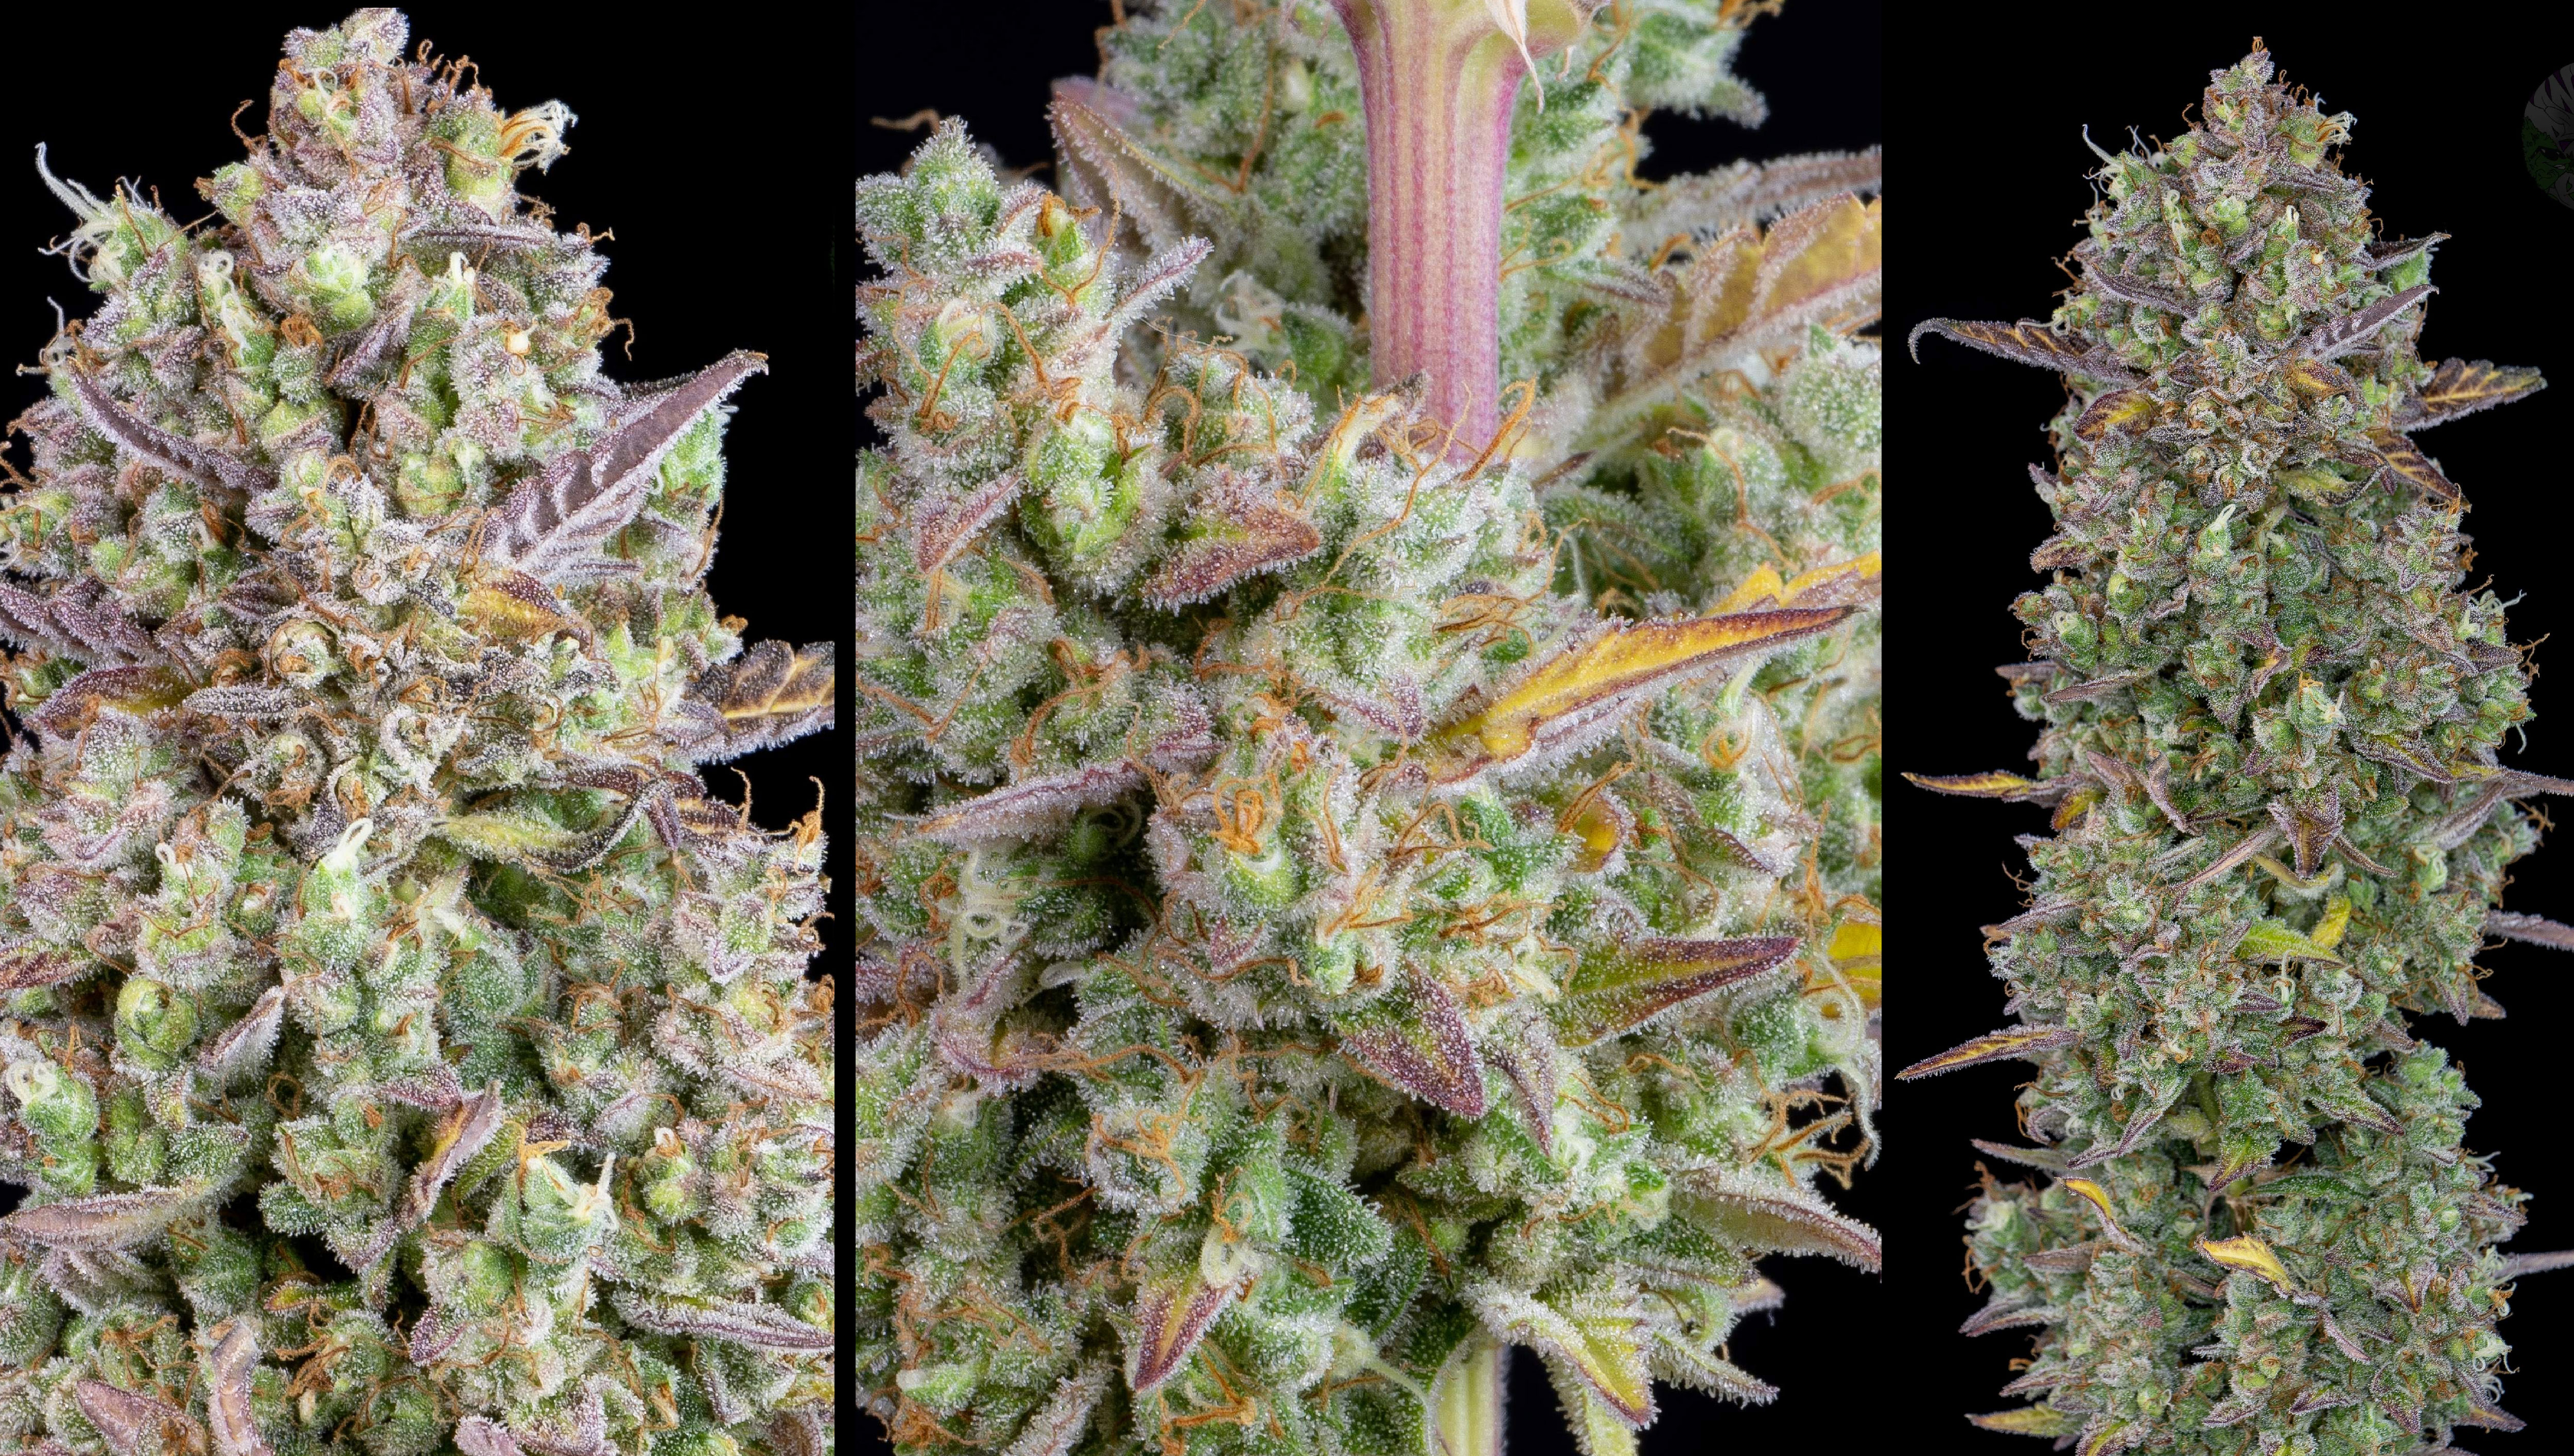
This revealed the structure of the plant—a classic Christmas tree shape, with a substantial main cola and many side branches not quite reaching the middle of the plant. A structure like this makes Wedding Cheesecake Auto a very convenient option for SOG (sea-of-green) setups.
B: Two Out Of Three Have Crossed The Finish Line
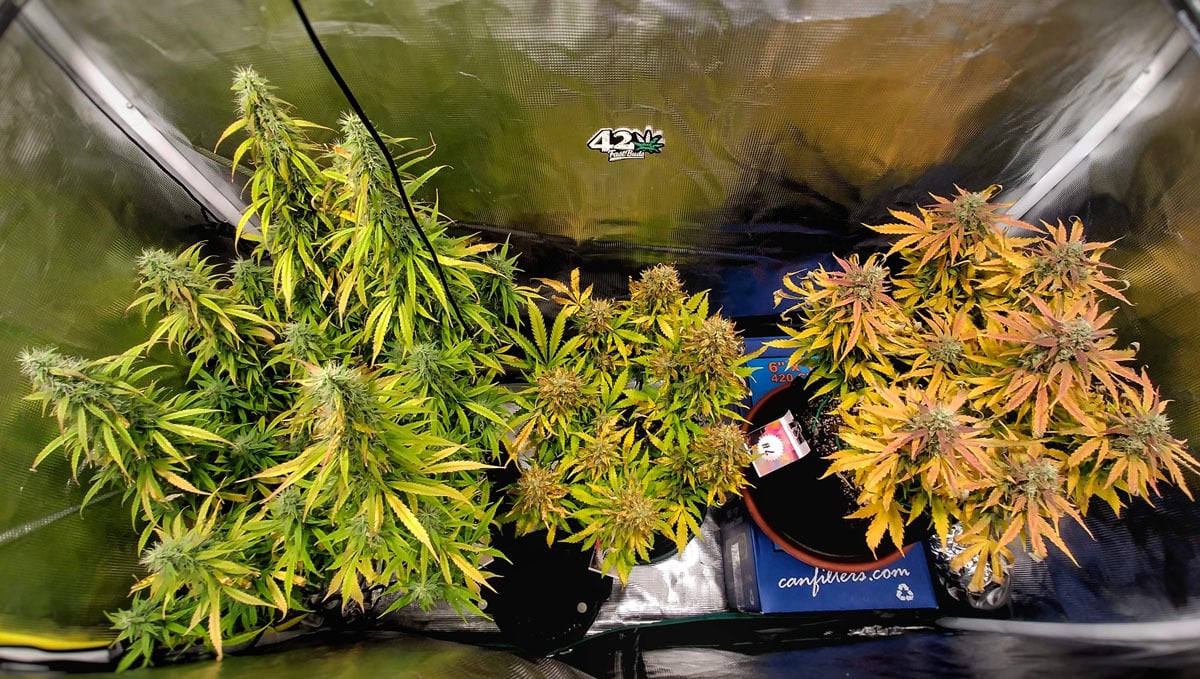
Grower B's girls were by no means picture-perfect, but mature enough to be cut down. At least two of them. She explained why her tall plant’s slow progress had made her so nervous: she didn’t have a separate room for drying, so all three had to be chopped at the same time.
When the fastest of the three showed the first amber trichomes, she turned off the lights for 48hrs of darkness (as a way to boost the production of THC). And here they are, all three of them, just before the lights off:
For the other two growers—BasementGanja (C) and Treighfunky (D)— the harvest time was still several weeks away, but every extra week was worth the wait because the final rewards would be jaw-dropping.
Let’s have a look at what was happening to both of them for the rest of the grow.
BasementGanja (Grower C)
In the remaining 6 weeks, the grower continued with his watering schedule where he gave his girl plenty of water (2.5 gallons for the 6-gallon pot) and then waited for 5-6 days for it to dry out. Only when the root zone became 90-95% dry, he gave his Wedding Cheesecake Auto the next plentiful watering.
With a regimen like this, it would be quite dangerous to use a lot of nutrients (their concentration would sharply rise as the water in the soil depleted), so he was rather stingy with fertilizers.
The grower was also kind enough to make a time-lapse video of his Wedding Cheesecake Auto’s development throughout her life cycle. It’s very short and a delight to watch!
On several occasions, the grower also noted that pH of the runoff water was too low and did a thorough flush (25 gallons at a time) before feeding her with a nutrient solution that had a pH level as high as 8.0.
Warning: Cannabis doesn’t like such wild pH swings. Even if your runoff is way outside the normal range, don’t go overboard with the pH levels of your feeding solution. Try to fit into the 6.0-6.5 range for soil and 5.5-6.0 for hydro and coco.
Specifically, in this particular case, I wouldn't exceed 6.5. Besides, the Wedding Cheesecake Auto looked quite healthy to me for such extreme measures.
Anyway, by Week 16 Grower C’s gorgeous lady was ready for harvest with an insane amount of not too fat and long, but very hard-and dense-looking colas.
Treighfunky (Grower D)
Treighfunky’s girl was getting various bloom fertilizers and other additives, but the grower kept alternating between giving her a nutrient solution and just plain water. The sugar leaves—those sticking from the buds—soon became deficient: first yellow, then dry and brittle.
I would say that she was simply hungry for N (which is normal and even desirable in late flower), and, since there were no fan leaves left to draw nitrogen from, she was taking it out of sugar leaves.
Here’s Grower D’s feeding regimen for weeks 10-14:
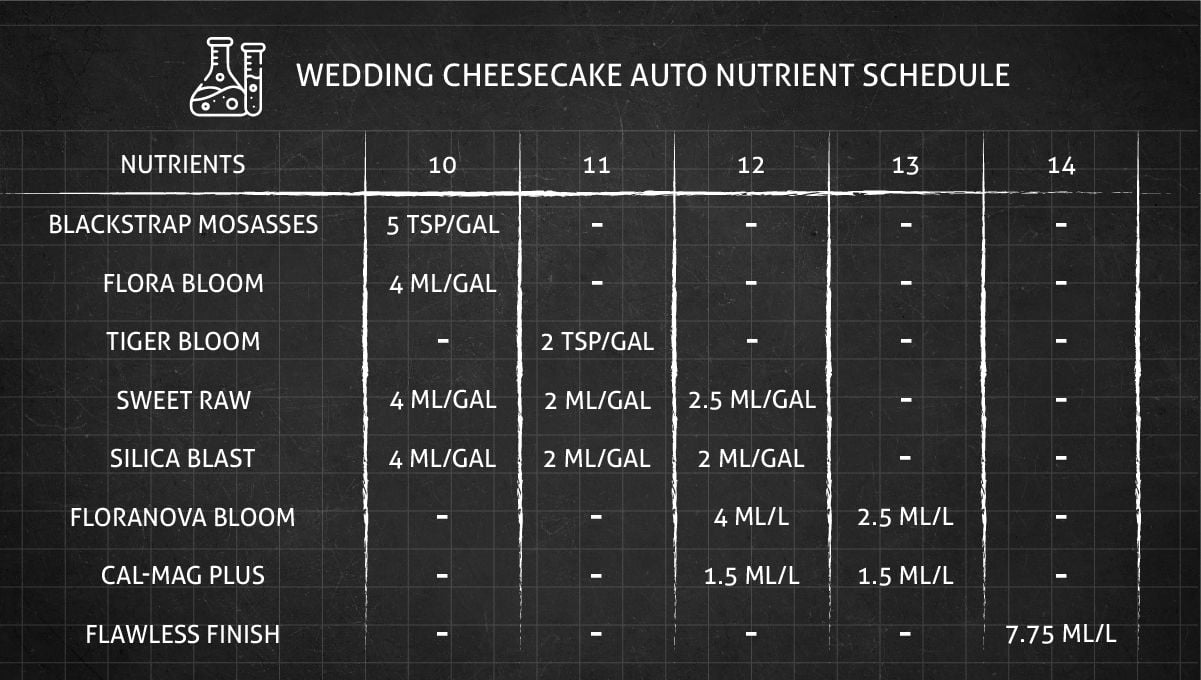
Apart from feeding and watering his Wedding Cheesecake Auto strain, the grower only did the following two things:
- Removing dying sugar leaves (probably a mistake because the plant then begins to suck nitrogen out of the leaves that are still green),
- Using yo-yos from week 11 when the buds got so heavy they began to droop.
I personally would want my plant to look more vibrant, even in its final week, but yield-wise this Wedding Cheesecake Auto is spectacular. Great job, Treighfunky!
9. How to Properly Trim, Dry, and Cure your Cannabis Harvest
After chopping down your cannabis plants, proper trimming, drying, and curing are vital for you to get good quality buds. All of these processes help preserve the flavors and aromas present in cannabis while getting rid of that harsh taste caused by chlorophyll. This means that after harvesting your plants the work is not over yet. So after harvest, you still have to trim the flowers, then dry and cure them to not only preserve flavors but stop moisture loss so that your harvest is not overly dry. The first step after harvest is to trim your harvest, so let’s read along to understand how it’s done.
Trimming Your Cannabis Harvest
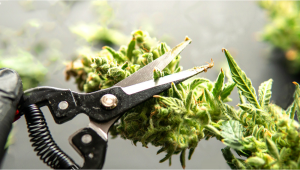
Trimming cannabis consists of removing the big fan leaves and small sugar leaves on the buds, and it’s a huge part of growing cannabis as it not only prevents your flowers from getting mold but also improves the aroma, bag appeal, and overall experience when smoking your flowers.
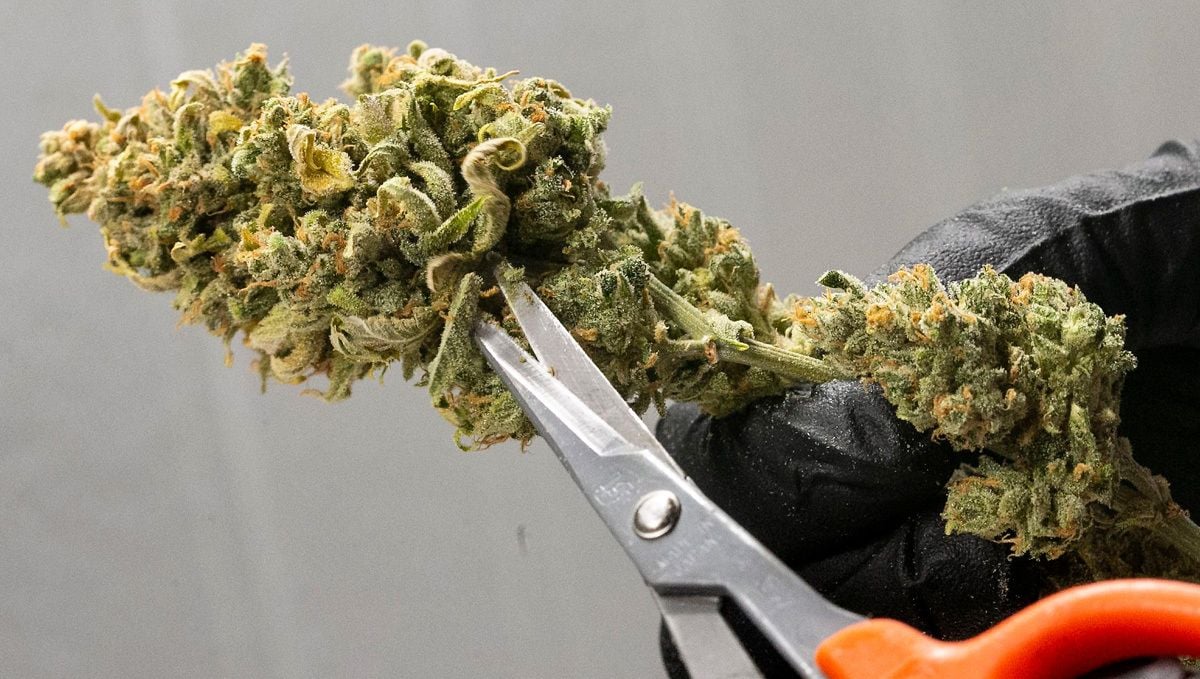
The trimming process can be done before drying your plants (aka wet trimming) or after drying your harvest (aka dry trimming).
Wet Trimming
Wet trimming (as the name suggests) refers to removing the sugar leaves before drying your plants. This is usually not recommended as it can cause your plants to dry fast, which ends up diminishing flavors. But, if you’re having trouble controlling the drying conditions, it may be the best choice as sugar leaves contain release moisture, and removing them can prevent moldy flowers.
Pros of Wet Trimming
- Can prevent mold in rooms with high humidity;
- Flowers dry faster;
- Allows you to dry more buds at the same time (on the drying rack).
Cons of Wet Trimming
- Can be a more tedious and messy process as the leaves are still fresh;
- Harvest can dry too fast, resulting in loss of flavor and smell.
Dry Trimming
Dry trimming (as the name suggests) refers to removing the sugar leaves after drying. This is the recommended method as it can help maintain proper humidity levels in places with low humidity levels and usually results in a better-tasting harvest as flowers dry slower.
Pros of Dry Trimming
- Helps maintain proper humidity leves in low-humidity dry rooms;
- Flowers dry slower and will maintain the full flavor and smell.
Cons of Dry Trimming
- Can easily lead to mold in dry rooms with higher humidity levels;
- Dried sugar leaves can stick to flowers, making it harder to remove them.
Cannabis Drying Rooms
A proper cannabis drying room should be completely dark, with a temperature ranging from 15 to 21 °C and humidity levels between 55 to 65%. Now, it may be a bit hard to maintain these conditions so make sure to get a hygrometer in order to know exactly the conditions you’re dealing with and make proper adjustments. In order to maintain the proper conditions, you’ll need a small fan, AC unit, or humidifier/dehumidifier. If you’re looking to get the best possible quality, it’s highly recommended to invest in these pieces of equipment as you want to avoid huge fluctuations in temperature and humidity at all costs.
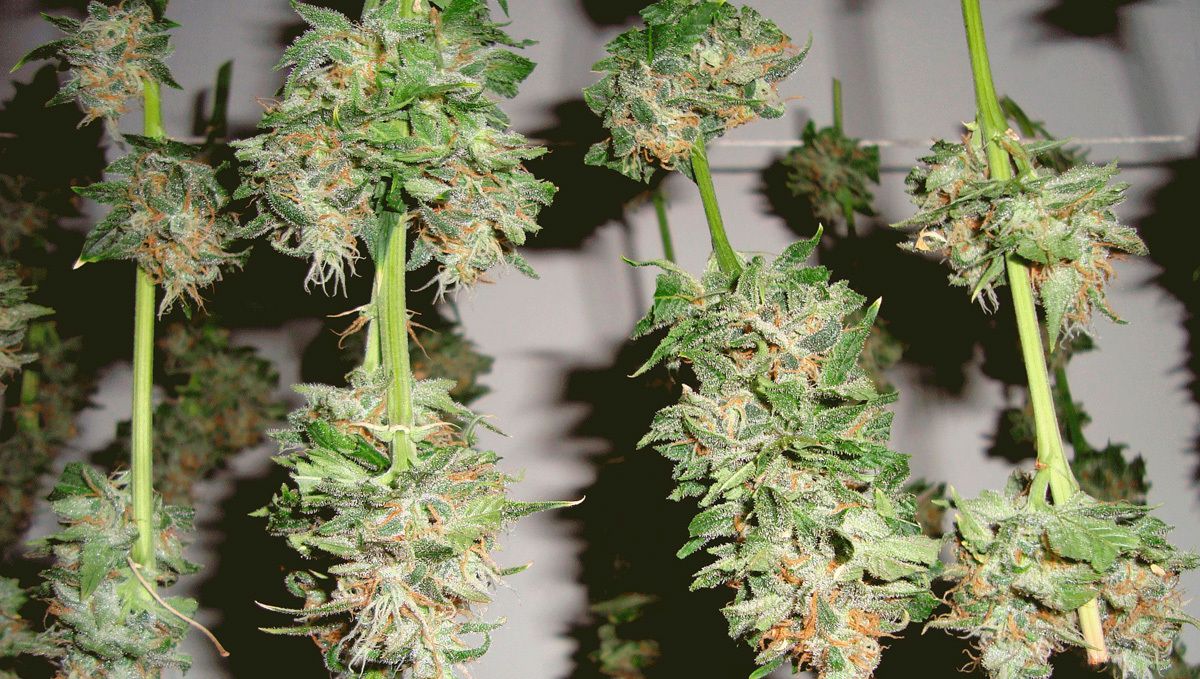
On top of that, remember that sunlight or strong light will degrade your harvest so cover all windows and light sources. It’s perfectly fine if you need to open the door to check on the harvest but avoid prolonged exposure at all costs.
How to Dry Cannabis Flowers
After opting between wet and dry trimming, it’s time to dry your harvest. In order to do this you can either hang the whole plant upside down (when dry trimming) or dry it in drying racks (when wet trimming).
Hang Dry Cannabis Buds
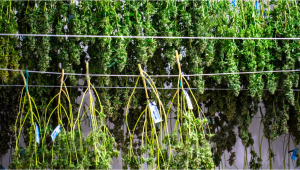
Hang drying whole cannabis plants requires less effort and time but takes much more space as it consists of hanging whole plants upside down (with all the branches, leaves, etc..).Hang drying will save you time because you don’t have to cut each individual bud but will also take longer to dry (anywhere from 7 to 16 days) as there is more green matter (branches, stems, stalks, and leaves).
Drying Racks for Cannabis Buds
When opting for wet trimming, you will need a flat surface (aka drying racks) where you’ll place all the buds you’ve cut individually. These racks are usually circular with a special type of mesh that improves airflow. Due to the buds being cut individually, the buds usually can take anywhere from 4 to 7 days to dry.
Curing Cannabis Flowers
Once you’ve finished drying your flowers, it’s time to cure your harvest. Obviously, if you opted for dry trimming you will have to trim the buds first. For curing flowers, it’s recommended to use airtight glass jars. These jars will not only stop moisture loss but will also preserve terpenes and cannabinoids, which results in more flavorful flowers.
For the curing process, you will have to maintain the humidity levels in the curing jar ranging from 55 to 65% and can take anywhere from 7 days up to 2 months or even more, this depends on the specific strain you’re curing. The curing process consists of drawing moisture from the center of the flowers towards the outside of the buds, so maintaining the humidity levels mentioned are essential to avoid mold during curing.
Also, a proper cure will allow you to store weed for up to 2 years without loss of potency! As you can see, curing weed is extremely important as it helps finish off the flowers by not only improving taste and smell but also removing chlorophyll, which gets rid of that harsh taste fresh weed has.
How to Cure Cannabis Flowers
In order to properly cure your weed you should do it in a completely dark room that’s not too humid and with a relatively stable temperature. Avoid wet basements! Anyway, in order to properly cure your harvest you will need:
- Airtight jars;
- Hygrometer that measures temperature and humidity (one for each jar).
So place your flowers in your airtight container, and avoid plastic jars as you definitely do not want your buds to taste like plastic. So pack the buds in the jar without compacting or pressing them and seal the jar. A couple of days into the curing process you’ll notice how the buds are a little bit softer, this is the moisture from the middle of the flowers coming out. If the buds are too hard or feel dry, they are likely to overdry so grab the hygrometer and place it inside the curing jars, the hygrometer should read 55 to 65% humidity.
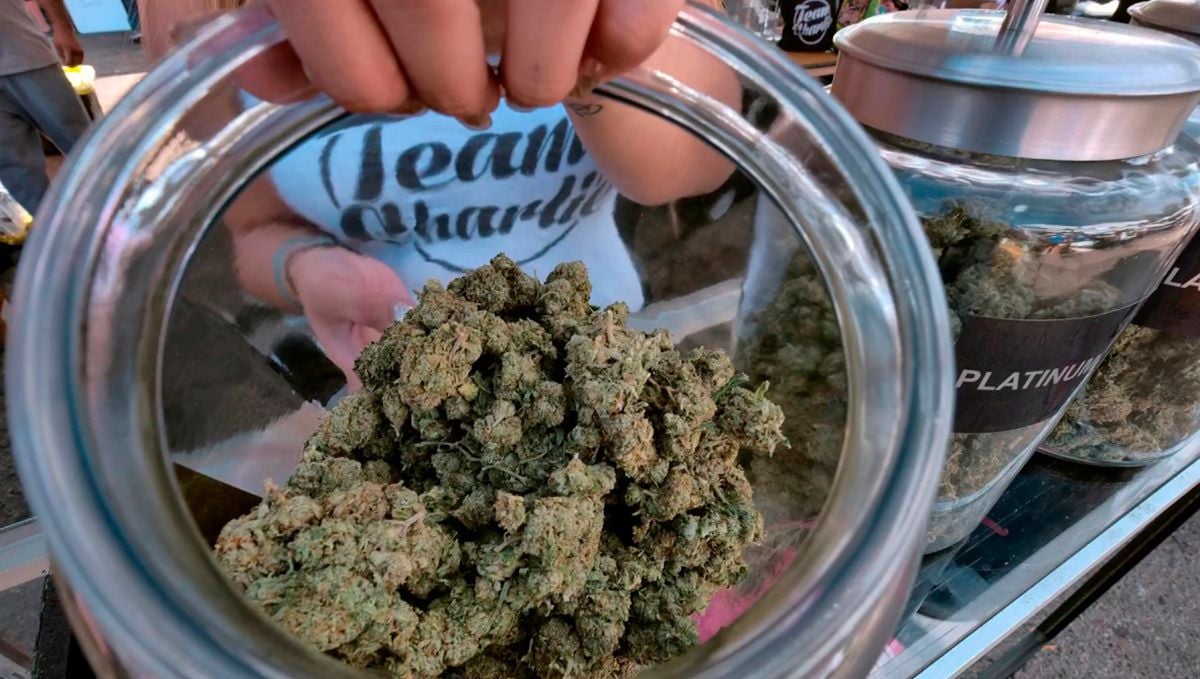
If by any chance your buds get too dry, make sure to grab a humidity pack to rehydrate the buds. Now, if the buds are too wet, leave the lid off for a couple of hours, this will help you get rid of the excess moisture. Removing the lid off the curing jars is referred to as “burping”.
Burping the Curing Jars
During the first week of the curing process, you’ll need to open the curing jar once or twice a day for a couple of minutes or hours, this process is called burping. Burping serves to release excess moisture and replenish fresh air in the curing jar. After the first week of burping, you can now burp the curing jars only once every 2 to 3 days and after two weeks, your buds should be properly cured but it depends from strain to strain. So continue curing (and burping your flowers every one to three weeks) until you’re happy with the results.
Keep in mind that it’s essential to smell them during the whole process as it’s fairly easy to get moldy flowers so if you smell ammonia when opening the curing jar, the buds are not dry enough and will probably get mold soon so leave the lid off for 1 day. Now, after properly curing your harvest you can store the flowers for up to 2 years or more, so make sure to store your harvest in a cool place as temperatures ranging from 25 - 30 °C can cause mold.
Top Tips for Storing Cannabis Flowers
Always remember that excessive heat can evaporate cannabinoids and terpenes so here are some tips to keep your stash always fresh:
- Store your curing jars in a dark, cool place out of direct sunlight;
- Use glass jars and avoid wooden or plastic materials;
- Use hygrometers and boveda packs to keep your weed always fresh.
10. The Outcome
Wedding Cheesecake Auto Yield
After just 10 weeks from seed, Hawkbo harvested 60g (2.12oz) of gorgeous tight nugs, completely covered in white ‘frost’. The grower noted that Wedding Cheesecake Auto had a high calyx-to-leaf ratio and a great commercial potential even in smaller 1-2-gal grow bags.
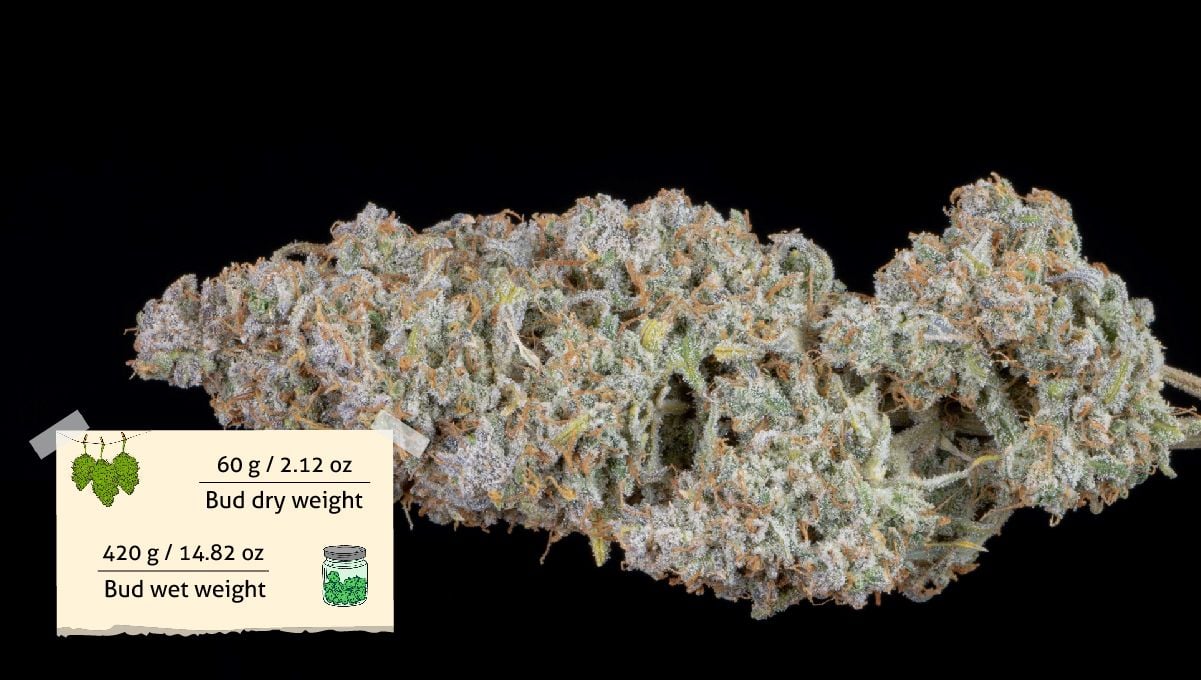
His was what a commercial grow should look like: fast, assured, trouble-free, with no nasty surprises along the way. Fortunately, the coco/perlite mixture and new-generation nutrients can guarantee you just that.
VanCpl’s 3 girls yielded 255g (9oz), or 85g (3oz) per plant. That’s a lot of buds, and the grower could have gotten even more if she gave the slowest of her Wedding Cheesecakes more time to fill out.
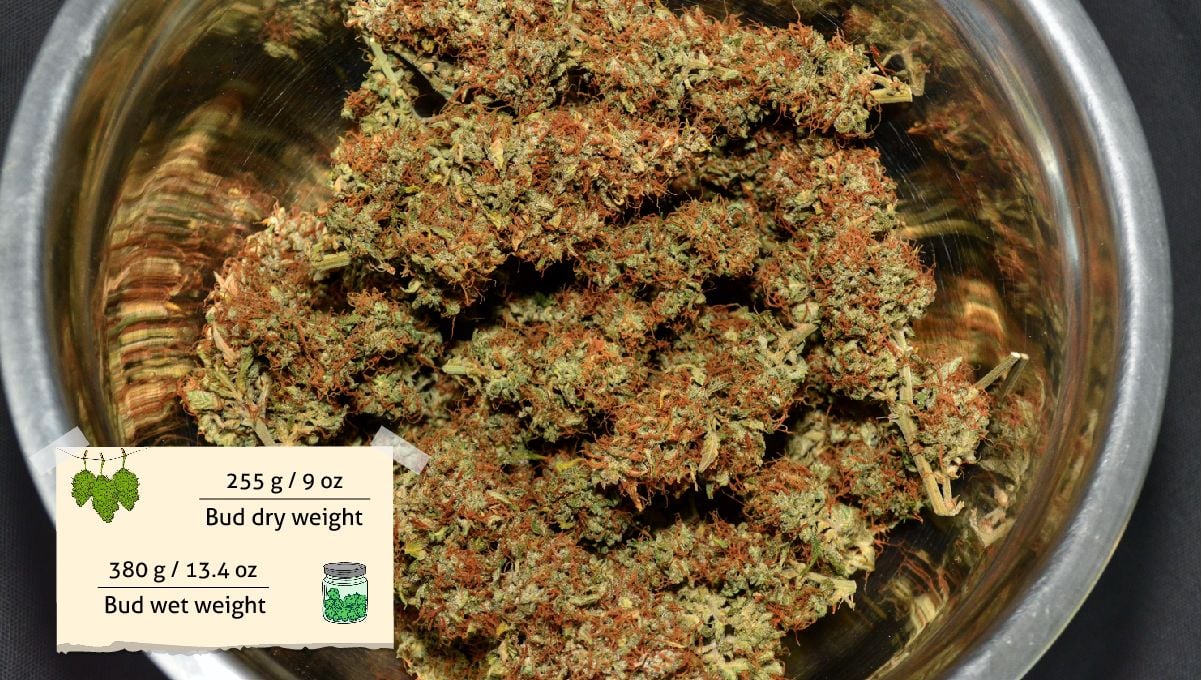
She thinks 1-2 extra weeks would have been enough, but, judging by Treighfunky’s grow, probably more. I think the result would be even better if not for all that heavy flushing.
BasementGanja had to work hard to get his rewards, but they were spectacular - 210g (7.41oz) from just one plant! The downside was the long wait. And we don’t think it was because he had a slow pheno.
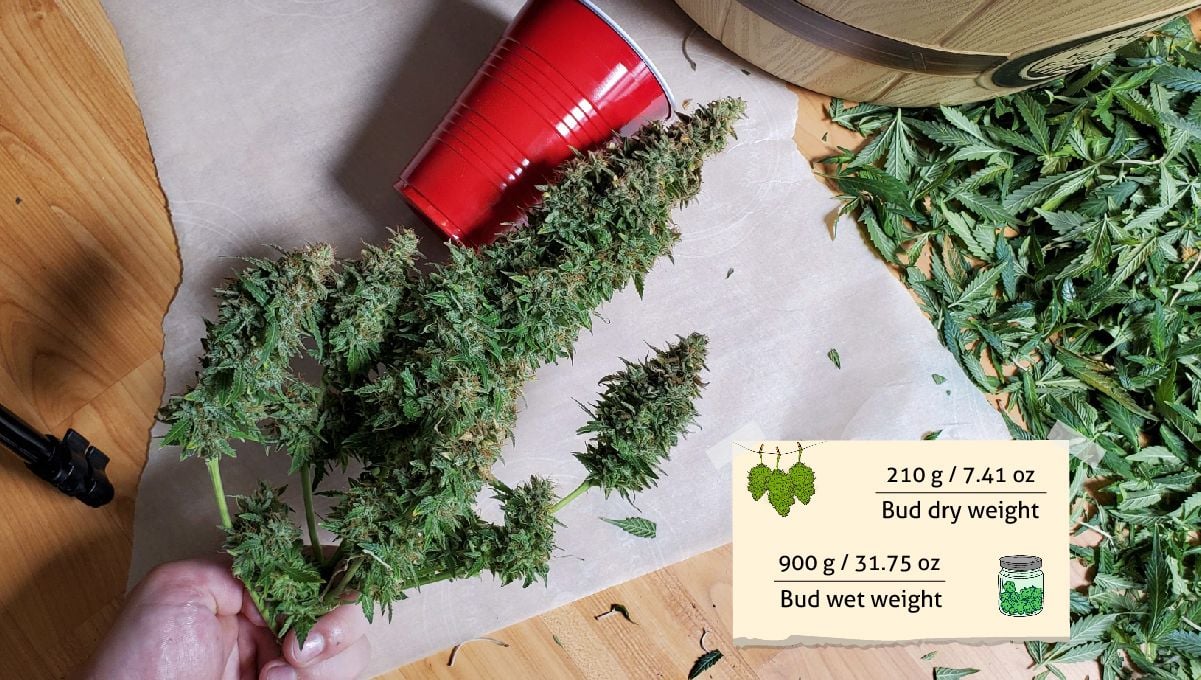
Probably, it was his own doing — his hardcore training methods and the heavy defoliation.
Finally, Treighfunky let his grow run its full course: his long-flowering sativa phenotype finished in 14 weeks from seed and brought him 130.12g (4.59oz) of trimmed and dried buds.
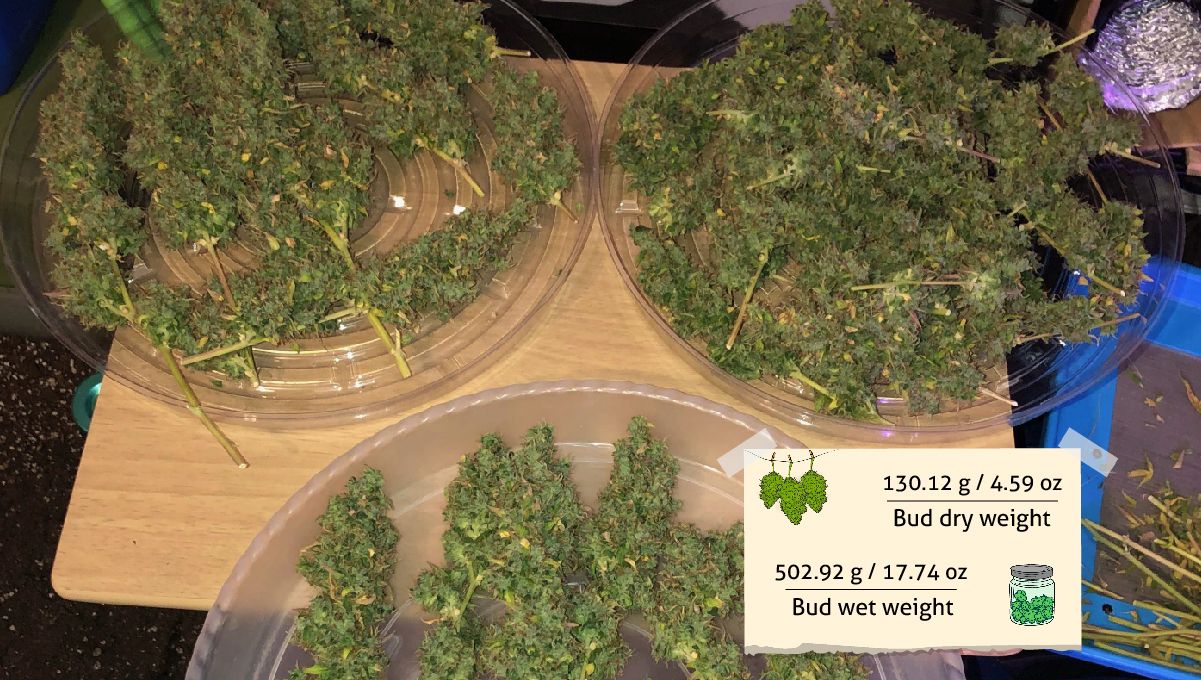
He definitely could have harvested more if only he trained his Wedding Cheesecake Auto more aggressively, or even topped it.
Wedding Cheesecake Auto Smoke Report
As so often happens with grow reports, people are more than willing to share the smallest details while they’re actually tending to their plants, but they kind of forget to come back and make a smoke report after a proper cure.
In this instance, only Treighfunky seems to have waited long enough to give his Wedding Cheesecake Auto the full appreciation. He describes the partly cured buds as smelling of baked goods, with aromas of cream, vanilla, and kettle corn. And this despite the fact that he was struggling to make the temperature during the drying process low enough.
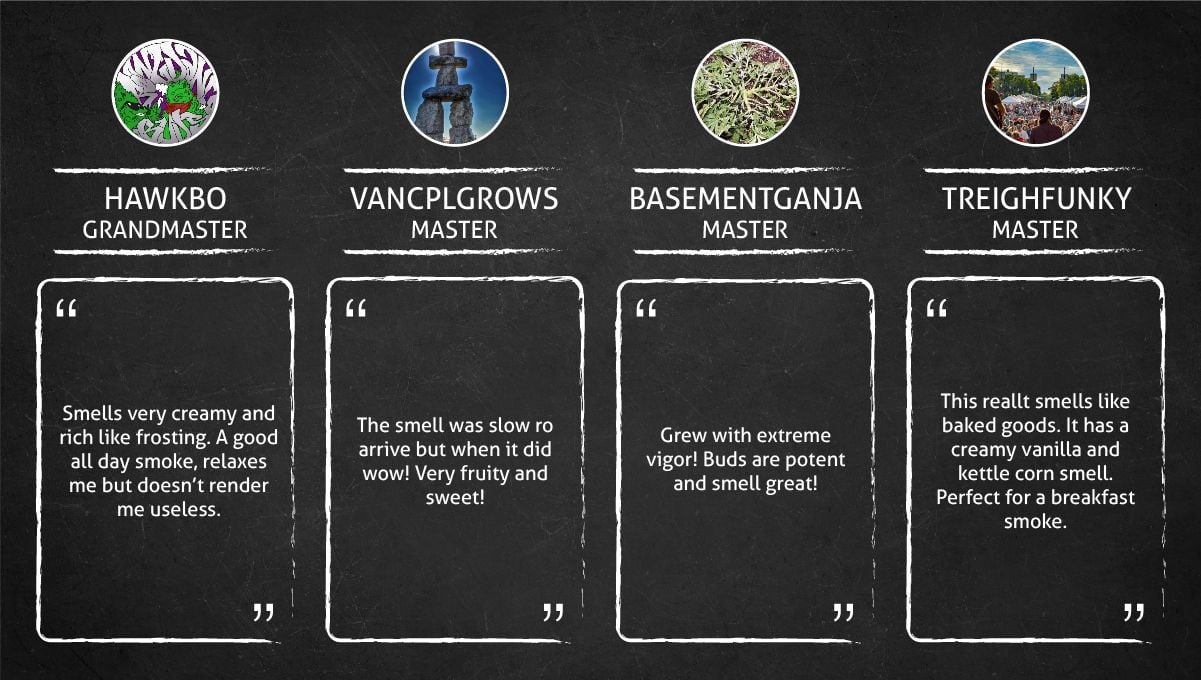
VanCplGrows only described the smoke produced by the uncured buds. She noted a subtle sweetness coming through the harsh pine & hay taste that so many freshly cut nuggets display. BasementGanja was brief, but very warm in his praise, simply stating that the buds smelled great. For Hawkbo, Wedding Cheesecake Auto was a nice smoke, too — smelling richly of cream, “like a frosting”.
We take this opportunity to recommend all newbie growers: give your buds a long cure, like 3 weeks or so, before even smoke-testing them. Even an average terpene profile will come to the foreground, and strains like Wedding Cheesecake Auto will turn out exquisite.
As for the type of effect, VanCplGrows was the only one who didn’t check in to comment on that. Let’s hope Wedding Cheesecake Auto didn’t kill her motivation. Probably not, because the other guys described the high as balanced and relaxing, but with a slight energizing sativa edge to it. This is exactly the kind of effect that experienced smokers—those who can handle the potency of modern-day autos—can use with their morning coffee and throughout the day.
11. In Conclusion
Judging by these 4 grows, Wedding Cheesecake Auto is a remarkably hardy autoflower. If left alone, she grows with no issues whatsoever. And if you decide to use advanced growing methods on her, you can get away with almost anything.
Autoflowering cannabis has a reputation of being rather finicky and fragile, but not this one. Wedding Cheesecake Auto shows great resistance not only to low-stress training techniques, but also to such high stress methods as pruning, defoliation, and even topping.
In fact, topping seems to be a must if your plant happens to be a taller and open-structured phenotype. This may delay the harvest by a couple of weeks, but on the upside, you’ll get an insane number of long and fat colas.
In any case, even a first-time grower will be rewarded with yields that are way above average, and the quality of the smoke will be outstanding.
Happy growing, everyone!
EXTERNAL REFERENCES
- “Photosynthetic response of Cannabis sativa L. to variations in photosynthetic photon flux densities, temperature and CO2 conditions” Physiology and Molecular Biology of Plants. October 2008.
- “Temperature response of photosynthesis in different drug and fiber varieties of Cannabis sativa L.” Suman Chandra, Hemant Lata, Ikhlas A. Khan, and Mahmoud A. ElSohly. June 2011.
- “The results of an experimental indoor hydroponic Cannabis growing study, using the 'Screen of Green' (ScrOG) method-Yield, tetrahydrocannabinol (THC) and DNA analysis” Forensic Science International. May 2010.
- “Closing the Yield Gap for Cannabis: A Meta-Analysis of Factors Determining Cannabis Yield” Frontiers in Plant Science. April 2019.






Comments