Purple Punch Auto Cannabis Strain Week-by-Week Guide

- 1. Grow specifications
- 2. Grow set up
- 2. a. Grower a: thecannaprophet
- 2. b. Grower b: canamatoes
- 2. c. Grower c: johnnyblaze
- 2. d. Grower d: chubbs
- 3. Germination and seedling stage | week 1
- 4. Early veg | week 2
- 5. Mid veg | weeks 3-4
- 6. Transition (pre-flower) | week 5
- 7. Early flower | weeks 6-7
- 8. Mid flower (bulk phase) | weeks 8-9
- 9. Ripening and harvest | week 10 (and beyond)
- 10. Post-harvest routine
- 10. a. Trimming your cannabis harvest
- 10. b. How to trim and manicure cannabis flowers perfectly
- 10. c. How to perfectly dry your cannabis harvest
- 10. d. Curing cannabis effectively
- 11. The outcome
- 11. a. Purple punch auto yield
- 11. b. Purple punch auto smoke report
- 12. In conclusion
With Purple Punch Auto, Fast Buds keeps supplying the autoflowering seeds market with Californian genetics that dominate dispensaries’ top shelves. This reincarnation of a Cali legend boasts an exquisite terpene profile and a beautifully relaxing Indica effect. The cultivar also grows like a dream.
This Purple Punch Auto week-by-week cultivation guide will give you an exact idea of how this plant did in 4 different grow cycles. You’ll learn its timeline, watch its daily progress from seed to harvest, glean useful tips and insights, and see how much people liked the way it smokes.
1. Grow Specifications
Purple Punch Auto is an 85% Indica-dominant variety and, as such, has a compact structure with short internodes. If you allow her to grow naturally, she will assume the classical Christmas tree shape, although her lower branches tend to be rather long. And LST or even topping will turn her into a very bushy plant with an even canopy.
At the same time, she can become quite tall and very high-yielding — if you give her roots enough medium, choose a proper feeding schedule, and keep other conditions at optimal levels. She can easily reach the final height of 90–150 cm (35–59 inches) by the end of her life cycle. The yields are well above average, even for the Fast Buds lineup: 450–600 gr/m2 (1.5–2 oz/ft2) indoors and 60–200 g (2–7 oz) per plant outdoors.
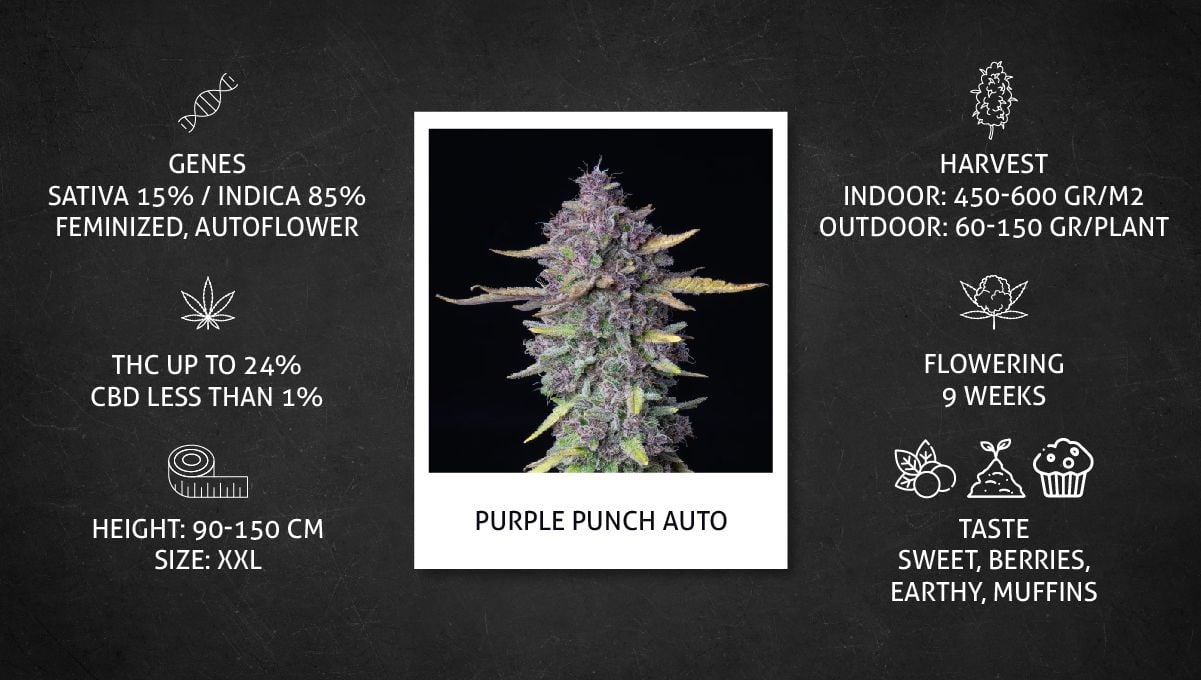
The buds which can mature as fast as 9 weeks from seed often have beautiful purple hues and smell of blueberries. The smoke has a sugary sweet taste with notes of berries and some baked goods like muffins against an earthy background.
With 24% THC, the effect is potent and powerfully relaxing but not really sleepy. Rather it leaves you uplifted, serene, and free from any pains and aches you may have had before. Purple Punch Auto can be a great assistant as you go about your day or a perfect companion if you plan a night out with friends.
2. Grow Set Up
Purple Punch Auto is relatively new genetics, with not so many finished grow cycles available online, so we didn’t have much choice. It was a stroke of luck that we found four skillful and talented gardeners who had described their experience with Purple Punch Auto in so much detail and shared so many good photos.
Grower A: TheCannaProphet
TheCannaProphet joined the GrowDiaries community more than a year ago and has published 27 diaries so far. These earned him 1462 likes and the title of Master. He also has won 6 different cups, including 1st place in the December 2020 Photo of the Month contest with a Fast Buds Gelato Auto grow.
The gardener doesn’t spare details when describing his setups and grow cycles, thereby letting us learn a lot from him.
For this run, he used a 4’x4’ Vivosun tent. Which he didn’t like because it soon started to come apart at the seams. And it was leaking light at the seams at zippers from the very start anyway. So the guy recommends a better brand—Gorilla Grow—which has never let him down.
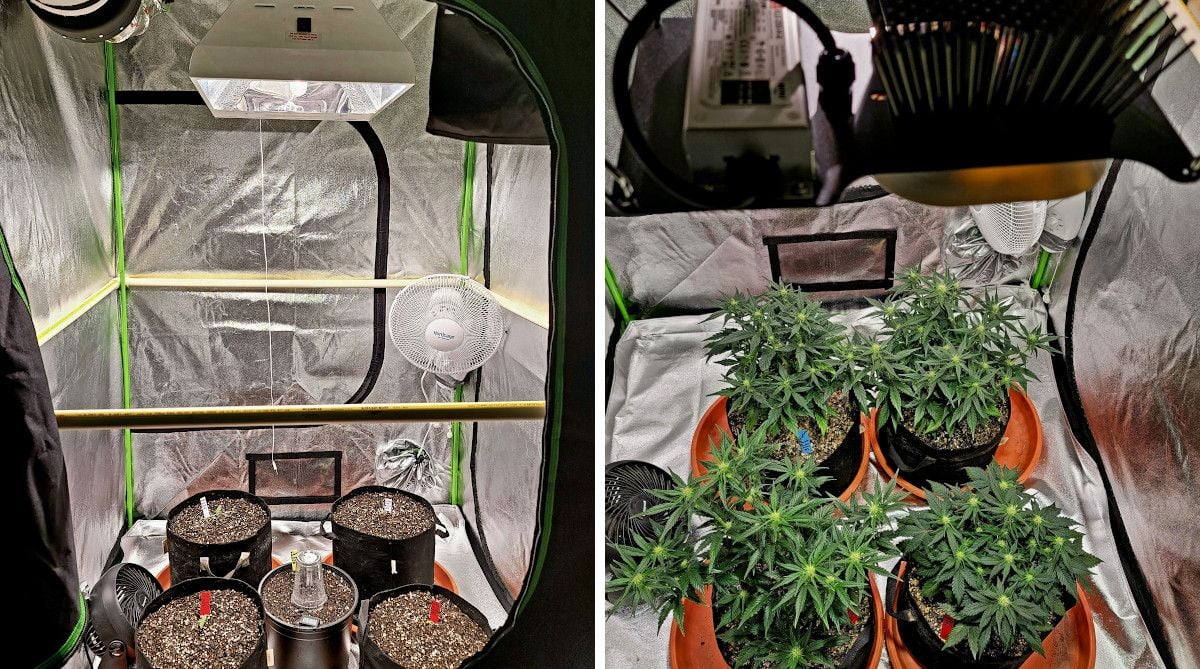
He installed a SunSystems LEC 315W CMH for the vegetative phase. This next-generation ceramic light is full-spectrum, with higher amounts of UV and far red, very beneficial for cannabis. To this, he added a Horticulture Lighting Group HLG 225 as soon as the vegetative phase was over and the pre-flowering stage began, bringing the total power to 550W. HLG 225 is a funny-looking device, with its extra-long cooling fins, but it’s also a very efficient light thanks to its red and deep red LEDs.
For the flowering stages, the gardener would leave the HLG 225 in place but replace the ceramic bulb with a 205W Unit Farm UFS3000 200 light. He liked its ultra-thin design and the fact that it has a remotely mounted ballast for minimal heat.
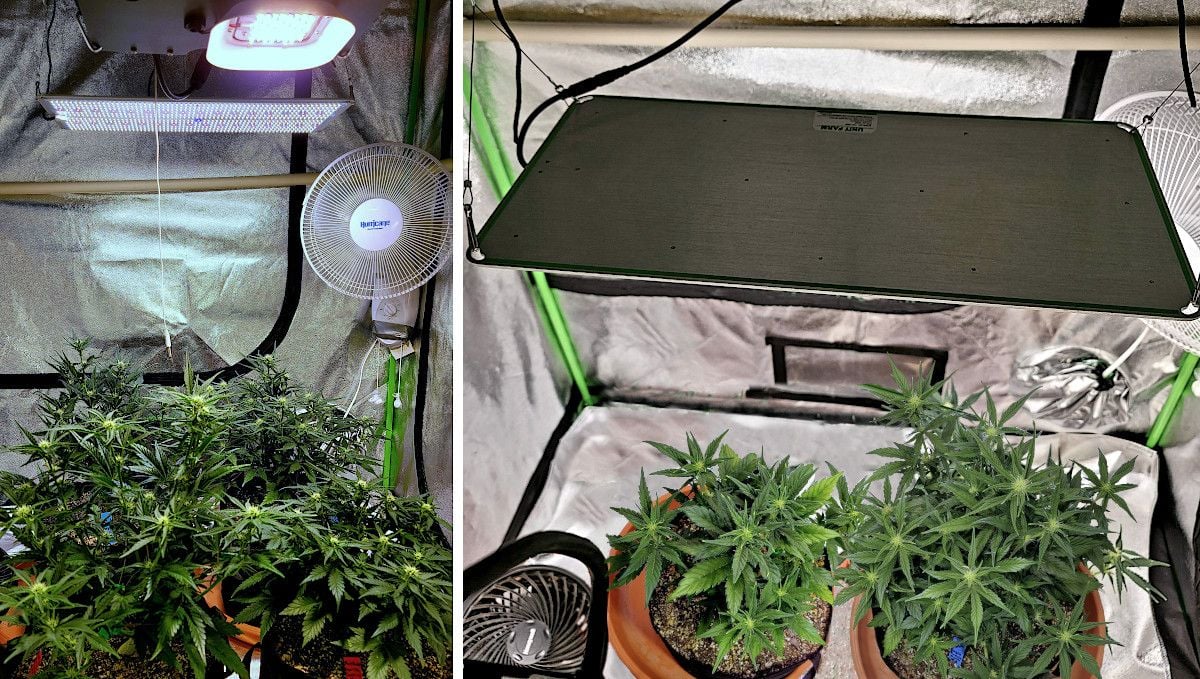
As for environmental conditions, he kept them in check by running a 14,000 BTU portable air conditioner with cool air ducted directly into his two tents. And inside the Vivosun tent, the temp and humidity were taken care of by:
- A Hurricane 450 cfm exhaust fan,
- An IdealAir variable speed fan controller,
- A 6x24" Terrabloom carbon filter.
All this was enough at the beginning of the life cycle, but when the hot summer weather came, the grower had to keep the tent flaps and door open. This btw is a lesson for amateur growers: avoid growing indoors in summer if you can.
Grower B: Canamatoes
This is the third time we feature Canamatoes. His cultivation methods might not be for everyone—because he uses extreme training techniques, and they backfire a lot—but his results are generally good and sometimes incredible.
He uses a spacious, 5’x4’ ViparSpectra tent which he rates high because it has no rips or light leaks after several uses. The plants themselves occupy only one corner of the tent. The rest of the space is free for the gardener to take a seat comfortably and spend hours at a time training his ladies.
He has hung two different Mars Hydro LED lights in his garden, and he rotates the plants so that they spend half of the time under one light and half under the other.

It’s hard to say why he does what he does because both of these lights—a 300W TSW 2000 LED and a 300W TSL 2000 LED—are exactly the same TS series and only differ in shape. One is wide, the other long. That’s what the letters ‘W’ and ‘L’ probably stand for. The gardener is happy with his LEDs because they do great in the vegetative phase and produce chunky buds in flower, and that’s what really matters.
Grower C: JohnnyBlaze
JohnnyBlaze registered on GrowDiaries 1.5 years ago but managed to publish as many as 50 diaries. With more than 5000 likes, he earned the title of GrandMaster.
For this run, he converted a regular room into a walk-in grow space where Purple Punch Auto occupied a less than 2’x2’ area. A Mars Hydro TS 1000 LED light drawing only 150W from the socket proved more than enough for both the vegetative phase and cannabis flowering stages. We couldn’t find a photo that would show the whole room and the equipment installed in it, so let’s just admire one corner of the garden with Purple Punch Auto in late flower.

Grower D: Chubbs
This grow cycle by Chubbs should be interesting to follow because the guy uses fluorescent T5 bulbs for the vegetative phase and a 600W HPS for the flowering stage. Note that the other three use LED quantum boards.
The gardener favors the sea-of-green (SOG) method, placing up to twelve 3-gallon fabric pots filled with a soilless mix in his Vivosun 4’x4’ tent. This allows him to focus less on canopy management and more on watering and feeding.

And for the flowering stages, the plants move to the flowering tent.
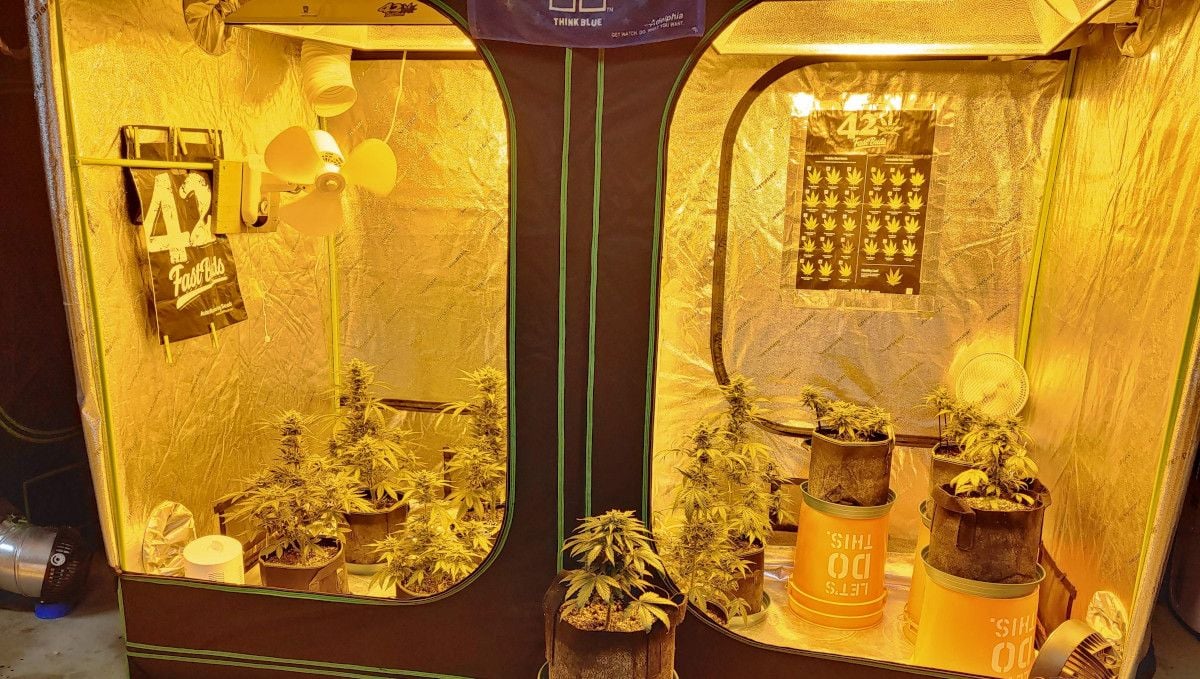
For your convenience, we’re comparing all four setups in the table below:
| Grower | Grow Room | Watts Used | Type of Light | Brand |
|---|---|---|---|---|
| A | 4'x4' | 235W + 205W | LED | HLG, Unit Farm |
| B | 5'x4' | 300W + 300W | LED | Mars Hydro |
| C | 2'x2' | 150W | LED | Mars Hydro |
| D | 4'x4' | 600W | T5, HPS | Unknown |
3. Germination And Seedling Stage | Week 1
All four gardeners in this Purple Punch Autoflower week-by-week review are highly skilled. So you may safely copy their choice of medium and the way they germinated their seeds. Likewise, if you want a good feeding schedule.
A: The Start of a Fully Organic Grow
For this run, the grower decided to try the ‘straight-into-the-final-pot’ method of germination which unfortunately didn’t work well. One of the two seeds planted was a no-show, so the grower germinated the third one using a more reliable paper towel method. Thus he had one girl 3 days younger than her sister.
Both surviving seedlings were grown in 5-gallon fabric pots filled with Mother Earth 70/30 coco/perlite medium. We’d say containers this big were overkill because with coco you can use much smaller pots and offset the smaller volume of medium with frequent fertigation.
However, this wasn’t your regular coco grow — it was fully organic. The coco was pre-amended with:
- Down To Earth 4-4-4 @ 2 tbs/gal,
- Earthworm castings @ 2 cups/gal,
- Dr. Earth Flower Girl 2-8-4 @ 1 tbs/gal,
- Dr. Earth Bat Guano @ 1 tbs/gal.
Of course, sooner or later these amendments would be depleted and the plants would require more nutrients. Which the gardener would give them via top dressing. Other than that, they would get mostly plain water (with an occasional organic supplement and a cal-mag formula) and weekly compost teas.
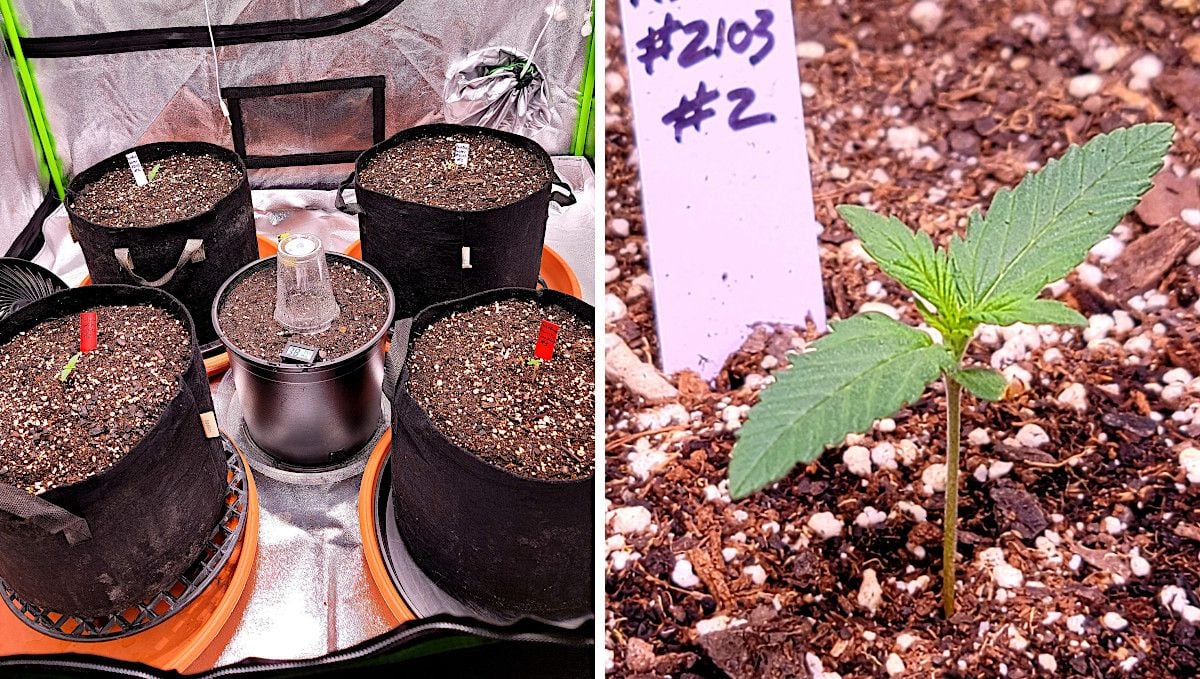
In the first week, the grower started with watering just a bit around the seedlings but then began to soak the entire surface area. He had an issue with too low humidity, so he had to cover the seedlings with transparent plastic cups. Both looked vigorous and healthy.
B: A Perfect Start in the Perfect Medium
One Purple Punch Auto seed germinated between wet paper towels and was put in the soil about 1/2“ (1 cm) down. The grower covered it with a humidity dome to locally raise the moisture level. When the seed sprouted, he kept the dome but would remove it every 5-6 hours to gradually acclimatize the seedling.
She sprouted already without the helmet head (which gives a seedling a great head start).
Hint: If you want your seedling to lose the helmet head while she sprouts, don’t plant the seed too close to the surface and keep the medium moist.
The medium in this run was PRO-MIX HP MYCORRHIZAE where ‘HP’ means ‘high porosity’ thanks to large quantities of peat moss and coarse perlite. This feature is extremely important for cannabis because the medium dries out faster and allows the roots to breathe. And the presence of mycorrhizae—a type of fungus working in symbiosis with roots—improves nutrient uptake and increases resistance to stress and such pests as fungus gnats.
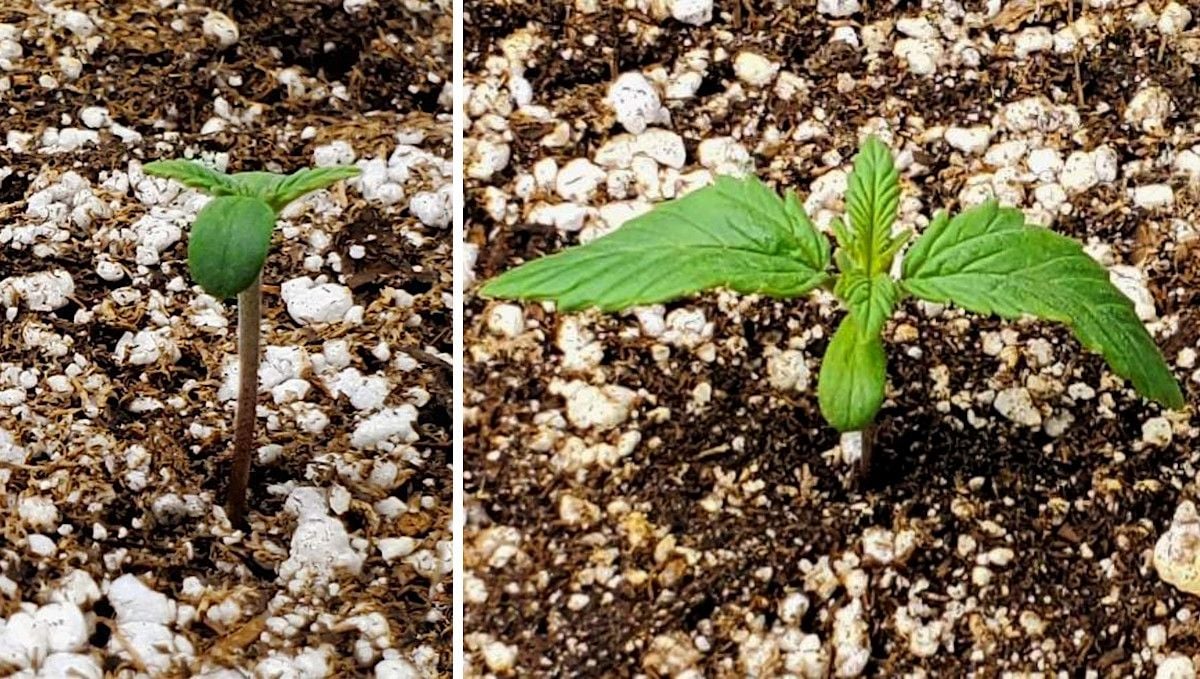
The container was a 7 gal (26.5 l) fabric pot put inside a milk crate. In the first three days, Purple Punch Auto got nothing but 2 cups of dechlorinated tap water per day and on day 4, she received her first meal of Greenleaf Nutrients Mega Crop. It’s a proprietary formula with NPK of 9-6-17 and all necessary trace elements, amino acids, and supplements to feed your autoflower from seed to harvest.
C: The 12-Week Long Feast on Nutrients Begins
One Purple Punch Auto seed was planted directly in an 11 l (2.91 gal) fabric pot and sprouted in 4 days. The medium was a 75/25 coco/perlite mix. Before the sprout emerged, the grower was watering the pot with three Advanced Nutrient products meant to colonize the root zone with beneficial organic life:
- Voodoo Juice, for enhanced root mass, density, and branching,
- Piranha, for better absorption of oxygen, nutrients, and water,
- Tarantula, for assisting roots in extracting plant food from the medium.
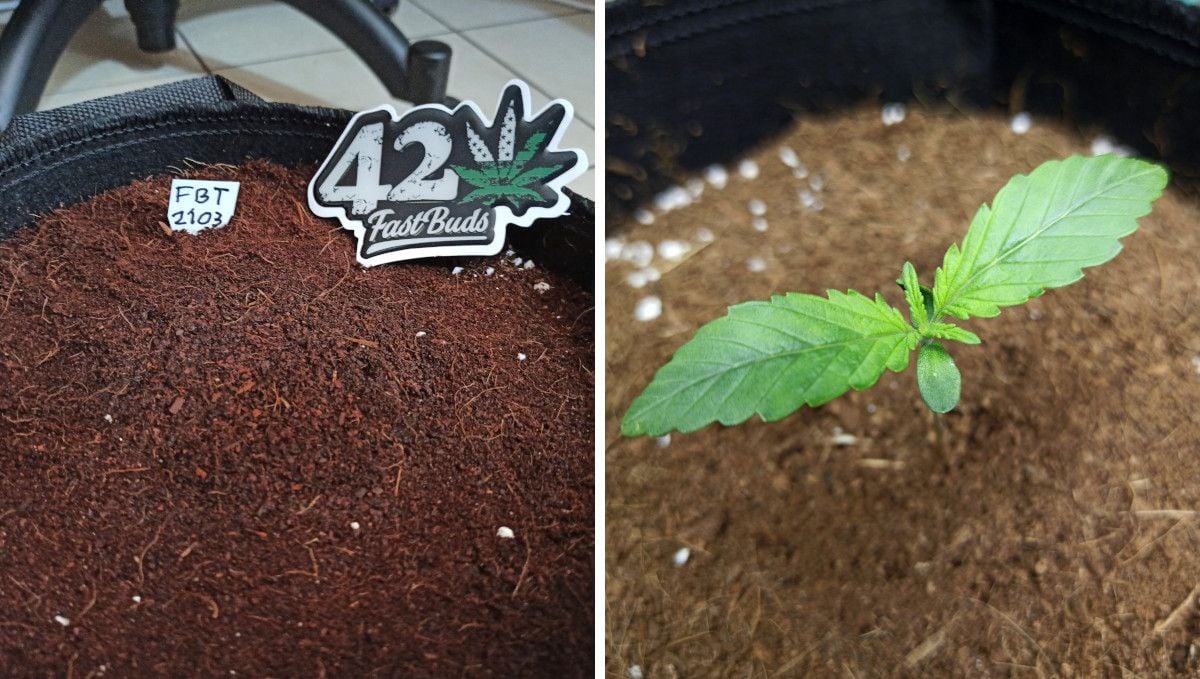
As soon as the seedling emerged, her diet changed and now included the following nutrients at ⅛ strength (the first two are by Advanced Nutrients):
- pH Perfect Sensi Coco Grow A & B, this 2-part base nutrient has the perfectly balanced NPK for the vegetative phase in coco; also contains calcium, magnesium, sulfur, and humic acids for the superfast growth,
- B-52, a potassium-rich mix of kelp and seaweed extracts; offers a wide range of vitamins and other bioactive substances; should be used early in veg and then in mid- to late-flower,
- Grotek Cal-Max, a source of calcium and magnesium which are absolutely necessary for coco where the weed grows extra fast and develops deficiencies easily; also provides iron.
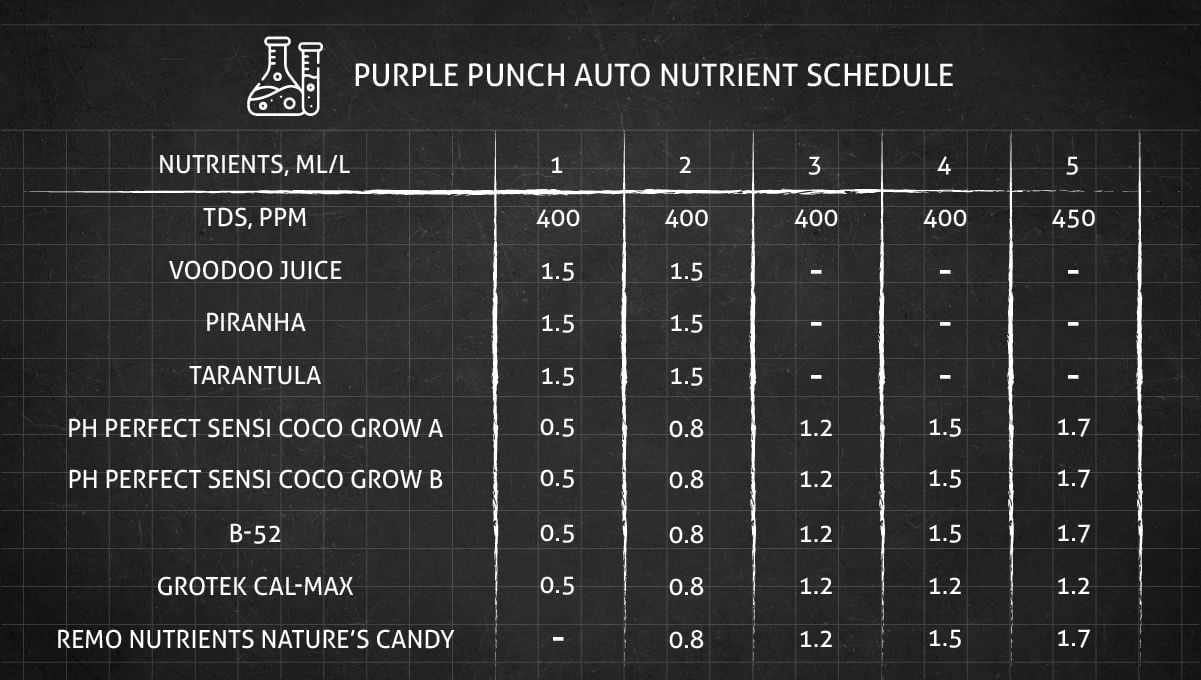
And this is the feeding schedule for the whole of the first month:
D: Three Gallons of Highly Nutritious Medium
Two seeds were germinated using the most no-nonsense method where you soak the beans for 24 hours till they crack and then put them straight in the final container. The gardener filled his 3-gallon (11.36 l) smart pots with Aurora Innovations Roots Organic 707 soil mix. This is an interesting medium and has the following features:
- contains peat moss, coco, perlite, pumice, and composted forest material,
- is amended with earthworm castings, bat guano, fishbone & kelp meal, etc.,
- is inoculated with beneficial strains of mycorrhizal fungi.
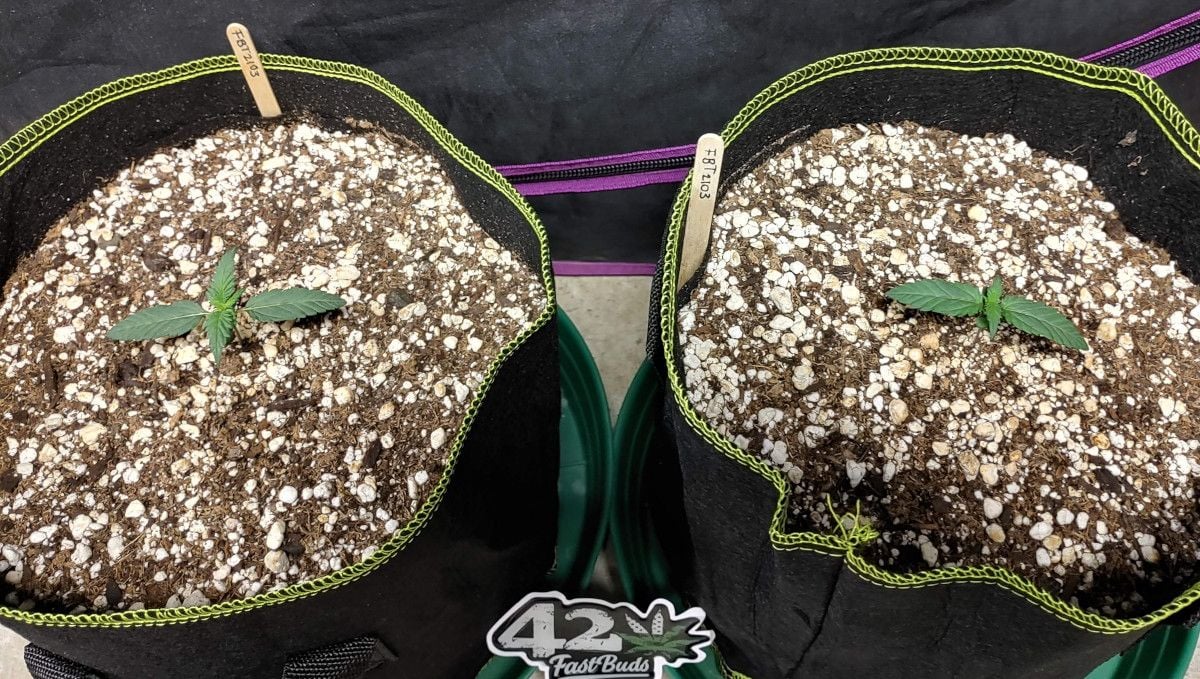
With a rich, nutritious medium like this, the guy had only to use pH’d water, moistening the surface of the soil with a sprayer. Both seedlings seemed to like this treatment and looked perfectly healthy.
4. Early Veg | Week 2
At this point in the timeline, three of the gardeners were mixing very complex cocktails for fertigation while the fourth one relied on the rich medium still containing everything necessary for the initial grow stages.

A: Organic Fertigation and Foliar Feeding
All through the second week from seed, both Purple Punch Autos were watered twice a day. At first, the grower made sure to soak only the top half of the medium (because that was how deep the roots had gotten at the moment), but by the end of the week, he would moisten the entire pot. He used a pump sprayer to make the watering more uniform.
His nutrient solution was mostly plain dechlorinated water to which he only added small amounts of the following:
- Botanicare CalMag+ (because even organic coco grow needs a lot of extra calcium and magnesium),
- Alaska Fish Fertilizer 5-1-1 (which provides a lot of nitrogen and stimulates the growth of microorganisms in the root zone at the same time),
- Fox Farm Wholly Mackerel (another fish-derived nutrient for vigorous vegetative growth).

He also started with nightly foliar feeding with the nitrogen-rich Fox Farm Flower Kiss, and both Purple Punch Autos looked like they were loving life.
B: Good Appetite and Resistance to Stress
Starting from week 2, Purple Punch Auto’s meals became quite substantial — first at 500 ppm and then at 700 ppm. Her diet now included three more Greenleaf nutrients in addition to Mega Crop:
- Sweet Candy, enhances taste, aroma, and yields and feeds beneficial bacteria in soil with carbohydrates,
- Sea-K Kelp Extract, a biologically active product full of growth hormones, vitamins, and enzymes,
- Cal-Mag Pro, contains higher amounts of calcium and magnesium and is also a nitrogen booster.
The grower fed his girl every 4 days when the 7-gal container became quite light. The seedling looked healthy which allowed the gardener to top her two times in one week and pluck the first pair of true leaves as well.

The genetics proved to be so strong, he would do as many as 4 nips in total and get 30+ flowering tops of equal size.
C: The Girl Works Up Her Appetite
In the second week of the vegetative phase, the grower increased the dose of nutrients from 400 to 500 ppm because the autoflower grew very vigorously and looked like she could use up extra food. Since the grower inoculated his coco with lots of different beneficial fungi and bacteria, he decided to add Advanced Nutrients Nature’s Candy to the mix. This supplement is a rich cocktail of carbohydrates and amino acids that can serve as food for all that life in the root zone.

While root feedings happened 2-3 hours after lights-on, the grower was also giving his girl Cal-Max showers a half-hour after lights-off. And since his Mars Hydro LED light was continuously dimmable, he gradually increased its intensity and now kept it at 75% power and lowered it to 50 cm. Purple Punch Auto seemed perfectly happy with this arrangement.
D: Water and Nothing Else
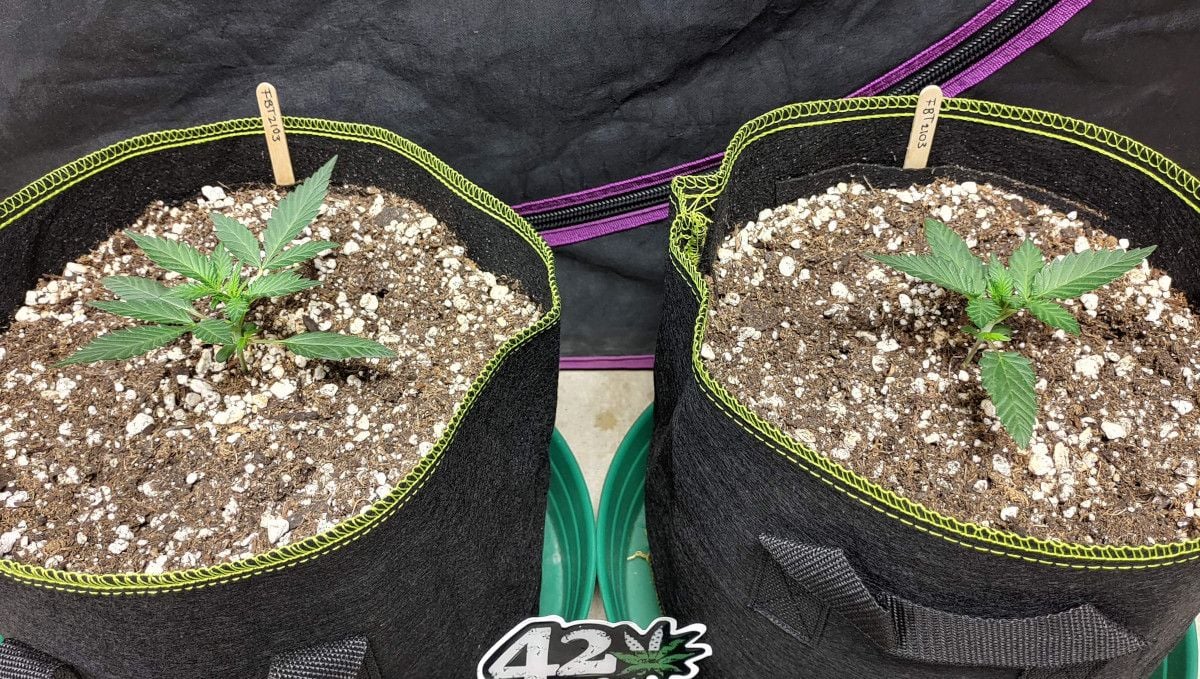
Considering how much organic food the medium contained, it was no wonder the seedlings could receive nothing but water and still develop at a good pace. They got about 16 oz (0.5 l) every 2 to 3 days when the pots were starting to feel light.
5. Mid Veg | Weeks 3-4
The second half of the first month—which is the pinnacle of the vegetative phase—was the right time for training. And all but one gardeners began to either LST or HST their plants.

A: Plenty of Organic Food and the Start of Training
In week 3, both girls received the same treatment: watering twice daily, organic supplements twice weekly, and foliar sprays every night before lights out. The grower would also brew very nutritious compost teas with the following ingredients:
- Wiggle worm castings,
- Alfalfa meal,
- Kelp meal,
- Unsulfured molasses,
- Dr. Earth Flower Girl 3-9-4,
- Great White Premium Mycorrhizae.
Btw, organic growing requires that you only water/fertigate to the point of runoff. Because you don’t want precious organic nutrients to be washed away. Besides, there’s no such thing as a salt build-up in the medium when you grow organically.
So the grower was watering carefully and slowly, allowing no runoff. And to ensure that the lower part of the pot got some moisture too, the grower would occasionally water from the bottom and let the medium draw water up.
The girls were big enough now to begin some form of training. The older one which was the bushier was simply tied down.
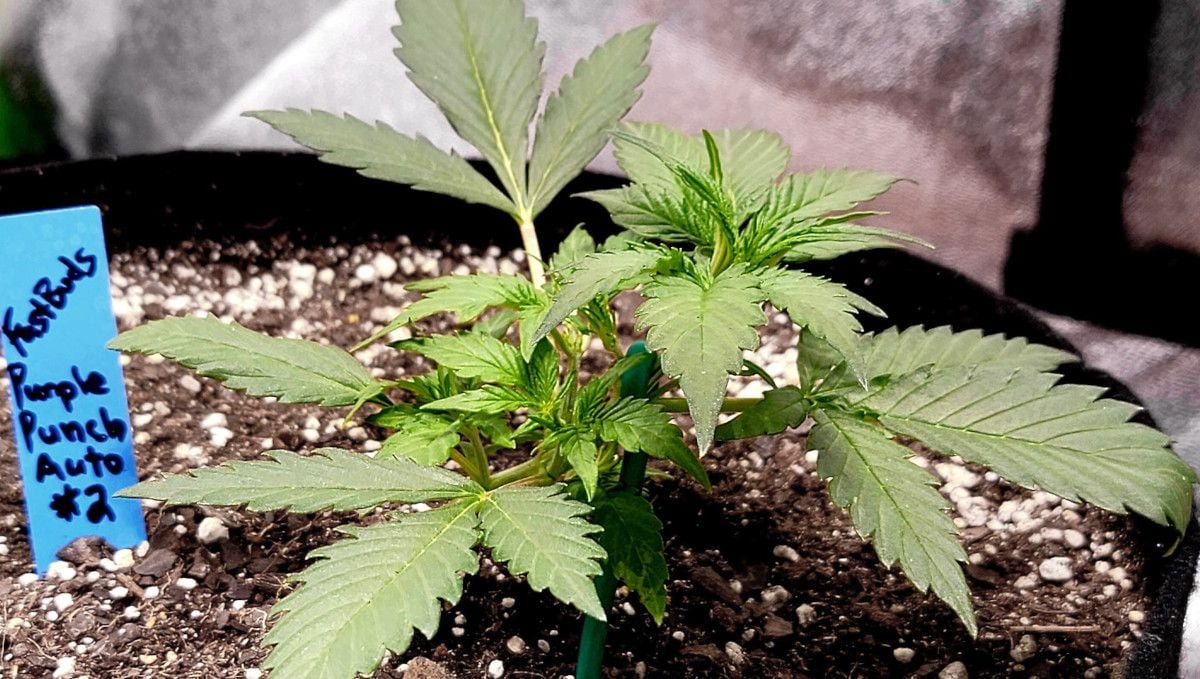
As for the other one, she already looked like a taller pheno, so she was topped, but there was no need to train her side branches outward just yet.
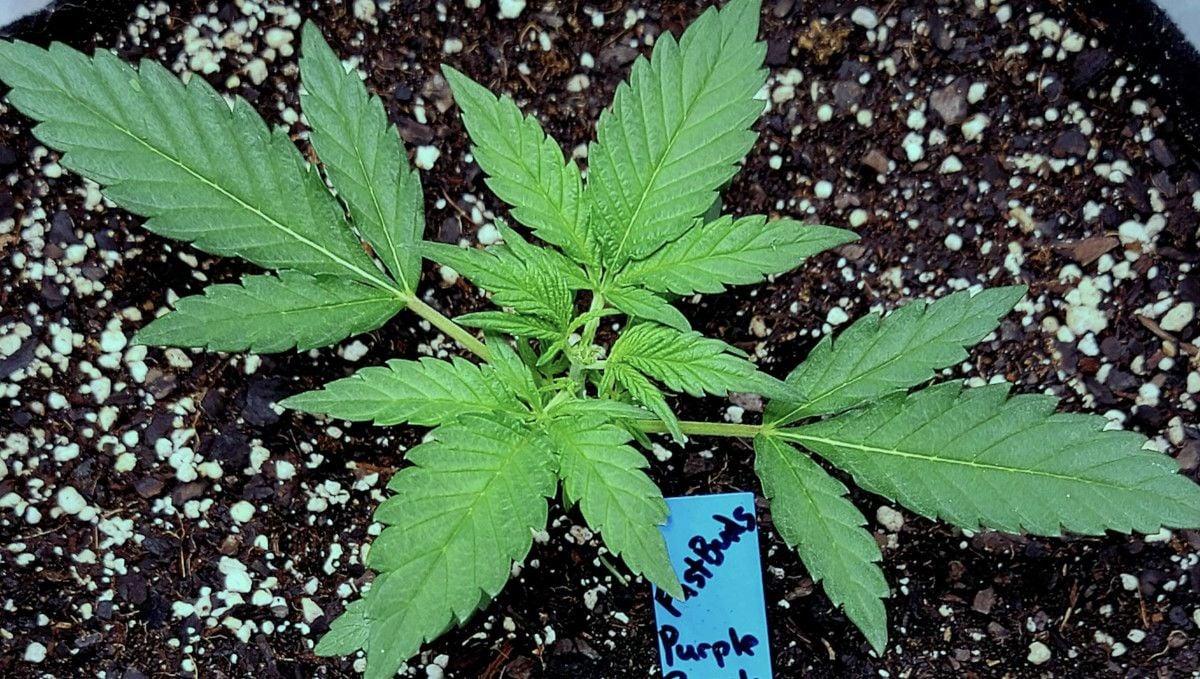
In week 4, both plants were thriving and continued with their vigorous growth. They quickly spread out over the whole surface of their 5-gallon pots and required the increase of everything: from the amount of light to the frequency of watering to nutrients.
It was at this time that the grower added the second light, bringing the total power to 500W. He also began to water twice a day: first, at lights on when he poured the nutrient solution into the drip pans, and for the second time, at midday when he sprayed the same solution from the top.
He also began to add several new organic supplements to the mix:
- Fox Farms Microbe Brew, many strains of soil bacteria and fungi along with the nutrients to feed them,
- Fox Farms Big Bloom, concentrated worm castings and bat guano for extra-large buds,
- Botanicare Silica Blast, a source of potassium silicate to strengthen plant tissues,
- Fox Farms Kelp Me Kelp You, a liquid seaweed extract to accelerate the uptake of nutrients.
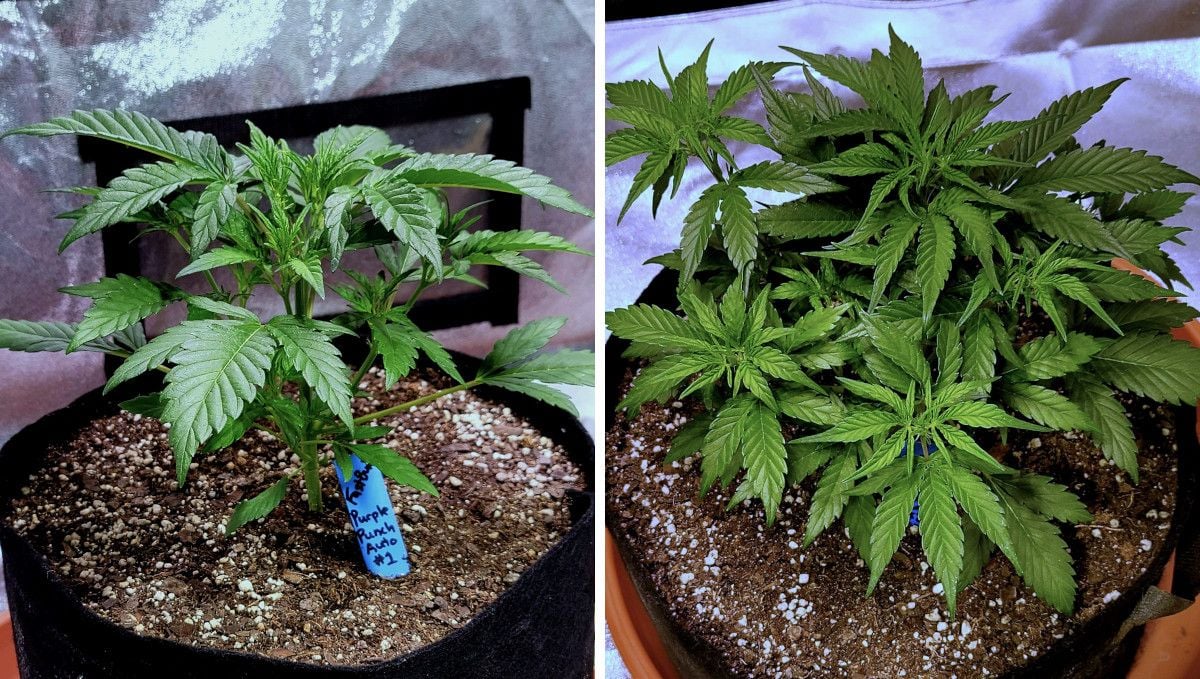
And whenever pH was off the mark, he would correct it with Alchemist PH Down or PH Up. Though, strictly speaking, you don’t need to worry about pH at all when you cultivate weed 100% organically.
B: Getting as Much HST as She Can Handle
In week 3, this overtrained Purple Punch Auto was recovering from the two toppings of the previous week, and in week 4, she was topped two more times. The idea was to make her completely flat in veg and then let her grow up in flower. The growth was slow because of the high-stress training, and the gardener frankly admitted that his cultivation style was rather risky. But he couldn’t help it — HST was kind of a compulsion for him.
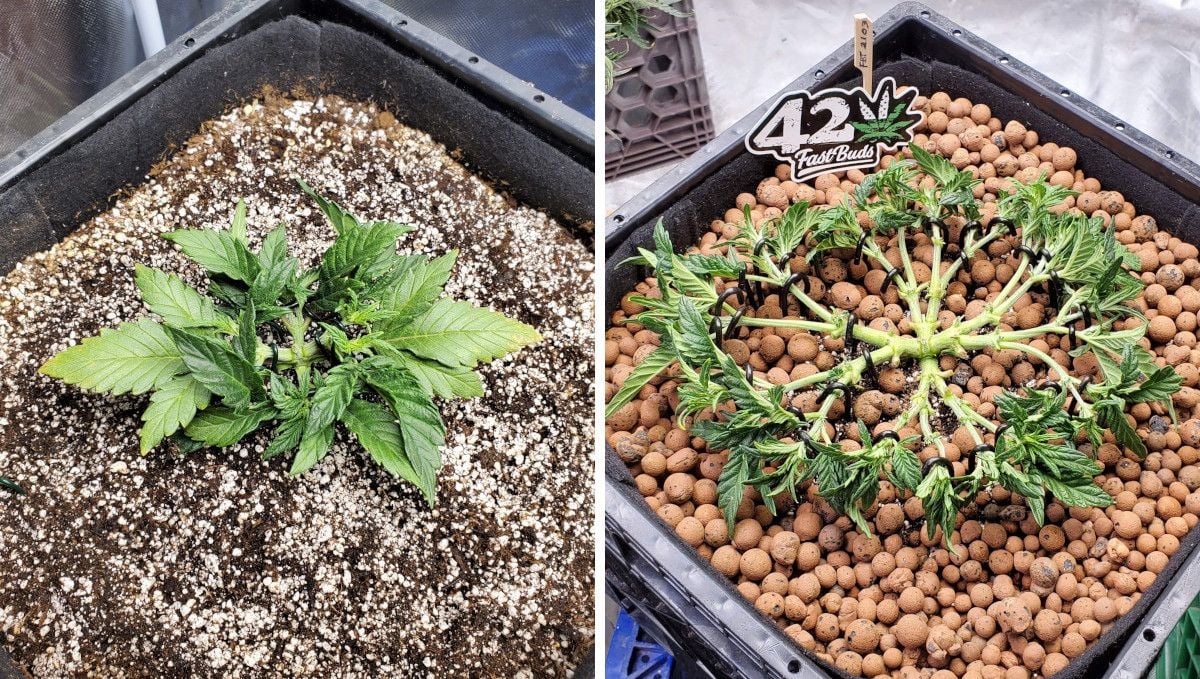
However, the girl recovered from all these stresses. probably because the rest of the conditions as well as the feeding regime were close to ideal. The light schedule was 24/0, and an oscillating fan was blowing high above the canopy with some good wind getting down too.
The dose of nutrients went up to 750 ppm and then to 800 ppm. In addition to the usual mix, the plant also received Green Planet Nutrients Massive Bloom Formulation. It’s a flowering fertilizer containing everything cannabis needs for the initiation of budding, as well as bulking up and ripening of the buds.
C: Accidental Topping. Sometimes, Things Just Go Wrong
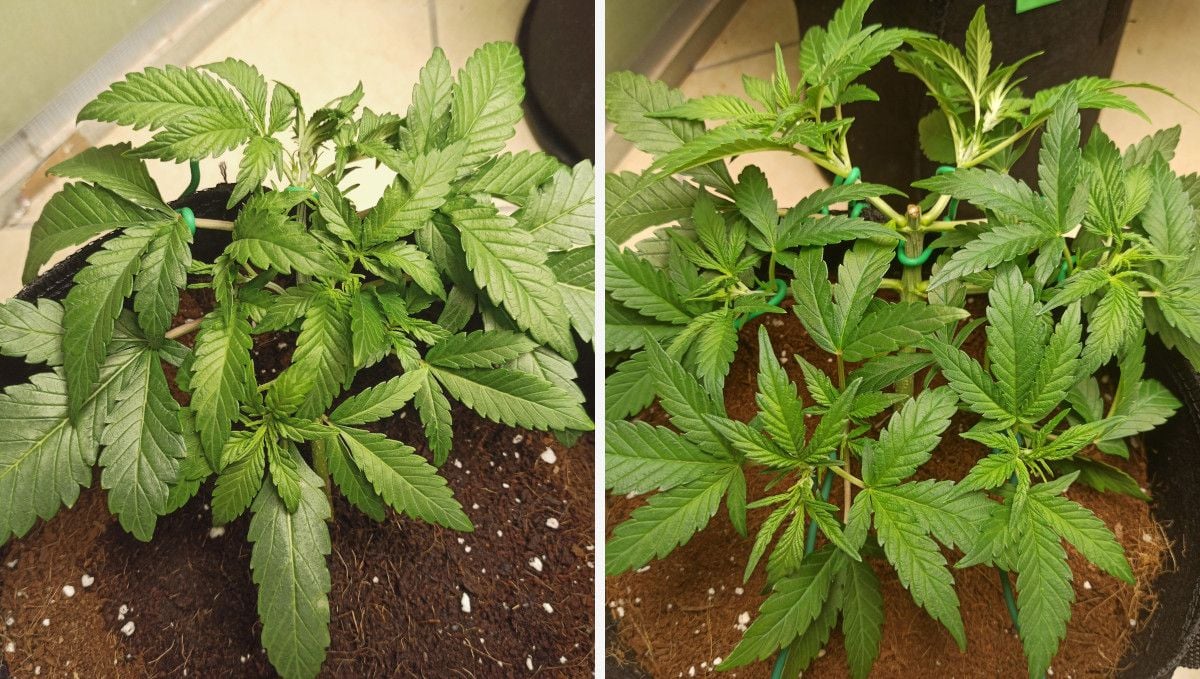
In weeks 3 and 4, low-stress training began for this vigorously growing little plant. Unfortunately, on day 25, she was accidentally topped, losing two nodes at the apex. However, she reacted so well to this accident that the gardener decided he would top his autoflowers from now on.
And anyway, since 3 nodes were left intact, this would result in at least 6 colas. In fact, many more because, if the vegetative phase is long enough, many secondary shoots develop into full-fledged branches.
D: When Every Single Day Counts
The grower was happy with how his girls were turning out. The vegetative stage for autoflowers is so short, and these two were wasting no time. The guy decided to brew some molasses tea to feed the microbes in the root zone. He hoped it would create a robust root structure which is so important during flowering time.
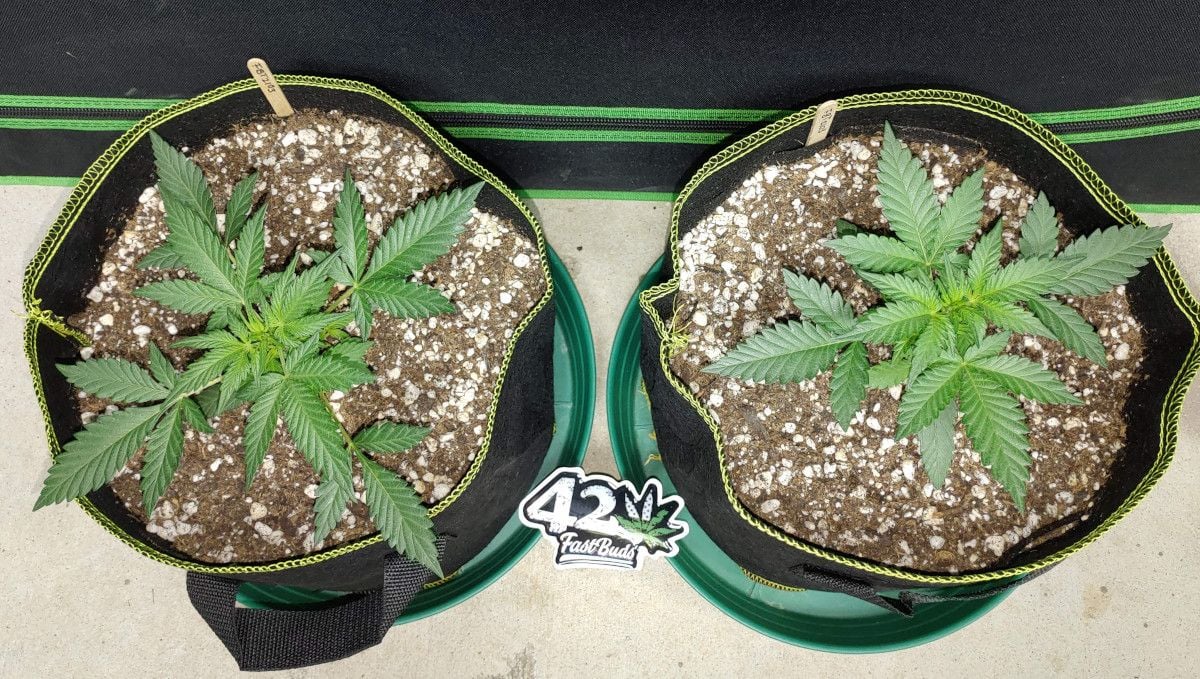
Apart from a one-time application of molasses, the plants received only water. Nevertheless, they were showing no issues whatsoever. Obviously, there were enough nutrients in 3 gallons of potting mix to last them at least for a whole month.

6. Transition (Pre-Flower) | Week 5
The flowering time began right on schedule for every auto in this review except the one that was accidentally topped too late toward the end of grow stages. This extended the vegetative phase for him by a week.

A: Flowering with Multiple Bud Sites
In week 5, both Purple Punch Autos were entering the pre-flowering stage. They were consuming the slow-release nutrients they had gotten during the top dressing the week before. The grower didn’t have to add anything extra and only watered them twice a day.
Now that the vigorous growth continued and the stretch began, he had to tuck the leaves daily. And if they couldn’t be put out of the way by tucking, he removed them to improve light penetration. He also continued with the LST using plastic training clips by Engineered Essentials. These clever clips bend individual branches, making the bush spread out.

Both Purple Punch Autos developed a good number of bud sites, especially the bushier plant #2.
B: HST Didn’t Delay the Start of Flowering
In week 5, the shaping of the canopy was over, and this extremely short but wide Purple Punch Auto began to pop flowers everywhere. And if you think that heavy defoliation is a good cultivation method, you better perform it at this stage — before the flowering stretch is over. This is what Grower B did, and the plant recovered amazingly fast.
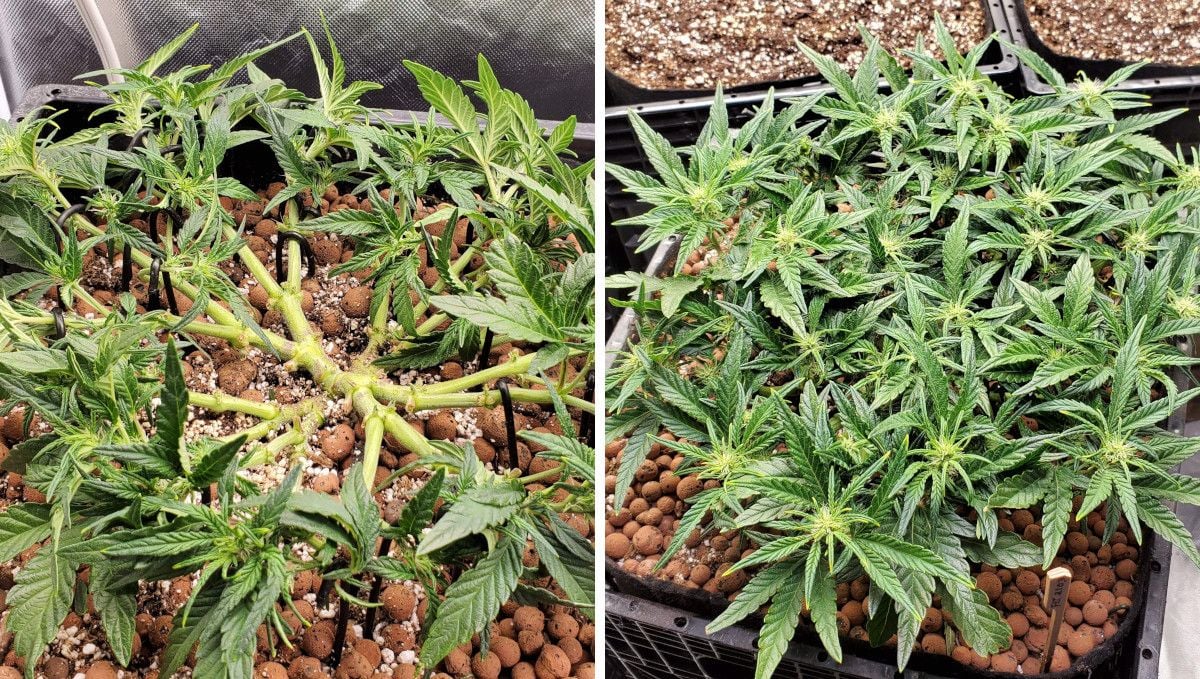
He did another light defoliation soon after, and it was the last big one. Now the canopy was thin enough so that every bud site was exposed to light. The diet was the same as in the previous weeks, with TDS readings ranging between 850 and 950 ppm. And this amazing Purple Punch Auto was sticky and smelly already.
C: Getting Gorgeous and Not Flowering Yet
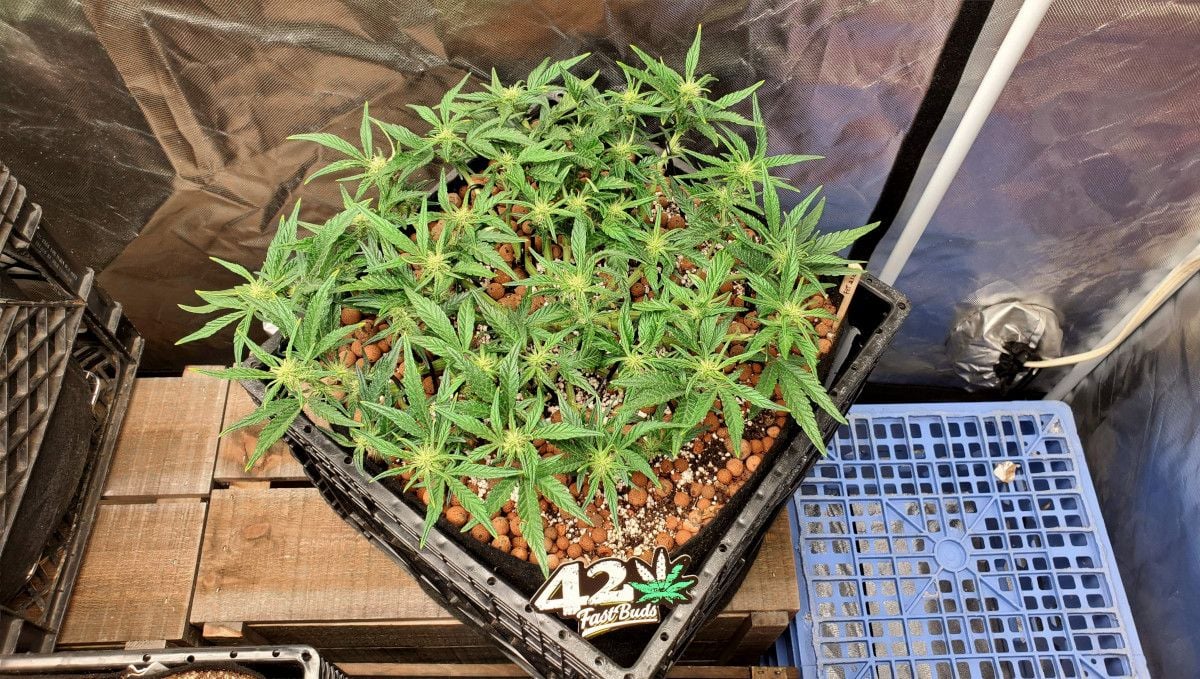
For this Purple Punch Auto, week 5 was just the beginning of the pre-flowering stage at best. After the accidental topping of the previous week, she fully recovered and resumed explosive vegetative growth. Her color was perfect, the leaves were pointing up, meaning she liked everything: from her feeding schedule to the lighting levels. The grower continued with the LST and was glad he had extra room for extra girth on this lady.
D: The Last Week Under the Veg Lights
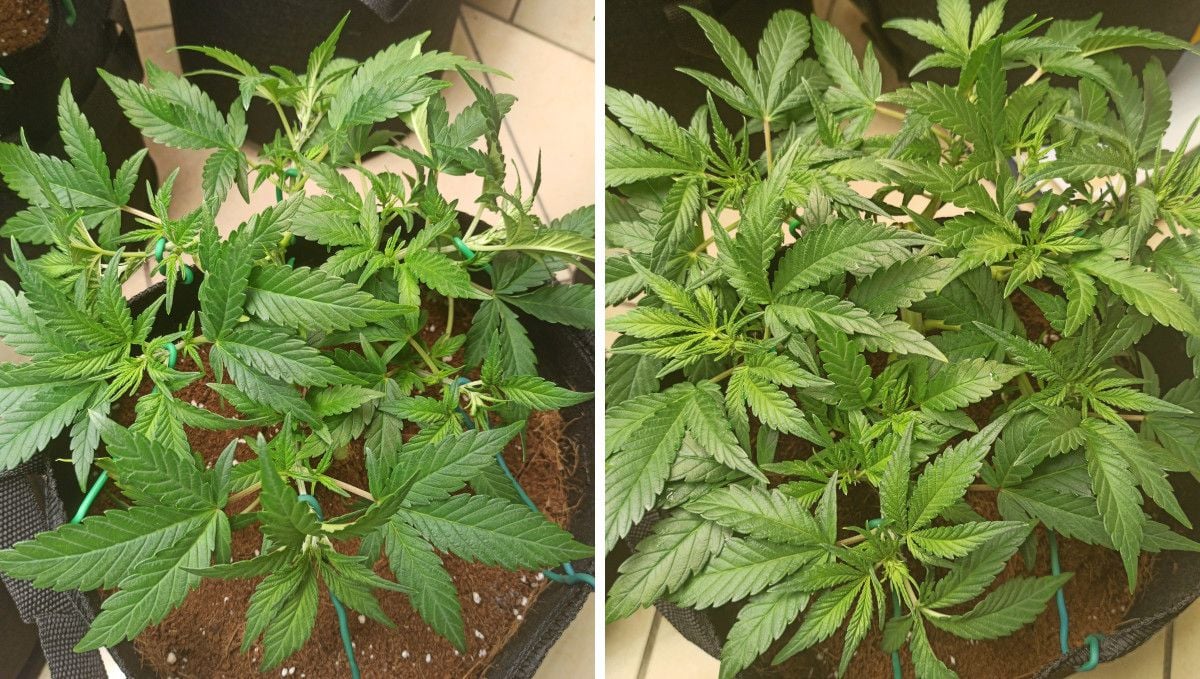
These two Purple Punch autoflowers looked more or less identical in height and structure. Both were not very tall but bushy, and one had especially small internodal spaces and long side branches. It was obvious that she’d become a beast if only the gardener chose to train her.
Though the budding stage had already begun, the grower decided to keep them under T5 lights for now and move them to the flowering tent and under HPS lights the following week.
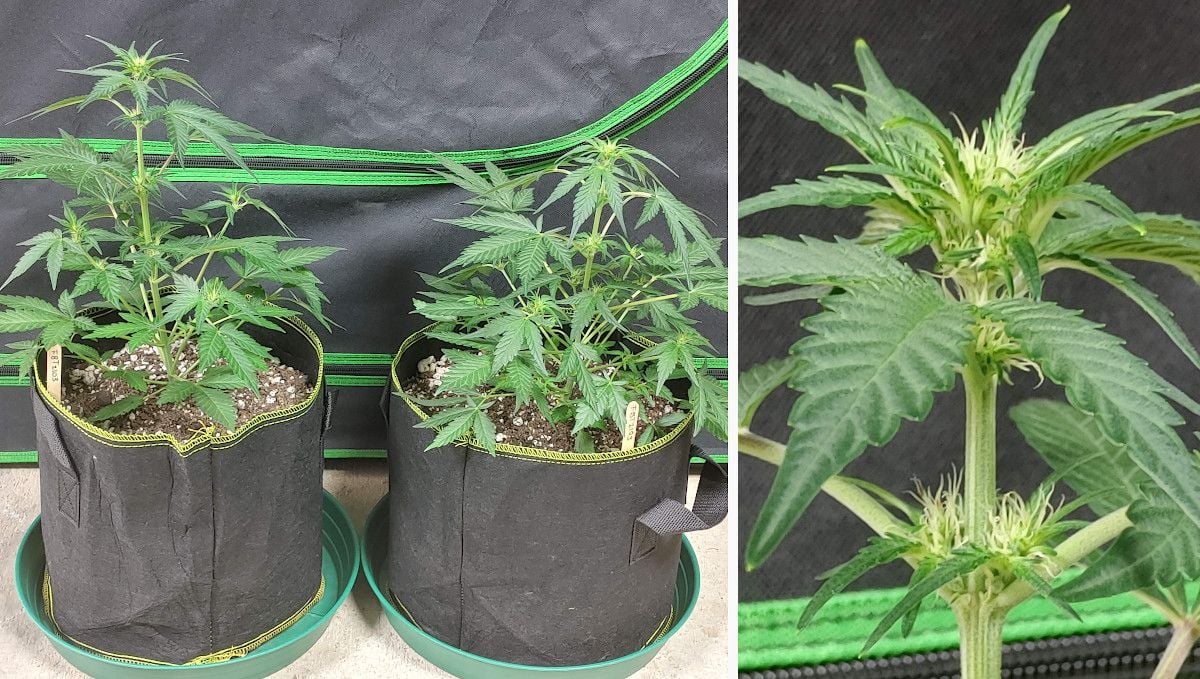
And for the first time in their life cycle, the ladies were receiving something with their water — General Hydroponics CALiMAGic (1 ml/l) as a source of calcium and magnesium. These two nutrients are difficult to provide naturally, but are essential. Besides Ca and Mg, this product also contains some nitrogen (N) which is still needed at this point in the timeline because stems begin to stretch after the start of flowering.
7. Early Flower | Weeks 6-7
At this point in the timeline, it was all about nutrients as gardeners tweaked and tuned their feeding schedule trying to do their best in giving their ladies everything that’s needed during the flowering stage.

A: A Rich and Varied Diet
In week 6, the gardener installed a new light — an ultra-thin Unit Farm LED quantum board. Which solved his problem with excess heat once and for all because this light runs extremely cool.
The garden still needed daily ‘tucking and plucking’ at this point. As for watering, the guy let his plants tell him when they needed it. Every time he noticed the slightest droop of the leaves, he would give them plain dechlorinated and pH’d water.
He was also watching for signs of nutrient deficiency, and as soon as it seemed to him that the girls began to look less vibrant, he top dressed for the second time. He gave each two cups of wiggle-worm castings which he worked into the top layer of the medium. He also added unsulphured Grandma's Molasses to the water.
His ladies seemed to love this P-K boost and were flowering profusely.

In week 7, the grower added even more Fox Farm flowering nutes to the diet:
- Beastie Bloomz, a PK-rich soluble fertilizer,
- Open Sesame, a source of extra phosphorus.
Both of these supplements were added through the top dressing. The gardener also added honey to water as a source of sugars and because of its natural antibacterial properties.
We must say that throughout all grow stages and different stages of flowering the diet was very rich and varied and, frankly, rather difficult to copy. You need to have many grow cycles under your belt to give everything in just the right amount and at just the right time. The only thing that makes this task any easier is the fact that in organics the nutrients get buffered in the medium. So it’s harder to overfeed your plants.
The bottom line is: if you’re a novice grower, start with a simpler feeding schedule and extend it with more amendments as you go. The more complicated you make the things, the more mistakes you may potentially make.
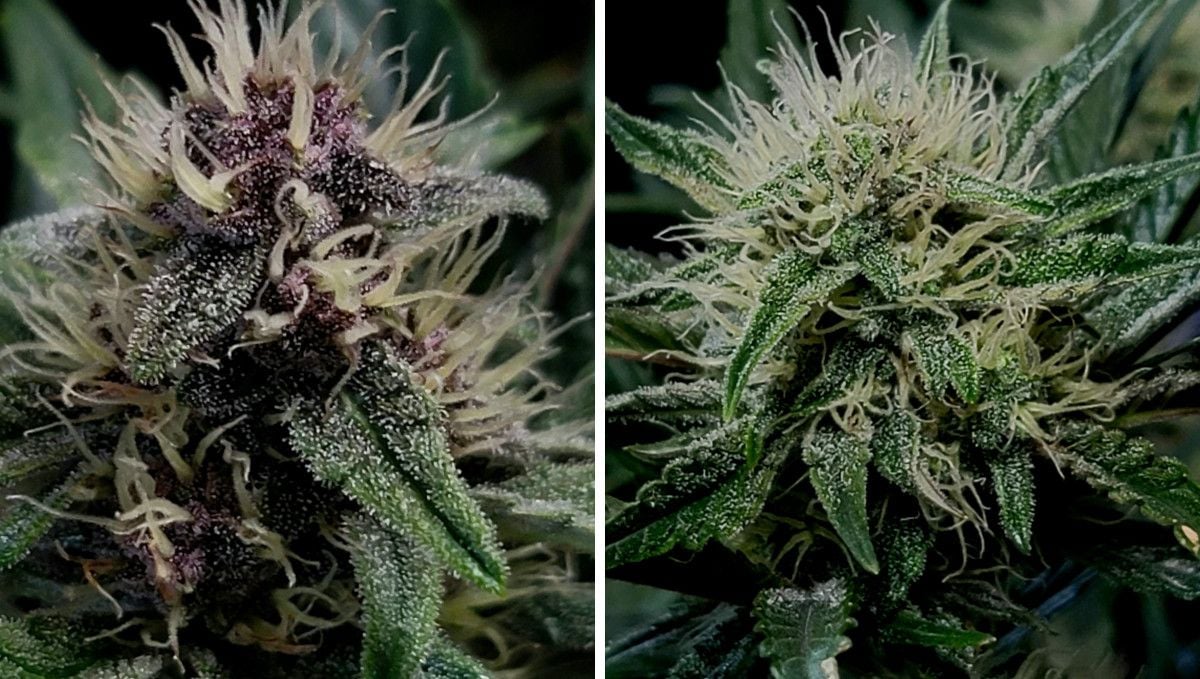
In this case, the grower had a lot of experience to please his ladies, and they loved everything they received. They ramped up their trichome production becoming extremely beautiful, and one of the plants showed deeper purple hues than the other.
B: More Than 30 Colas Tightly Packed
In weeks 6 and 7, the girl stopped her flowering stretch which was ridiculously low at 2.5 inches. Now her 30+ flowering tops began to swell up, and the grower did some lollipopping and light defoliation to space colas just a bit.
At this point, he added yet another Green Planet nutrient to the mix. Rezin is a budding enhancer that improves the terpene profile in cannabis. It serves as a source of molybdenum which helps convert nitrates into usable forms of both N and amino acids. This formula also contains vitamin B1 and makes the finished product more flavourful and aromatic.
This Purple Punch Auto proved to be a light feeder. She reacted with symptoms of overfeeding (burnt leaf tips) to 800-1000 ppm feedings, and the grower went easy on her the next time. Then he upped the dose again—to 1060 ppm—and again found it was too much. The runoff was too high at 2200–2650 ppm and pH dropping to 5.2–5.3. Obviously, the lady didn’t use up most of the nutrients in the root zone. She drank about 2.5 gallons every 5 days.
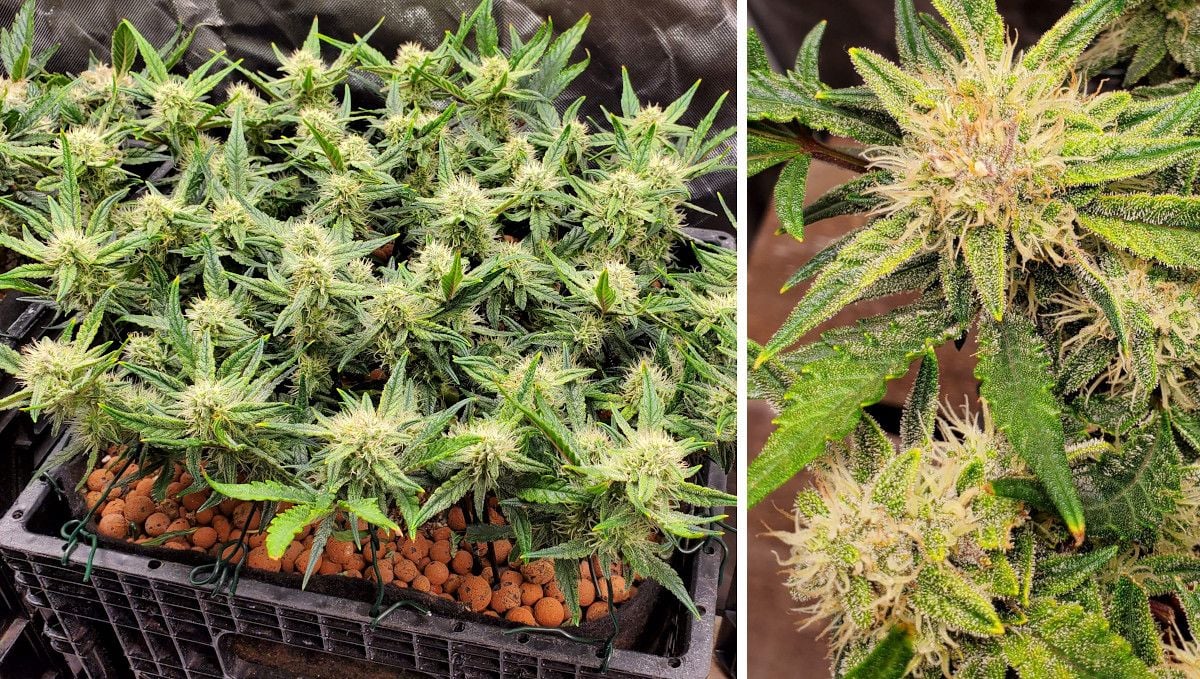
Anyway, she looked great, with most of the leaves ‘praying’, almost vertical. Whenever the guy had to work on her, he made sure to wear gloves because she was so damn sticky.
C: Change of Diet as the Flowering Begins
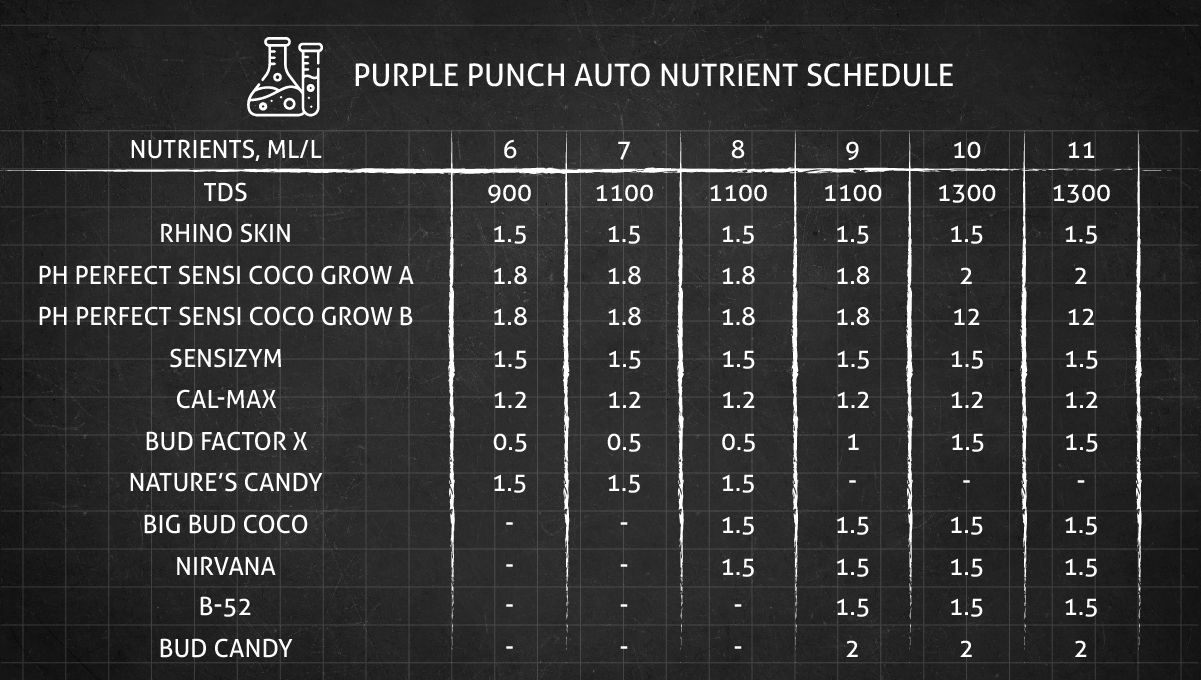
In week 6, this Purple Punch Auto was still in her pre-flowering stage but far along enough now to change the feeding schedule to the one suitable for autoflower flowering stages. So the grower did a complete overhaul of her diet, introducing the following Advanced nutrients:
- Rhino Skin, makes branches robust and rigid and able to support the weight of outsized flowers,
- Sensizym, breaks down excess organics in the root zone and stimulates growth via enzymes,
- Bud Factor X, complements such sources of microbial life as Voodoo Juice and Tarantula; boosts the production of terpenes through various bio-active ingredients.
He also added Bud Ignitor to the mix. This AN supplement makes sure that you get a bud at every node and—when used alongside other products by the same manufacturer—it does this without even raising PPM of your solution.
Take a look, at the whole feeding schedule for all Purple Punch Autoflower flowering stages:
Now, the grower was glad he had accidentally topped this girl two weeks before because that helped with the training. She developed numerous flowering shoots, and they all formed an even canopy.

D: Getting The First Feed With Their Water
In weeks 6 and 7, these two ladies demonstrated an above-average trichome production. At the same time, they remained on a small side, but with a great number of side branches and with very short intervals between them. The grower also gave them a haircut: he pruned some lower branches and a few larger fan leaves.
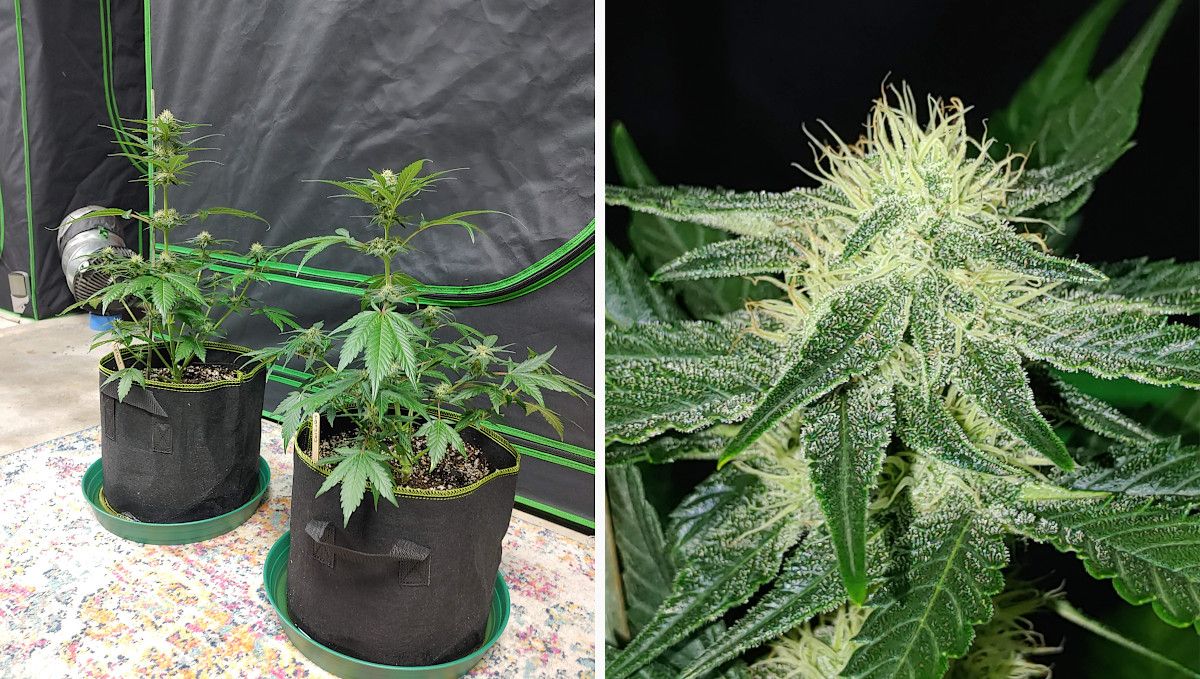
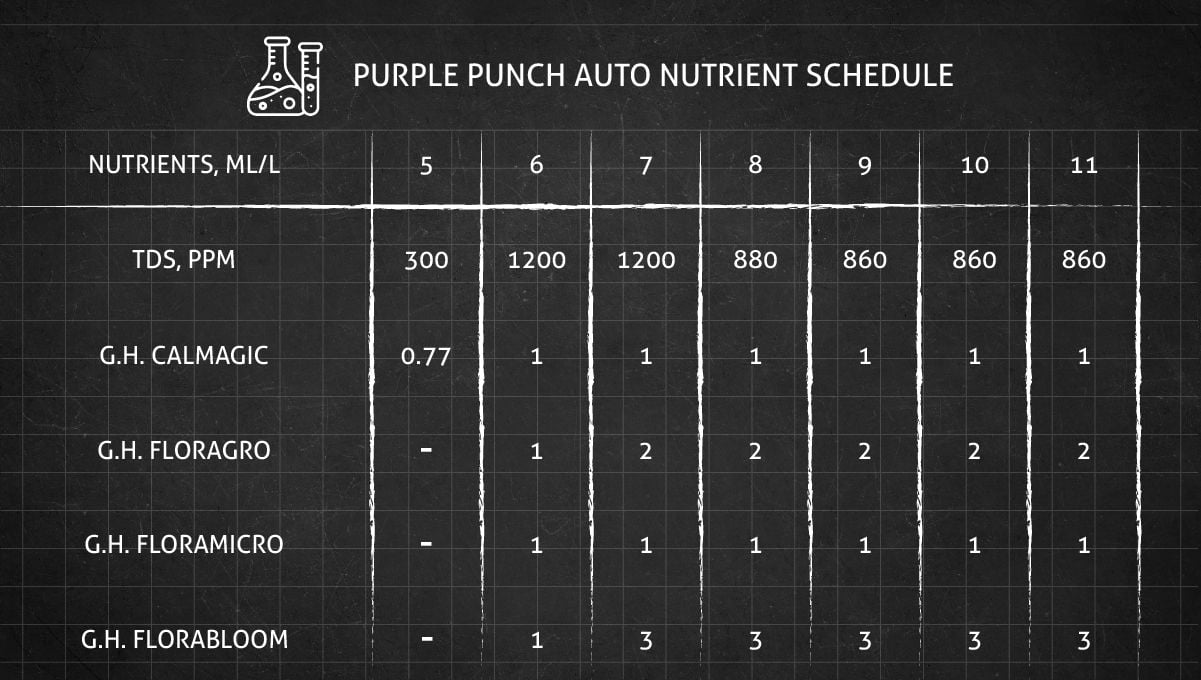
Although none of the two displayed any deficiencies, he decided that it was time to introduce some nutrients. He used a 3-part formula by General Hydroponics. Their Flora series consists of three components: Gro, Bloom, and Micro and is an inorganic source of everything a weed plant needs. As a result, his Purple Punch Autoflower week-by-week feeding schedule was an exemplary simple one:
8. Mid Flower (Bulk Phase) | Weeks 8-9
In two of the four gardens, the flowering stage was almost over. In the other two, the Purple Punch Autos were a little behind in their life cycle but filling out and producing tons of crystals. Amazingly, for one of the gardeners, week 9 would be the last one.

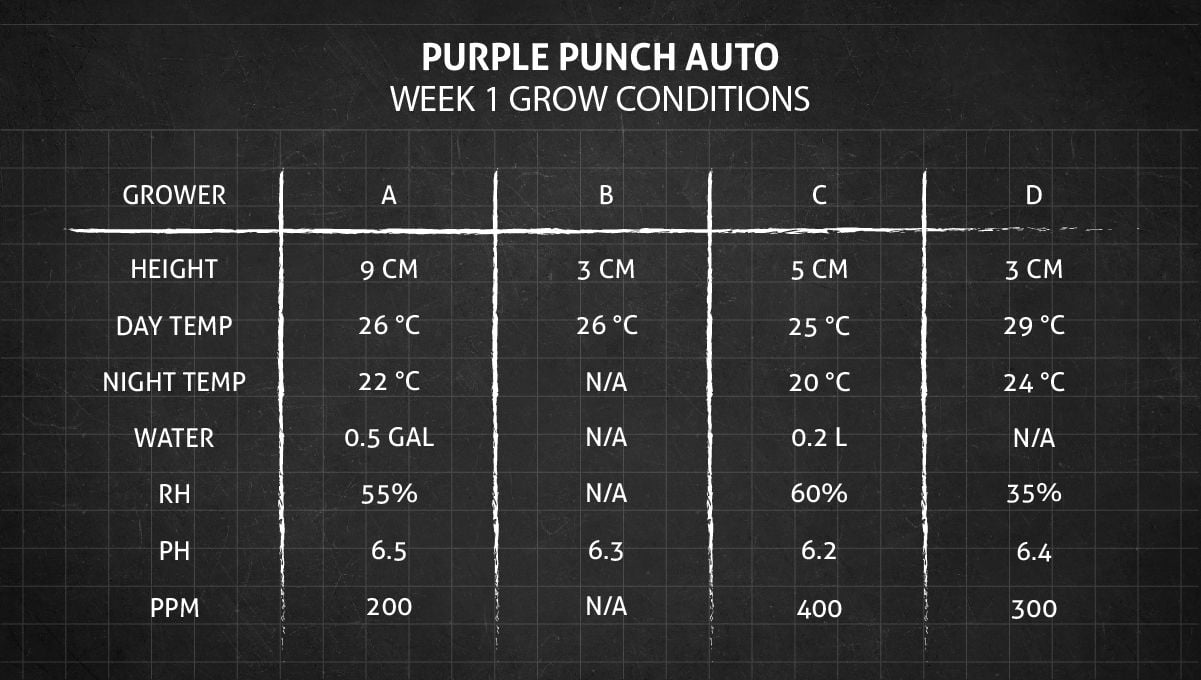
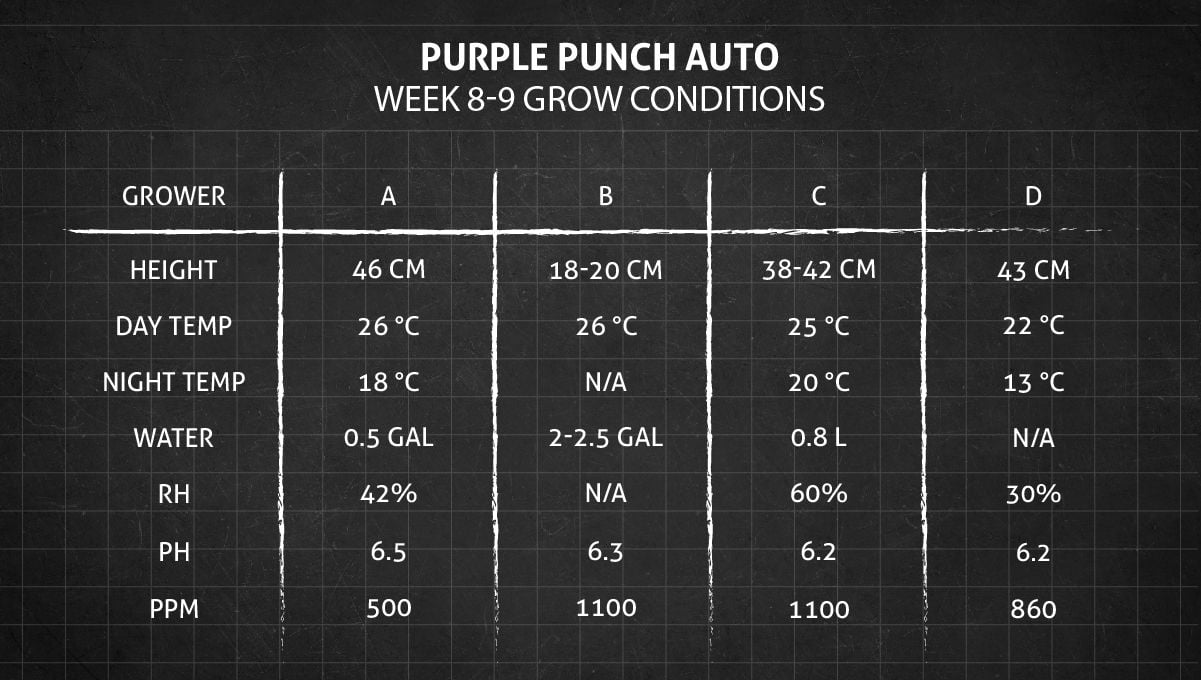
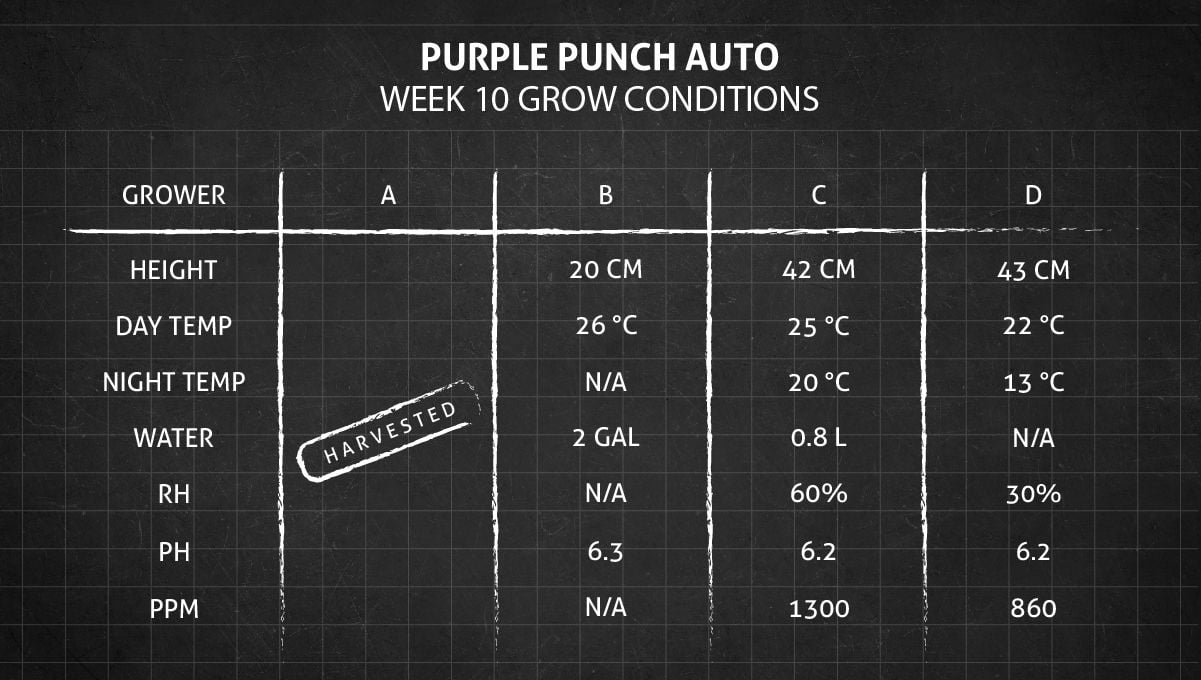
Since autoflowers usually stop growing after 9 weeks, we can sum up Purple Punch Auto height progress for the entire life cycle in the table above.
A: The Organic Feast Continues
4 weeks into flowering, both Purple Punch Autos were fast approaching harvest. One had beautiful purple flowers, the other was green, with tightly stacked dense buds. They got two more amendments that provide chemicals necessary for cannabis flowering stages (again by Fox Farm):
- ChaChing, with its insane amount of phosphorus,
- Bembe, which is an extract of the sweetest sugary plants.
The garden didn’t require much tending now. The grower only made sure to hand-water the pots when they felt light and to turn them ¼ twice a day so that every branch received enough light. He also started to watch the state of the trichomes, and by the end of week 8 from seed, 80 percent of them were milky, a few amber, and the rest still clear.
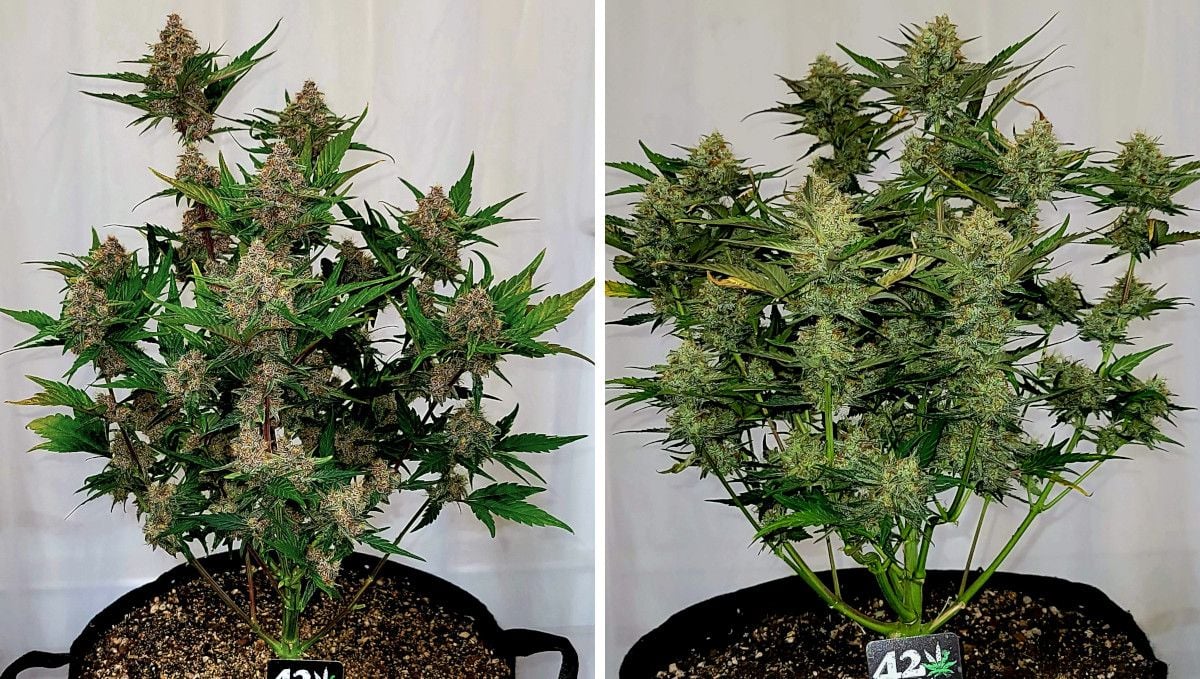
In week 9, both girls were practically ready, although they still kept packing some more weight and exuding a strong, intoxicating aroma of berries. The grower made sure to give them only fresh water at this point — to wash away any unused nutrients from the medium.
However, this flush took only a couple of days. The rest of week 9 (72 hours) the plants spent in total darkness. This is a rather popular method of stressing cannabis into the production of even more trichomes. And in this case, the trick seems to have worked.

B: Final Flush is Imminent
In weeks 8 and 9, this gorgeous lady looked and smelled so amazing, that the grower was watching her closely not to miss the perfect moment to begin the final flush. The plan was to flush her for a full two weeks or at least 10 days because 7 gallons is a lot of medium, capable of holding a lot of salts.
Purple Punch Auto was indeed displaying some purple hues but looked more white because of an insane amount of trichomes. She had a zesty smell of lemons and oranges, extremely strong.
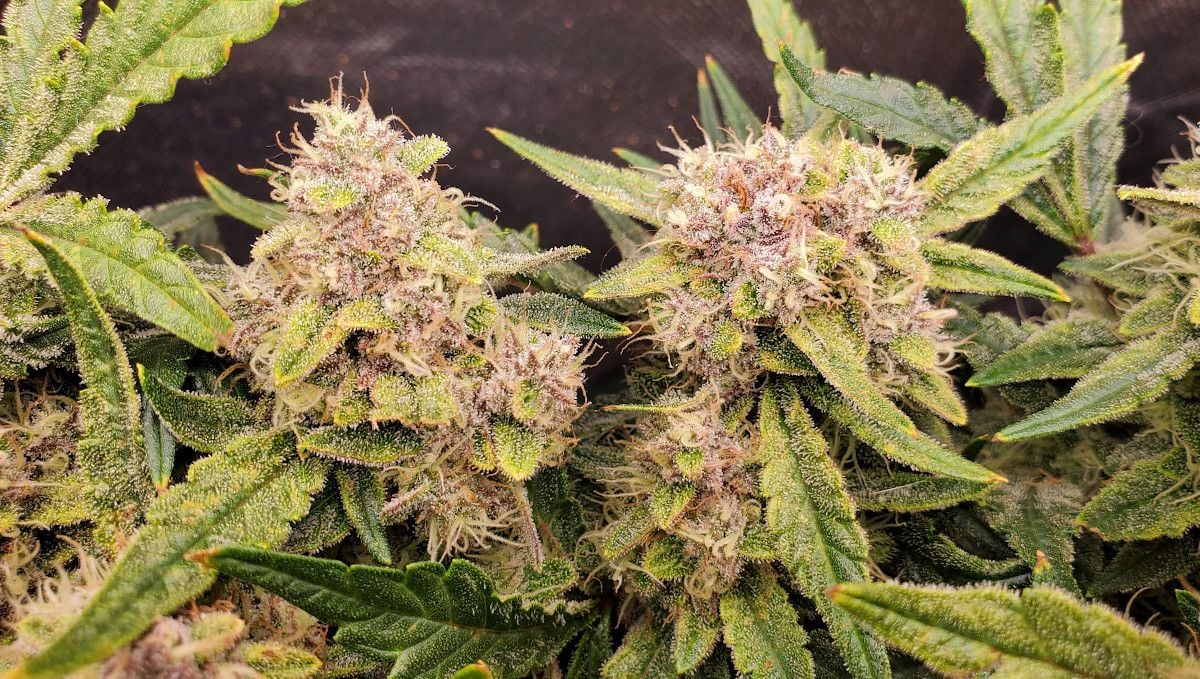
C: Gobbling Up Even More Nutes Now
By week 8, this Purple Punch Auto—which had rather long veg—entered into the final phase of stretching. The grower kept low-stress training her, making sure that none of her many flowering tops was taller than the canopy level.
Since autoflower flowering stages hugely benefit from budding boosters with their raised levels of P and K, the gardener introduced Advanced Nutrients Big Bud Coco and Nirvana. The overall TDS readings of his solution climbed as high as 1100 ppm for weeks 8 and 9 and would be even higher in the following two weeks. Which makes his Purple Punch Auto a very hungry plant.
In week 9, he introduced yet another buddying supplement — Bud Candy which furnishes a cocktail of organic molecules, such as isoflavonoids, anthocyanins, polyphenols, tannins, and isoterpenes, extracted from cranberries and grapes. Presumably, this product makes cannabis more aromatic almost instantly. And the guy really did notice that his Purple Punch Auto started to smell strong like fruit and berries.
The buds were also turning a deep shade of purple, although the only color you can see in the photo is white — from all those trichomes thickly covering the calyxes and trim leaves.
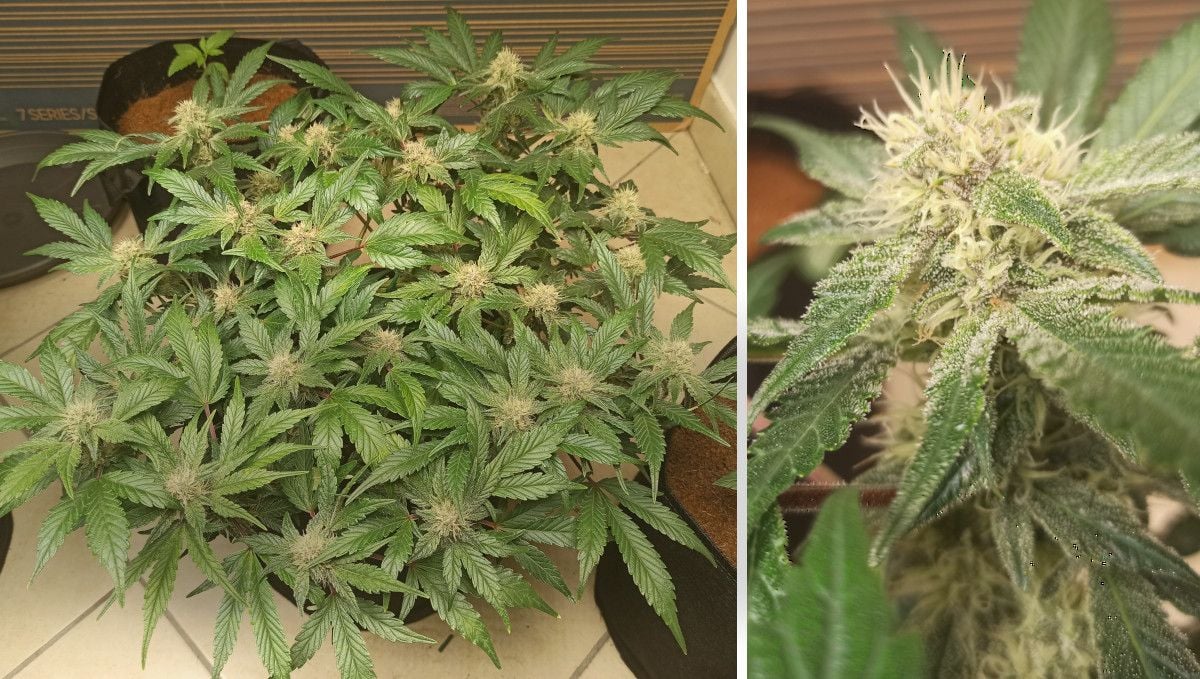
D: Minor Nute Issue and Tons of Resin
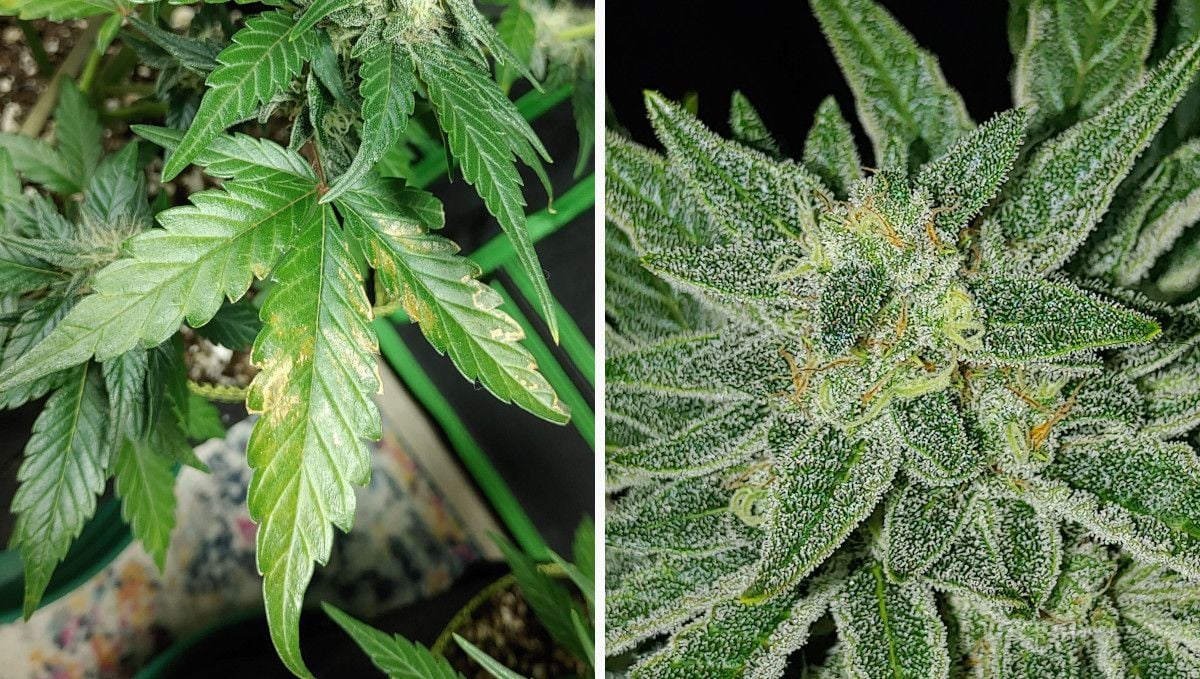
In week 8, there were symptoms of something that looked like calcium deficiency — yellow dry spots and the distortion of tips on some leaves. However, it didn’t get any worse as the two Purple Punch Autoflowers headed into week 9. The rest was smooth sailing, and the flowers were swelling up and getting dense and insanely sticky.
9. Ripening And Harvest | Week 10 (And Beyond)
Our Purple Punch Autoflower week-by-week growing guide is coming to an end since only one of the plants took more than 11 weeks to complete her life cycle. The rest were much quicker than that.
A: Already in the Dry Room
It took Grower A only 9 weeks from seed to harvest, so in week 10, his two Purple Punch Autos were already drying. The temperature in the dry room was on point at 17°C (63°F) while the relative humidity was 58%. Perfect for slow drying with the maximum retention of terpenes and flavonoids.
B: Buds Turning into Candy Rocks
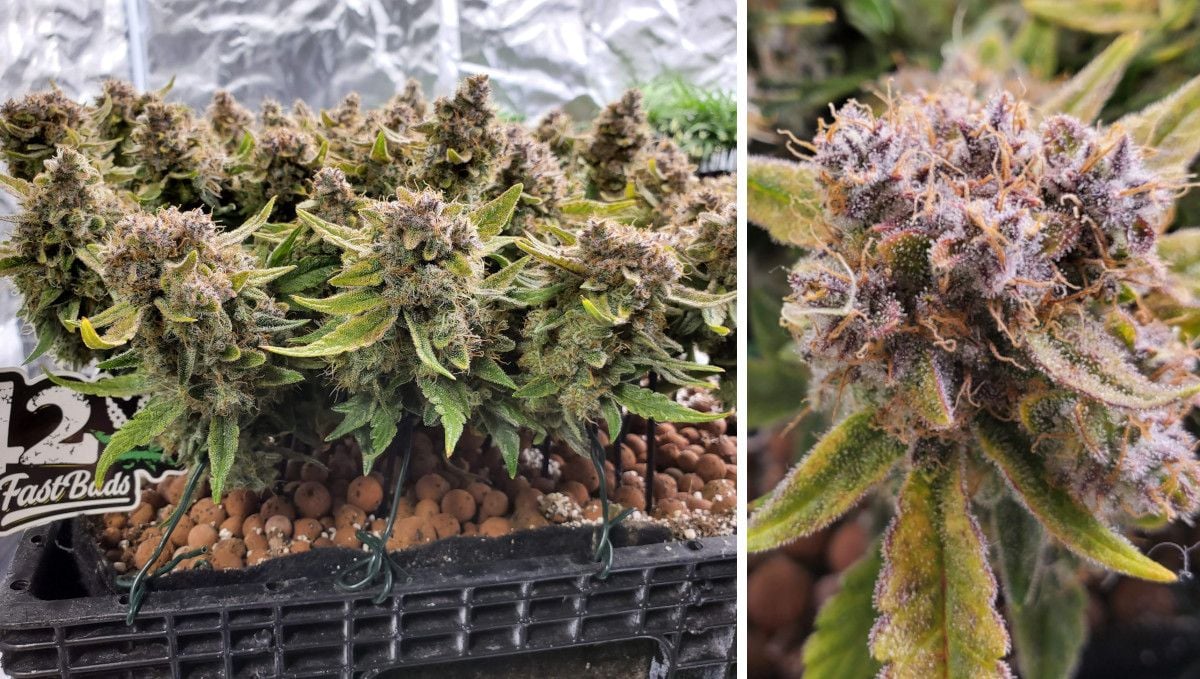
On day 70, this Purple Punch Auto received a 15-gallon flush — more than twice the volume of her container, and this was the last watering for the remainder of her life. Her leaves were fading now, but there weren’t too many of them. The plant was practically nothing but the sticky-icky mass of flowers, spread flat like on a tray.
The buds were beautiful with all those red, purple, yellow, and orange hues coming through a thick layer of white ‘frost’. And they smelled too — of candy, fruit, and even cat piss! On day 82, the plant was coming down.
C: Dashing to the Finish Line
For two of the last three remaining weeks of her life cycle, Purple Punch Auto was receiving Advanced Nutrients Overdrive with its substantial PK to boost the fattening of the buds. The grower didn’t know to the very end what strain this tester seed actually was. Now he was convinced that this was an Indica-dominant variety, probably related to Blackberry. The buds looked chunky and dense, with purple hues getting deeper under that thick white coat of frost.
This baby grew with zero issues from seed to harvest, and two small spots (a manganese deficiency maybe?) were the only symptoms that the guy noticed during the whole of the life cycle. In week 12, she was flushed with Flawless Finish.
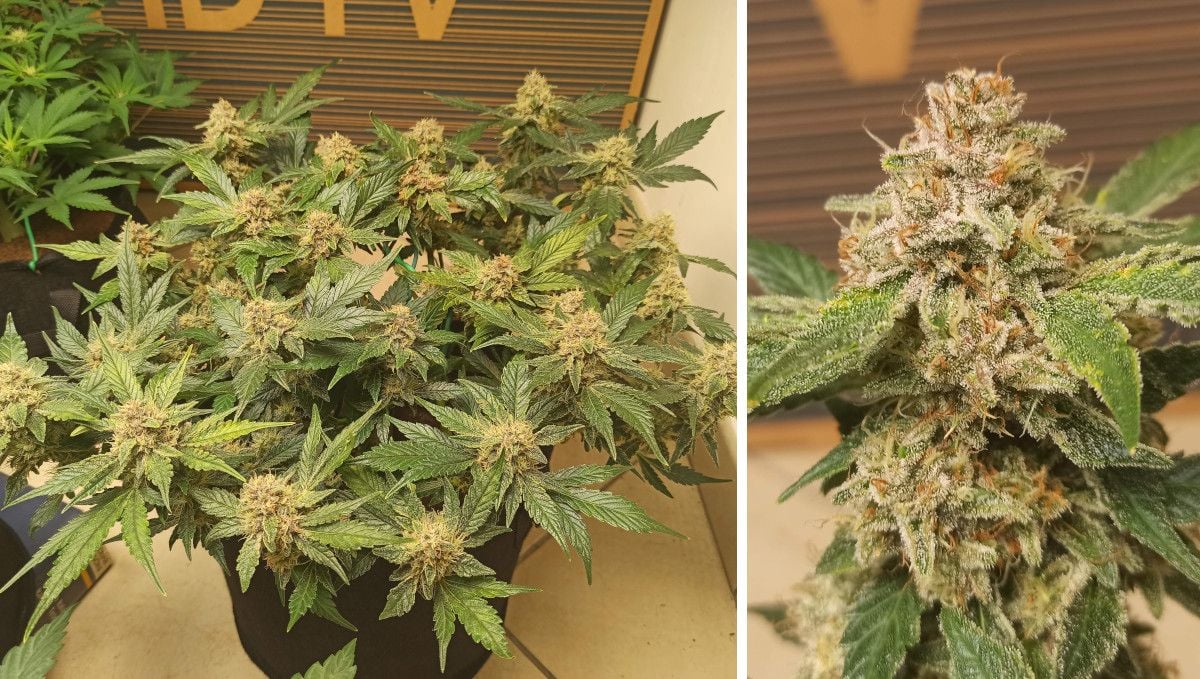
The trichomes were not only numerous but also so big that you could see them clearly with a naked eye. They were already milky by the start of the flush, but the grower wanted to see some ambers too. And then this beautiful Purple Punch Auto was chopped and hung to dry.
D: Flushed Without Any Visible Fade
The guy called these two ladies ‘show stoppers’, and they, in fact, looked spectacular. He noticed a lot of amber pistils and decided it was time to stop with the nutrients and start to watch the trichomes.

He also performed defoliation more than a week before the harvest. Maybe it was done too early because too much stress can prevent the buds from filling out like they’re supposed to. But at the very least, the pre-harvest defoliation makes the post-harvest trimming so much easier.
10. Post-Harvest Routine
So, here we are. You've successfully made it all the way from seed to harvest, and have finally cut down those gorgeous girls. You probably think the work is over, right? Sorry to break it to you, but really you've only won half the war. While most of the heavy lifting may be behind you (except for the trimming - fun...), it's now time to fight a whole different battle - your own self-control. To get the very best out of all that hard work, that blood, sweat, and probably a couple of frustrated tears, you are going to have to put your patience to the test, possibly like never before...
Why, drying only takes a few days, yeah? If you count 8 to 12 days as a few, then sure. But you're forgetting the curing period, or maybe the idea of curing is news to you (like it is for most new growers). Curing? Curing weed after it has dried is one of the most vital components to producing the type of top-shelf, potent as-all-hell, well-rounded, and dank nugs you've been dreaming of. But before we get ahead of ourselves, let's break down how to properly trim and dry your harvest, then chat about the curing process in detail.
Trimming Your Cannabis Harvest
If this is your first time harvesting cannabis then, in all likelihood, you can't bloody wait to get those trimming scissors out of the box and get to work. If this is your second harvest (or any number after that) then there's a good chance you are dreading the idea of it. Trimming cannabis is about as tedious a job as possible when considering the ins and outs of weed cultivation, especially if you have a bumper crop to work through. Sure, if you just have a few ounces of the sticky-icky at your feet then it's all gravy, but anything more than a pound or so is going to take a little while to work through. Especially if you have little to no experience. Just like all facets of growing weed, there's a certain art form to trimming weed correctly, and just like all disciplines, it takes time and practice to get it right.

But before we discuss how to brandish those shears in the perfect way, let's chat about the main decision you are going to have to make before you start trimming (or drying). That is, whether you are going to wet trim or dry trim. There are advantages (and disadvantages) associated with both, but the only real question you need to ask yourself before deciding is... Can I control the humidity and temperature in the drying area? If the answer is yes, then dry trimming is the route to go down. If the answer is no, then you'll probably want to buck the buds down (remove them from the branches), and also take off most of the sugar leaves before chucking them in to dry. Why Let's find out!
The Difference Between Wet and Dry Trimming
Ok, so with drying, the most important thing is to be able to control how long the drying period takes. We want to dry our precious buds in a controlled way, and over a long period. Quickly drying cannabis may seem like the way to go, but that results in a product that will exhibit much lower levels of flavor and aroma, and the potency of the cannabinoids will also drop significantly. Not what we want, not at all.
Wet Trimming
Wet trimming is an approach to trimming cannabis buds directly after chopping the tree down, without leaving it whole for the drying period. This obviously reduces the time it takes before you can indulge in your newest cultivar, and is a sticky and messy affair. We want to try and reduce the chances of having to wet trim altogether, as dry trimming allows the plant to stay as whole as possible for the entire drying period.
But, if you live in a hot, humid climate - and you don't have the facilities or equipment to control the environmental conditions - then wet trimming is the only real option. Not ideal, but better than nothing. For wet trimming, you are going to want to get into the plant and remove as much of the plant material as possible while leaving the buds as a whole as you can. Don't worry if your weed looks unkempt, you'll go back and give it a proper haircut once they have dried up. Just remove the branches one by one, then carefully cut away each bud from the branch. You can chop away at the larger sugar leaves also, and leave a bit of the branch connected to help with hanging the bud up to dry.
Dry Trimming
When it comes to dry trimming, we want to be able to keep the whole plant intact during the drying process. This method allows us to string up our monster colas and branches (or even the entire plant) and hang them in a dry, ventilated area. The trimming is then done once the buds have dried right out, which makes the process much less annoying. Why? The plant material is drier, and the trichomes have been preserved to the fullest. Dry trimming allows you to carefully snip away the sugar leaves, and shape and craft your buds into something that looks, smells, and smokes great.
This is also why we leave the final manicuring when wet trimming until after the buds have had a chance to dry. The more whole we leave the plant, the slower it will dry, and the higher percentage of both the terpenes and cannabinoids that will be preserved. That's what we are looking for, but to be able to we need to have a certain level of control over the temperature and humidity of the drying area. What are the perfect drying environmental conditions? We will get onto that in a second, but first - let's talk about the actual act of trimming... Trimming weed can be a tedious affair, but with the right technique and equipment, you can cut down on the annoyance that may be on your horizon.
Trimming Equipment
Ok, so when it comes to the kit, there are a couple of key things you should grab. These will not just make your life easier, but they will also ensure you don't waste any of those precious frosty trichomes that you've spent months tending to. You will wanna grab:
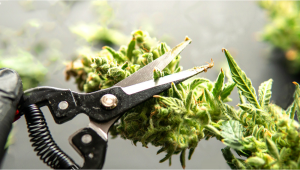
- A set or two of high-quality scissors or shears. Do not, we repeat DO NOT just use any old blunt pair of scissors. You know that pair that every house has floating around in a kitchen drawer that has been passed down more times than anyone can remember? Yeah, that set. We don't want them anywhere near our buds - get yourself a nice new pair of scissors specifically for trimming. There are a few great options and styles available, so if this is your first time trimming check out our favorites here and here.
- A trim tray. This is a cannabis trimming-specific tray that incorporates a micron mesh filter bottom that allows the trichomes that will 100% fall during the trimming process to pass through, but none of the plant material. So, what you're left with is a nice, fluffy bed of pure kief just ready to be used in any way you see fit. Think hash, rosin, or just a beautiful little sprinkle on top of your bowl or blunt.
- Isopropyl alcohol. You're going to work out pretty quickly that trimming is a sticky business, and if you want to get the job done quickly, you'll need some rubbing alcohol on hand (as well as a couple of pairs of scissors). This is to help clean off the layer of resin that can build up on the blades over time. Just give them a quick wipe and you're ready to get back into the thick of things.
Optional Extras:
- Gloves. Some growers, especially the newbies, like to wear latex gloves. Most trimmers grow out of this, as it reduces the amount of control you have over holding the buds (and it makes it harder to peel off that layer of finger hash that builds up over time…)
- Masks, or other protective equipment. Believe it or not, trichomes can be a real bitch to work around if you're allergic or suffer from general hay fever. So if you're anything like me and you want to stay away from all that sniffling and sneezing, then masks are an essential piece of kit.
How to Trim and Manicure Cannabis Flowers Perfectly
Ok, so the drying period has finished, and it's time to give the buds one final haircut before we send them off to the curing jars. But as we mentioned above, trimming and manicuring weed is very boring, especially if you have a lot to get through. There you have it, those are the essentials of trimming weed. Next up, we need to talk about the perfect environment and time frame for drying.
How to Perfectly Dry Your Cannabis Harvest
Right, so no matter how large the harvest is, how dense those juicy girls are, or what the ambient climatic conditions are - you are going to want to be able to control the temperature and humidity in your dry room. Ideally, you should be looking for a temperature range of between 20-25⁰C and a humidity level of between 45%-55%. This will allow the buds to dry slowly, while also not allowing any mold issues to take hold during the drying process. Many a grower has gone through all the hard work of growing and harvesting their crop, only to find that it's gone to the dogs while drying out. Mold issues can quickly run through a crop, so make sure you have your dry room set up correctly before starting the process.
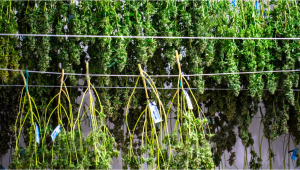
When it comes to actually drying the buds out, you want the whole period to last anywhere between 8 to 12 days if at all possible. This amount of time is ideal, as it allows the buds to dry out both slowly and evenly. This ensures the lowest amount of terpene and cannabinoid degradation. There are 2 main ways that experienced growers dry their buds. Either by hanging them up on lines that have been strung within the dry room or tent (or in a DIY dry box), or by laying them out on drying racks. The hanging method is far and away more popular, especially with large-scale grows, as it allows for more even drying on each individual bud. It also tends to be the least labor-intensive overall.
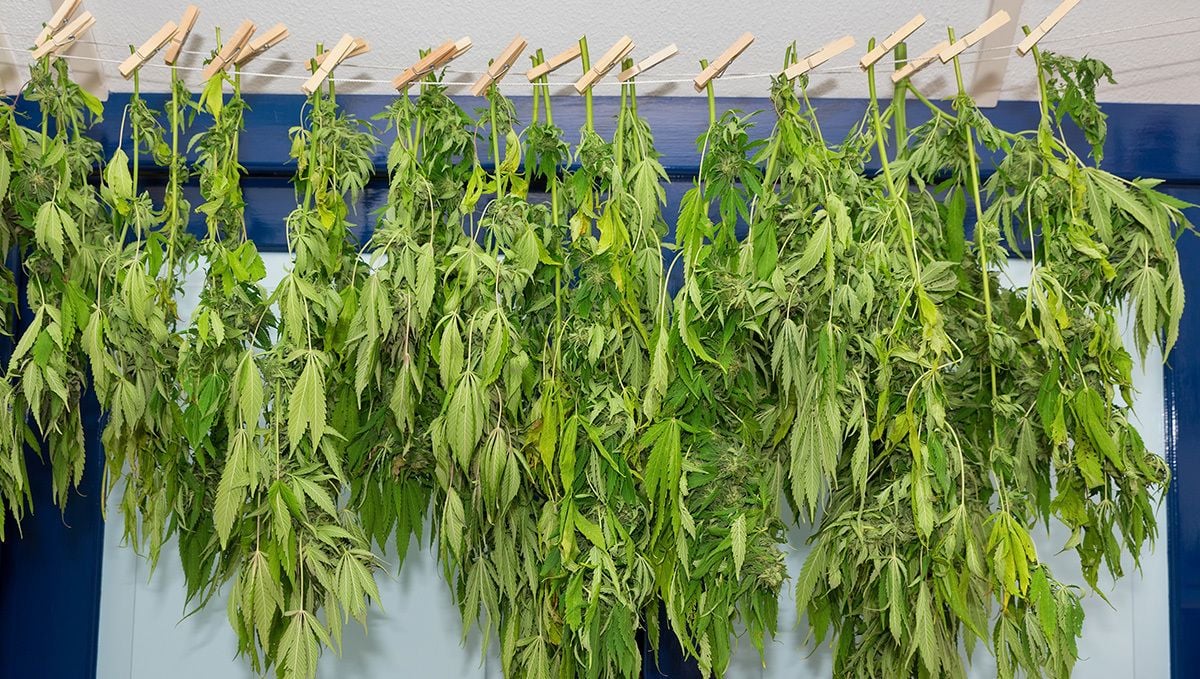
Home growers will find the rack option to be pretty handy, especially if the harvest isn't all that large. This method allows for each individual bud to have its own space and makes it easier to check up on the progress throughout the drying time. If you do end up drying the buds on racks, keep in mind that they will end up compressing slightly, so you should consider turning your buds regularly - usually, every 24 hours is more than enough. No matter which method you end up using, make sure to keep the temperature and humidity in check throughout the process - this is the key to perfect drying.
How to Control the Environmental Conditions in the Drying Area
Controlling the environmental conditions in your drying area is crucial if you want to perfect the drying process. You may be one of the lucky few who just happens to live in an area where the ambient temps and humidity are perfect, but the chances are pretty high that that isn't the case. So, what are the perfect environmental conditions for drying cannabis correctly? You are going to want to try and keep the temperature as close to 21 degrees Celcius (that's 70 F) as possible, with a relative humidity of 45 to 55%, but if you can stabilize it at 50% then you'll be laughing. These conditions ensure the buds dry slowly and evenly while keeping the maximum terpene and cannabinoid concentration. Fortunately, there are a couple of products out there that make this task a lot easier.
The first is an AC unit. This will allow you to both heats and cool the room, depending on the ambient temperature outside. Just make sure to get one with a humidifier function, as this will allow you to raise or lower the humidity levels in the room with ease. The second, and depending on your location the most vital, is a dehumidifier. These units effectively suck the moisture out of the air and can balance the humidity levels without raising or lowering the temperature. If you live in a colder, more humid environment then a small electric space heater will probably do the trick. These are great for quickly bumping the heat up a few degrees while also lowering the humidity.
You want the drying period to take between 8 to 12 days. If you are able to effectively control the temperature and humidity to 21 degrees C and 55% RH then that is how long the process should take, but it is also dependent on the structure of the buds themselves. Denser, heavier buds will obviously take longer to dry than airy, whispy offerings. Can you smoke the harvest once the drying period has passed? Yep, definitely. But if you want to produce the best quality possible, you are going to have to test that patience a little further. It's time to manicure the flowers, and send them off to cure!
Curing Cannabis Effectively
Ok, so think of the curing process like aging a fine whiskey - and also thank the lord that it takes nowhere near as long. Curing cannabis performs a couple of key functions. Not only does it allow the last little pockets of moisture buried deep inside the buds to slowly seep out, but it also allows the terpenes and cannabinoids to mature. And if you've ever smoked overly harsh weed, well that's a telltale sign that the bud hasn't been through a curing period. Chlorophyll is the guilty party here. This slowly breaks down through the curing period, offering a much smoother smoke and fuller mouth feel.

Pulling out the remaining moisture (that you wouldn't even know was there) is super important, as it lets you store the weed for much longer periods without having to worry about the dreaded mold rearing its ugly head and crashing the party. Properly cured weed can be stored for up to 24 months if stored correctly.
How to Cure Cannabis
All you really need for effective curing is airtight containers (mason jars work brilliantly, but you can use any airtight vessel), and a hygrometer for each jar. You'll also want to find a cool, relatively dry area that is protected from any light source. Basements usually work great, as they hold and maintain a regulated, cool environment with negligible temperature swings. So, grab some buds and carefully place them into your mason jars. Be careful not to pack them tightly inside the jars, or to fill the jars past the 75% mark. This allows the buds to breathe, which is what the curing process is all about.
Curing humidity should sit at around the 55 to 65% mark if possible, with the temps sticking between 20 to 23 degrees C. For the first week, you are going to want to burp the jars (crack the seal) once or twice a day. Don't worry if the flowers soften up slightly in the first few days, this is just that trapped moisture slowly seeping out. Do worry if you smell any signs of ammonia or 'offness'. If you do, then mold is almost definitely going to follow. Just remove the buds from the curing jars, place them back in the drying area for a day or two, and cross your fingers that you weren't too late to save them. After the first 7 days, you can back the burping off to once every two days, and then once a week from the third week onwards.
How Long Does the Curing Process Actually Take?
This is a heavily debated point throughout the cultivation community, but most growers agree that most strains should be ready to enjoy after two to three weeks. Some strains will benefit from a four to six-week cure, with some only reaching peak maturity after three to four months. But, all strains will be at a decent maturity level after three or so weeks, and from that point, you can just store them in the jars to let the curing continue until the harvest has been all smoked up!
11. The Outcome

Purple Punch Auto Yield
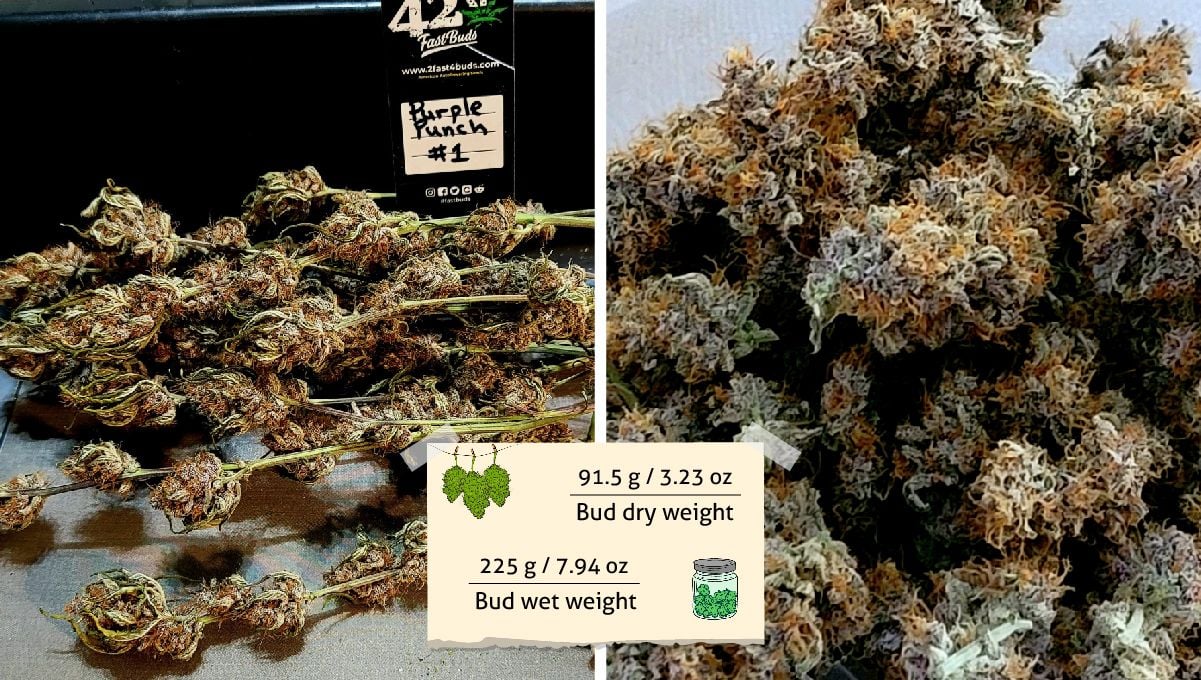
For TheCannaProphet, the results—91.5g (3.23oz) from two autoflowers—weren’t really jaw-dropping, but organic growing is never about weight. The main thing is quality. Both plants developed rounded compact buds with fat calyxes and a completely solid feel when you tried to squeeze them. But most importantly, they had a heavy coating of ‘frost’ all over them.
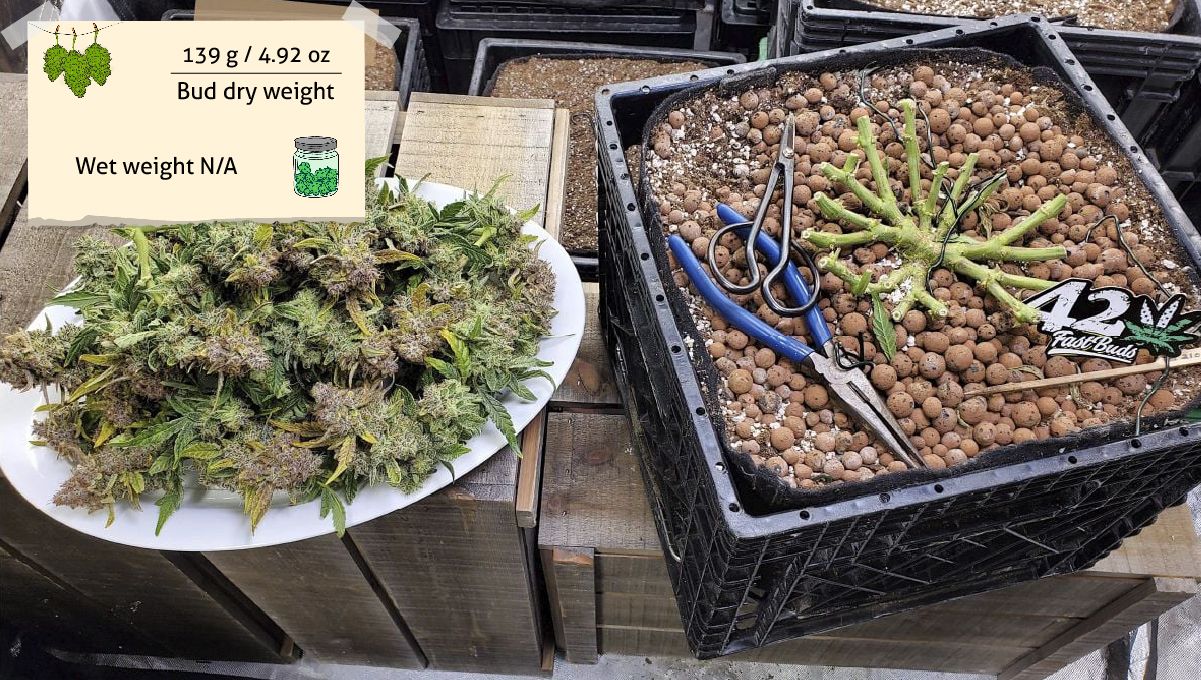
Despite all that HST abuse, Canamatoes managed to harvest 139g (4.92 oz) from his manifolded little bush. The buds looked as if they had been dipped in powdered sugar. Even when completely dry, they clogged the grinder and the scissors as if they were wet. Purple Punch Auto proved to be a resinous strain like no other.
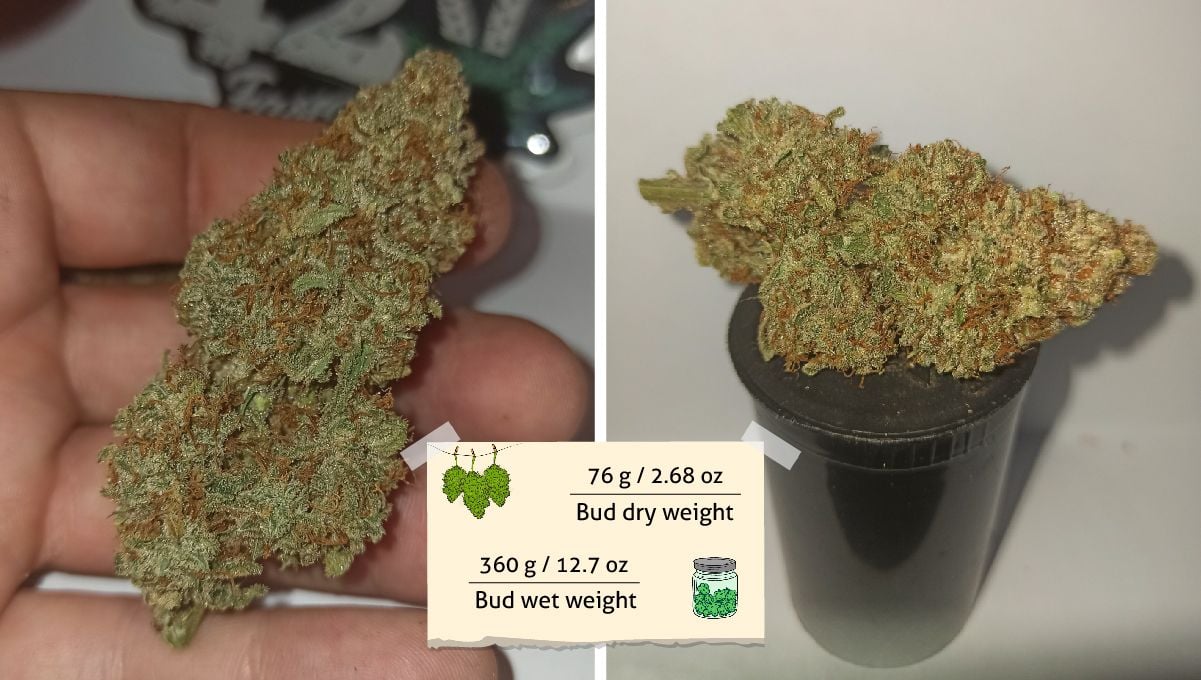
JohnnyBlaze who got 76g (2.68oz) dry was amazed by the calyx-to-leaf ratio of the buds. They were extremely easy to trim and soon turned into rock-hard, dense, sticky nuggets, so beautiful that his camera didn’t do them justice — no matter how many photos he took.
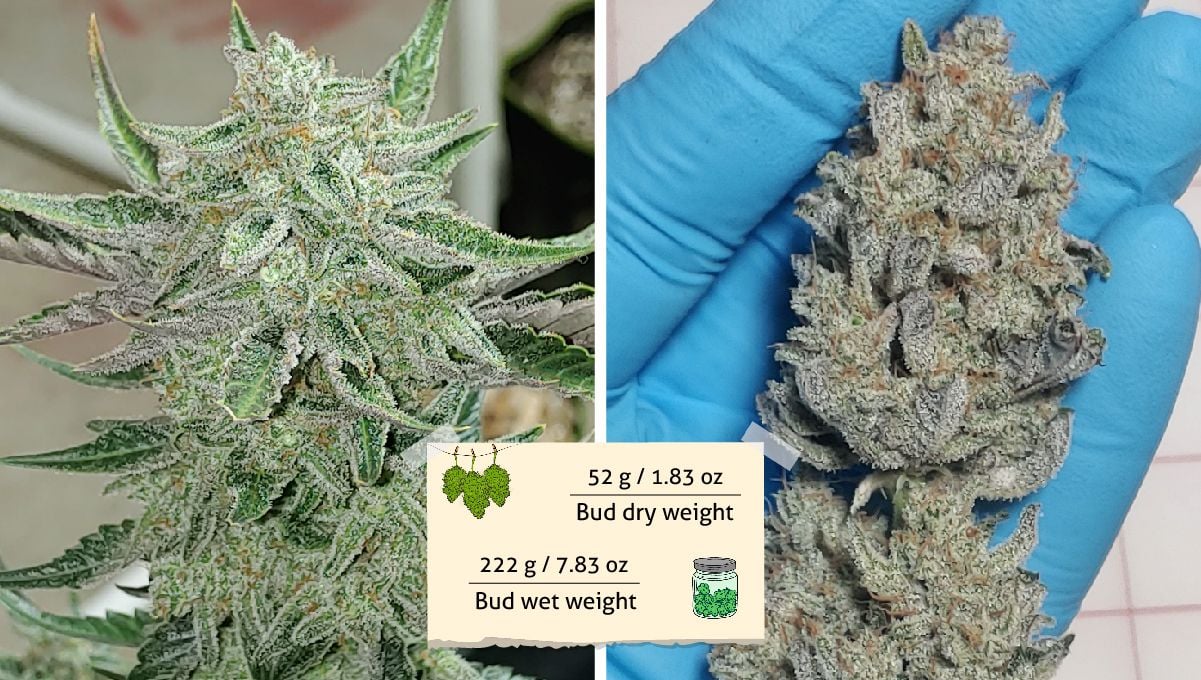
Chubbs harvested 52g (1.83oz) from his two Purple Punch Autos. The buds had a vibrant green color under a thick layer of trichomes, but after 8 days of drying, the purple tint started to show as well.
Purple Punch Auto Smoke Report
TheCannaProphet sampled a bud even before it was cured. And he still found the taste amazing — sweet, creamy, with nutty notes, ‘almost like biting into a blueberry pastry’. The effect was an almost instant relaxation of your whole body but with enough Sativa influence to counteract the couch-lock. A very clear and creative head high would make Purple Punch Auto the perfect companion for the whole day or a night out with friends.
Canamatoes described his stash as the ‘tastiest purple fruit bomb’ he ever smoked in his life. Even after months, the stuff smelled of fruit punch, and the effect felt 100% Sativa. It was exceptionally strong and relaxed the body without any couch-lock and tiredness. One couldn’t stop smoking because of the flavor and got only higher with every puff.

For JohnnyBlaze, the buds smelled sweet and creamy in the jar, with the smoke extremely potent and thus rather harsh on the lungs. It was one of those cases where you cough because the THC content is so high. The taste was the same as the smell — sweet, with creamy notes with an earthy background. The high put his brain on pause which was perfect for listening to music. The relaxation would then deepen into a heavy couchlock where you can’t move a muscle.
Chubbs’ smoke had a very strong pungent smell, dominated by sweet and fruity notes. The effect was a perfectly balanced Sativa/Indica mix. It was not too heavy on the body to make you immobile but created a nice pleasant buzz all the same.
12. In Conclusion
Based on the four grow journals we have reviewed, Purple Punch Auto is a fast-maturing variety and a not very tall one. It’s also extremely easy-to-grow, can take a lot of beating, including extreme forms of high-stress training, and still come out on top.
It also reacts equally well to any feeding schedule, tolerating both high and low doses of nutrients. Those may affect the size, growth rates, and the ultimate yield but not the overall health and vigor of the plant.
And above all, this autoflower is exceptionally resinous, with white trichomes concealing the buds’ natural color which may be either purple or vibrant green. And the smoke is pure sweetness, creating a strong buzzy relaxation, both pleasant and calm.
In short, Purple Punch Auto is definitely worth having in your garden. Happy growing, everyone!
External References
- Shape Matters: Plant Architecture Affects Chemical Uniformity in Large-Size Medical Cannabis Plants, Nadav Danziger and Nirit Bernstein, Plants, Sept 2021
- Interplay between chemistry and morphology in medical cannabis (Cannabis sativa L.), Nirit Bernstein, Industrial Crops and Products, March 2019
- Soil beneficial bacteria and their role in plant growth promotion: a review, Rifat Hayat, Annals of Microbiology, Dec 2010
- Nitrogen supply affects cannabinoid and terpenoid profile in medical cannabis (Cannabis sativa L.), Avia Saloner and Nirit Bernstein, Industrial Crops and Products, Sept 2021





Comments