Banana Purple Punch Auto Cannabis Strain Week-by-Week Guide
- 1. Grow specifications
- 2. Grow set up
- 3. Germination and seedling stage | week 1
- 4. Early veg | week 2
- 5. Mid veg | weeks 3-4
- 6. Transition (pre-flower) | week 5
- 7. Early flower | weeks 6-7
- 8. Mid flower (bulk phase) | weeks 8-9
- 9. Ripening and harvest | week 10 (and beyond)
- 10. The outcome
- 10. a. Banana purple punch auto yield
- 10. b. Banana purple punch auto smoke report
- 11. In conclusion
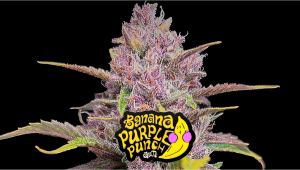
Banana Purple Punch Auto is an autoflowering strain that is sure to impress. Its fast and easy growing process, coupled with its mouthwatering blend of sweet banana and berry flavors, make it a standout choice for growers of all levels. The buds produced by this autoflower are of the highest quality, offering a potent and enjoyable experience for smokers. Whether you're an experienced grower or just starting out, Banana Purple Punch Auto is worth considering for its unique combination of potency and flavor.
In our Banana Purple Punch Auto week-by-week guide, we review four indoor grows done by gardeners with different levels of experience, focusing on straightforward methods and good practices. As you shall see, each grow resulted in a great harvest of 1.73 ounces (49 grams) to 6.7 ounces (190 grams) per plant and took 10 weeks from seed on average.
1. Grow Specifications
Banana Purple Punch Auto is an Indica-dominant hybrid strain with a composition of 75% Indica and 25% Sativa. It has a fast flowering time of just 8-10 weeks from seed to harvest, making it a great choice for growers looking for a quick return. This strain is known for its impressive size and height, with plants reaching an average height of 80-120cm indoors and up to 200cm outdoors. In terms of yield, indoor growers can expect to harvest between 450-550g/m², while outdoor growers can expect to harvest 60-200g per plant.
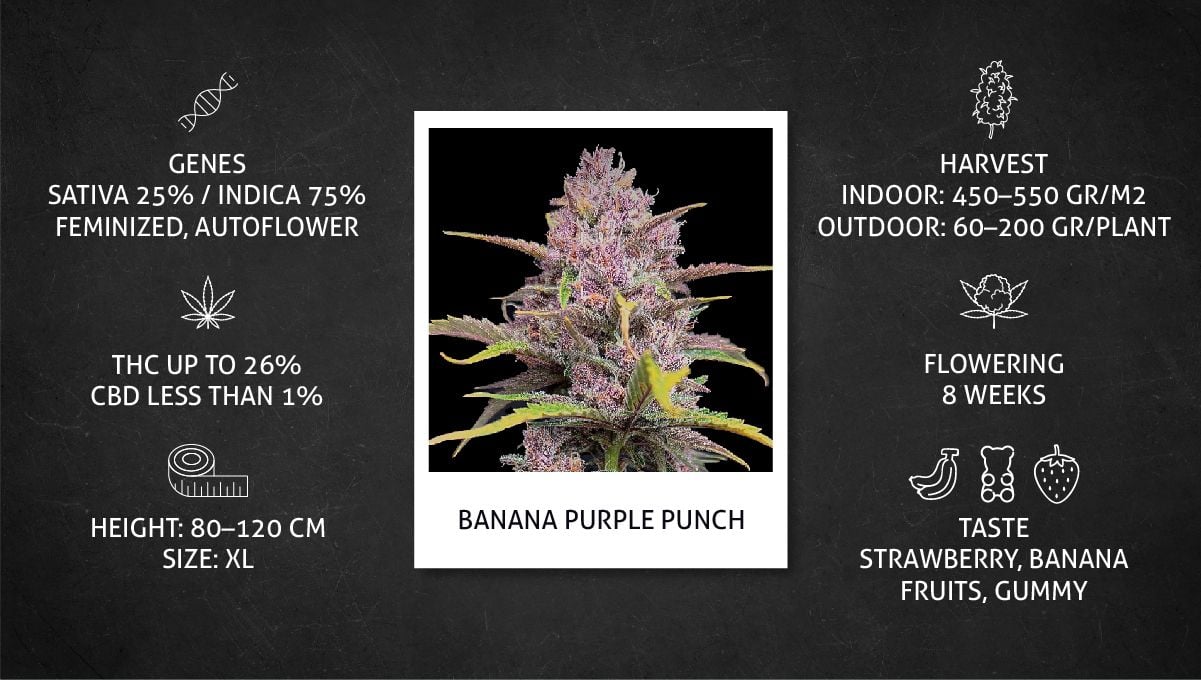
This strain has a THC content of up to 26%, delivering a potent and long-lasting high. Banana Purple Punch Auto has a delicious and fruity flavor, with notes of strawberry, banana, and gummy that are sure to please even the most discerning smoker.
2. Grow Set Up
We've selected a group of grow diaries to create this week-by-week guide. We'll keep a close eye on four of them, but we might use pictures from other grows too. The growers we're featuring kept things pretty simple and all grew their plants using LED lights and most of them grew in small grow tents. They didn't do anything too fancy, which is good news for you because it means you don't need any experience to follow in their footsteps and grow some beautiful plants of your own!
| Grow Space | Light | Medium | |
|---|---|---|---|
| A | 1.16 m2 | 615W LED | Enriched Soil |
| B | 1.49 m2 | 660W LED | Coco/Perlite |
| C | 0.36 m2 | 300W LED | Enriched Soil |
| D | 0.66 m2 | 150W LED | Coco/Perlite |
We have seen enough Banana Purple Punch Auto grow diaries to draw one conclusion: this strain is versatile in any setup and suits any growing style. So, whatever you're planning with your grow, rest assured that this autoflower will perform admirably.
3. Germination And Seedling Stage | Week 1
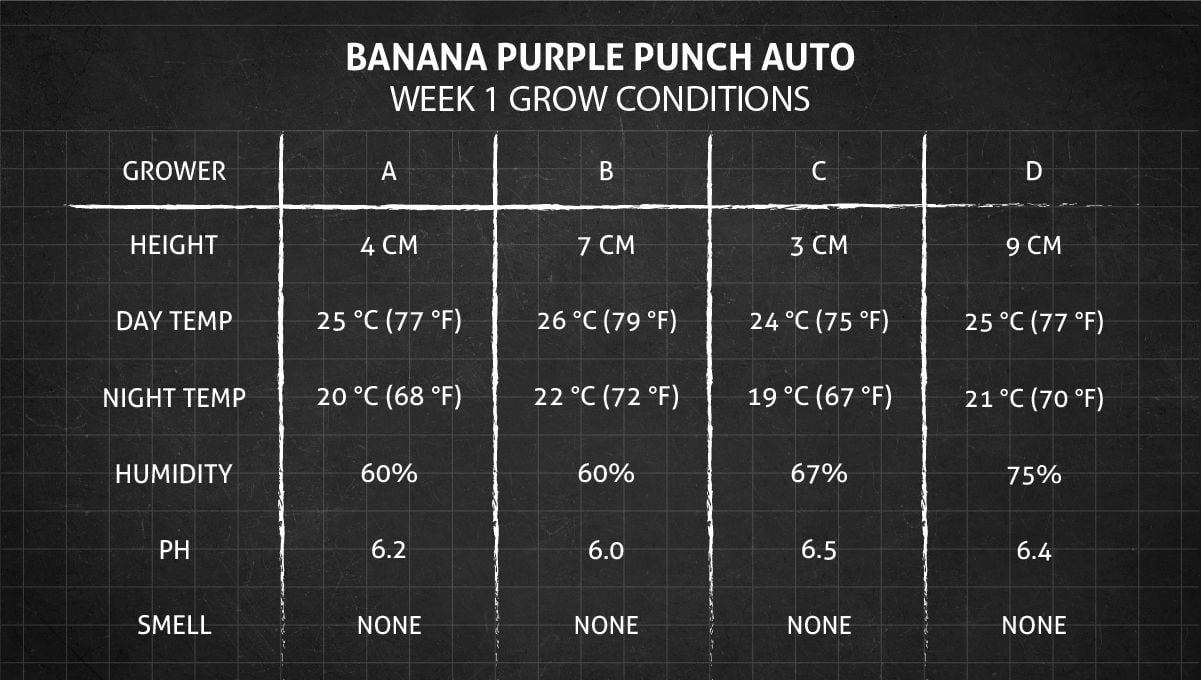
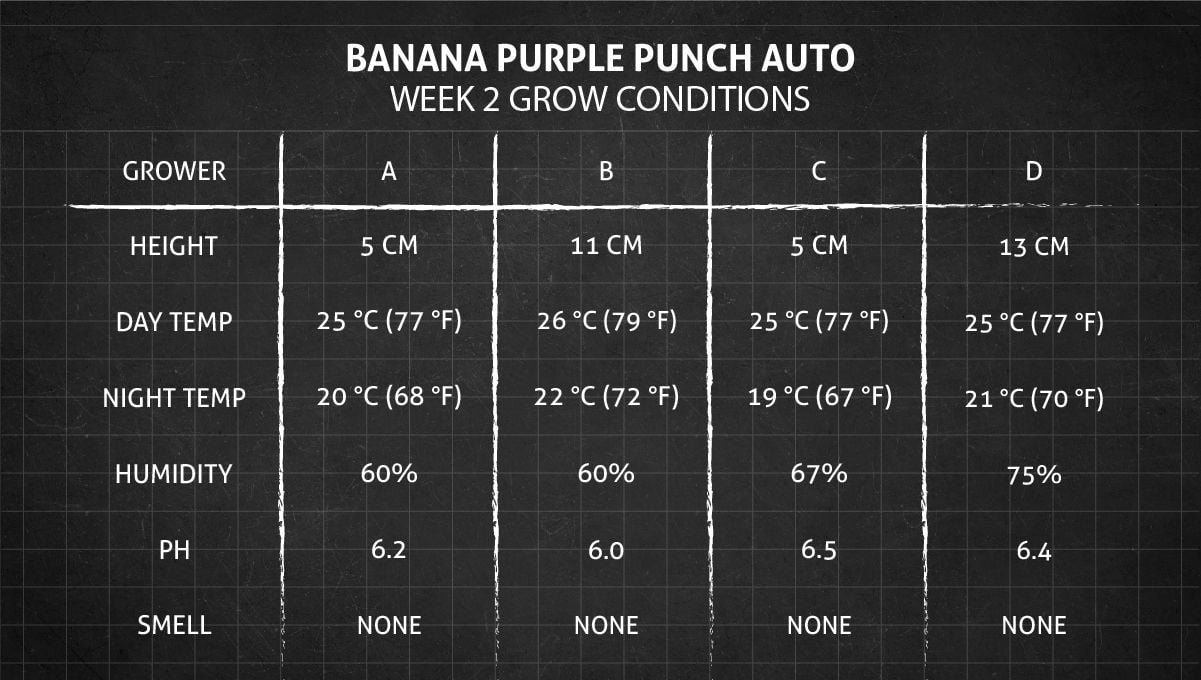
Proper germination is crucial to the success of a cannabis grow. It sets the stage for the plant's entire life cycle, and if not done correctly, can lead to weak plants, low yields, or even total failure. The key to successful germination is to provide the perfect conditions for the seeds to sprout. This includes keeping the seeds moist and warm, while also ensuring they have access to oxygen. Look at the numbers in the table below to see what we mean!
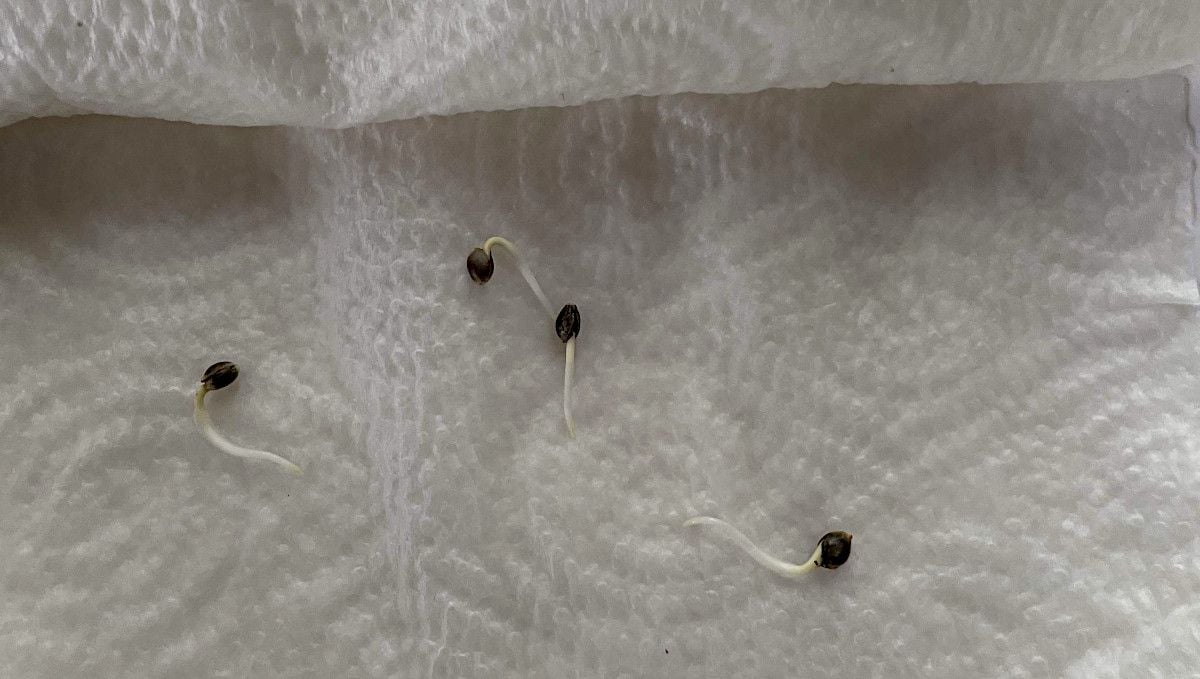
To create the optimal conditions for germination, you should start by choosing high-quality seeds such as Banana Purple Punch Auto. Then, you'll need to provide them with a warm and humid environment, such as a seedling tray or a damp paper towel. Keep the seeds consistently moist, but not soaking wet, and provide them with plenty of oxygen by ensuring proper ventilation.
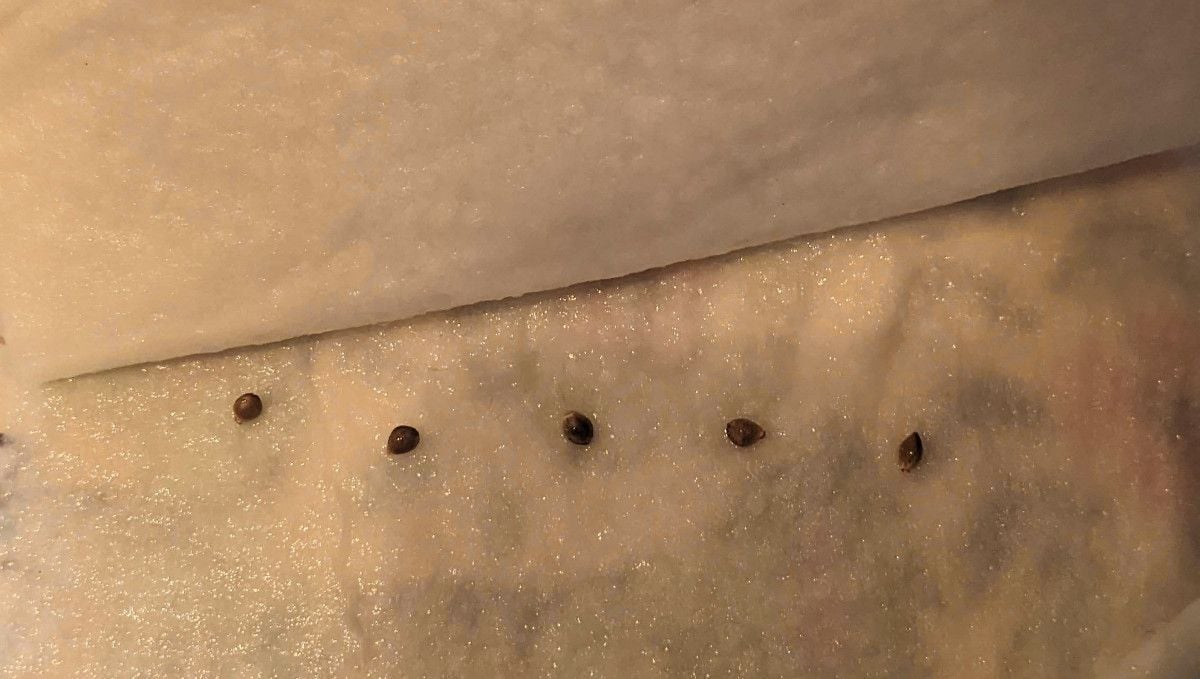
To ensure the best chance of success, it's best to wait until the taproot is at least a quarter to half an inch long before transplanting the seedling into your growing medium. This gives the plant a solid foundation as you'll be setting it up for a healthy and productive life.
Jiffy plugs, also known as peat pellets, can be another great choice for germinating cannabis seeds. These small, compressed discs of peat moss or coco coir are easy to use, affordable, and provide a great environment for seed germination. They are especially useful for growers who want to later transplant their seedlings directly into a larger container, as the plugs can be easily inserted in the medium along with the seedlings.
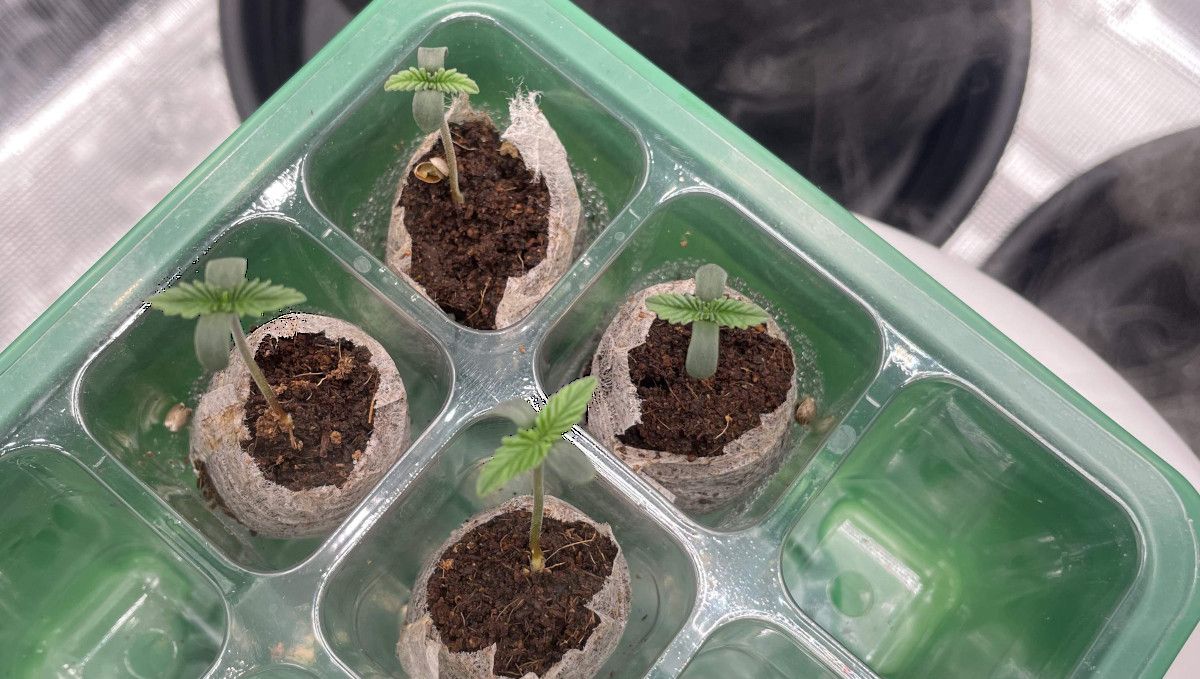
Removing the shell from a sprouting cannabis seed can be a critical step in ensuring the health and growth of the young plant. As the seedling grows, the outer shell can sometimes cling to the young leaves or stem, inhibiting their development and potentially even choking the plant. By gently removing the shell, you can help the plant shed its protective coating and continue to grow strong.
However, it's important to be gentle when removing the shell, as the young seedling is still very delicate and can be easily damaged. You can try misting the shell with water to help soften it and make it easier to remove. With careful attention and a gentle touch, you can help your cannabis seedlings thrive.

Please be aware that giving a cannabis seed nutrients in its first days of life can be risky, as the delicate young roots may not be able to handle high levels of fertilizer. Overfeeding at this stage can lead to nutrient burn, root damage, and stunted growth. As such, it's generally recommended to wait until the plant has developed a few sets of leaves before starting to add nutrients to the soil or growing medium.
4. Early Veg | Week 2
In the second week of life, a cannabis seedling will typically start to actively grow and develop new leaves, as well as continue to develop its root system. At this stage, it's important to maintain the right conditions to ensure the plant's uninterrupted growth and health. This includes providing adequate light, keeping the temperature and humidity at appropriate levels (around 70-80°F or 21-26°C and 50-70% respectively), and watering the plant as needed to keep the soil moist but not waterlogged.
Some cannabis growers like to foliar feed their young cannabis plants, as this technique can provide a quick boost of nutrients and help address nutrient deficiencies. However, foliar feeding can be a risky procedure, particularly for young plants with delicate leaves. It's important to keep the nutrient levels low and ensure that the nutrient solution is properly balanced to avoid causing damage to the leaves or increasing the risk of mold and fungal growth. In general, it's best to avoid foliar feeding young cannabis plants unless you have experience and are confident in your ability to do so safely.
Novice growers may be unsure about the progress of their young cannabis plants and often ask questions. However, it's typically easy to determine whether a plant is developing well or not. A good indicator is to observe if the second set of true leaves is the same size as the first set by day 10. If they are, then the cannabis plant is developing well.
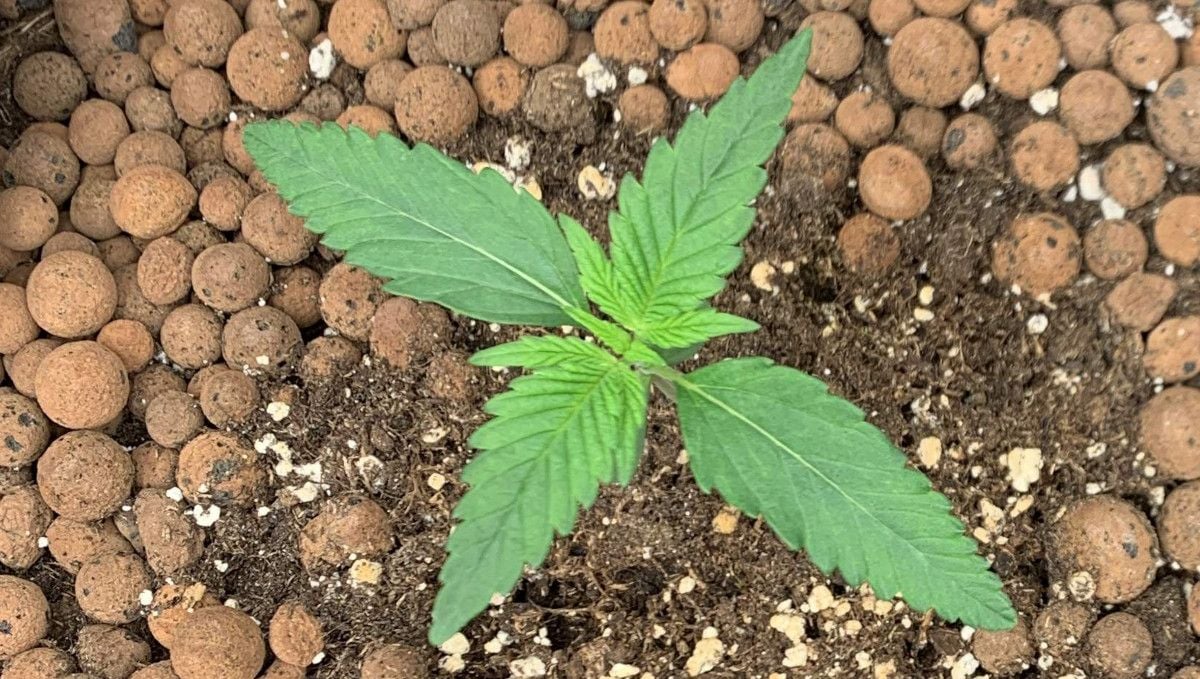
The second week of a cannabis plant's life is often when growers begin to provide their seedlings with additional nutrients, particularly if they are growing in soil. In contrast, growers using coco or hydroponic mediums typically start providing nutrients from day one. This is because these mediums do not contain any pre-amended nutrients, unlike soil.
5. Mid Veg | Weeks 3-4
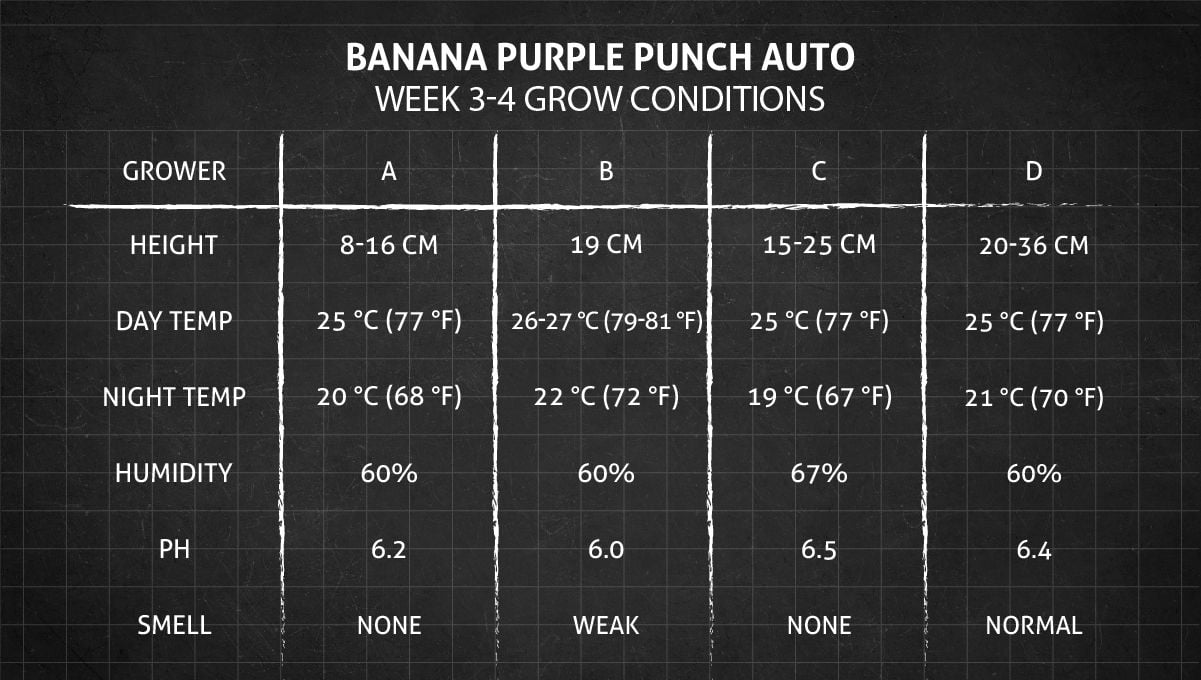
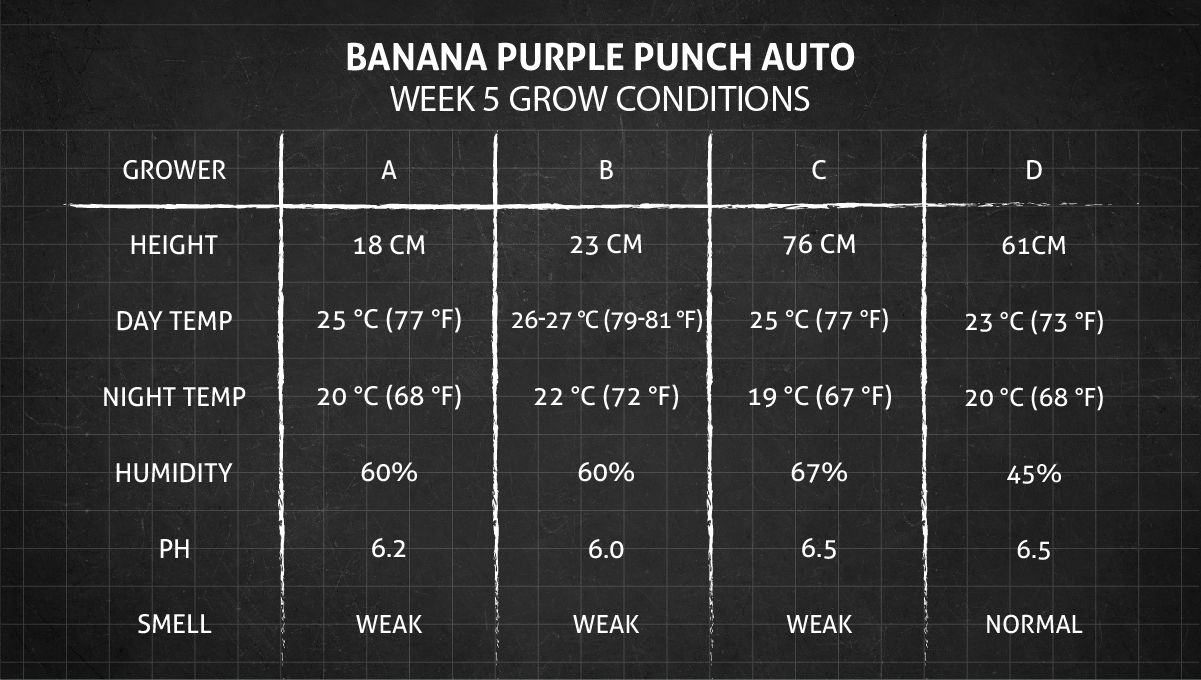
By weeks three or four of their life, cannabis plants have become sturdier and less vulnerable, meaning they don't require the same level of precise and controlled conditions as during the earlier stages of growth. However, it's still important to maintain proper light, temperature, humidity, and nutrient levels to ensure healthy and vigorous growth. See the table below for details.
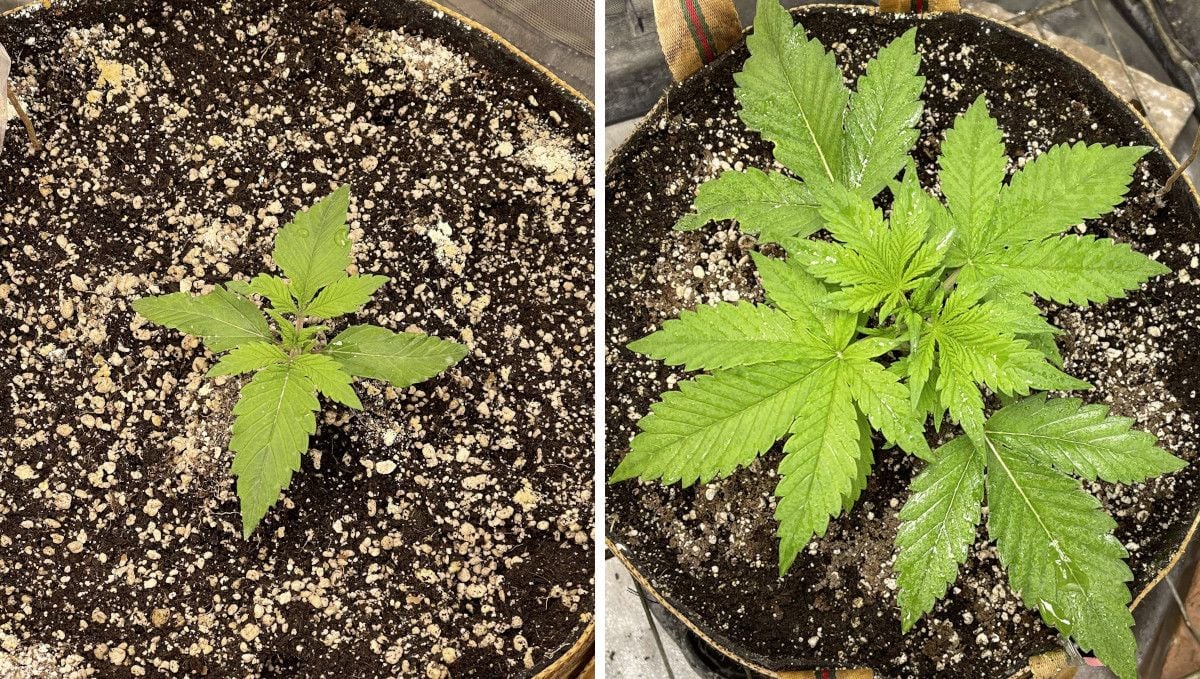
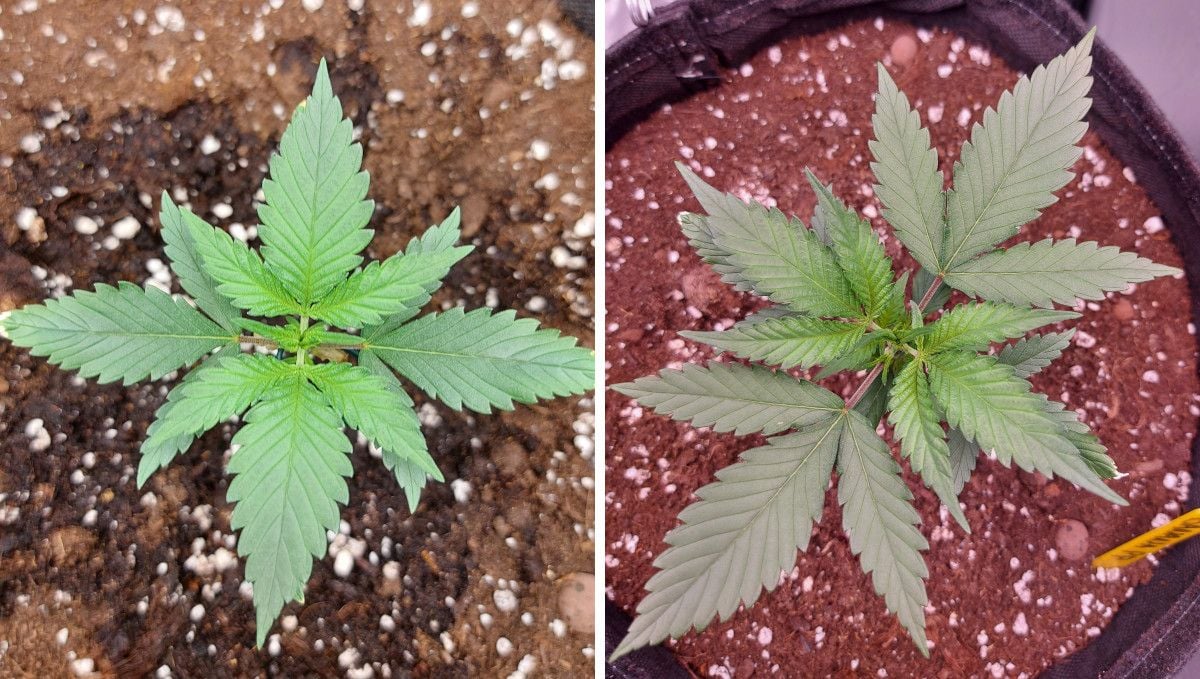
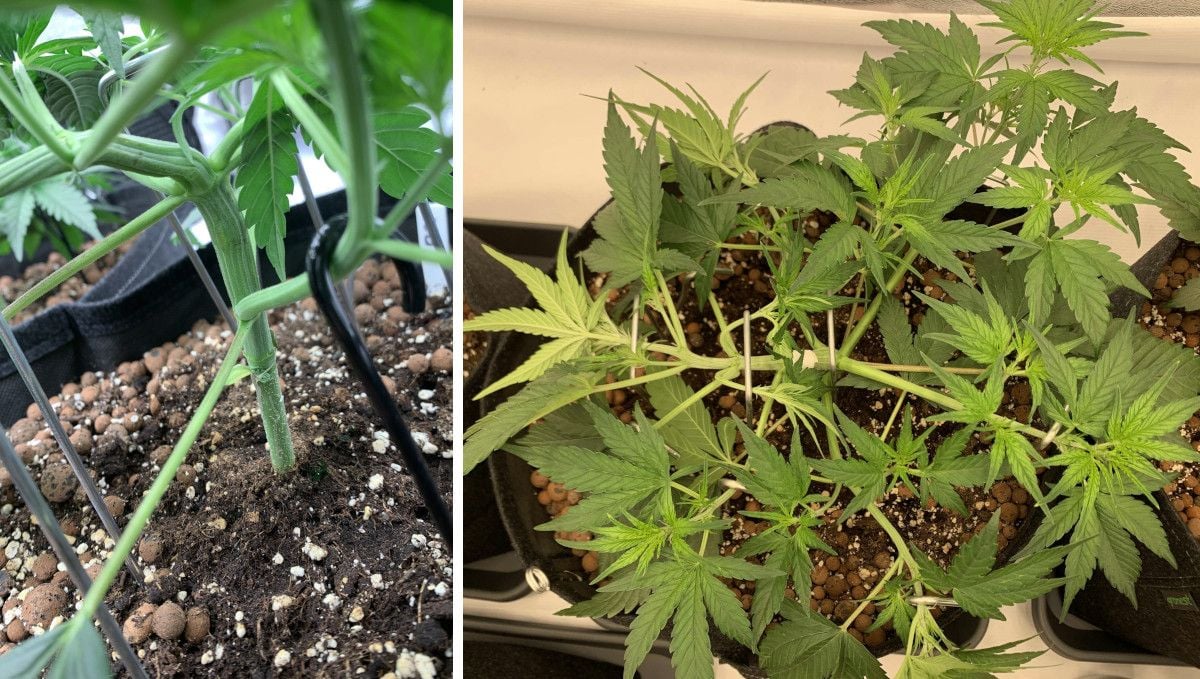
Starting to train cannabis plants as early as the third or fourth week of their life can have both pros and cons. On one hand, early training can help shape the plant's structure and maximize its potential yield. On the other hand, if the plant is too young or weak, training can cause stress and potentially harm the plant. It's important to carefully evaluate each plant's individual health and growth before deciding to begin training. The one in the pic below is better left alone for now.
As for the Banana Purple Punch Auto in this picture, the grower decided to start training her early. However, this was likely a mistake as the plant was already a bit stressed. We suspect that the plant may have been suffering from water stress. Fortunately, the Banana Purple Punch Auto is a strain with strong genetics and this one would eventually recover well.
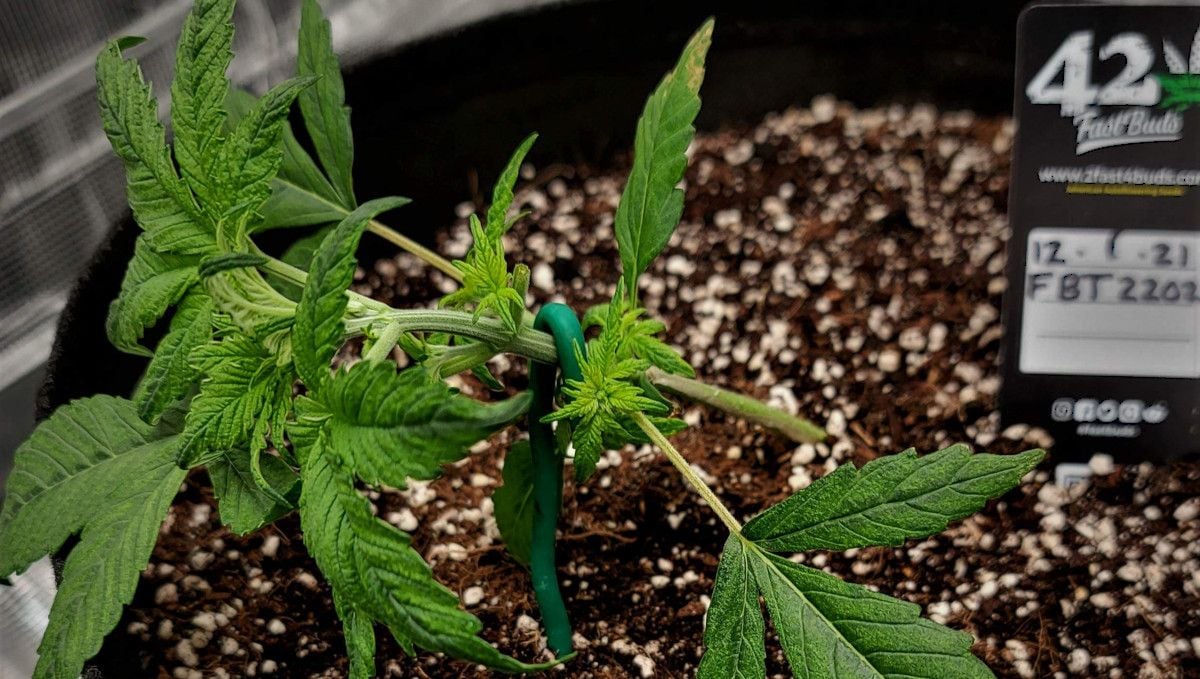
If your plant isn't sick or stressed, training it is the best way to ensure great results come harvest time. You can tie down the main stem and side branches using metal braces, pieces of string, or similar materials to keep the plant short and maintain a flat canopy. This helps ensure that each growing top is at the same level and distance from the light, promoting even growth and maximizing the plant's exposure to light..
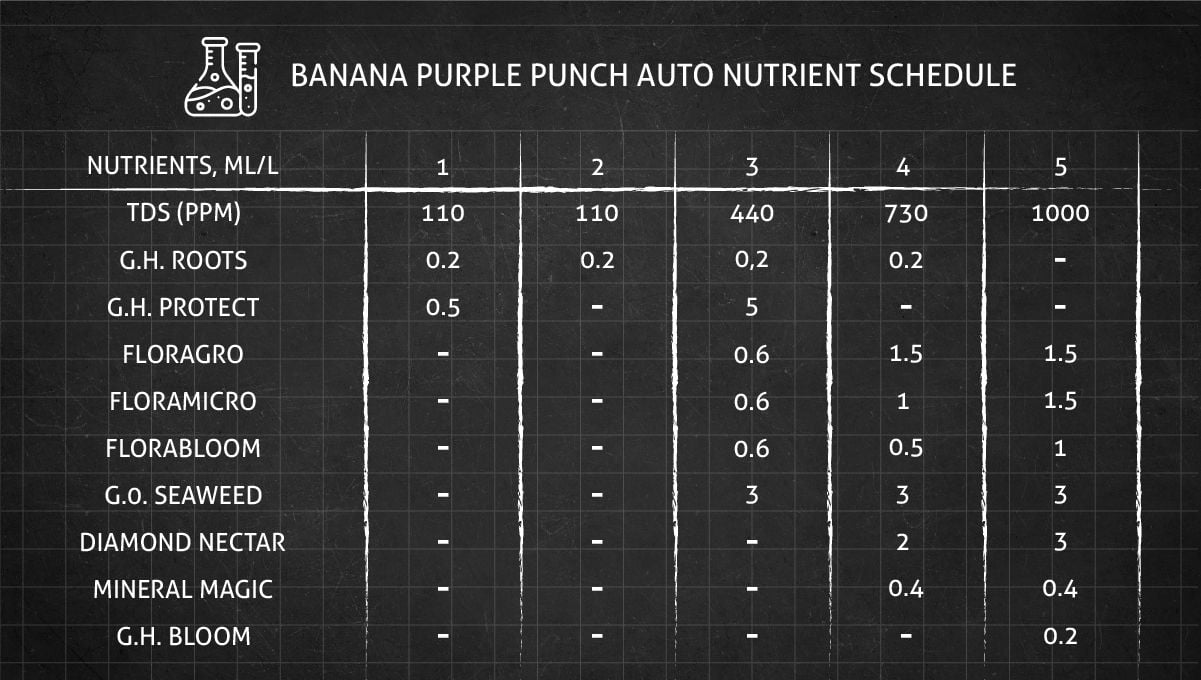
Regardless of your chosen growing medium (except for maybe super soil), it will eventually become depleted of nutrients, and you will need to supplement it with plant food when watering your garden. There are numerous producers offering a wide range of nutrient formulas for feeding cannabis plants, making it impractical to describe them all. Instead, we will provide one feeding schedule as an example and reference for you to follow.
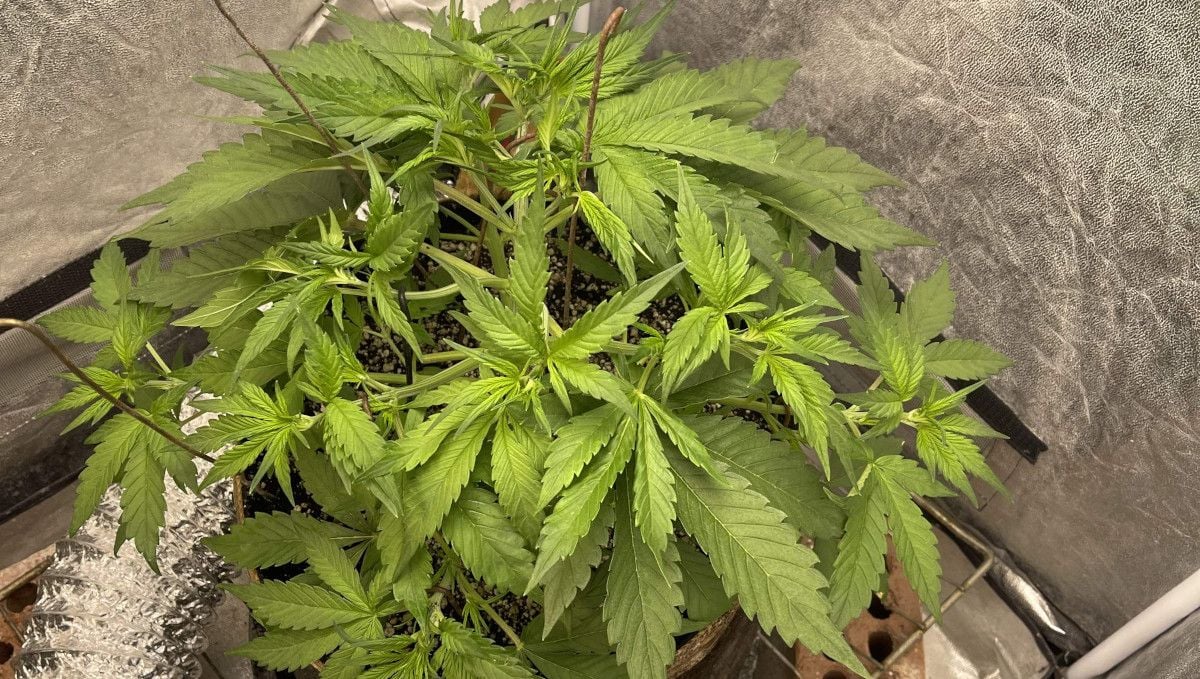
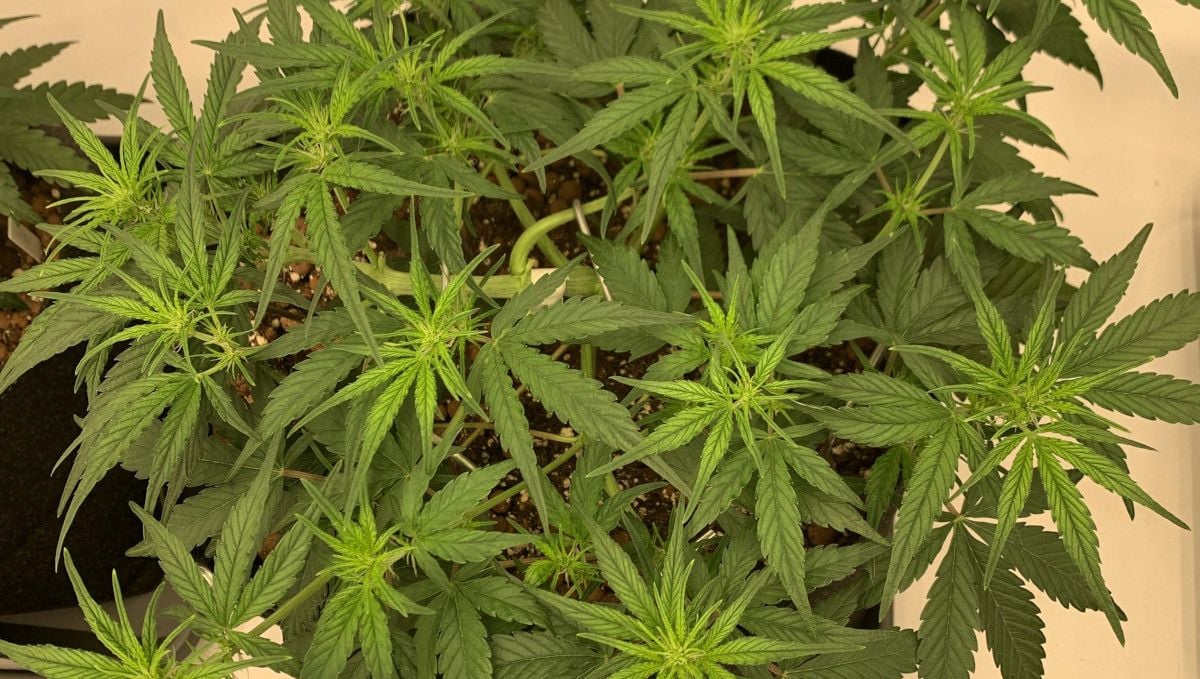
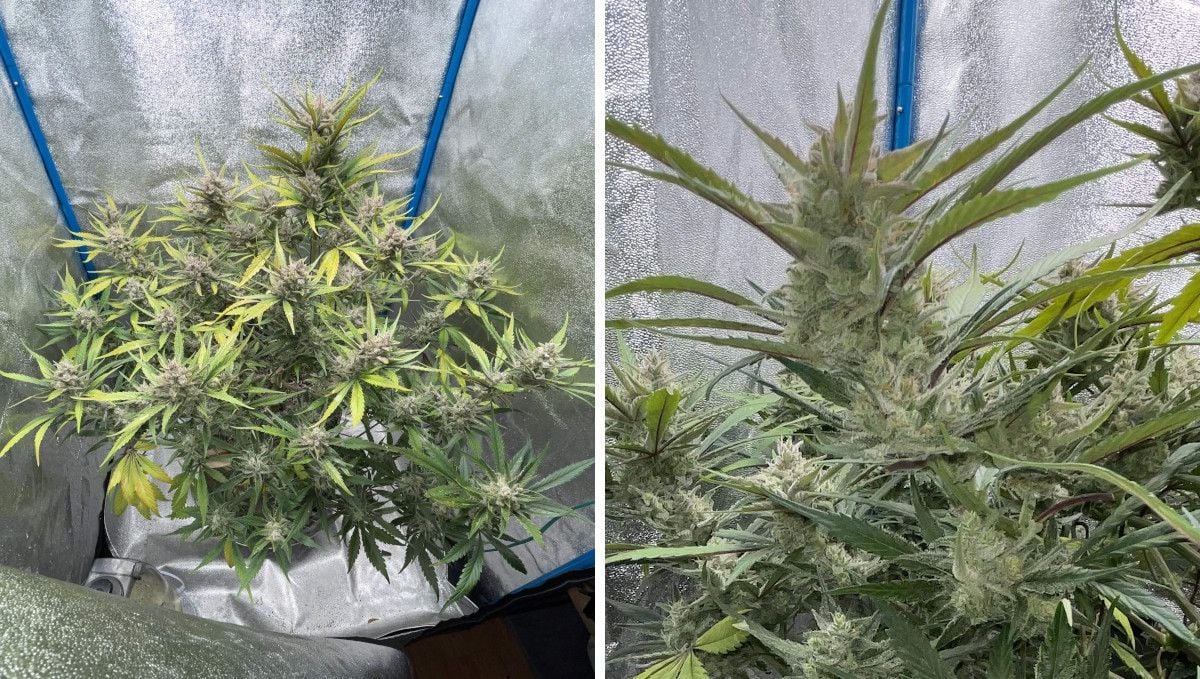
The most important macronutrient at this stage is nitrogen (N in th NPK). Visually, it makes the foliage look healthy green. However, too deep a shade of green signals nitrogen toxicity. In the picture below, you can see a perfectly healthy plant with just the right shade of green.
6. Transition (Pre-Flower) | Week 5
Autoflowering cannabis plants differ from photoperiod plants in that they do not require a change in light schedule to start flowering. This is because they are genetically programmed to automatically start the flowering process after a certain period of time, regardless of the amount of light they receive. So, indoors, they start budding under any light schedule, and it happens around week five.
As your autoflower cannabis plant enters the flowering stage, you'll notice a change in its appearance. The once-uniform green foliage will now have lighter shades of green and may even appear yellowish. This is a clear indication that flowering has begun, and you can expect to see buds forming on every top within a few days.
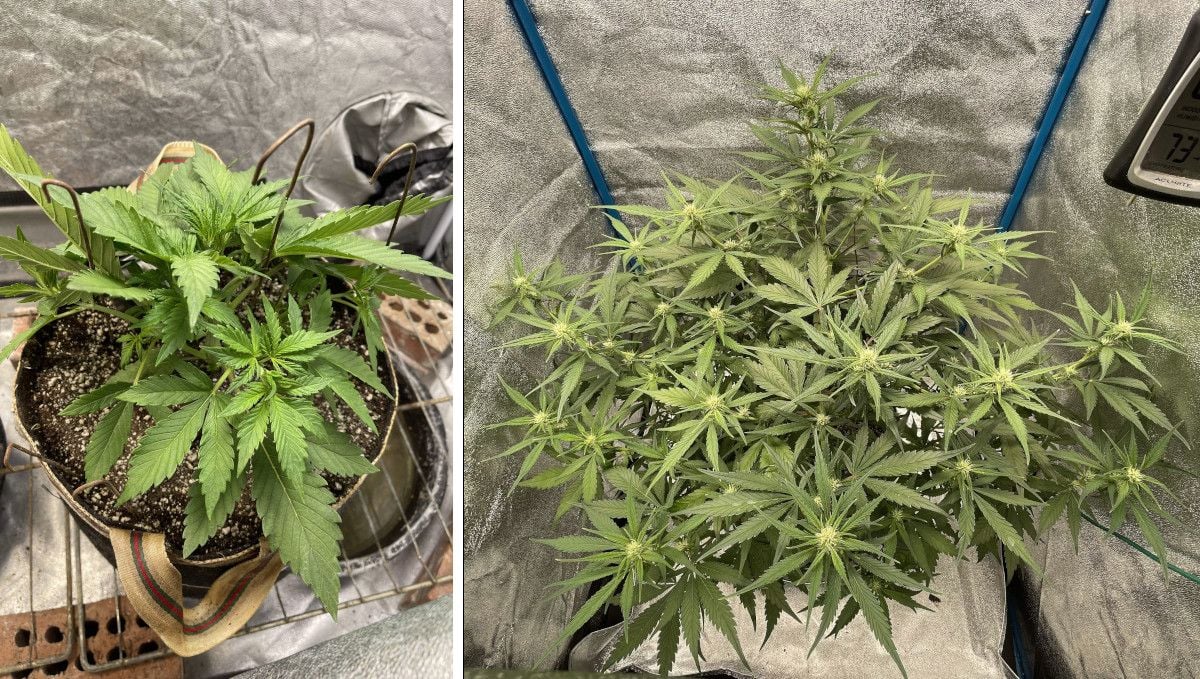
During this stage, your autoflower plant will undergo what is called the "flowering stretch." This means that it will not only form buds but will also continue its vegetative growth, resulting in longer internodal spacings. In some cases, the plant can double or even triple in size, although a 50% growth is more common. Look at the picture below and see how much progress a Banana Purple Punch Auto has made in a little more than one week.
It's also around this time that you'll need to change your feeding schedule to accommodate the plant's needs. During the vegetative stage, your autoflower plant required more nitrogen, but now it will need more phosphorus and potassium to support proper bud development. These two macronutrients are critical to the plant's overall health and should be closely monitored throughout the flowering stage. As the plant focuses its energy on building flowers, it will require more nutrients, so be sure to watch your TDS levels and adjust accordingly.
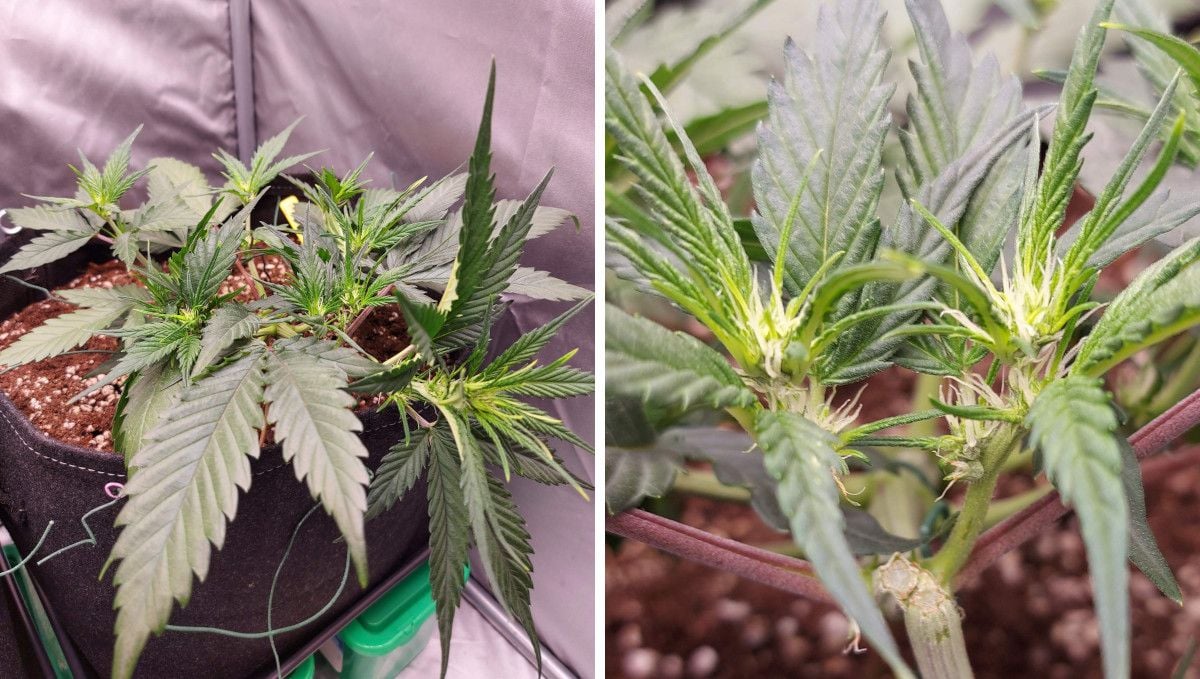
Of course, the start of flowering and the accompanying flowering stretch don't prevent you from going on with the training. Just make sure that it is only a light-stress training, not the high-stress one.
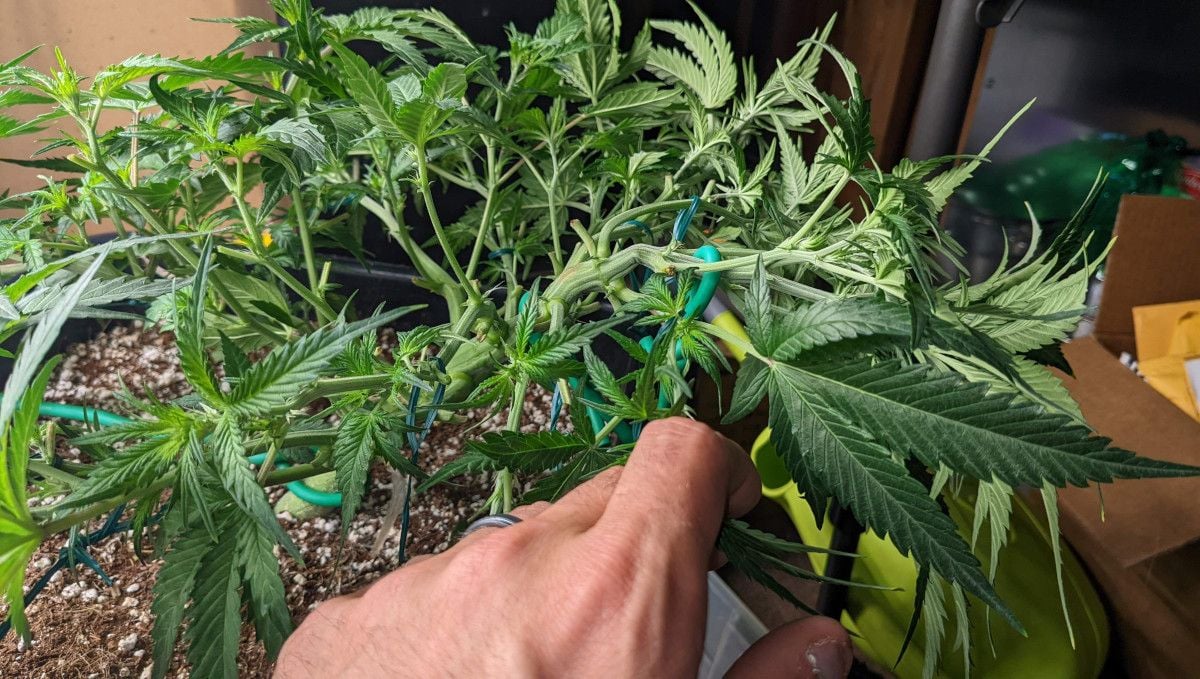
The purpose of training is to keep the canopy flat because in this case every flowering top will be at more or less the same distance from the light and thus receive the same amount of light. Also training helps you ensure that no lower bud site is in shade or too far from the light.
7. Early Flower | Weeks 6-7
As the flowering stretch progresses, keep a close eye on the distance between the plant and light source, and adjust as needed. Also, be sure to lower the temperature and relative humidity in the grow room as the buds start to bulk up. This helps conserve terpenes and prevents moisture-related problems like bud rot and mold.
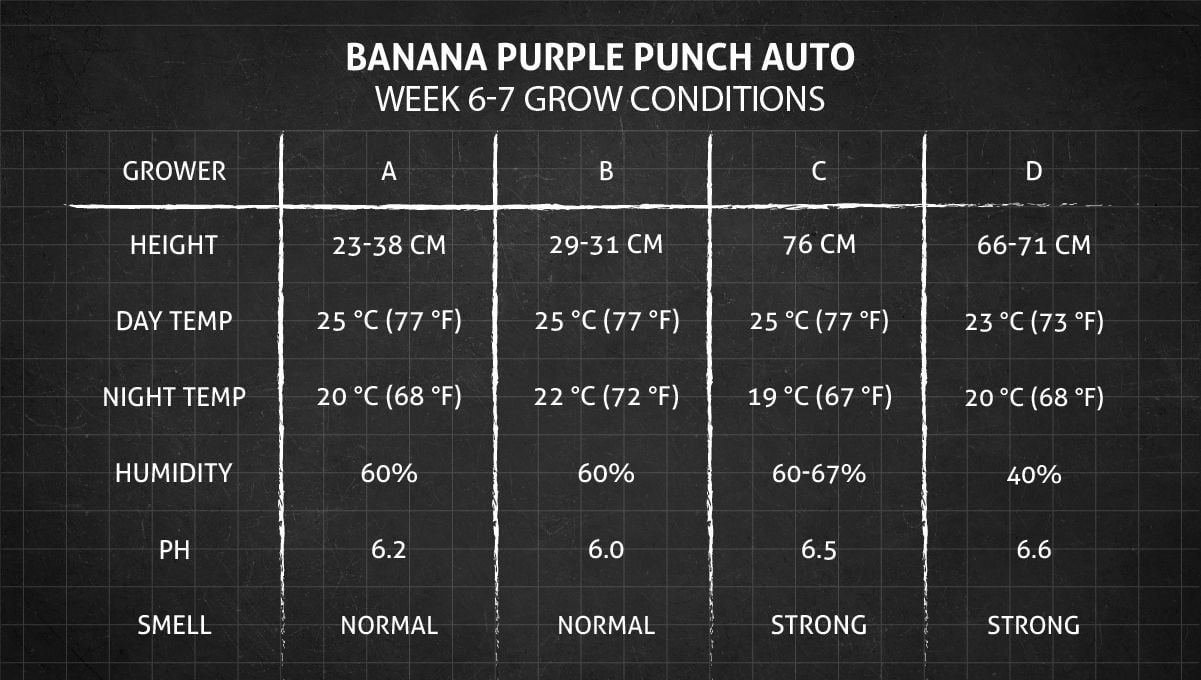
As the plants gain in size the fastest at this stage and spend even more energy on building the flowers, they are the hungriest. So make sure that you watch the TDS levels and make them the highest during this stage. TDS is the way to measure how much plant food you are adding to your water. Let us remind you that at this stage the plants continue to need more phosphorus and potassium than nitrogen, but they also need all essential micronutrients as well.
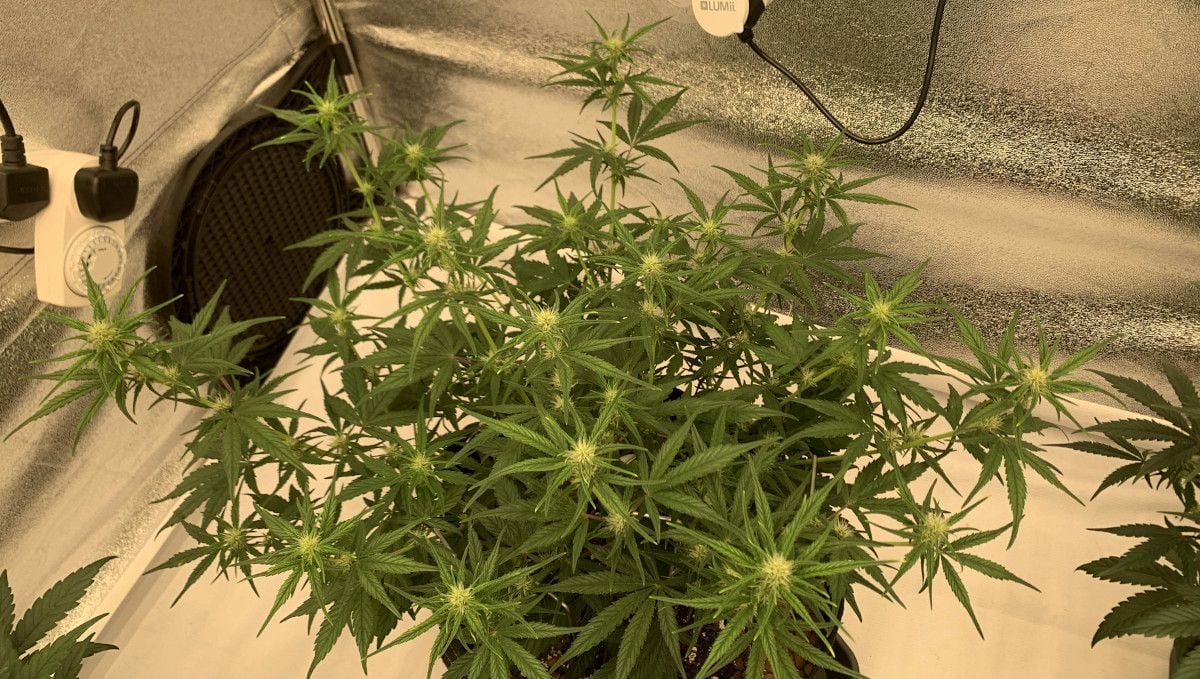
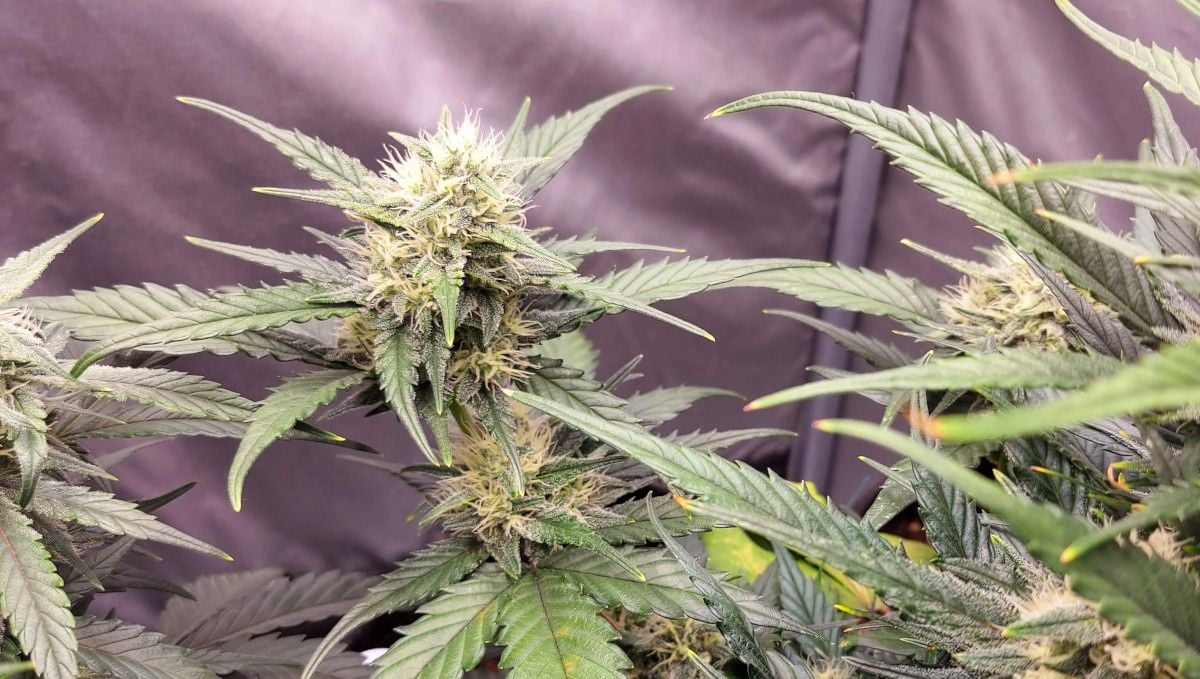
If you maintain the perfect growing conditions, give your plants enough water, food, and light, they will thank you with fast bud development. It's also around this time that the best cannabis genetics start to get covered in trichomes.
One of the growers we feature in this article has provided a basic nutrient schedule that you can use as a reference for your future grows. Don't hesitate to replicate it exactly or make adjustments based on your unique conditions.
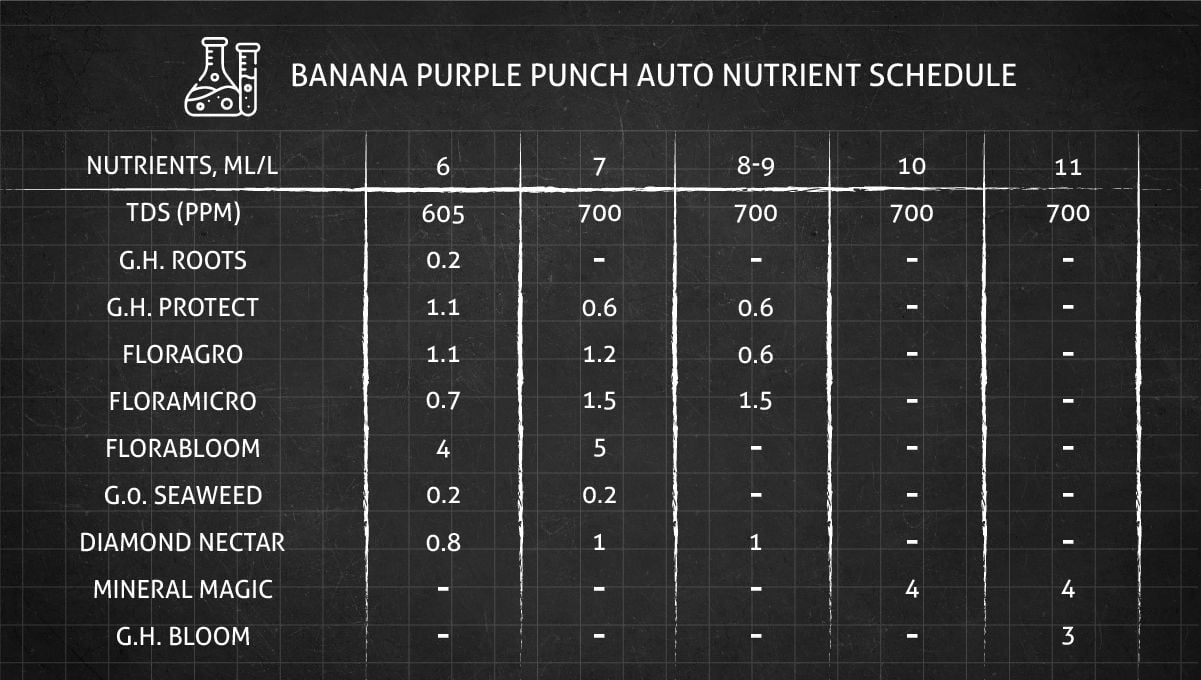
While adjusting your feeding regimen, monitor how your plants look and how they change over time. Well-fed plants should have no spots and discolorations and their progress either in size or the density of the flowers should be noticeable.
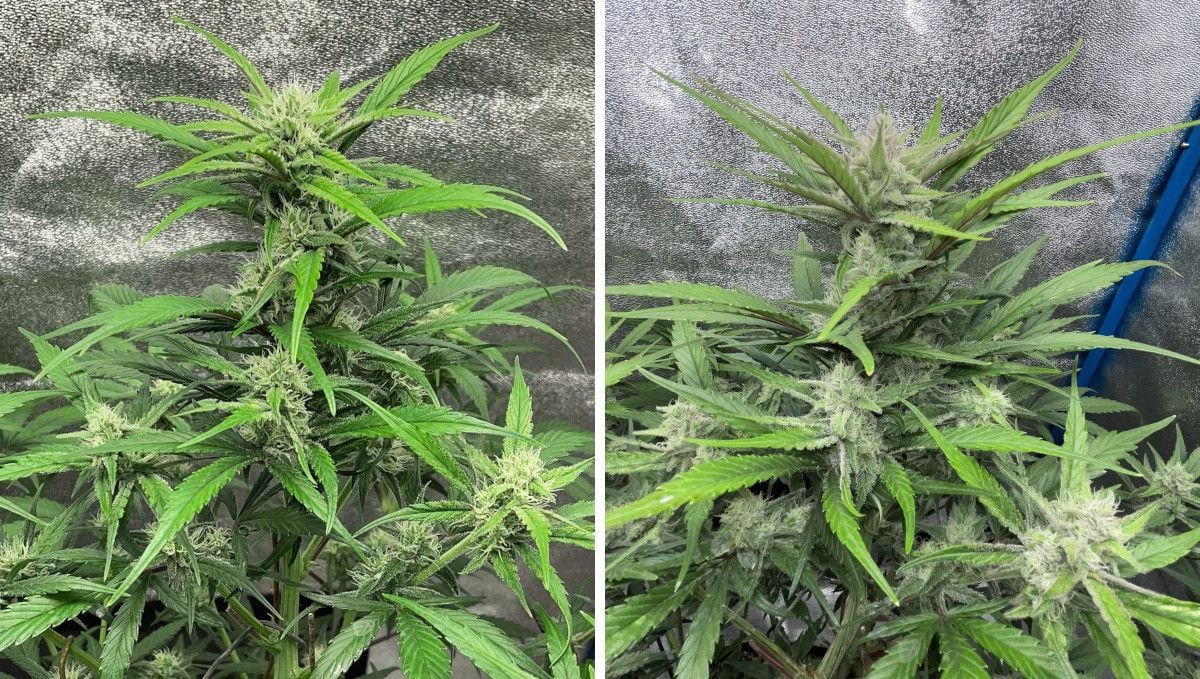
8. Mid Flower (Bulk Phase) | Weeks 8-9
As your cannabis buds enter the bulk-up phase, it's crucial to maintain an ideal temperature to preserve their terpene profile and prevent THC degradation. Lowering the temperature in the grow room can be a useful strategy for achieving this. It's also essential to reduce the relative humidity during this stage to mitigate the risk of mold and bud rot, which can wreak havoc on large, dense buds that struggle with moisture evaporation.
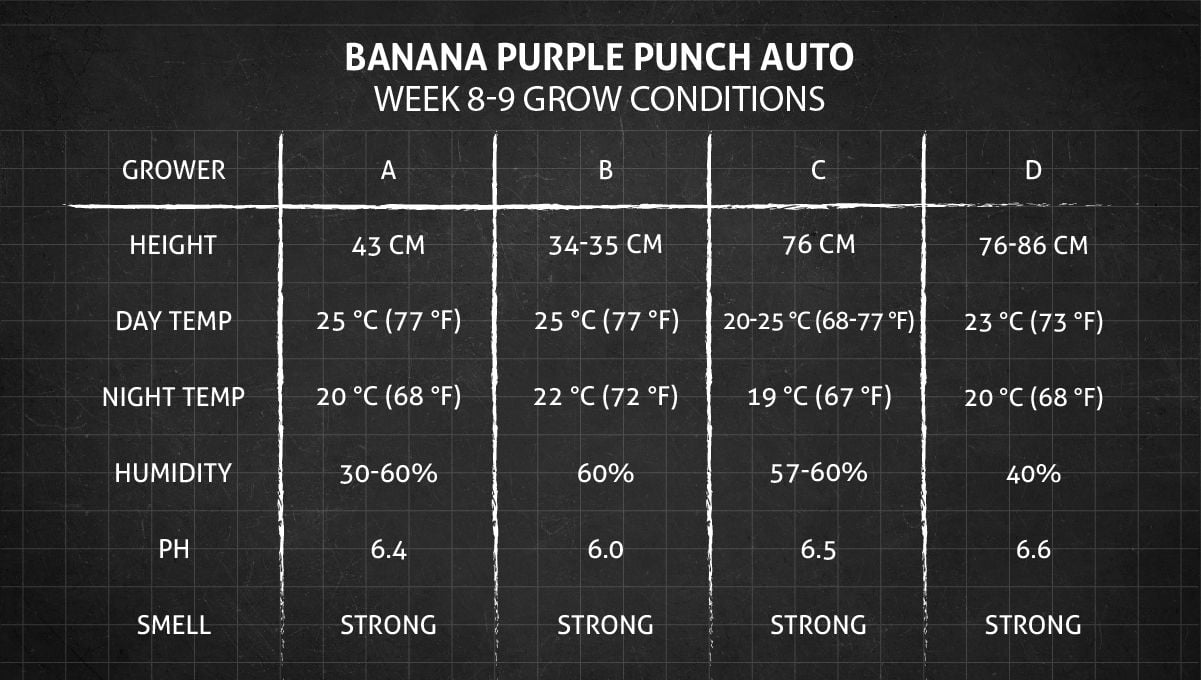
In order to keep your plants healthy and productive during mid-flowering stage, it's important to continue providing them with sufficient nutrients. Large doses of nutrients will help prevent leaf deficiencies and fading, which can be detrimental to your plants' growth. It's normal for leaves to fade toward the end of the lifecycle, but at this stage, it's too early for that. Additionally, your buds will start to emit a strong aroma and be fully covered in trichomes. This is also the time when you need to consider using a carbon filter to eliminate the smell from the grow room.
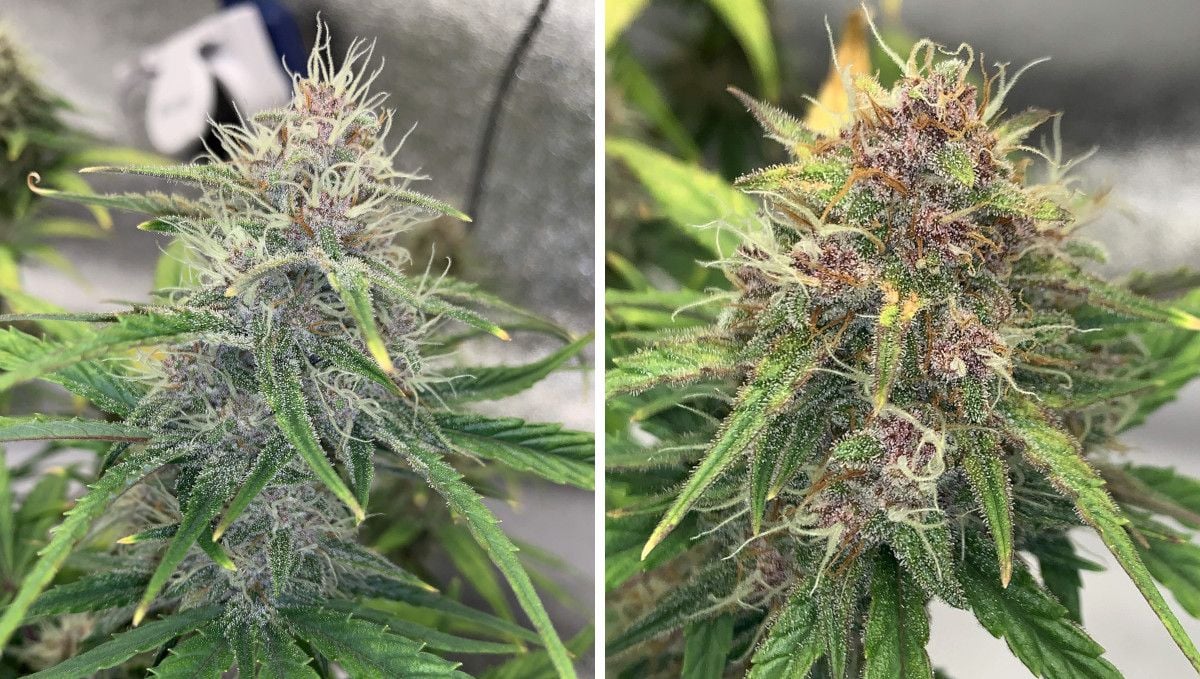
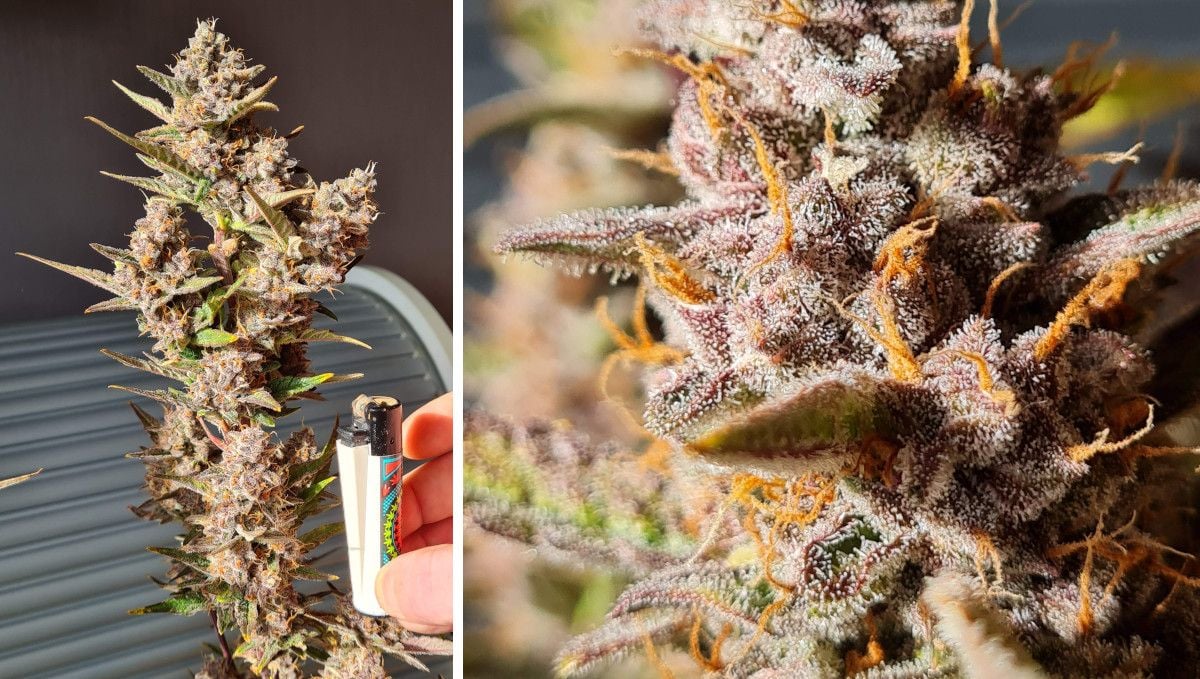
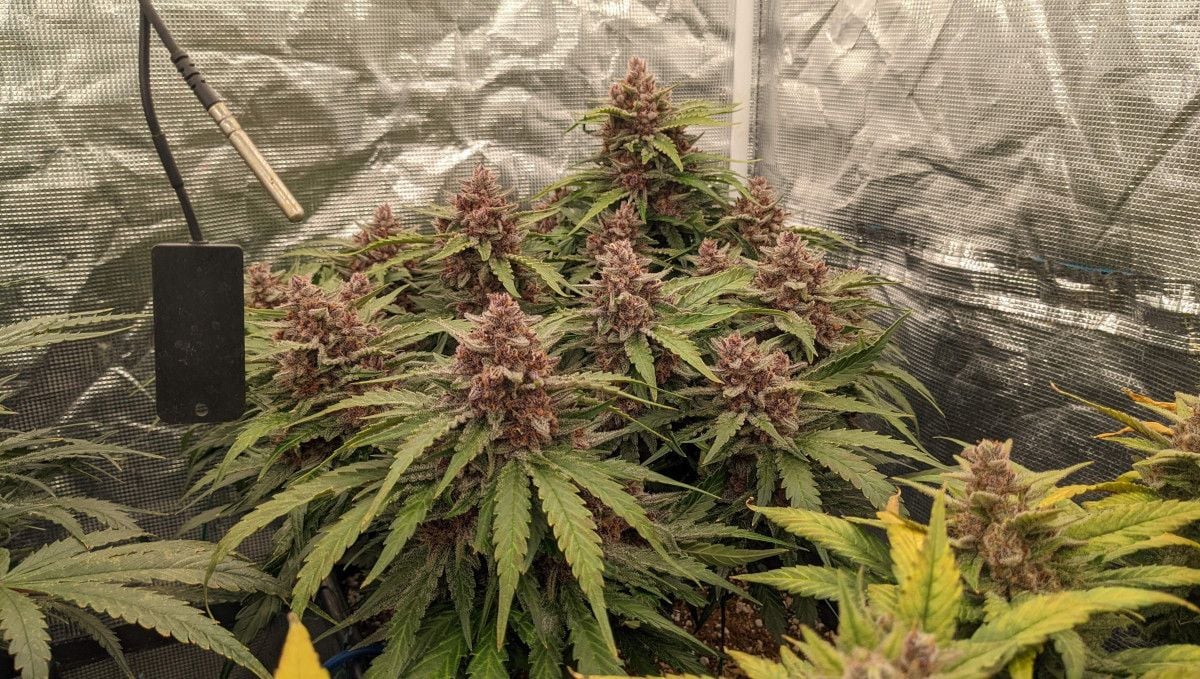
As evidenced by the images above and below, the Banana Purple Punch Auto strain tends to develop striking purple, pink, magenta, and other similar hues as it reaches the late flowering stage. This trait is common among most plants of this strain, resulting in a visually captivating final product.
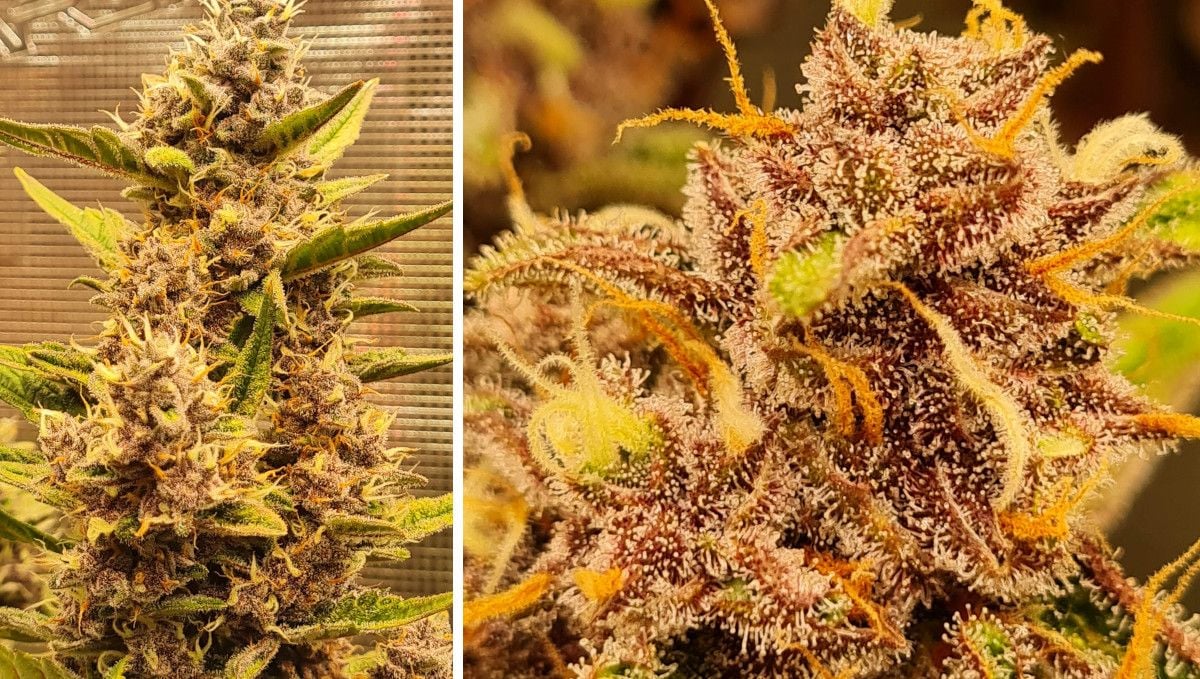
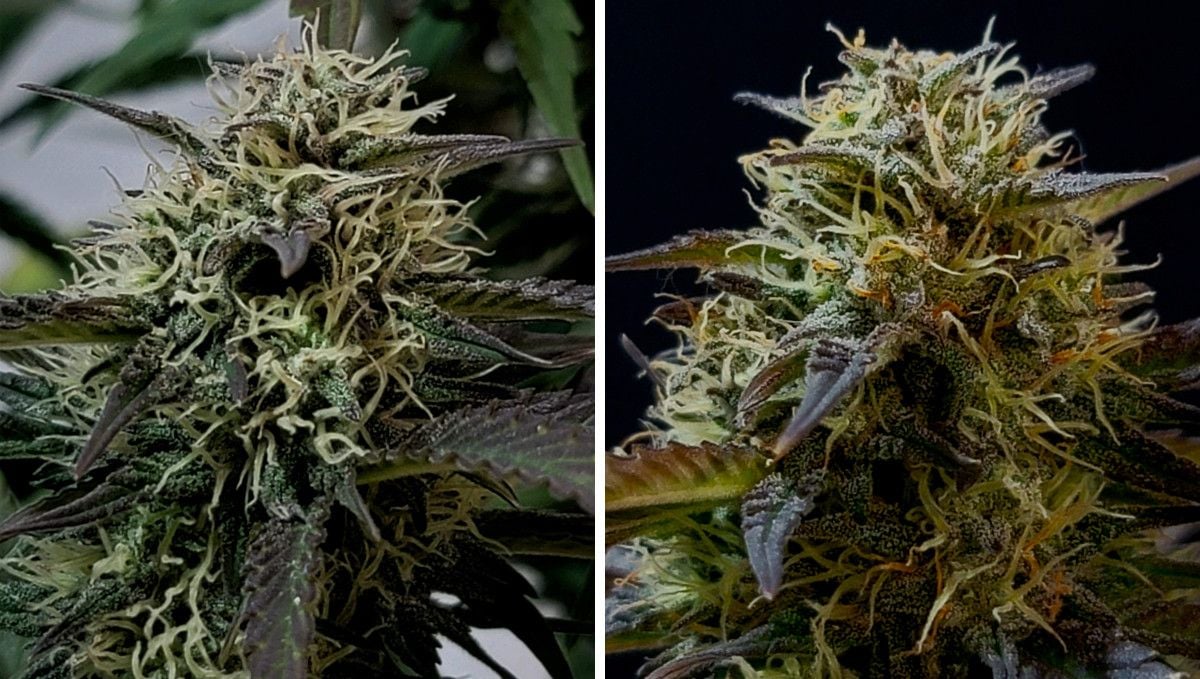
As your cannabis buds mature, you may notice that the white pistils covering them gradually turn brown. While this is an indicator that harvest time is approaching, it's not the only factor to consider. To determine if your buds are ready for harvest, there are several other methods that we will discuss in more detail below.
Once you've reached this stage without encountering any major issues, it's time to take a step back and relax. Your plants will now flourish on their own, taking in the favorable growing conditions that you've provided for them. Simply continue to supply them with adequate water, nutrients, and light as you have been doing, and take pleasure in watching your buds develop on a daily basis.
For those who are fans of purple cannabis buds, it's worth noting that there is a method for encouraging plants to develop this color. One way to do this is by reducing temperatures, particularly during the night. By maintaining daytime temperatures around 23-24 °C (73-75° F) and allowing the temperature to drop by 5 to 10 degrees at night, you can encourage the plants to develop their purple hues.

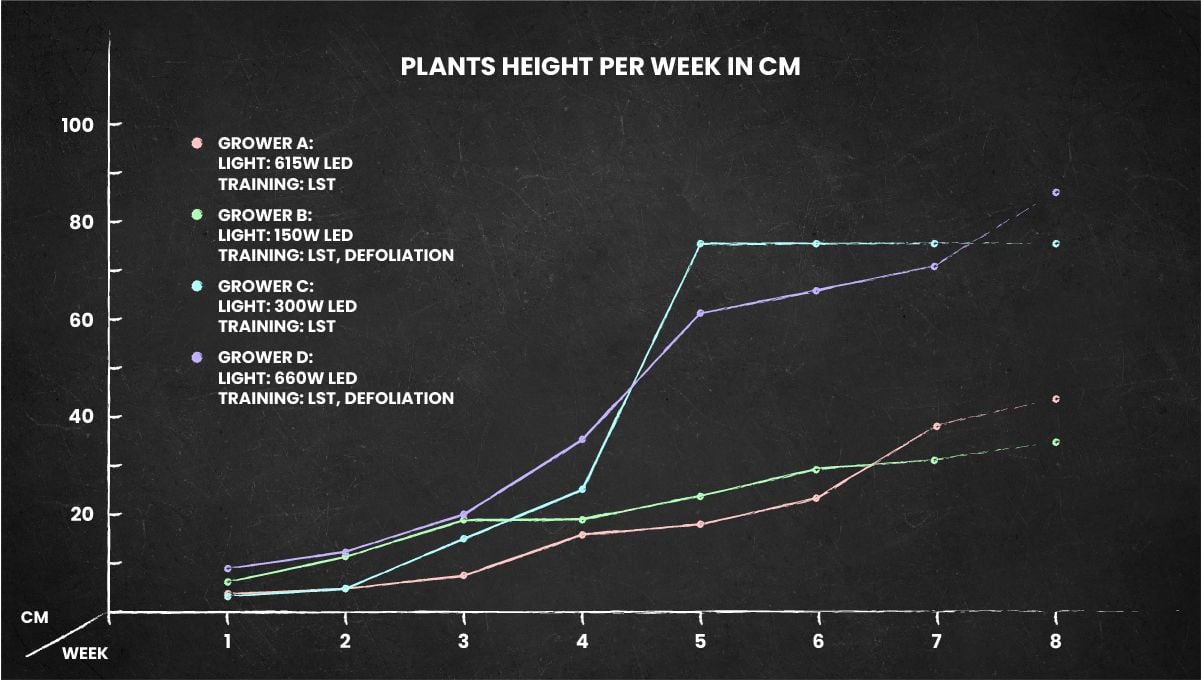
Also, at around week 8 from seed, your Banana Purple Punch Auto (or, in fact, almost any autoflowers) will stop gaining height. In the graphic below, you can see the height chart for the four plants in our review:
Monitor your plants' health, watch out for the signs of overfeeding, and wait for the next stage when your autoflowers will be nearing the harvest and you may start looking for the signs that they are ready to be cut.
9. Ripening And Harvest | Week 10 (And Beyond)
Just like the germination phase, the late flowering gives newbies some trouble because they don't really understand how to determine whether it's time to harvest the buds or not. During this final periods in the lifecycle of an autoflower you will notice that the buds have stopped developing altogether: they do not grow in size and do not seem to become denser. Does it mean that it's time to harvest them? Read on, and we'll tell you.
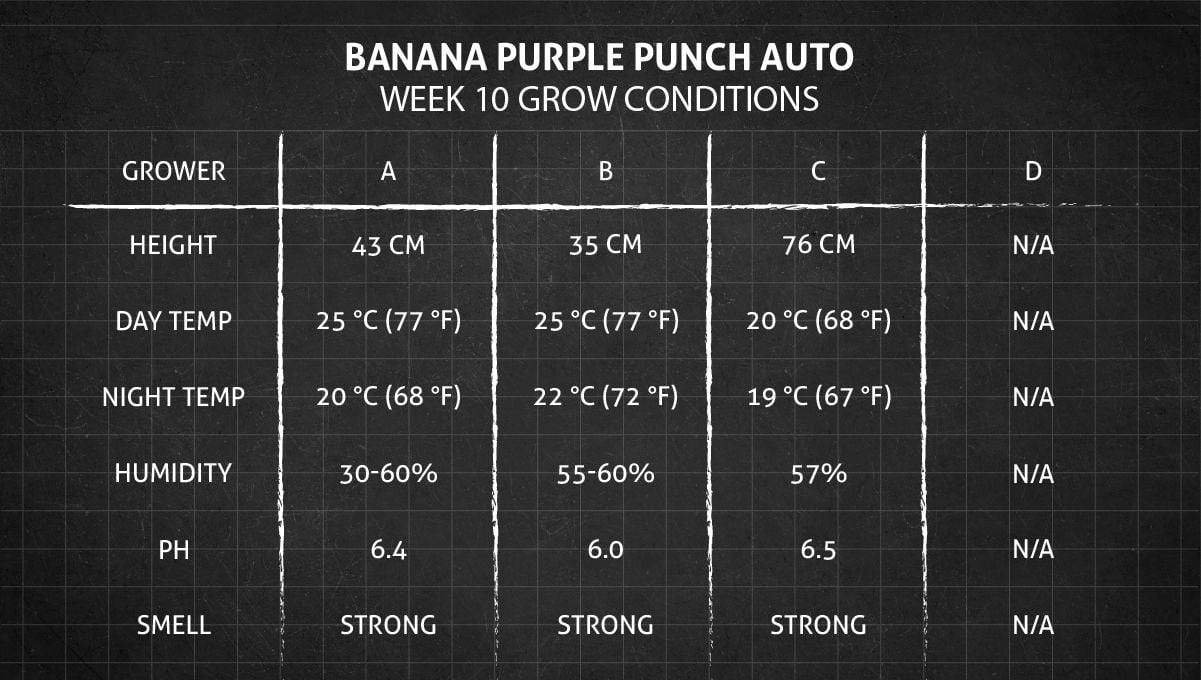
When you see those buds of yours developing those beautiful autumn colors, it's time to inspect the trichomes under a microscope. For this, you'll need a 60x jeweler's loupe to look at the state of those little resin glands that cover calyses and little leaves sticking out between them.

The ideal time to harvest your valuable cannabis flowers is when all the trichomes have turned milky or cloudy, and there are no clear ones left. Some trichomes may eventually turn amber, which means that the THC inside them has begun to convert into cannabinol, resulting in reduced potency and a more sedative high. Therefore, it is best to harvest before this stage to ensure the desired effects.
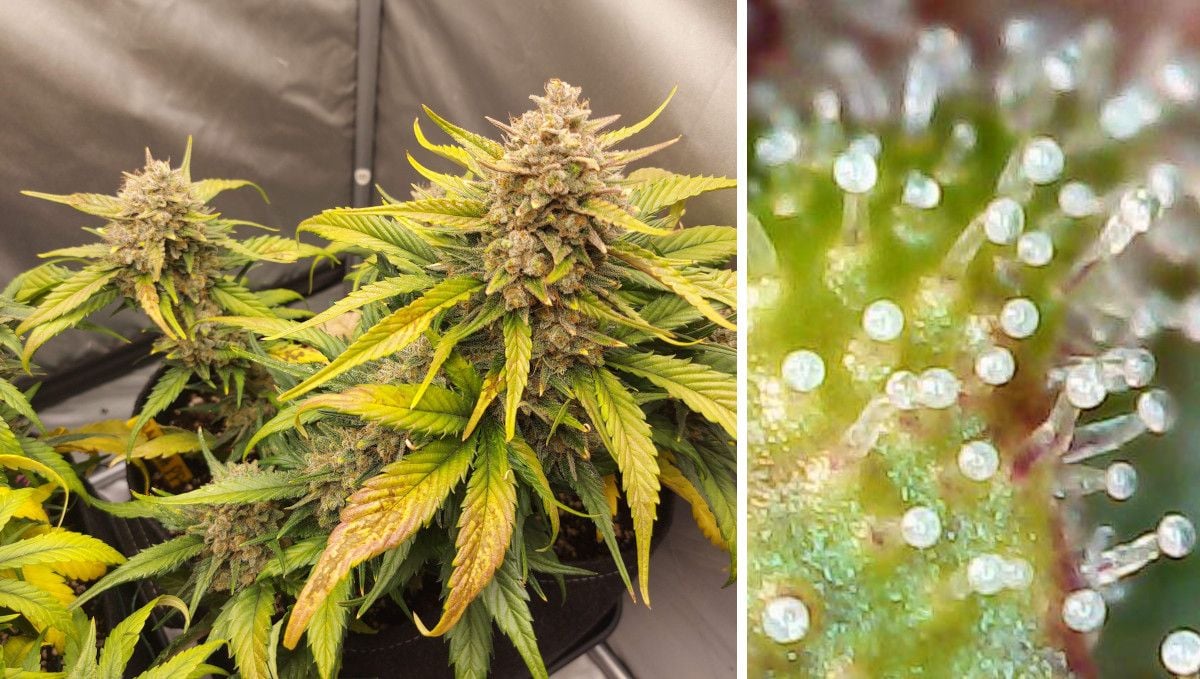
It's an interesting thing that many growers have noted that LED lights compared to HPS lights contribute to buds becoming more resinous while HPS leads to biggerand heavier flowers.
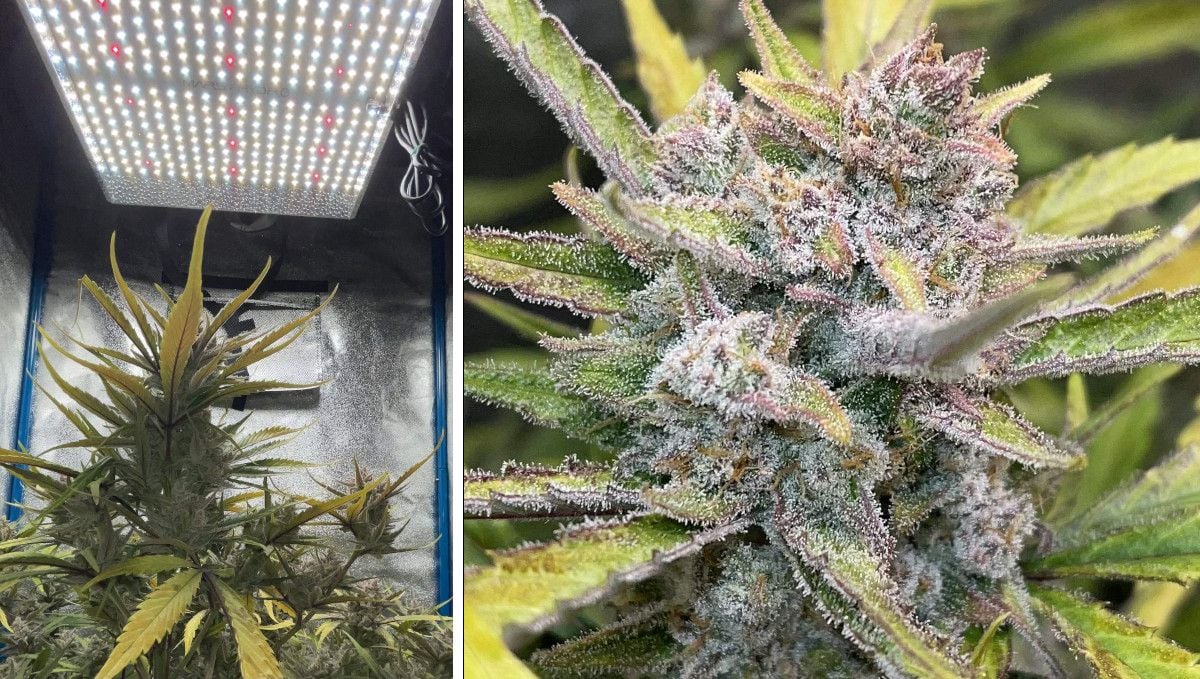
While waiting for your flowers to be completely mature, don't forget that you still need to flush them, meaning stop giving them nutrients and only give them freshwater for the rest of the cycle and till harvest. This way, you can ensure that your buds are rid of built-up salts and the smoke is clean, tasty, and potent. You'll need about two weeks of flushing when you grow your cannabis in soil. In coco or hydro, the flushing will only take one week.
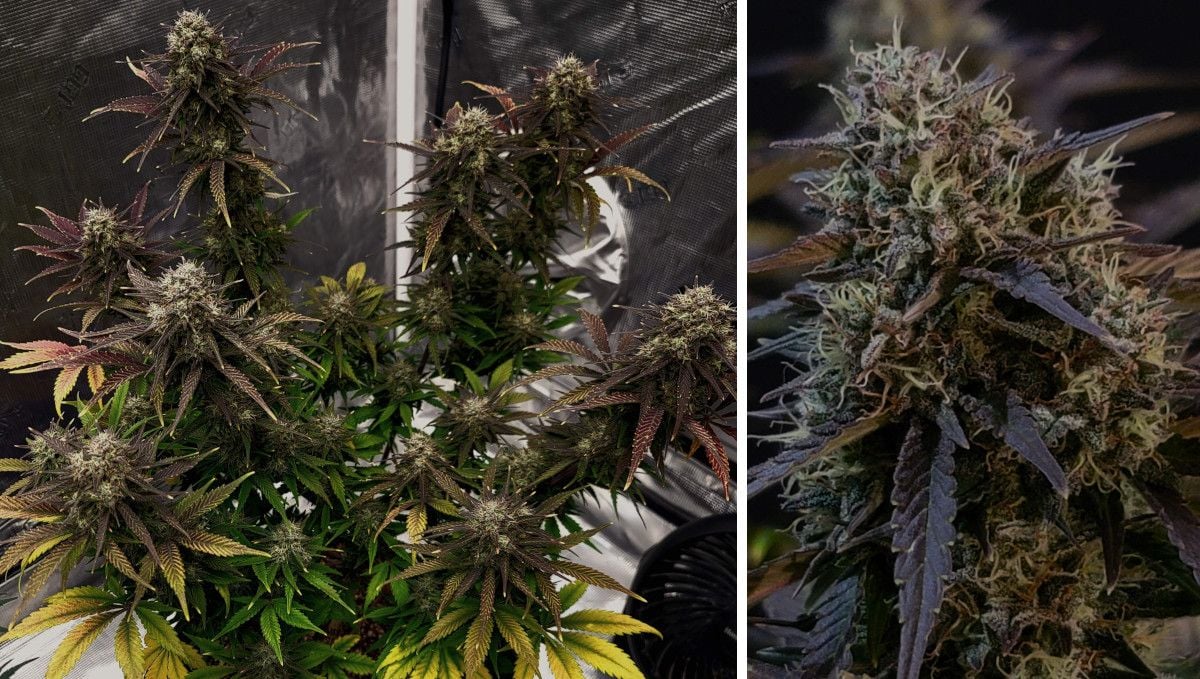
Even during the flush, the buds may continue to grow - inperceptively gaining in size. However, the most conspicuous thing that you'll notice during this time will be the fade as the leaves start to turn yellow and lifeless one by one and the colas themselves assume beautiful autumn colors. This fading of the leaves is actually a good thing because it means that chlorophyll goes out of them, and chlorophyll is exactly the thing that gives your smoke a nasty smell of hay. Your buds will be much better without it.
When growing Banana Purple Punch, don't forget to reduce the temperatures during the day and especially during the night as this will help conserve THC and terpenes inside your flowers and will deepen their purple coloration.
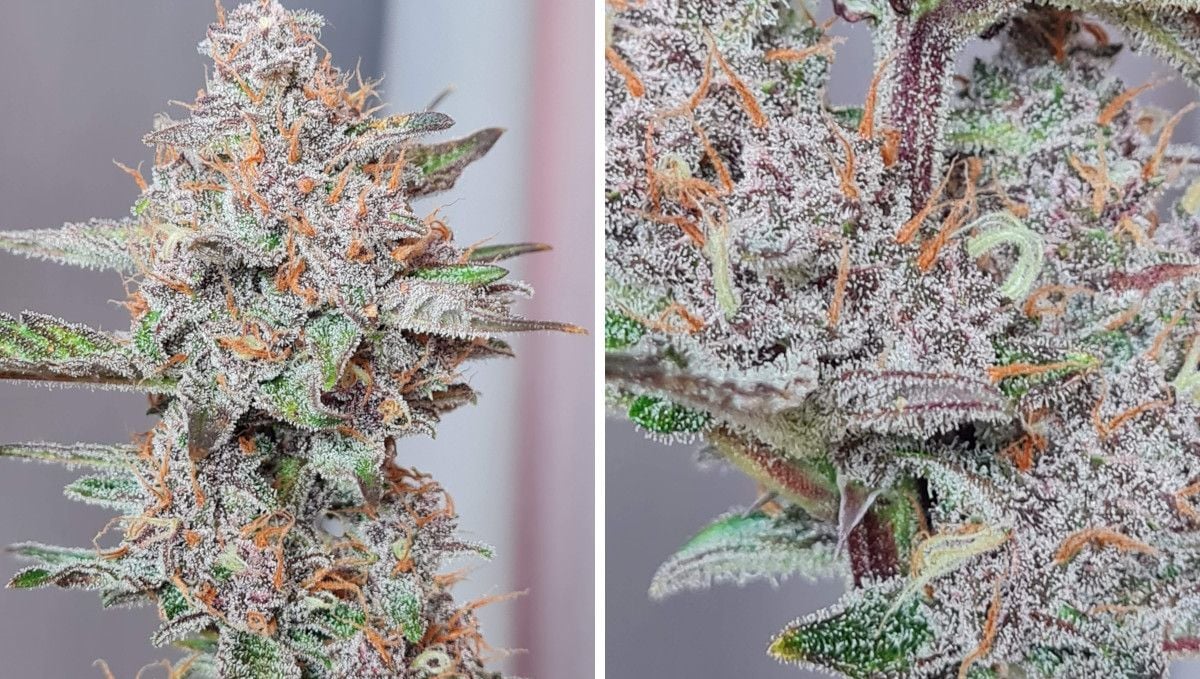
Also, when handling the buds during the last weeks of flowering and especially during the drying, curing, and trimming process, be sure to handle them very gently as the trichomes are very fragile and fall off easily from the buds, especially when they are dry.
10. The Outcome
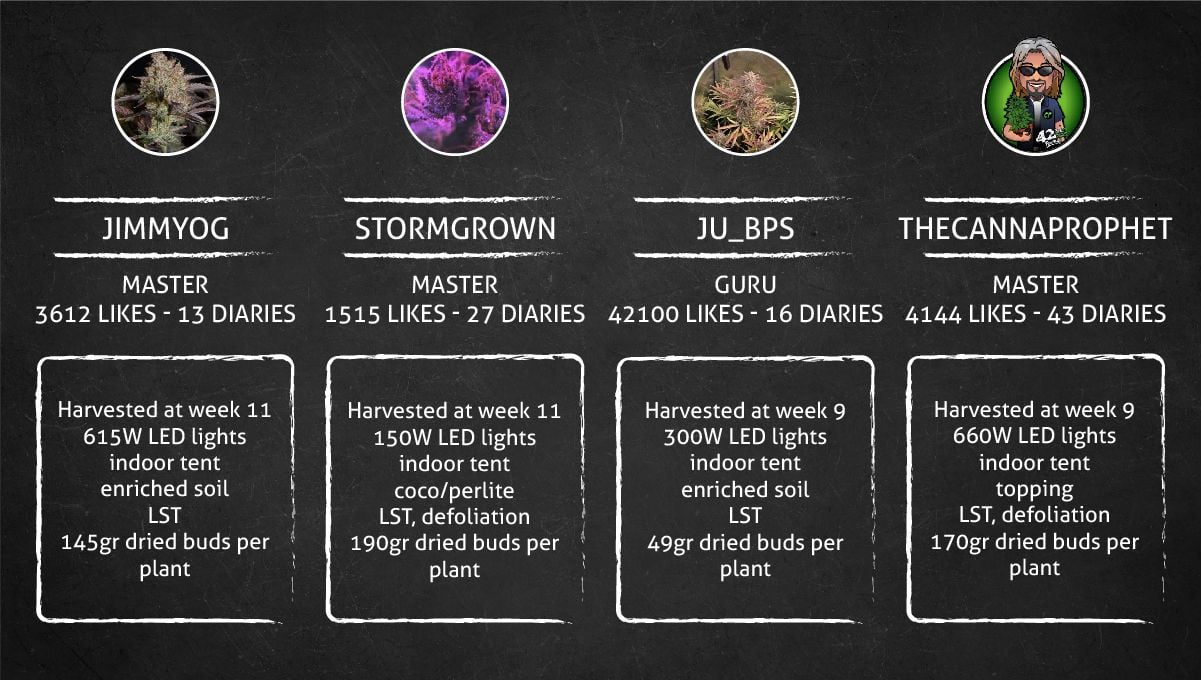
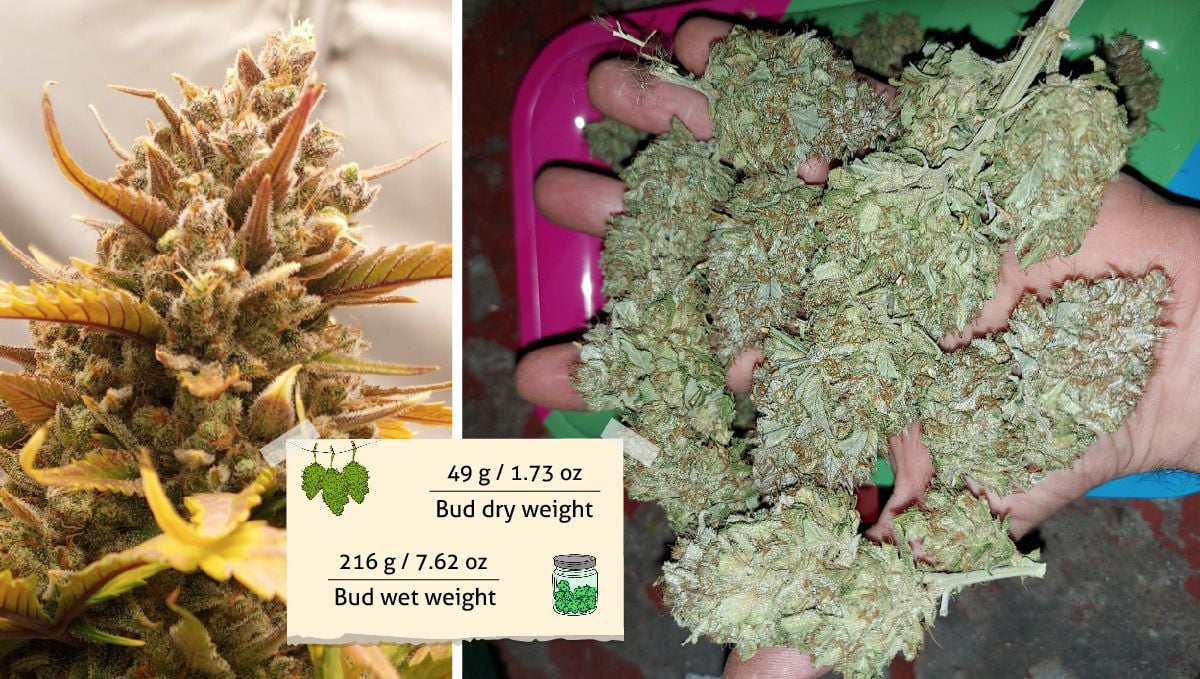
When studying all those grow reports, we were impressed by the productivity of Banana Purple Punch Auto. Even that plant that was a bit sickly and small at the very beginning proved tremendously productive as it brought 49 g (1.73 oz) of dry buds of the highest quality. In the rest of the grows, the plants were record-breaking champions. They brought their proud gardeners an astounding 145 to 190 g (5.11-6.7 oz) of premium bud.
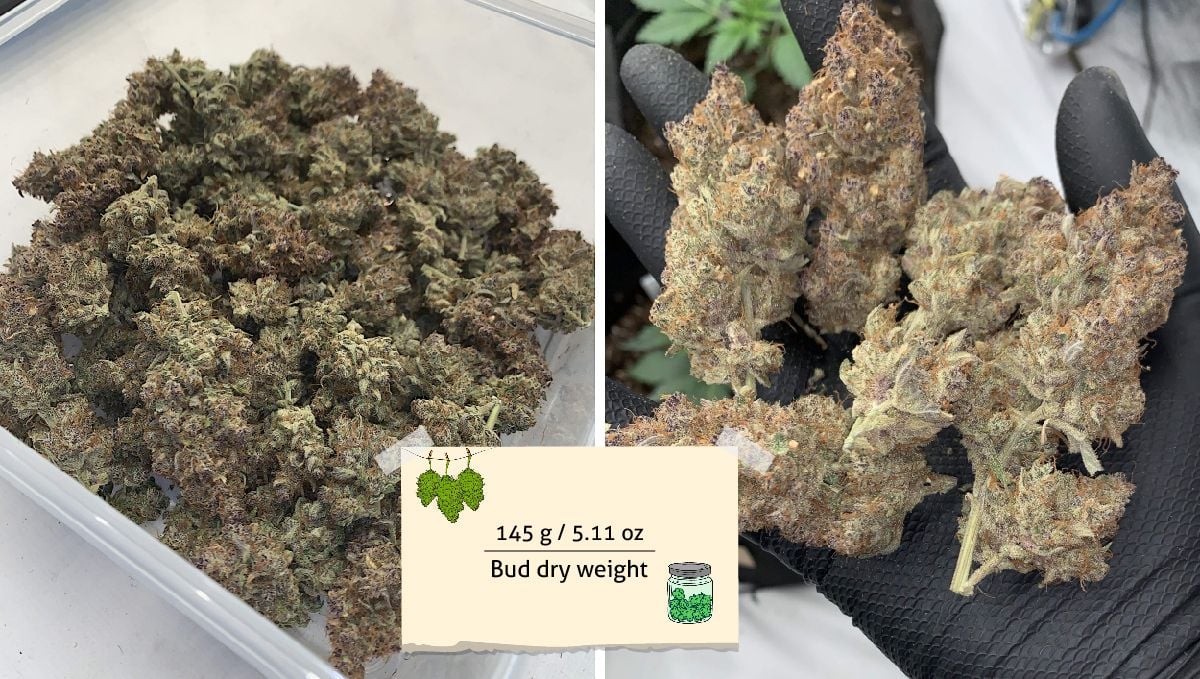
Banana Purple Punch Auto Yield
Stocky but vigorous, the first plant in our review was a real marvel as it produced 5.11 ounces (145 g) in 11 weeks.
This Banana Purple Punch was tall and bushy, with colas that were long and tight, and they collectively weighed 6 ounces (170 g) when bone-dry and cured.

Although this plant was quite short, the buds were immensely dense, so that the gardener harvested 1.73 ounces (49 grams) in 9 weeks.
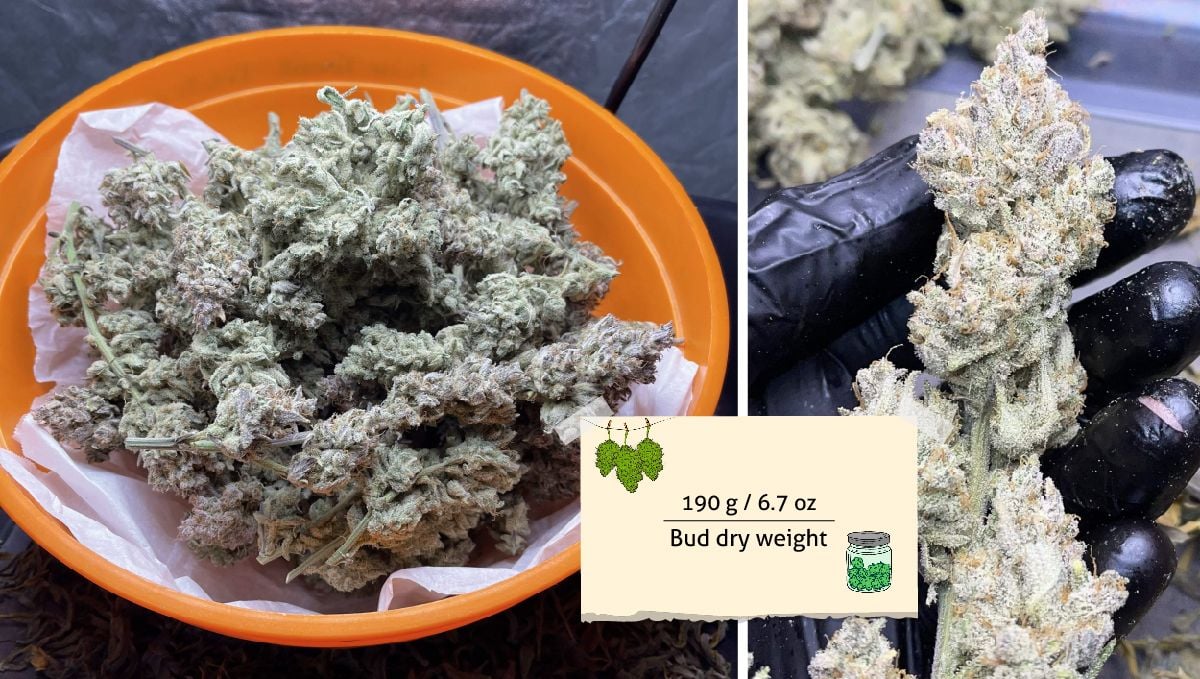
Finally, the last Banana Purple Punch that we're reviewing here was the absolute winner as it was growing fast from the start, produced dozens of very strong and long branches, and all of them got covered by big and dense flowers by harvest time. All this resulted in a yield of 6.7 ounces (190 g).
Banana Purple Punch Auto Smoke Report
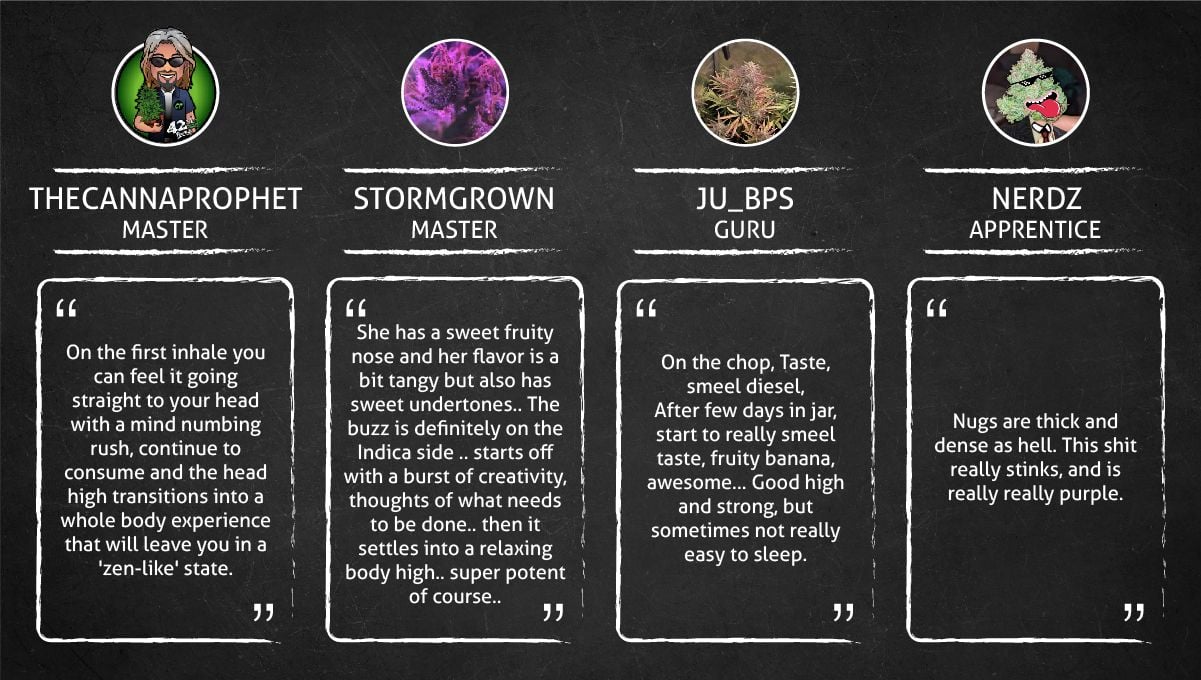
Based on the reviews that we've seen, Banana Purple Punch Auto is a very potent strain with a mind-numbing and relaxing high that transitions from a head to a body experience. It produces a strong buzz that starts with creativity and later settles into a relaxing body high, making it suitable for use during the day and in the evening. The taste and smell are described as fruity, sweet, and tangy with a strong, pungent diesel aroma.
10. In Conclusion
The grow diaries that we have analyzed and compared when we were writing this grow guide demonstrate that Banana Purple Punch Auto – despite its strong Sativa dominance – doesn’t create problems with excessive size. At least, there’s nothing that a well-managed LST can’t handle. None of the growers chose to top their autoflowers, and yet their height remained manageable all the way to harvest. Even grower D's plant -- which ended up at 86 cm -- was compact enough for most indoor setups.
Grower C let the problem of stuck shell get out of hand, and that resulted in a slow start for his Banana Purple Punch Auto and the plant remained comparatively small and less productive than others. This means that you should pay extra attention to the first week in your plant’s life cycle.
Three out of four growers used soil as a medium, and it worked great for them. Grower D chose coco coir, and his Banana Purple Punch Auto turned into a real monster. If you dream of breaking your personal record, we suggest trying coco too.
You don't have to go over the top equipping your setup with the most powerful grow lights to harvest very dense and heavy buds from this strain. The most successful of our 4 growers (D) used just a 150W LED but harvested way more than 1 gram/watt.
To recap, Banana Purple Punch Auto needs only the most basic techniques to flourish and bring you loads of top-shelf bud, so even first-timers are encouraged to try it in their gardens. Good luck!


Comments