Gorilla Auto Cannabis Strain Week-by-Week Guide
- 1. Grow specifications
- 2. Grow set up
- 3. Germination and seedling stage | week 1
- 4. Early veg | week 2
- 5. Mid veg | weeks 3-4
- 6. Transition (pre-flower) | week 5
- 7. Early flower | weeks 6-7
- 8. Mid flower (bulk phase) | weeks 8-9
- 9. Ripening and harvest | weeks 10-12
- 10. Yield and smoke report
- 11. In conclusion
Gorilla Auto is the ultimate resin-producing machine and the standard against which every new arrival is measured. The name reflects both the strain’s stickiness and its enormous power when it comes to effect. While any first-timer can grow her, not everyone can handle this weed’s potency – thanks to the high THC content, the smoke melts your face and feels like roaring fire behind your eyes.
This strain puts the true power of autoflowering varieties on full display. In the past, autos failed to compete with photoperiod cultivation when it came to potency. However, our breeders have completely changed the game. By selecting for high THC concentrations, our skilled team has created one of the most potent autos available on the market today. Not only does it rank higher than most other autos, but it outcompetes many photoperiod strains when it comes to getting as high as possible! You better buckle up before you blaze Gorilla Auto. The red eyes, raging munchies, and deep philosophical thoughts will set in faster than you can imagine.
At the same time, the effect is very cerebral and lets you move, uplifted and happy, through the longest to-do list. Of course, if you don’t overindulge because even an extra toke can make you motionless – filled with bliss but unable to unglue yourself from the couch. In our week-by-week growing guide, we’ll show you how to grow this fantastic plant in your home garden the easy way. Based on an indoor coco grow journal, our report follows Gorilla Auto progress through all grow stages and highlights important points throughout her life cycle. Hope you glean enough tips and tricks from it to grow your own GG to perfection.
1. Grow Specifications
Gorilla Auto has a slight Sativa dominance – 65% Sativa vs 35% Indica – however, this doesn’t necessarily translate into above-average height. Plants rather tend to stay short, ranging from 60 to 130 cm (24–51 inches), especially indoors. Outdoor plants – when they have all the space they need and receive lots of sunshine – have the potential to get big and insanely productive at 70-350 gr (3–12 oz) per plant. Indoor cultivation ensures equally XXL yields of 450–600 gr/m2 (1.5–2 oz/ft2).
The production of resin is legendary so that in 9–10 weeks from seeds you’ll harvest buds that are incredibly sticky and pack a hefty 24% THC. Besides her frosty appearance and hard-hitting potency, Gorilla Auto is famous for her complex terpene profile which is quite different from most sweet and fruity varieties. It’s dominated by a strong smell of pine forest, with gassy and lemony notes and some peppery bitterness on the palate. This is the kind of flavor that keeps you guessing and makes inhaling the smoke so much fun.
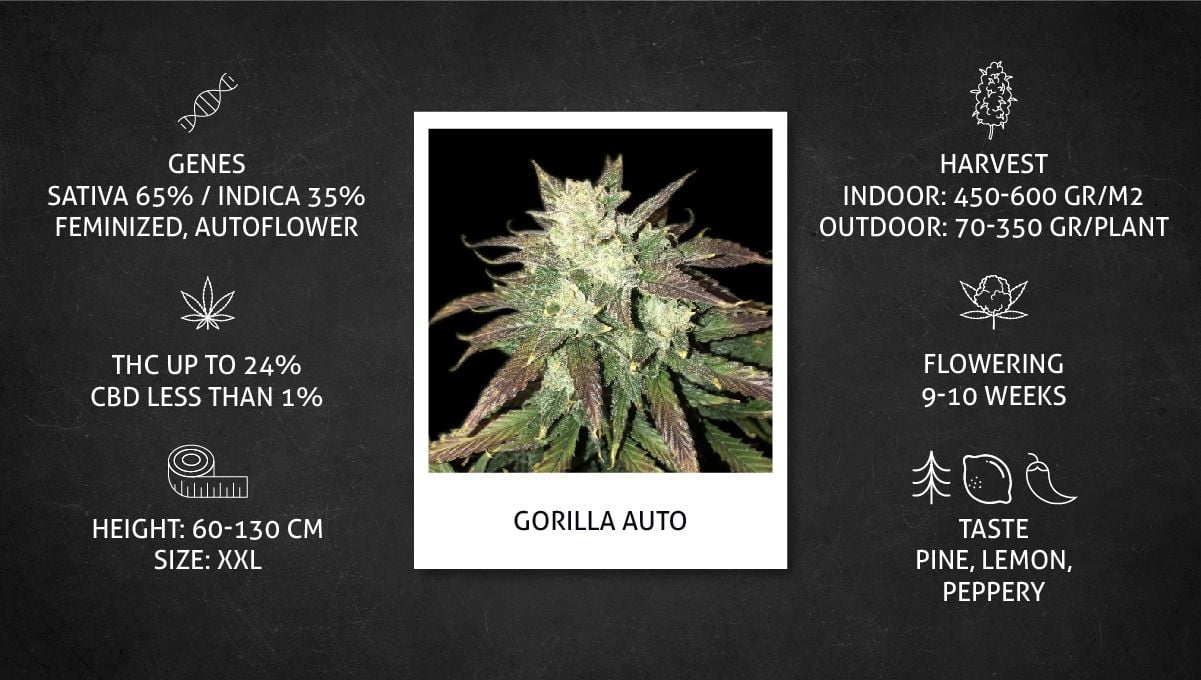
While these terpenes underpin the delicious flavours and aromas of this strain, they do much more than that. These aromatic molecules synergise with high THC levels to create the unique psychoactive effect that Gorilla Auto offers. Think about it. All psychoactive cannabis strains contain THC, but they all produce slightly different effects. This is because of their terpene content. While THC contributes to the core effects, the terpenes add diversity. In the case of Gorilla Auto, high levels of the terpene pinene provide a refreshing experience. Moreover, this terpene helps to take the edge off some of the side effects of THC, such as short-term memory impairment.
2. Grow Set Up
Gorilla Auto is an insanely popular strain with literary hundreds of grow reports available online. We’ve chosen for you one that shows how to cultivate this weed using the simplest methods.
The gardener with the nickname Chimken cultivates his autoflower seeds indoors, in a 4x2 Secret Jardin grow tent. Its oblong shape makes it perfect to keep 2-3 medium-size plants side by side. There were there in this garden – two Gorillas plus one Gelato Auto. As we shall see later, the Gelato which was the slower of the three in veg, grew enormous and started bullying the adjacent Gorilla. So, looking back, two and not three plants in the same area would have been just right.
The grower used a custom-made 400W LED quantum board with white and red diodes, a powerful extraction fan coupled with a carbon filter, an oscillating fan in one corner, and an air humidifier. The humidifier was necessary because the air tended to be too dry which is not good early in the grow cycle. The rest of the equipment was pretty standard.
What was NOT standard about the whole setup is that the guy chose not to water his plants manually but installed an automatic watering system. This GoGro irrigation system is of a passive kind – the water fills trays below the containers, and when the level is high enough, a valve closes and stays closed till the roots of the plant drink up some of the water. Then the valve opens again and lets some more water (or nutrient solution, to be more exact) from a reservoir go to the trays.
| Grow Space: | 0.72 m2 (8 ft2) | Pot Size: | 15 l (3.96 gal) |
|---|---|---|---|
| Seed to Harvest: | 12 weeks | Medium: | 100% coco coir |
| Flowering: | 8 weeks | Nutrients: | Synthetic |
| Light Cycle: | 18/6 | Day Temperature: | 26°C (79°F) |
| Light Type: | LED | Night Temperature: | 23°C (73°F) |
| Watts Used: | 400 | Humidity: | 60% ↘ 48% |
Of course, you don’t need an automatic watering system to successfully grow Gorilla Auto successfully and achieve a rewarding and potent harvest. However, automatic watering has numerous benefits. First of all, by using a timer, a water pump, and an external water reservoir, you can make sure your plants get the exact amount of water they need at exactly the right time. This approach helps to avoid underwatering which causes plants to wilt and impact their performance. It also helps to prevent overwatering which can cause anaerobic conditions in the soil and root diseases. Automated watering systems also allow growers to leave their plants alone for extended periods of time. If, for example, you want to take a holiday, you don’t need to find somebody willing to tend to your plants every day.
3. Germination And Seedling Stage | Week 1
There are many efficient methods of germinating cannabis seeds, and the grower chose one of the simplest. He let the seeds float on the surface of the water in a glass until they cracked and grew taproots long enough to plant them in the medium. It’s a good method, provided that you don’t let the seeds sink to the bottom or they could ‘drown’. The thing is that embryos inside the seed hull need some oxygen for their growth. If you deprive them of oxygen (in water) for many hours, they first lose their vigor and then die.
On the flip side, this technique also comes with several benefits. It often causes seeds to germinate faster than they would when directly sowed into the soil. This is because they are constantly exposed to water. If a seed dries out too much during germination, it can delay the speed of the process or also cease it altogether. Additionally, germinating seeds in a glass of water enables the grower to keep an eye on the whole process. If a seed doesn’t germinate, you’ll be able to tell much sooner than one that’s under the soil, enabling you to grab another seed and start a grow successfully.
| Plant Height: | 2.5“ (6 cm) | Day Temp: | 79°F (26°C) |
|---|---|---|---|
| Distance to Light: | 23.5“ (60 cm) | Night Temp: | 66°F (19°C) |
| Humidity: | 60% | Smell: | None |
The grower used a rather pricey option of germinating several seeds and choosing only half of them – those that are the strongest. It probably makes sense considering how much time, effort, and electricity you could spend on a runt. As you can tell by the picture, some of the grower’s seedlings grew quite leggy and the cotyledon leaves appeared quite yellow. This is because the seed hulls got stuck following the germination process. Unfortunately, this phenomenon is quite common with cannabis plants.
While the leaves are trapped in the seed hull, they are deprived of the light that they need to conduct photosynthesis and create vital sugars. Otherwise known as etiolation, legginess is caused by plants desperately searching for light. You can easily avoid this trouble by physically peeling the seed hull from the tip of your seedling. However, you need to do this very delicately to avoid damaging the leaf tissue. After the seeds developed inch-long taproots, he placed them into jiffy plugs.
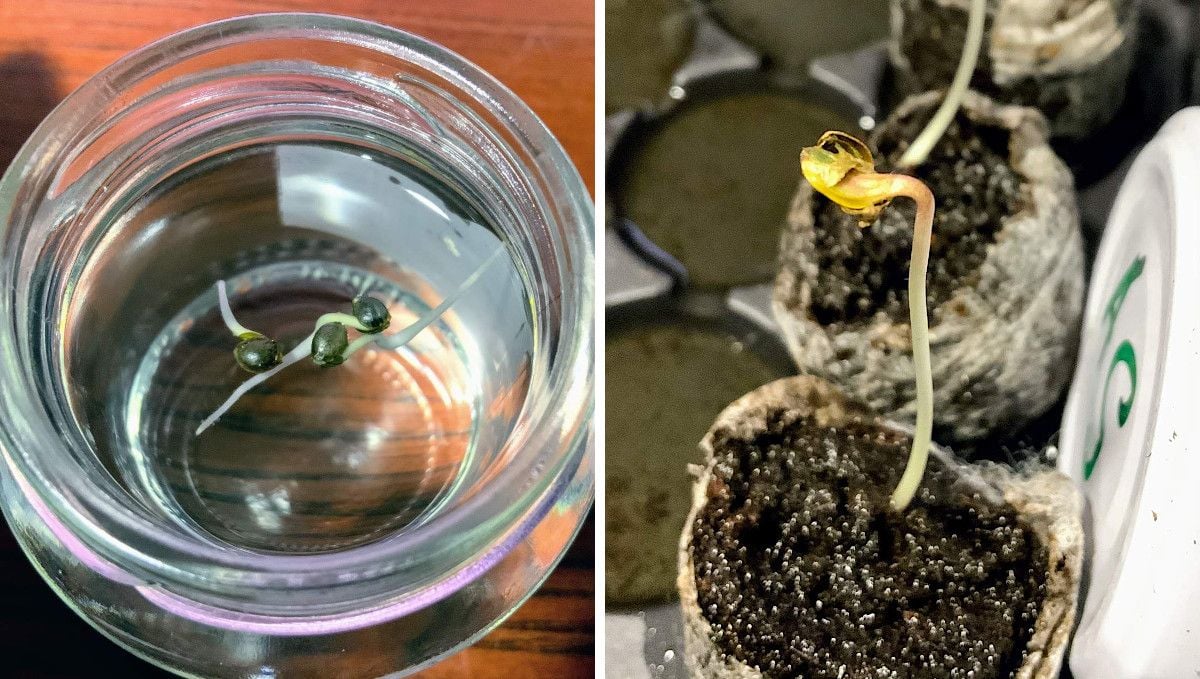
If you like the glass-of-water method, please bear in mind the following things that will increase your chances of success: keep the glass in a dark place, keep the temperature around 25-26°C (77-79°F) for the best germination rates, and use plain dechlorinated water without any nutrients.
You can use rooting stimulants if you want, but they’re not necessary and increase the risk of a costly mistake. Some gardeners also add hydrogen peroxide (H2O2) to kill any chance infection on the surface of seeds (and give embryos some extra oxygen). You could use it too – by taking one part of 3% H2O2 from a pharmacy to five parts of water. Again, it’s not really necessary and may result in mistakes.
When seedlings grew the first pair of true leaves, the grower transplanted the jiffy plugs into the final 15-liter (3.96-gallon) containers filled with coco. Don’t mind the LEGOs in the photo below – they are just the guy’s personal idiosyncrasy and nothing more.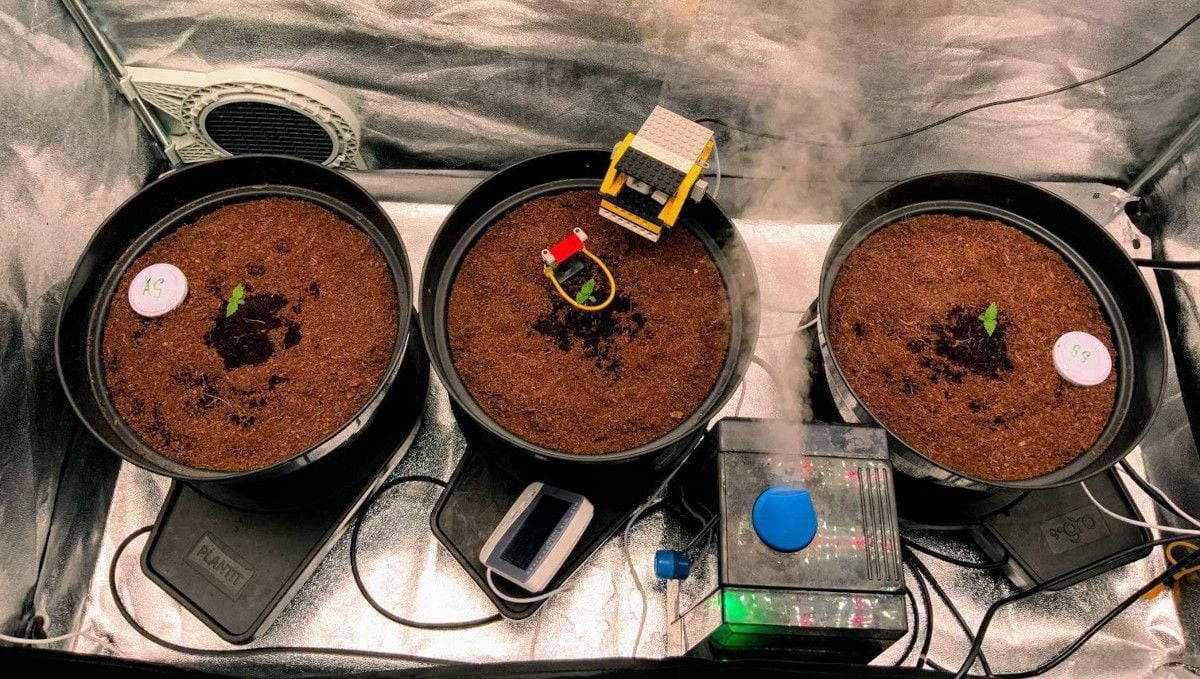
4. Early Veg | Week 2
The first two weeks of cannabis grow cycles are usually rather slow, at least above ground. As for the roots, they develop like crazy, building a strong foundation for the rest of the life cycle. In hydroponic setups and coco (which is really a form of hydroponics), the growth is very noticeable and fast above ground too. At this stage, your objective should be to find the optimal distance from the light and keep the conditions warm and humid.
You have two options when it comes to determining the distance of your light: The simple or the complicated. The simple method is based on your observations and intuition. Place your light around 30–60cm above the tip of your growing plant and watch how it responds. If you notice symptoms of legginess, simply adjust the position of the plant and move it closer to the leaves. If you notice signs of leaf burn and light stress, move the light slightly further away from your plant. If your plant looks vibrant and healthy, you know that it’s hanging at the perfect distance. Now, not every grower likes to raise their plants using guesswork alone. If you prefer to do things as accurately as possible, you can use several devices to measure the intensity of your light over a specific area.
| Plant Height: | 2“ (5 cm) | Day Temp: | 79°F (26°C) |
|---|---|---|---|
| Distance to Light: | 31.5“ (80 cm) | Night Temp: | 73°F (23°C) |
| Humidity: | 60% | Smell: | None |
If you’re on a tight budget during your grow, you can use a lux meter to measure the amount of illumination over one square meter. Although lux only measures the amount of light perceivable to the human eye, these devices can help to determine how far away to hang up your light. Generally, you need to aim for a lux reading of 6,000 during the seedling phase, 30,000 during the vegetative phase, and 50,000 during the flowering stage. If you have a bit more money to invest when growing weed, you can get yourself a PAR meter to measure light humans can’t see, but that plants use to photosynthesize (PAR stands for photosynthetically active radiation. When using a PAR metre, you should aim to achieve a reading of 300–400 1,500 µmols/m2/sec during the entire growing cycle. Look at the day and night temperatures in the table below – they are just about perfect. The relative humidity (RH) can be at 60-70% in the seedling stage because young plants love it. In later stages, you can lower a bit both the temps and the RH.
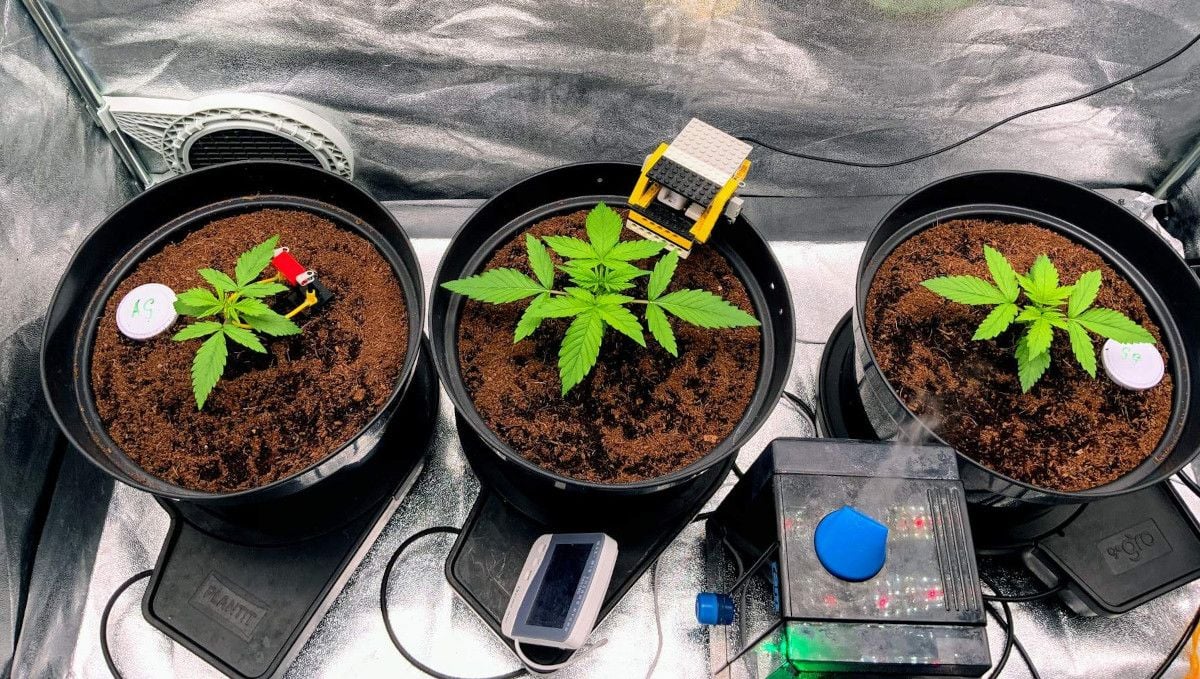
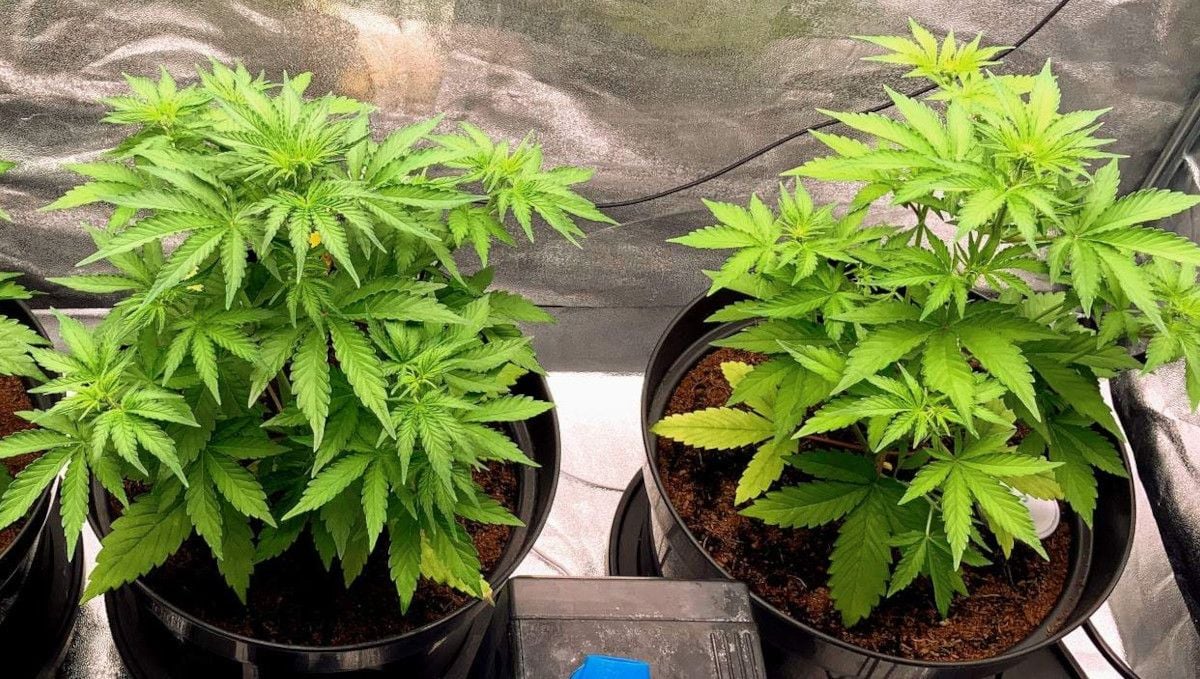
In the second week, the growth was outstanding. This was probably due to a combination of factors, but we think that the main ones were the medium (coco) and the watering method (automatic wicker-style irrigation). Cannabis roots love oxygen, that’s why hydroponic setups are so effective – they give roots water all the time and air (with oxygen), also all the time. In wicker-type irrigation, the labor is also divided by different parts of the root system – while the lower part drinks water, the upper part absorbs oxygen. The central Gorilla Auto emerged as a leader in the race, the other Gorilla (on the right) was a little behind, and the Gelato on the left was the ‘loser’. But wait till the end of the run. Spoiler alert: the roles will exactly reverse.
5. Mid Veg | Weeks 3-4
The second half of the first month is usually the time when cannabis starts to change daily – with new leaves and new side growth appearing all the time. Strangely, it wasn’t the case in this grow. Probably because the girls received very moderate doses of nutrients while their appetites were increasing.
Mid-veg is also the point in the timeline when most gardeners begin to train their plants – trying to control their height and make central colas and side branches more uniform in size. But this particular gardener used a tall enough tent and a very powerful light so he decided to grow his girls without either LST or HST. When there’s enough light, it can penetrate deep down, and so there’s no need to keep the plants short and flat.
| Plant Height: | 6-12“ (15-30 cm) | Day Temp: | 79°F (26°C) |
|---|---|---|---|
| Distance to Light: | 27.5“ (70 cm) | Night Temp: | 73°F (23°C) |
| Humidity: | 60% | Smell: | Weak → Normal |
Noticing that the growth was slowing down, the guy upped the dose of nutrients in week 4. He used a singularly simple feeding schedule, with only one two-part product – Coco A & B by CANNA.
Cannabis needs three major macronutrients – nitrogen (N), phosphorus (P), and potassium (K) – a few lesser nutrients, such as magnesium, calcium, and iron, and several miсronutrients. CANNA Coco A & B has them all, and as is evident from its name, the exact ratio is specifically formulated for coco cultivation with its raised need for magnesium and calcium. And below, you can find the nutrient schedule for the complete life cycle (as it was used in this particular grow):
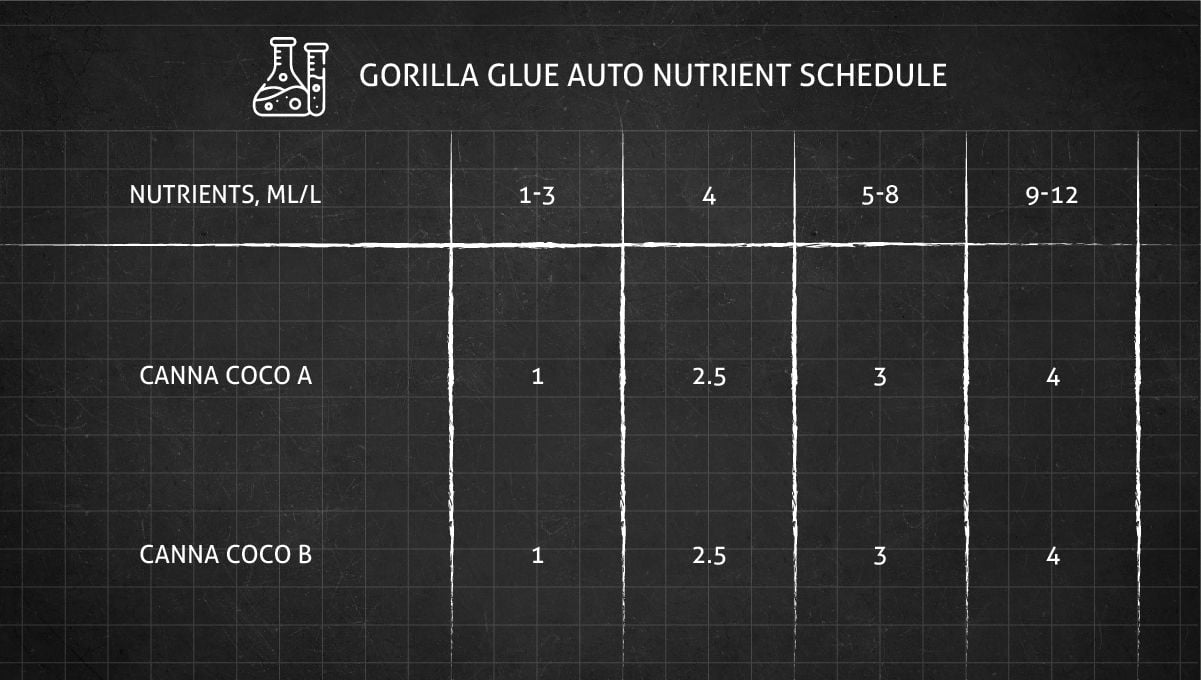
Of course, the modern market offers many other amazing products that contribute to the plants’ health, vigor, smell and taste, the amount of resin, etc. Most of them definitely do their job and make your grow more rewarding, but they’re not necessary, strictly speaking. Moreover, we encourage beginner growers to keep things as simple as possible because the fewer small decisions you have to make, the more you can focus on essentials. And this grow is proof that keeping things simple leads to success.
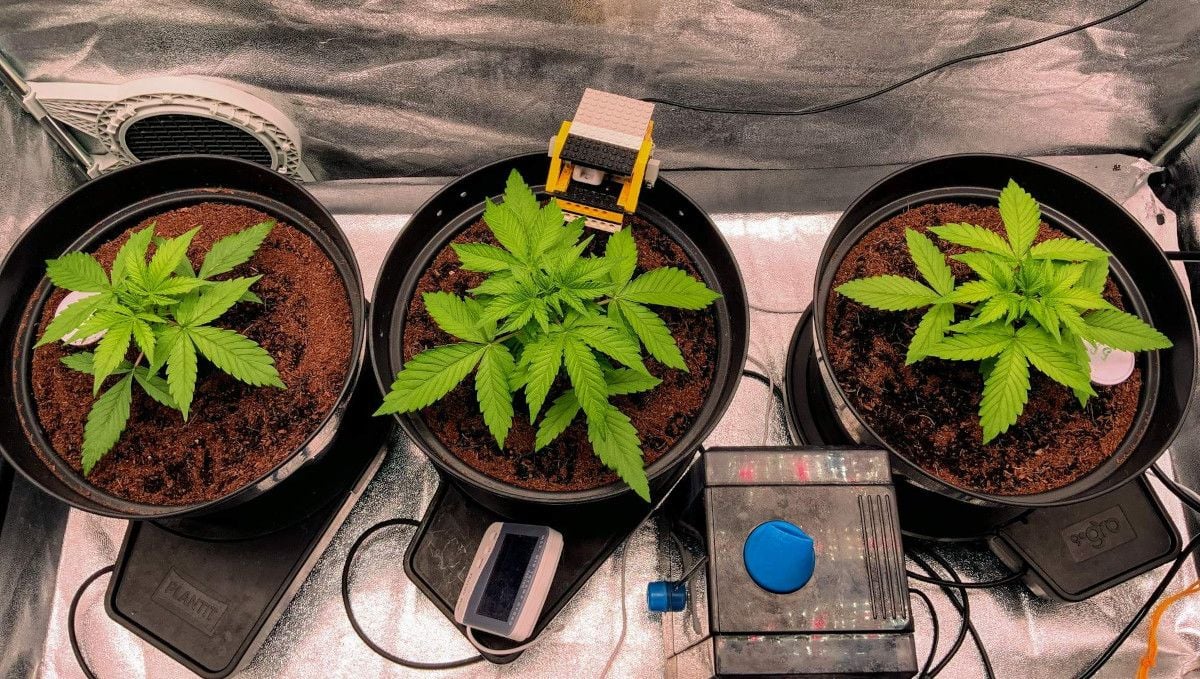
The plants stayed short (probably because of the very powerful light) but began to develop nice side growth. All the grower had to do was change the solution in the nutrient reservoir. He used to do it once every two weeks but decided that it was too long and the solution was spoiling in the meantime. For this grow, he changed it once a week.
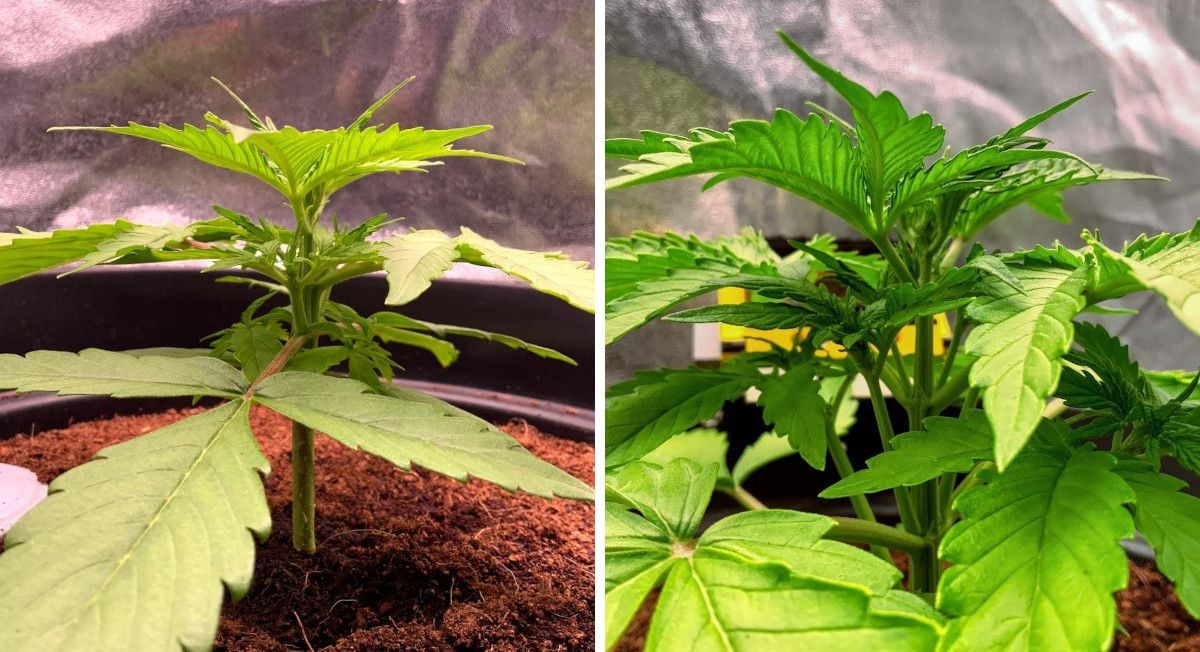
The explosion in growth came in week 4 as the two Gorilla Auto girls began to stretch every side branch they had. They also showed sex which meant that the flowering time was about to begin.
6. Transition (Pre-Flower) | Week 5
The transition to flower and the early stages of budding are probably the most misunderstood time in the life cycle of cannabis because beginner growers expect the vegetative growth to stop completely. In reality, they watch in horror as their plants shoot up like rockets – to double or even triple in size over the next few weeks.
| Plant Height: | 22“ (57 cm) | Day Temp: | 79°F (26°C) |
|---|---|---|---|
| Distance to Light: | 27.5“ (70 cm) | Night Temp: | 73°F (23°C) |
| Humidity: | 60% | Smell: | Normal |
When girls enter the pre-flowering stage (around the end of the first month for autoflowers), they still need a lot of nitrogen, so it’s too early to radically change their diet. They’ll benefit yet from some veg nutrients.
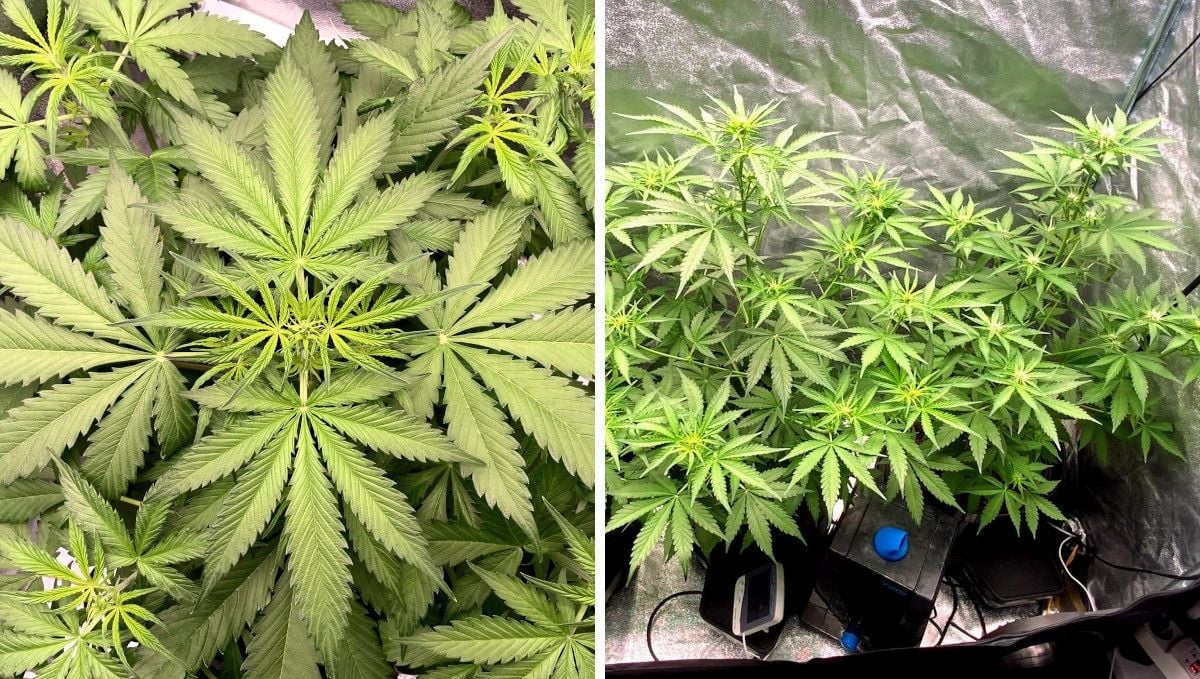
The most evident development at this point in the timeline is the elongation of the main stalk and every side branch. The other thing that you will notice – the leaves on top will seem very light-green, almost yellowish, and they will grow very thin and dense. You may even wonder if these are leaves or first female hairs. In fact, it’s both – growing next to each other and forming what will soon become buds.
7. Early Flower | Weeks 6-7
In early flower, cannabis continues with what is called the flowering stretch and begins to stack up flowers as they bulk up at the nodes and gradually fill in the spaces between the nodes. Around this time, the flowers and trim leaves get covered in trichomes – sticky resin glands full of aromas and THC.
| Plant Height: | 30-37“ (75-95 cm) | Day Temp: | 79°F (26°C) |
|---|---|---|---|
| Distance to Light: | 27.5“ (70 cm) | Night Temp: | 73°F (23°C) |
| Humidity: | 48% | Smell: | Normal |
By this time, the grower tuned in the feeding dosage so that whatever small deficiencies have developed before, they were gone now and the ladies looked absolutely healthy and green.
This is the beauty of using nutrients specifically formulated for cannabis. You can try and use other fertilizers for other home plants but you’ll have to be on the alert constantly and closely monitor the pH and TDS of the nutrient solution because the imbalance in nutrients can cause lockouts and deficiencies.
The nutritional demands of cannabis plants are different during the flowering phase as compared to the vegetative phase. During this time, plants have less of a need for nitrogen. This element helps to form amino acids, which are then harnessed by plants to create large proteins that contribute to plant structure and enzyme formation. However, plants have done most of their growing by the time they reach flowering. Instead, they now need higher levels of potassium and phosphorus—the two other macronutrients.
Potassium helps with the movement of water, nutrients, and sugars in plant tissue, whereas phosphorus forms a vital component of ATP, the unit of energy within plant cells. For this reason, different nutrient formulas are either labeled as veg nutrients or flowering nutrients. These products contain exactly what your weed specimens need at different stages of the growing cycle.
This gardener didn’t even report watching pH, but he mentioned that his previous attempts resulted in failure while this run – with Gorilla Auto and Gelato Auto – was a success from the beginning. This often happens with coco growers because the medium is rather unforgiving and requires getting used to. But once you master it, the results are phenomenal and far surpass anything you can hope to achieve in soil. We mean the speed of growth and the yields.
8. Mid Flower (Bulk Phase) | Weeks 8-9
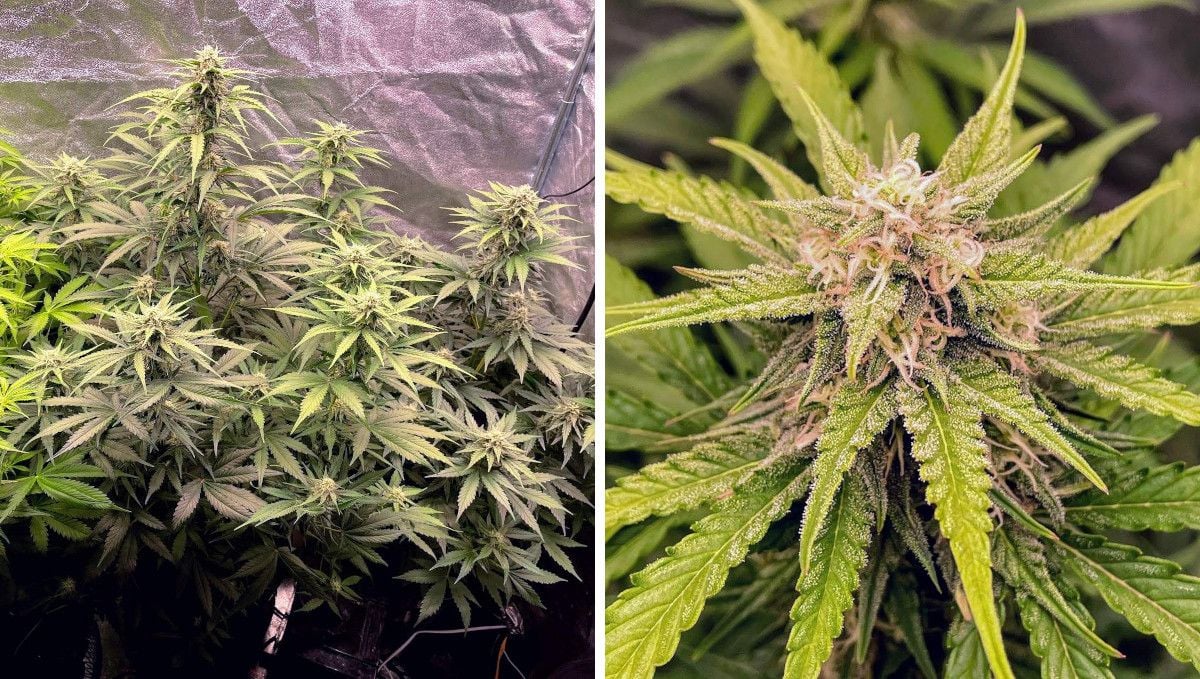
Now that the plants have finished stretching and the buds are well stacked up and begin to fill out, it’s best to decrease the relative humidity to something like 35-40%. (In this grow, it was 48% for the rest of the flowering stages.) With lower humidity, you run a substantially lower risk of encountering either mold or bud rot. Cannabis starts to smell at different stages of flowering depending on the genetics. With Gorilla Auto, the strong smell appeared quite early.
| Plant Height: | 41“ (105 cm) | Day Temp: | 79°F (26°C) |
|---|---|---|---|
| Distance to Light: | 28↘14“ (70↘35 cm) | Night Temp: | 73°F (23°C) |
| Humidity: | 48% | Smell: | Strong |
Gelato Auto turned out to be the ‘sleeper hit’ of this grow. She grew so big that she started to overcrowd her neighbors, and the bigger of the two Gorillas (the one in the center) suffered from this bullying. In the end, she would yield a bit less than the other one. Other than that, both developed beautifully and lived up to their fame of being the most resinous autos ever. The gardener noted that he never had grown such sticky plants before.
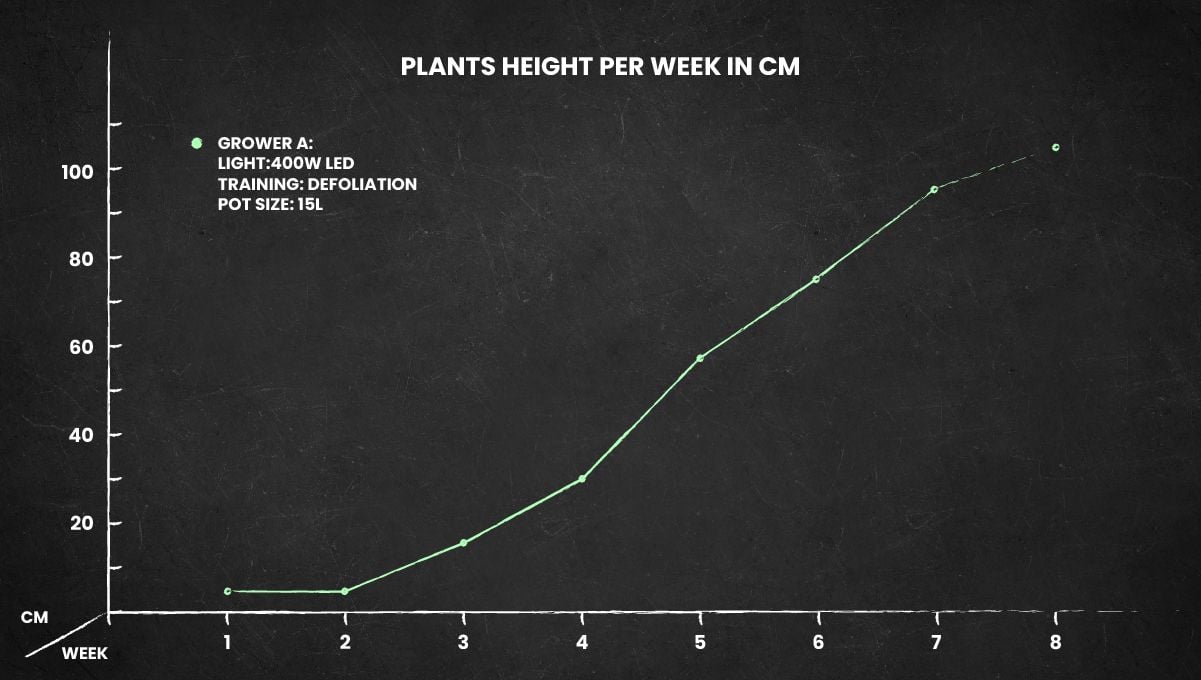
Even when crowded by their bigger neighbor, Gorilla Auto plants got quite tall, which you can see in the height chart below:
9. Ripening And Harvest | Weeks 10-12
When the harvest is approaching all you have to do is to continue with the feeding regime that you have fine-tuned by now and to watch for the right moment to start the pre-harvest flushing. You may also want to decrease the day temperature to something like 73°F (23°C) because flowering cannabis benefits from slightly lower temps.
| Plant Height: | 41“ (105 cm) | Day Temp: | 79°F (26°C) |
|---|---|---|---|
| Distance to Light: | 14“ (35 cm) | Night Temp: | 73°F (23°C) |
| Humidity: | 48% | Smell: | Strong |
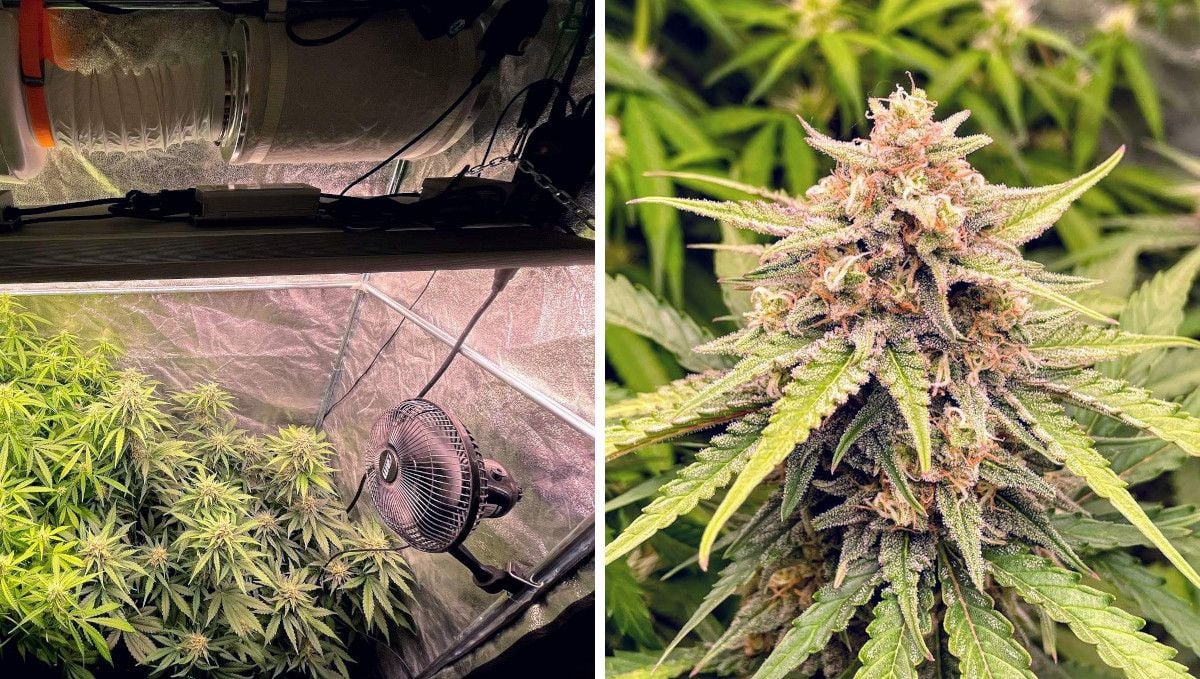
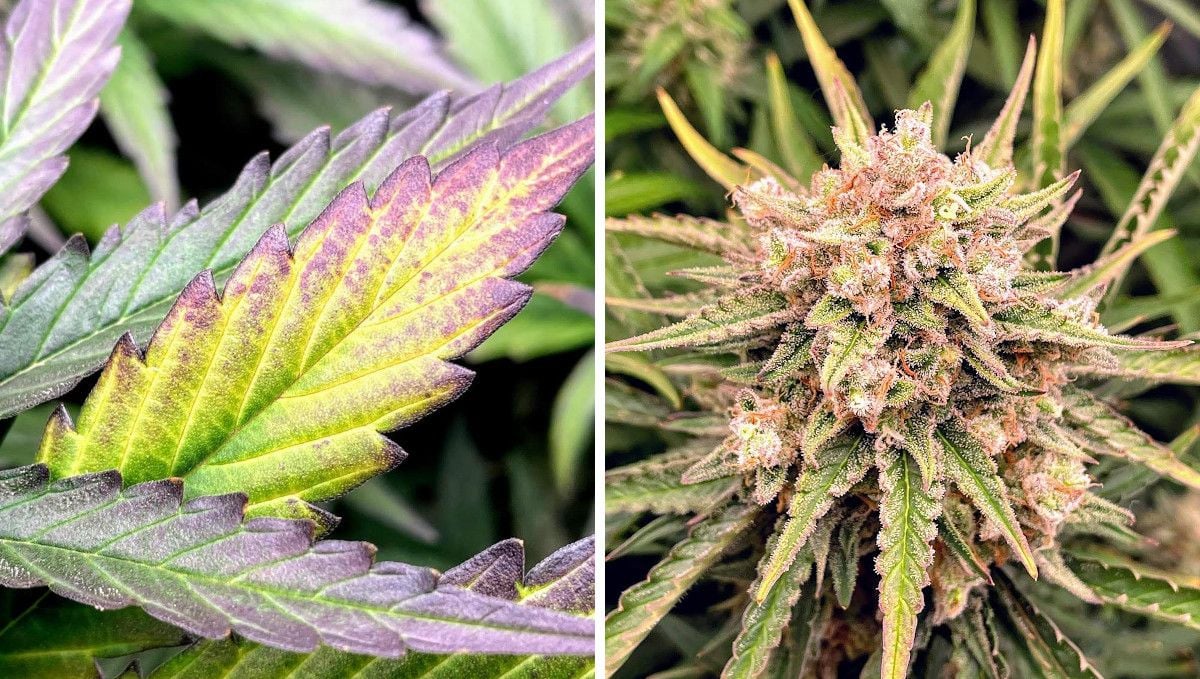
All growth had long stopped for both Gorilla Autos, and they only kept increasing the size of the buds. As promised in the description, this strain turns purple in late flower, and this is exactly what happened to one of the girls.
The grower didn’t mention any flushing, and judging by his feeding schedule, he kept feeding his plants till harvest, but it’s not the best strategy, especially for such tasty strains as Gorilla. Flushing helps you remove the built-up salts from the plant tissues which makes the smoke much cleaner.
In hydroponic setups (including coco), one week of flushing is more than enough, and you need to buy a jeweler’s loupe (a 60x hand microscope) and start inspecting the trichomes when you notice the plants have begun to fade. When most of the trichomes have turned cloudy and only a few remain clear, start the flush. By the time, you end it, all of the trichs will have turned cloudy and there will be even a few amber ones as well. It means the buds are at the peak of their potency.
10. Yield and Smoke Report
At the end of the day, the grower achieved that Holy Grail of all indoor gardeners – the gram-per-watt yield. In particular, his two Gorilla Auto ladies brought him 233 grams (8.22 oz) of trimmed dry bud.
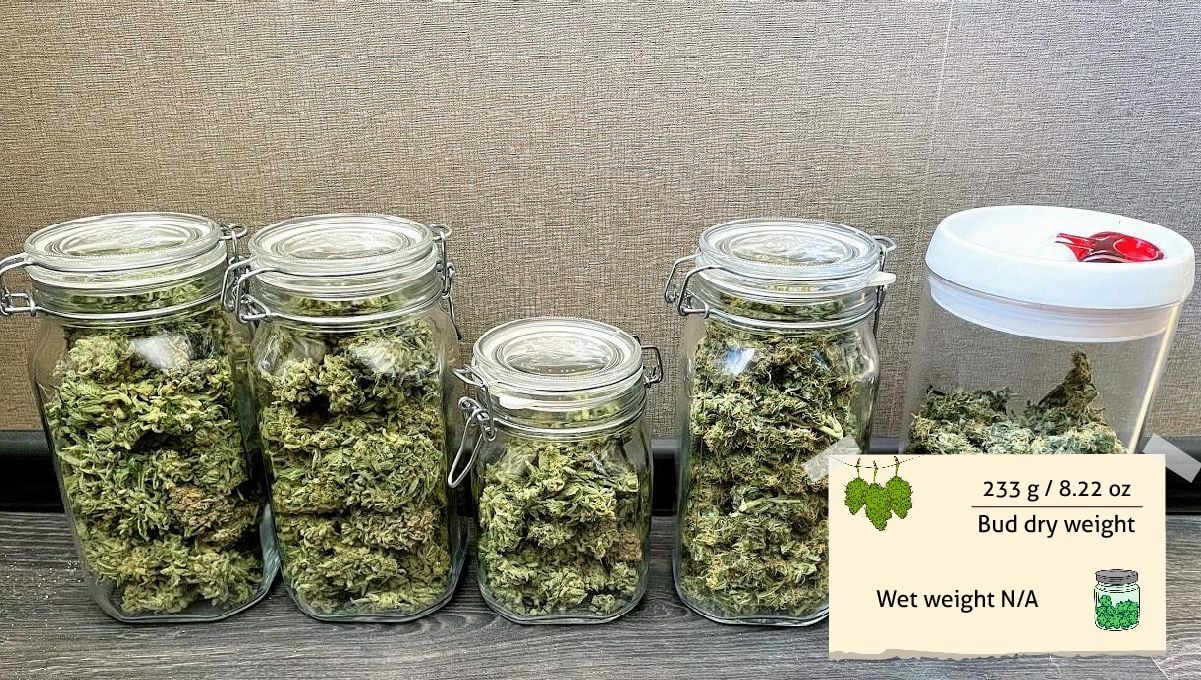
The smoke with aromas of berries and herbs was hybrid in nature but with a slight Indica dominance – making the grower relaxed and happy – but also with enough cerebral side manifesting in bright creative ideas.
Expert Opinion by Jorge Cervantes - co-author
The Gorilla Glue Auto strain is a remarkable example of the advancements in cannabis genetics and cultivation. As a seasoned cultivator and author, I've always been intrigued by the evolution of cannabis strains, and Gorilla Glue Auto is a shining example of this progress.
This strain's unique growth pattern, characterized by its rapid development and substantial yield potential, is a topic of great interest to growers. The week-by-week guide co-authored with Enzo Schillaci provides a thorough understanding of what to expect at each plant's life cycle stage. Every detail is crucial for optimizing the plant's health and yield from the initial germination to the flowering phase.
One of the most striking features of Gorilla Glue Auto is its robust trichome production, which contributes to the strain's potent effects and alluring aroma and flavor profile. The guide offers insights into nurturing these qualities, ensuring that growers can fully realize the potential of this exceptional strain. In conclusion, cultivating Gorilla Glue Auto is an enriching experience that combines the art of gardening with the science of genetics. This guide provides a comprehensive roadmap for growers to navigate the cultivation process, ensuring a rewarding and successful harvest. Remember, each plant has its unique characteristics, and understanding these nuances is critical to unlocking the full potential of your cannabis cultivation journey.
11. In Conclusion
For the author of this Gorilla Auto grow report, this was the first successful grow. He had botched all the previous attempts. It says a lot about the vigor and easy maintenance of the genetics. The plants also proved compact enough for an indoor grow although they were totally untrained.
They became very resinous early on and began to smell even before the first flowers appeared. Please keep this in mind and install a good carbon filter. The buds were of perfect texture – dense, frosty, and easy to trim. To conclude, by all means, try this marijuana variety if you need plants of moderate size and above-average yields of premium bud. Happy growing!
External References
- Kinetics of CBD, Δ 9 -THC Degradation and Cannabinol Formation in Cannabis Resin at Various Temperature and pH Conditions, Wuttichai Jaidee et al. June 2021
- Distribution of the principal cannabinoids within bars of compressed cannabis resin, Analytica Chimica Acta, May 2005




Comments