Outdoor Cannabis Grow in Italy: Week-by-Week Guide
- 1. Climate regions in italy
- 2. Growing cannabis in italy: week-by-week
- 2. a. Week 1 - germination (march 1 - march 7)
- 2. b. Week 2 - seedling stage (march 8 - march 14)
- 2. c. Week 3 - the vegetative stage (march 15 - march 21)
- 2. d. Week 4 - the vegetative stage (march 22 - march 28)
- 2. e. Week 5 - the vegetative stage (march 22 - march 28)
- 2. f. Week 6 - the flowering stage (april 5 - april 25)
- 2. g. Week 7 - the flowering stage (april 12 - april 18)
- 2. h. Week 8 - the flowering stage (april 19 - april 25)
- 2. i. Week 9 - the flowering stage (april 12 - april 18)
- 3. The post-harvest routine explained
- 3. a. Trimming cannabis buds
- 3. b. Curing cannabis
- 4. Tips for growing outdoors in italy
- 4. a. The best medium
- 4. b. Choosing the appropriate genetics
- 4. c. Masking the smell
- 4. d. Guerilla growing cannabis
- 4. e. Harvest bigger buds
- 4. f. Best nutrients
- 5. Common pests found in italy
- 6. Water quality in italy
- 7. Is cannabis legal in italy?
- 8. In conclusion
Weed is not legal in Italy, although you can find grow shops that sell everything you need to grow your own, feminized seeds, paraphernalia and CBD flowers, you can get in trouble with the law if you don’t have a way to prove you are growing for your own consumption.
1. Climate regions in Italy
You should be cautious when starting to grow cannabis outdoors because the humidity, temperature, and light cycle can affect plant growth and yields. Italy has six climate regions that go from the mountains all the way to the coast. Most of them are perfect for growing cannabis outdoors. Choose the right genetics and use a few tricks to maintain humidity to get great outdoor yields. You can achieve exceptional results with autoflowering strains. To do so, first, you need to know what are the regions of Italy and how the temperature is changing throughout the year:
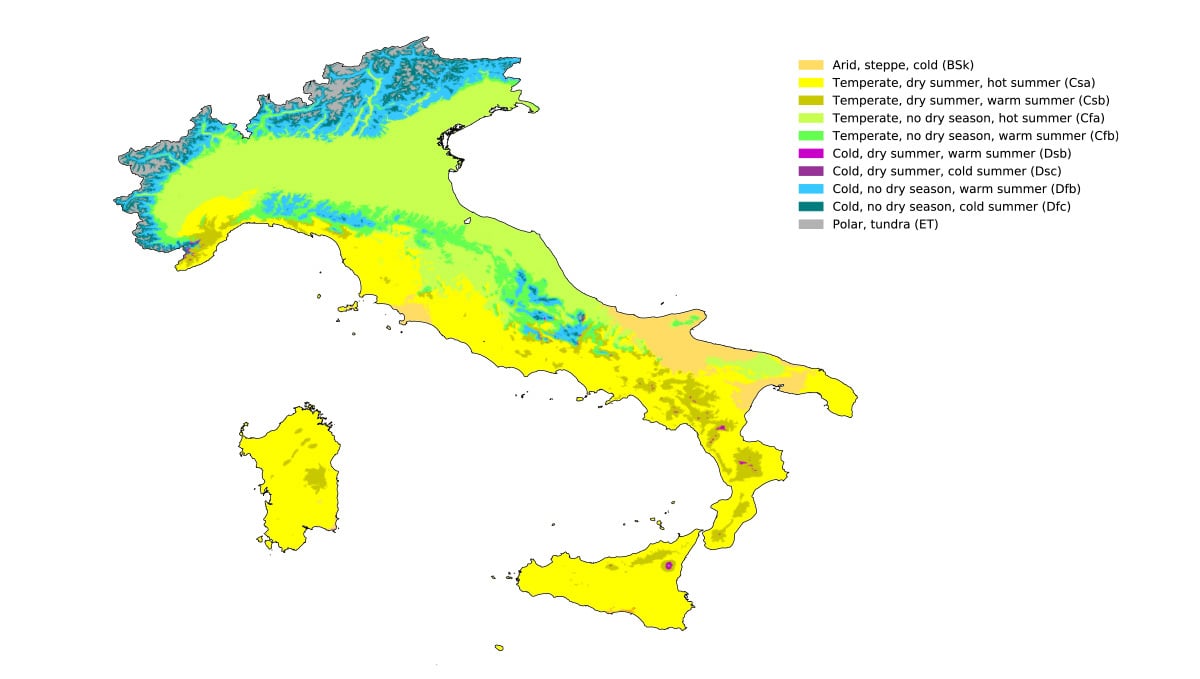
Hot-summer Mediterranean Climate (Csa)
The hot-summer Mediterranean weather is found in all coastal areas; the winter average temperature varies from 6°C in the north to 14°C in the south. During the dry and hot summers, the average temperatures are around 23°C in the north and can reach 28°C in the south. This type of climate includes places like Sardegna, Sicilia, Calabria and Puglia.
| Month | Avg. High (C°) | Avg. Low (C°) | Average (C°) | Rel. Humidity | Sunlight Hours |
|---|---|---|---|---|---|
| May | 22.6 | 12.1 | 17.3 | 70% | 14:15hs |
| Jun | 26.2 | 15.6 | 20.9 | 69% | 15hs |
| Jul | 29.3 | 18.0 | 23.6 | 68% | 15hs |
| Aug | 29.5 | 17.9 | 23.7 | 68% | 14hs |
| Sep | 26.3 | 15.3 | 20.8 | 71% | 12:45hs |
Warm-Summer Mediterranean Climate (Csb)
The warm-summer Mediterranean weather is found inland, it is quite similar to the Csa climate but with wetter winters. Average temperatures can reach 3-5°C in the winter (with a chance of snow) and up to 21°C in the summer. The main places where you can find this climate are Lazio, Abruzzo, Molise and Campania.
| Month | Avg. High (C°) | Avg. Low (C°) | Average (C°) | Rel. Humidity | Sunlight Hours |
|---|---|---|---|---|---|
| Jun | 33.0 | 12.7 | 17.5 | 70% | 15hs |
| Jul | 36.8 | 15.4 | 20.6 | 68% | 14:45hs |
| Aug | 36.8 | 15.7 | 20.7 | 70% | 14hs |
| Sep | 33.2 | 12.7 | 17.2 | 74% | 12:45hs |
Humid subtropical climate (Cfa)
In the humid subtropical weather, the seasons are more defined and are found mostly up the valleys in the north. The summers are more humid and hot, reaching up to 22°C, and slightly cold in winter, ranging from 1-3°C. The main places where you can find this climate are Trieste, Ancona, and Alessandrino.
| Month | Avg. High (C°) | Avg. Low (C°) | Average (C°) | Rel. Humidity | Sunlight Hours |
|---|---|---|---|---|---|
| May | 22.3 | 11.6 | 17.0 | 68% | 15hs |
| Jun | 26.2 | 15.4 | 20.8 | 68% | 15:40hs |
| Jul | 29.2 | 18.0 | 23.6 | 67% | 15:15hs |
| Aug | 28.5 | 17.6 | 23.0 | 70% | 13:50hs |
| Sep | 24.4 | 14.0 | 19.2 | 74% | 12:20hs |
The transition between Cfa and Csa climates
Some regions of Italy have weather that cannot be defined as one or another, that is the case in places like Ferrara and Alessandria, where summers are not too dry or wet and the winters are cold but milder in other regions. This is because these regions are a transition between humid subtropical climates and hot-summer Mediterranean climates. In this region, the average temperature in the summer is around 22-23°C and the winter ranges between 6-7°C.
| Month | Avg. High (C°) | Avg. Low (C°) | Average (C°) | Rel. Humidity | Sunlight Hours |
|---|---|---|---|---|---|
| May | 23.7 | 11.6 | 17.7 | 65% | 14:45hs |
| Jun | 27.7 | 15.0 | 21.4 | 62% | 15:30hs |
| Jul | 31.4 | 17.7 | 24.6 | 59% | 15hs |
| Aug | 31.5 | 17.7 | 24.6 | 60% | 13:45hs |
| Sep | 26.7 | 14.4 | 20.5 | 65% | 12:30hs |
Oceanic climate (Cfb)
The oceanic weather can be found mostly in the Apennines, where the average temperature in the summer ranges from 17-21°C and the winters from 2-4°C. This climate can be found to the north, 400 meters above sea level, and to the south, above 500 meters above sea level.
| Month | Avg. High (C°) | Avg. Low (C°) | Average (C°) | Rel. Humidity | Sunlight Hours |
|---|---|---|---|---|---|
| Jun | 25.3 | 12.2 | 18.7 | 62% | 15:30hs |
| Jul | 29.0 | 14.2 | 21.6 | 59% | 15hs |
| Aug | 29.1 | 14.1 | 21.6 | 60% | 13:45hs |
| Sep | 24.7 | 11.4 | 18.1 | 65% | 12:30hs |
Humid Continental Climate (Dfb)
This type of weather is found in the alps, with an altitude of 1000m or more. Growers there suffer from cold climates ranging from -7 to -3°C and mild summers ranging from 13-18°C.
Subarctic climate (Dfc)
Around 1600-1800 m, in the alpine valley, winters are super cool, ranging from -12 to -5°C, and summers are a bit cold also, around 10-12°C.
Tundra climate (ET)
Above the subarctic weather, when you reach the Tundra climate all year long there’s an average temperature around 8°C.
2. Growing cannabis in Italy: week-by-week
Imagine you live in Florence and are planning to grow an autoflowering strain outdoors, like Lemon Pie Auto.
What should you have in mind before germinating your seeds?
Before even germinating your seeds it's essential you know the weather for the next couple of weeks, the humidity, temperature, and sunlight will have an effect on the growth and outdoor yield of your plants.
The temperature, humidity and sunlight hours cannot be changed outdoors, so it’s good to plan ahead when growing cannabis outdoors, this way you guarantee a good harvest and good outdoor yield.
Depending on the type of plant you're planning to grow cannabis (auto or photo) you can use techniques such as light deprivation to reduce the light they receive and keep them vegetating for longer, the plastic tarp you use for light deprivation can also be used as a cover to keep rain off.
It’s really good to know the weather you’ll have in the next couple of months so you can plan and prepare your growing methods. For example, there are a couple of days in March which have an extremely high humidity level, this means you can already start thinking about LST to improve airflow to avoid mold and bugs.
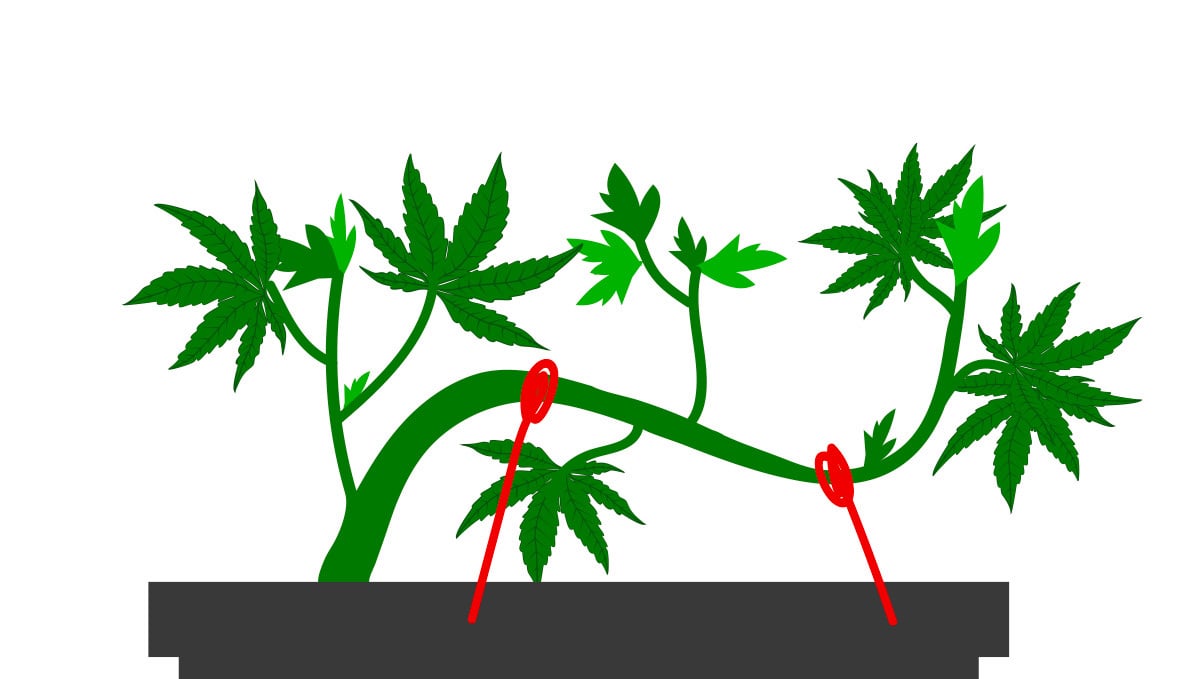
By knowing the weather to come, you can potentially improve outdoor yield and avoid problems that come with high humidity, cold climates, and choose when your plant will be in the flowering stage so she’s getting more light. In the charts below, we can see that in March you would get 11hrs of sunlight while in May you can get up to 15hs, even though it seems like 2hrs is not a lot, it can have a big difference in the development of your plants. For example, if you are planning to start growing in March, below we'll explain what you can expect from your plant's lifecycle week-by-week:
Week 1 - Germination (March 1 - March 7)
If you were to germinate a couple of seeds (which takes 9 weeks from seed to harvest) and plant them on March 10, you would expect to harvest around May 2, by having an approximate harvest date you can have an idea of the weather you'll have through your growing cycle.
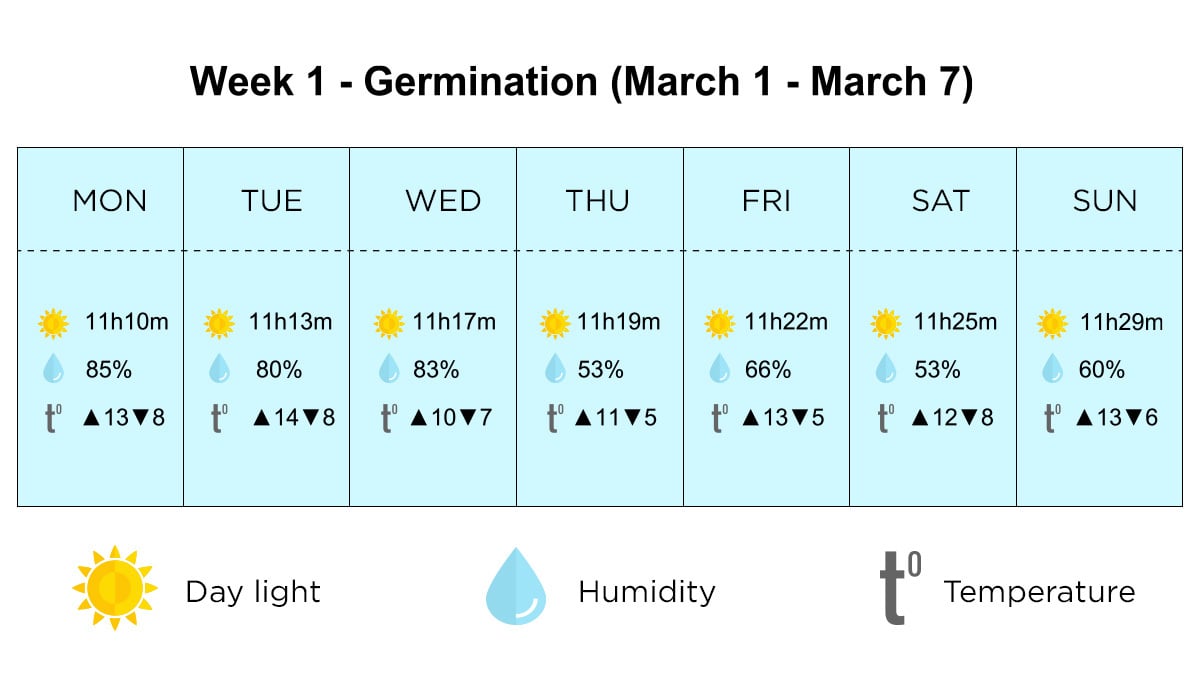
Seeds can take up to 7 days to germinate, so if you want to plant it for example, on March 10 we would have to start the germination process at least on March 1-2, remember this depends solely on the seed, some seeds take around 72hrs and others can take up to a week. Have this in mind when planning your outdoor grow because plants are living things, you cannot accelerate their natural processes and even have in mind that they can take a bit more than what you planned.
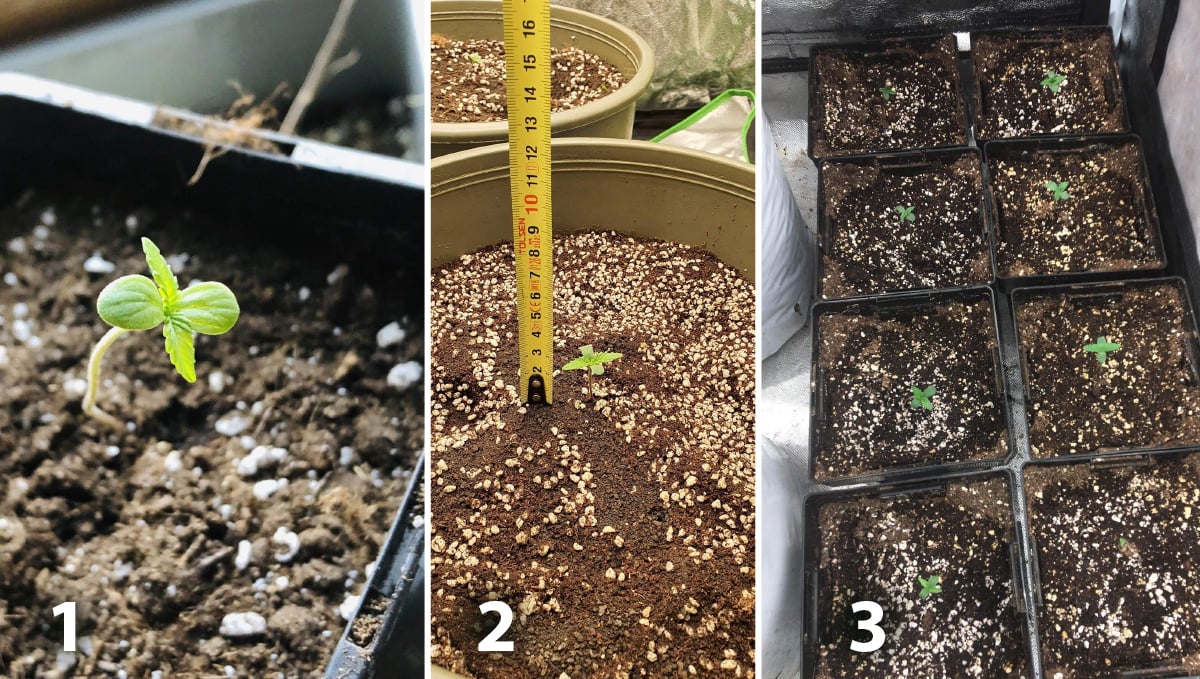
As you can see, in the first week your plants will sprout and develop the first pair of true leaves, this is a sign they are developing correctly.
Week 2 - Seedling Stage (March 8 - March 14)
After your plant has emerged from the medium, it can take around 10 days for the first pair of true leaves to appear. At this stage we should maintain a high humidity level, so by taking a look at the chart, you can expect a relatively low humidity with the exception of a couple of days.
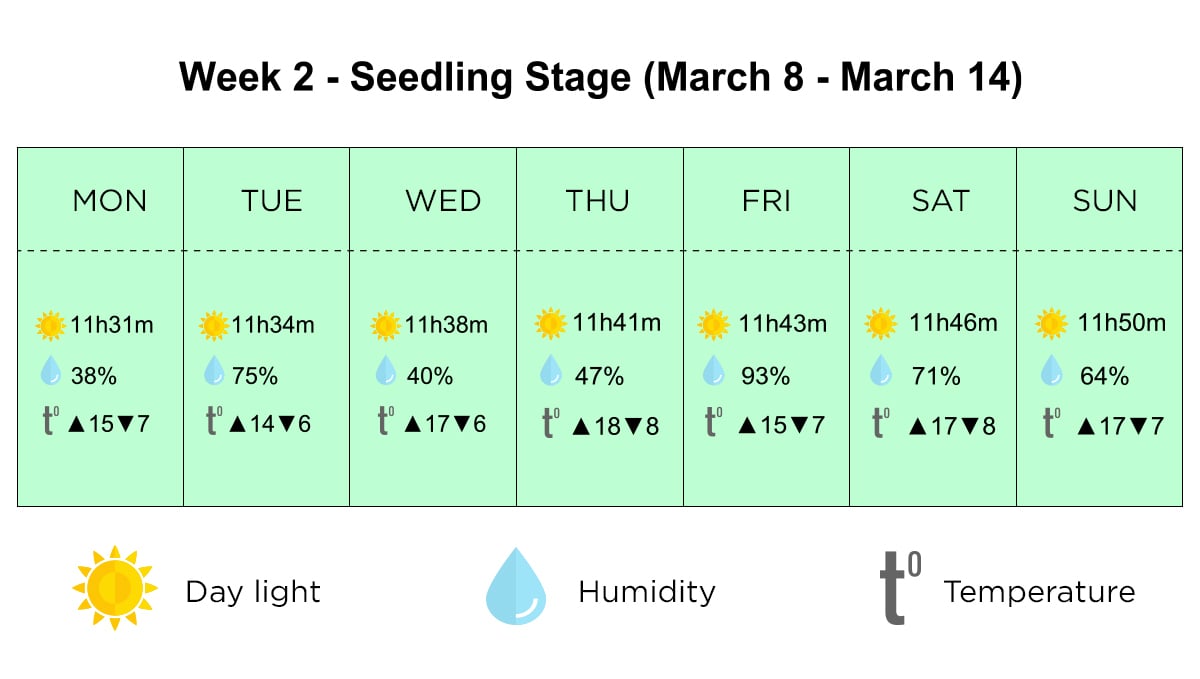
This means you should place a dome on top of the seedling to help maintain the humidity levels and spray water often, so the humidity levels don’t decrease. You need to maintain humidity as close as possible to 60% so the seedling doesn’t dry out and die. Having gone through germination and seedling stages in March, in April your plant will be entering the vegetative stage.
In the second week of plant growth, your plant will start to develop more leaves and will start to thrive.
Week 3 - The Vegetative Stage (March 15 - March 21)
In the vegetative stage you need to keep a relative humidity of around 50%, although the chart shows a couple of days with 25% and 30% relative humidity, you should be ok. Another thing you must adjust is the temperature. If you look at the chart, there are a couple of days where the temperature drops drastically.
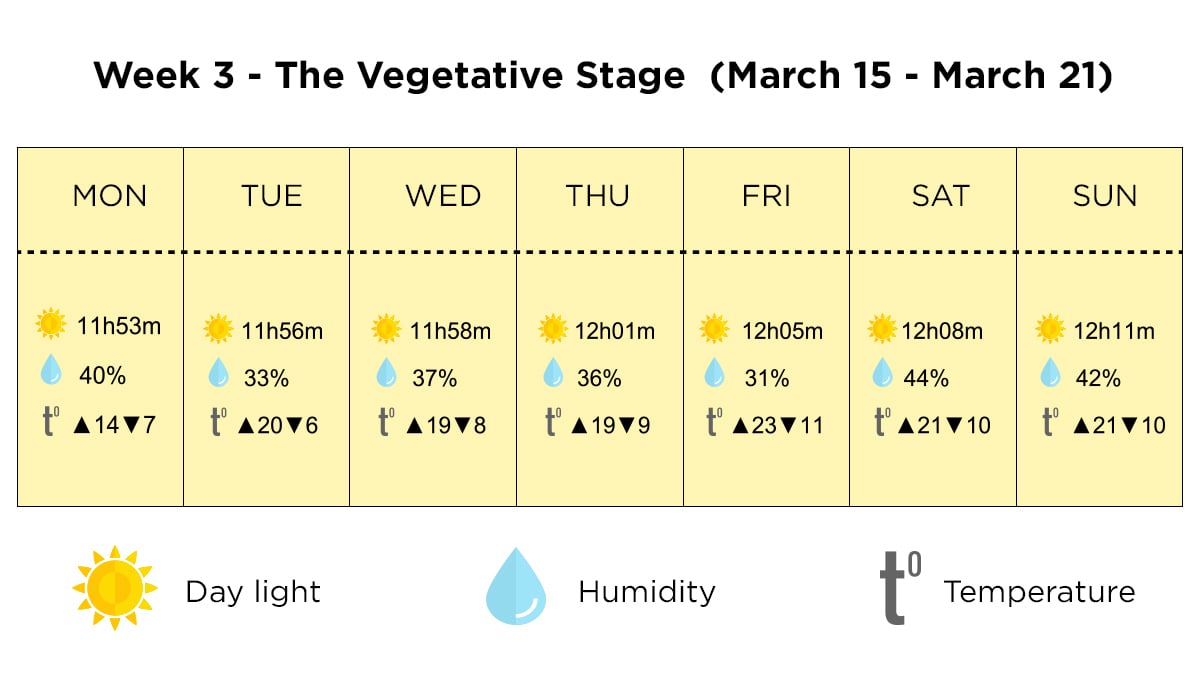
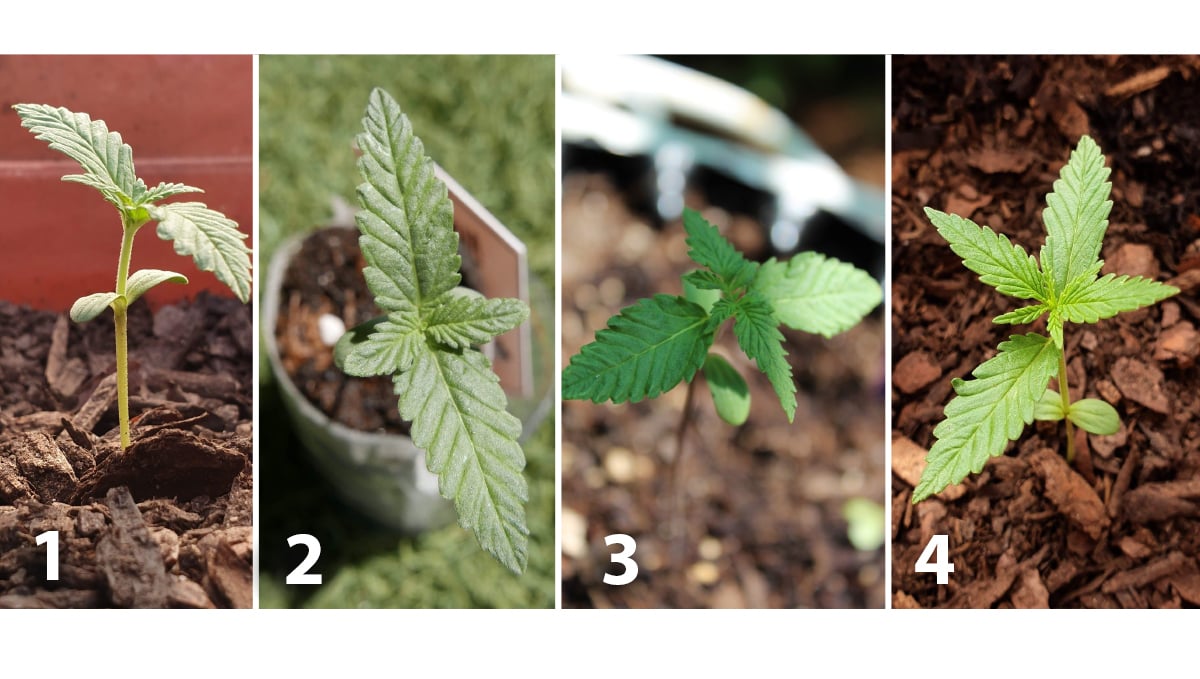
Temperature drops can stress our plants so if you can predict this, you can make the correct adjustments so your plant doesn’t stress out. You must maintain a temperature between 22-25°C for your plant to grow well.
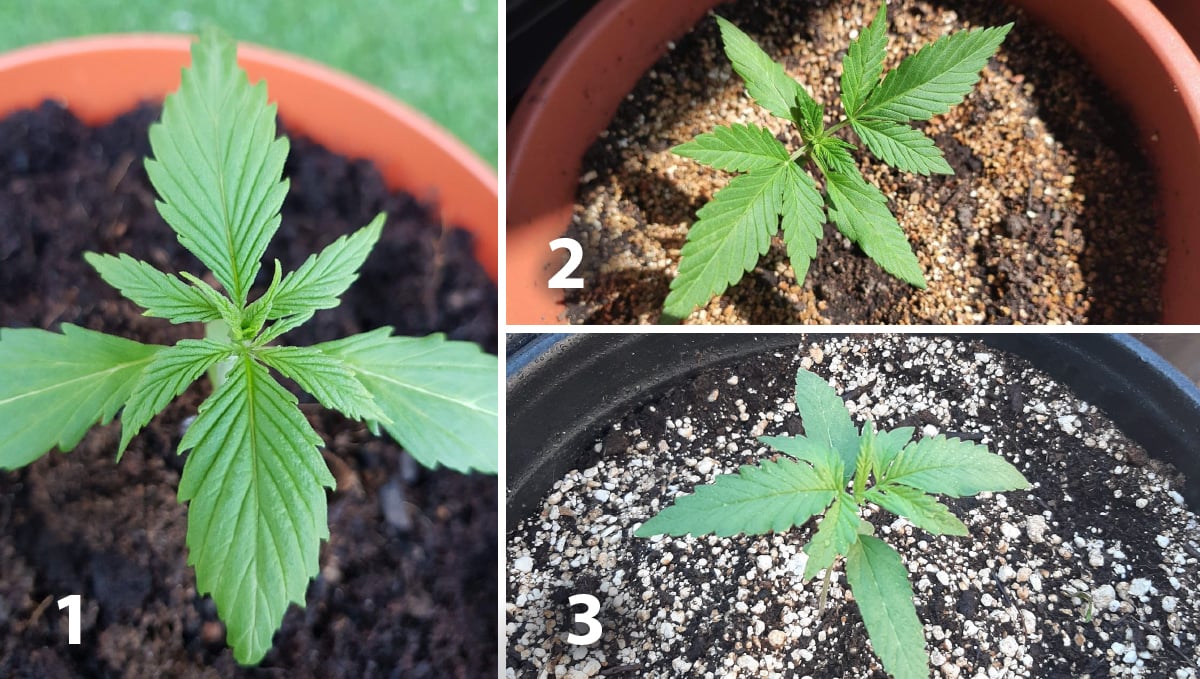
On the third week of growth, it is probable the cotyledons fall, you don't have to worry because it is normal and when that happens the plant will start to feed on the nutrients you give her.
Week 4 - The Vegetative Stage (March 22 - March 28)
Even though plants outdoors can grow with 14 and 16 hours of light, they will develop better with at least 18 hours of light.
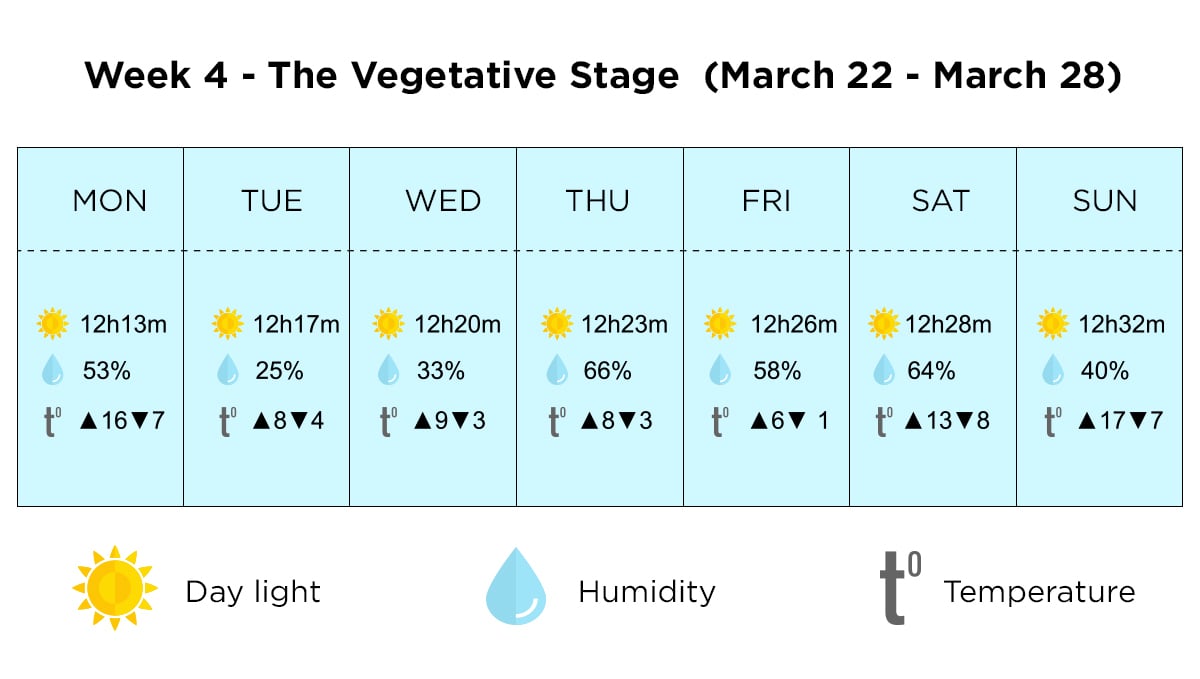
You should also provide 18 hours of sunlight for your plant to grow well, although in some places you don’t get that much, so you should plan to grow your cannabis plants when you get the most amount of light in your region.
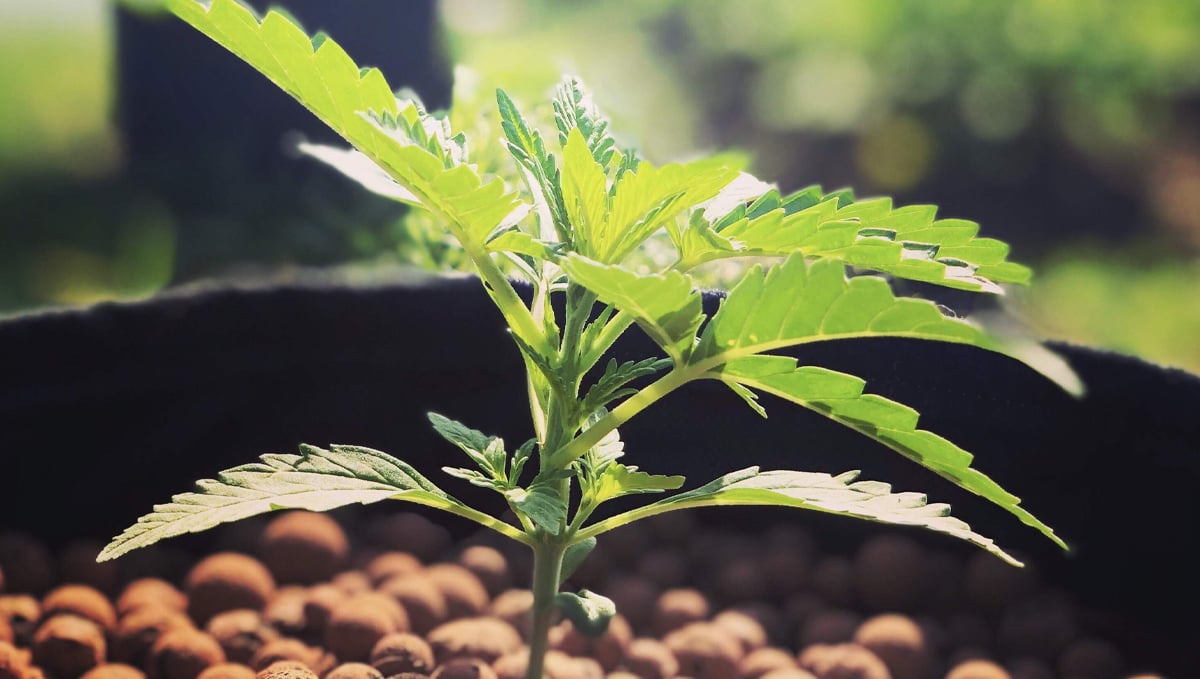
At this stage, you're taking good care of your plant she will start growing 1 pair of leaves per day, it is essential you don't stress her too much so she can grow properly.
Week 5 - The Vegetative Stage (March 22 - March 28)
This is the last week before entering the pre-flowering stage, at this stage, you should start your trellis for Scrog and start removing the ties if you LST'd your plant.
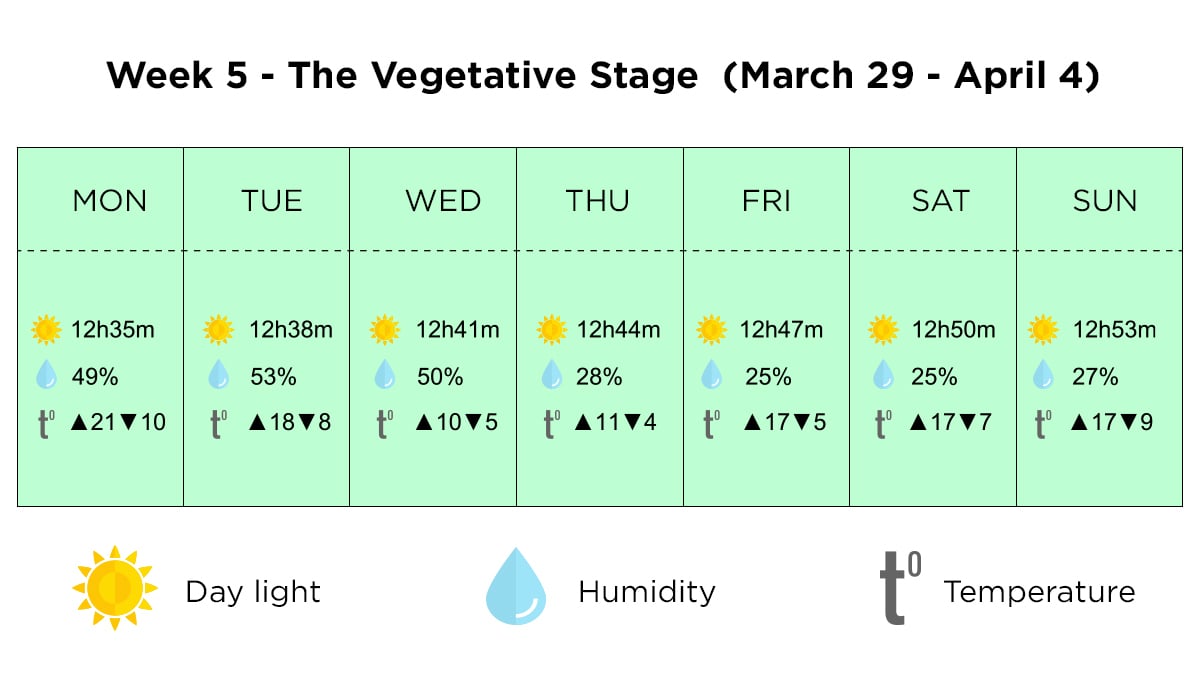
At this stage of cannabis growth, you should slowly start decreasing the amount of vegetative nutrients and start gently adding flowering nutrients, this will provide what your plant needs to start flowering.
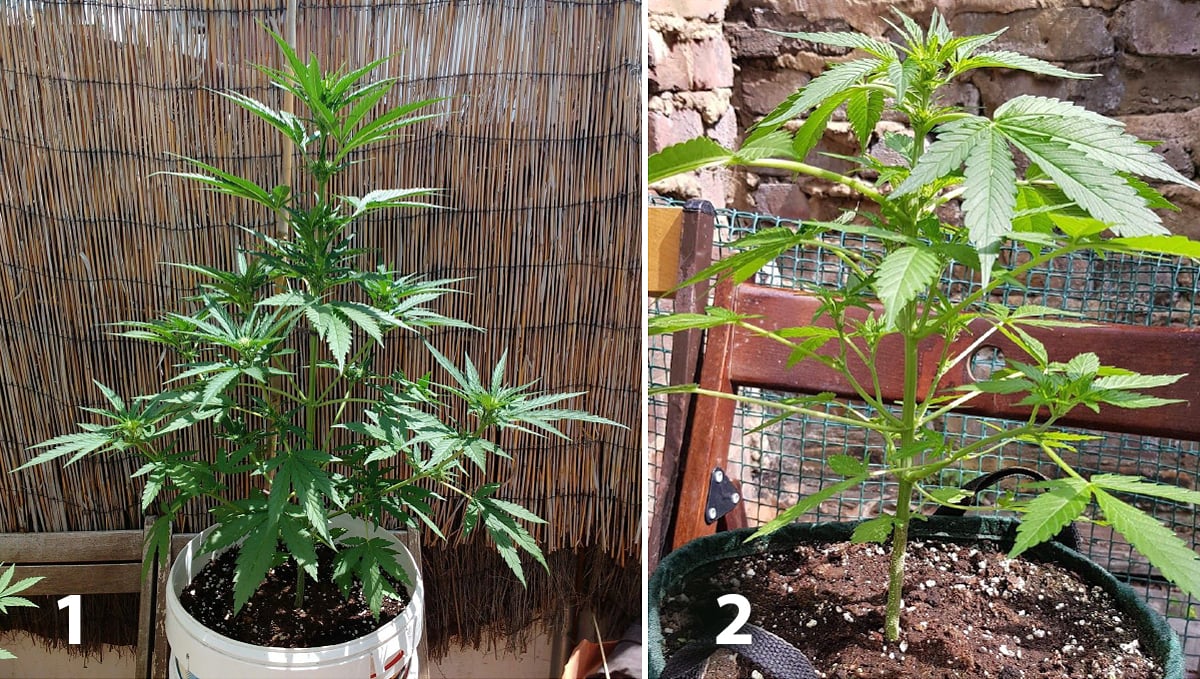
On week 6 your plant is almost ready to enter the pre-flowering stage, it should only take a couple of days before you see the white hairs appearing.
Week 6 - The Flowering Stage (April 5 - April 25)
Around April 10 our plant will start to show signs (white hairs) she’s entering the pre-flowering stage.
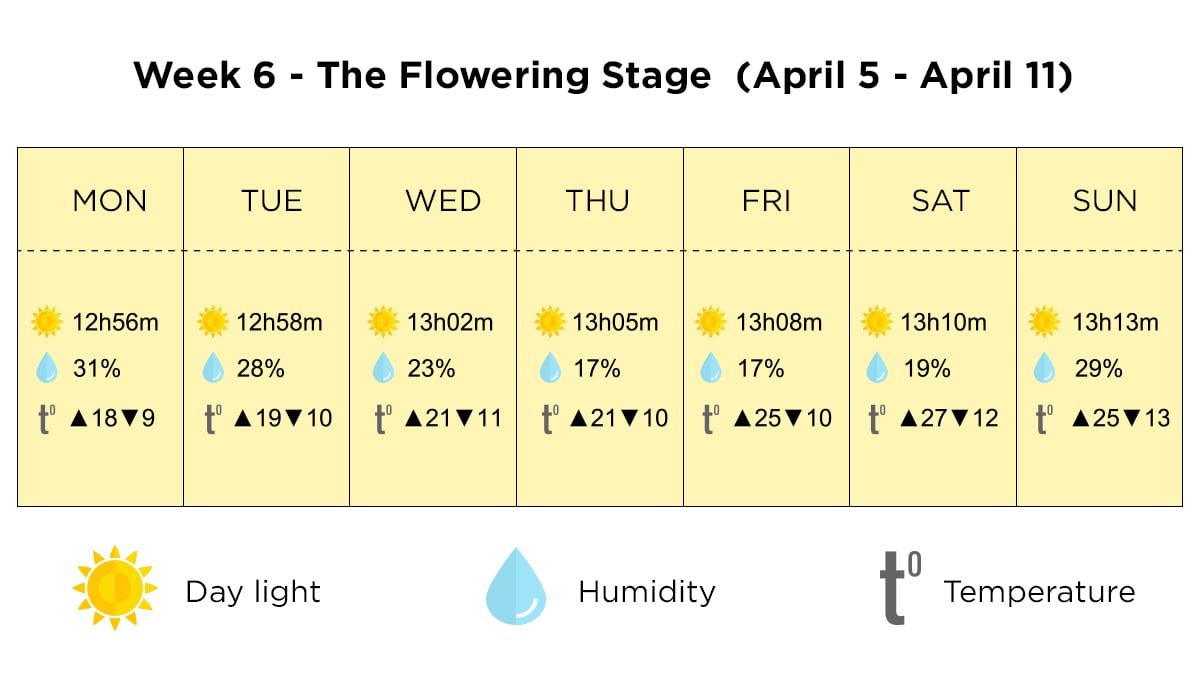
When you see the white hairs starting your plant is officially entering the flowering stage. The relative humidity should be around 45% and slowly start decreasing until we reach around 40%, by taking a look at the chart below you can have an idea of what to expect.
White hairs (pistils) are a sign that your plant is mature enough to start flowering and will take around 1 week to start developing flowers.
Week 7 - The Flowering Stage (April 12 - April 18)
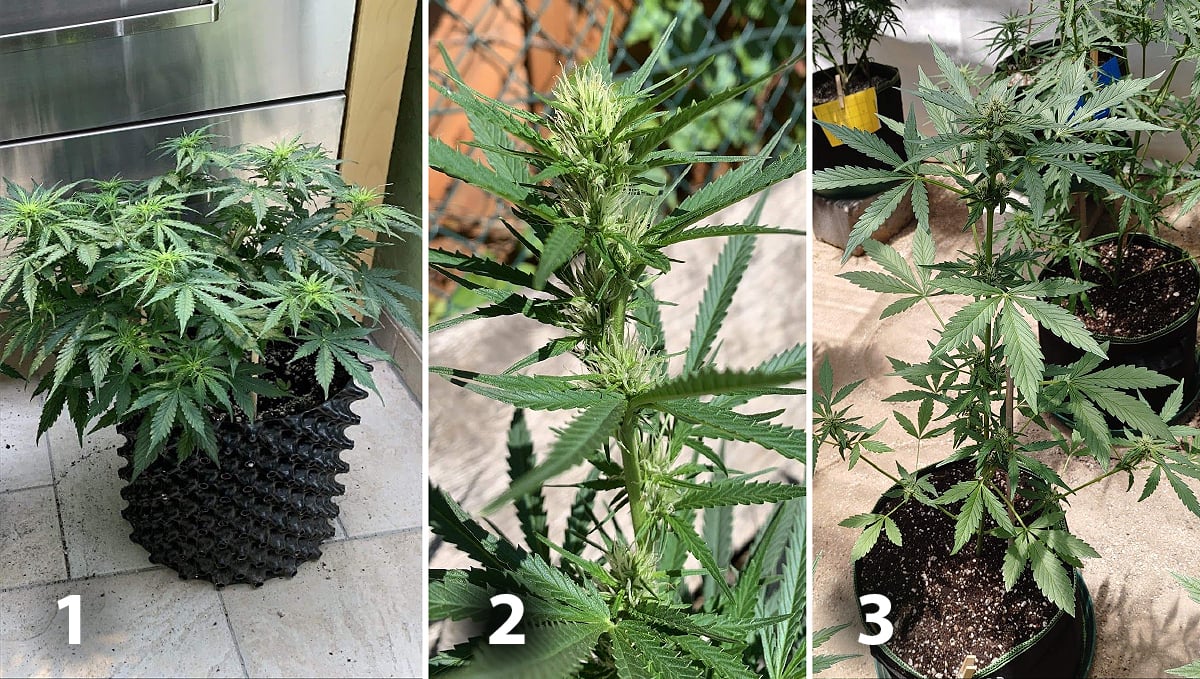
In the pre-flowering stage, your plant can start to smell, it's a good idea to install the carbon filter or other ways to mask the smell now.
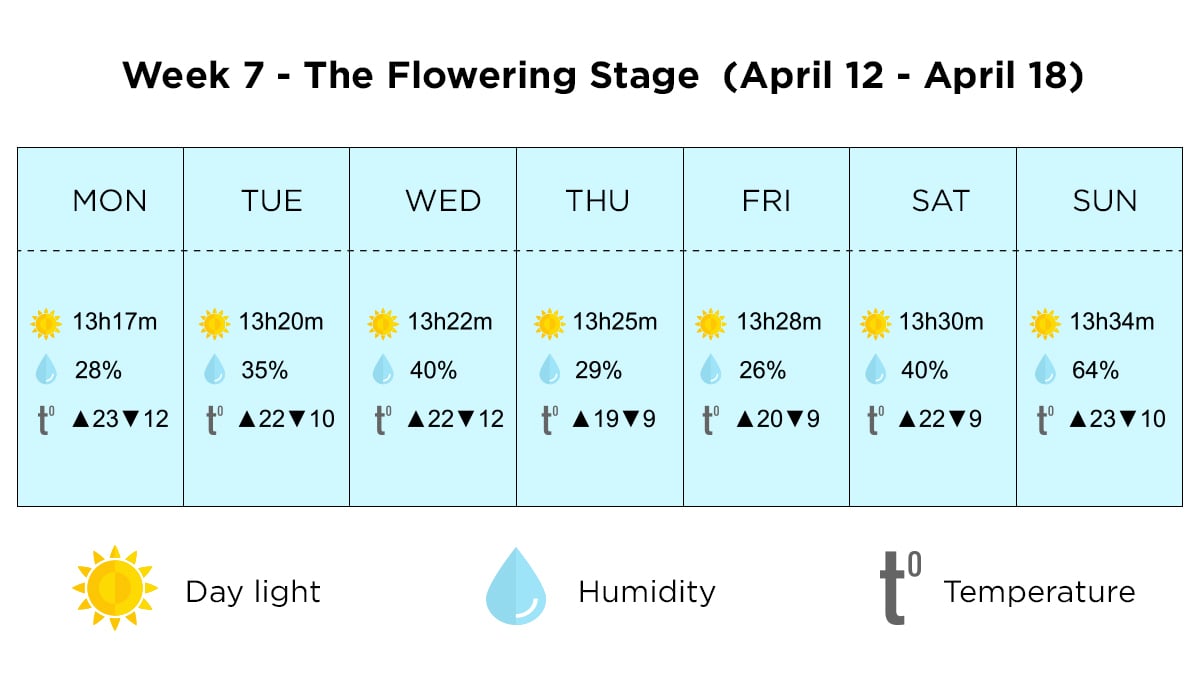
The humidity levels will be quite low so maybe you’ll need to use a humidifier or other methods to increase humidity in your growing space.
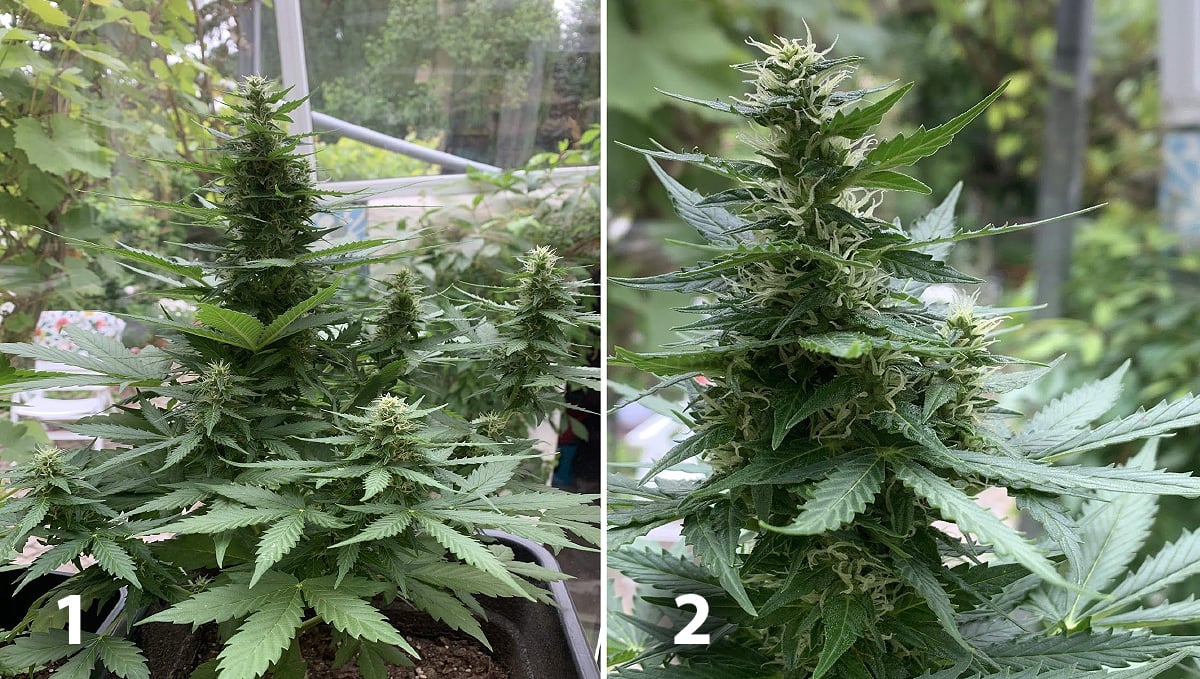
On week 7 your plant will start to fatten up the buds and you will see a lot of white hairs throughout all the bud sites, at this stage you should already be feeding her good quality blooming nutrients to ensure high yields.
Week 8 - The Flowering Stage (April 19 - April 25)
In the last two weeks before harvesting you should start flushing, washing the roots 2 weeks before harvesting will remove the excess nutrients and will result in a better tasting and smelling flowers.
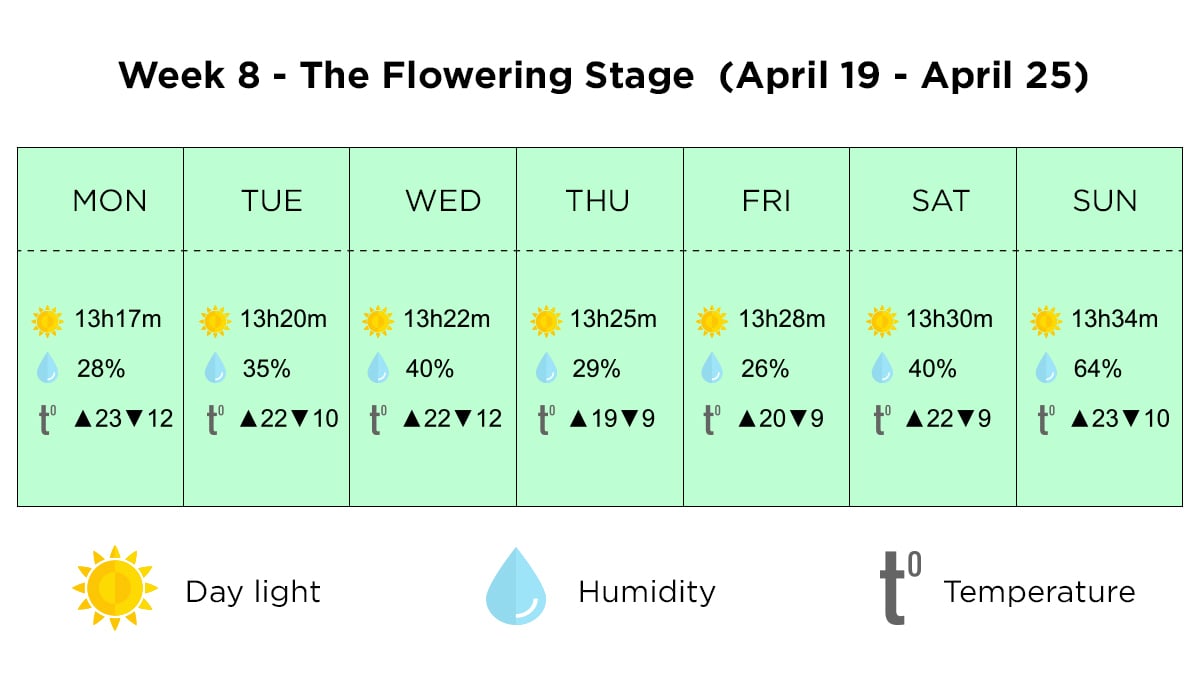
You can also prepare to adjust the temperature, although in this example you don’t have to because by having an average low of around 11°C and an average high of around 22°C, the average will be around 17°C.
The best choice of strain will be an Indica dominant hybrid that takes cold climate very well, so unless you suffer from extremely cold weather (less than 13°C) you won’t have a problem.
Week 9 - The Flowering Stage (April 12 - April 18)
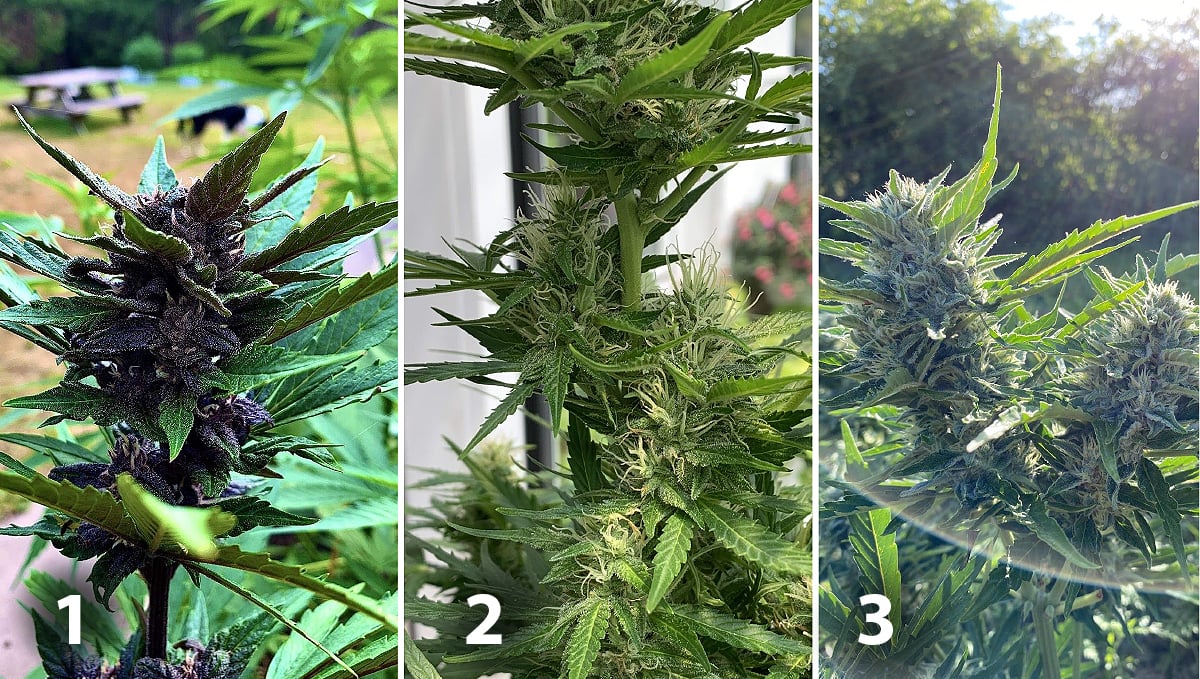
In the last week, your plant will mostly ripen and dense the buds a little bit more, it's crucial you harvest at the right time and have the drying room ready for your harvested plants.
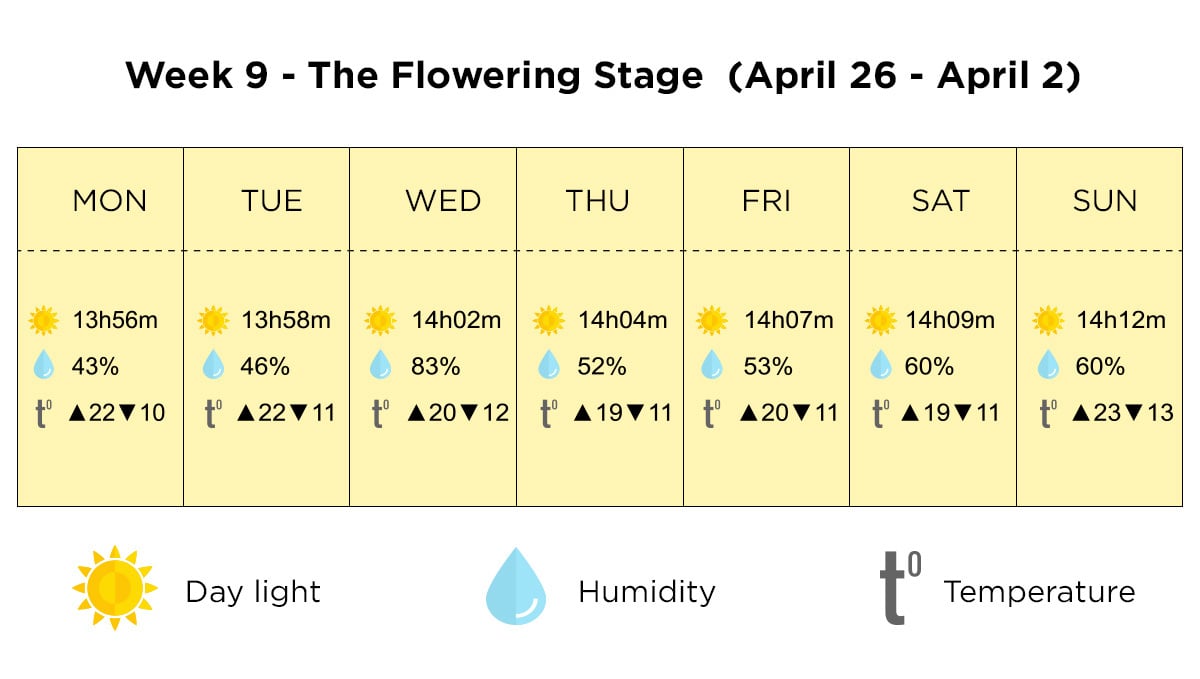
After harvesting and trimming you'll need to dry your plants for around 2 weeks and then cure the buds for a minimum of 2 weeks.
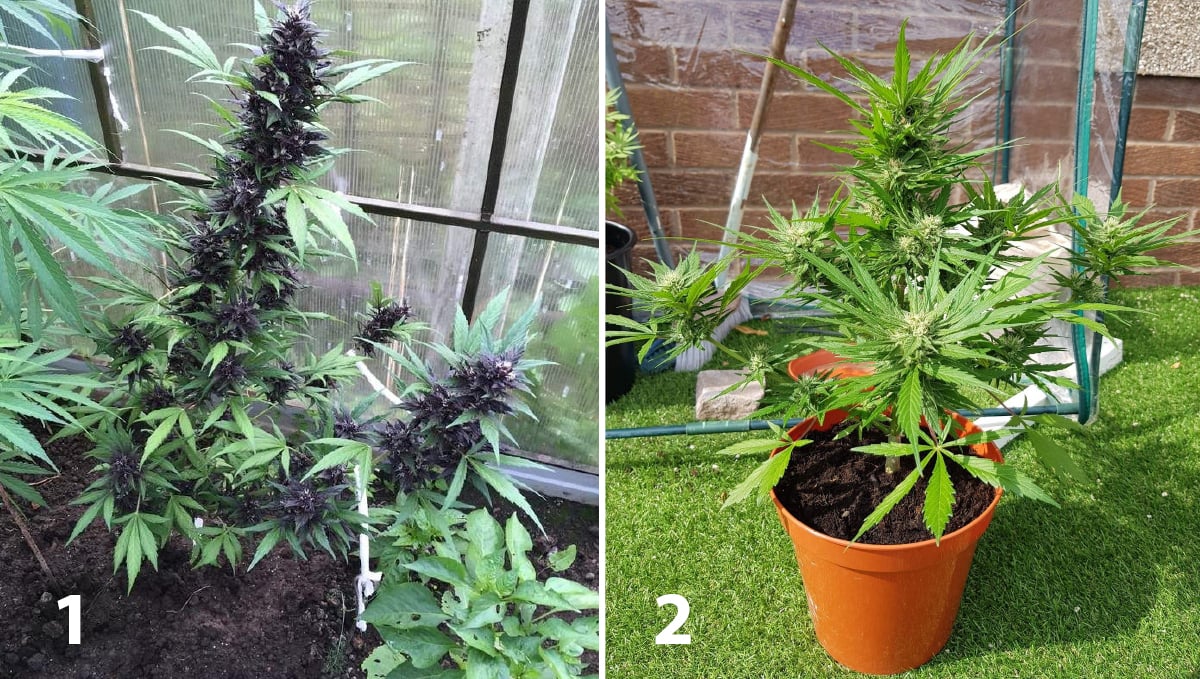
When your plant is ready for harvest most growers leave it for 48hrs in complete darkness, this will make your plant know she's going to die and will frost a little bit more.
3. The Post-Harvest Routine Explained
Ok, so there we go - a full grow diary from our friendly grower in Italy! But, the work isn't over once you cut the crop down. Oh no, there are still a bunch of steps and processes to get through before it is finally time to smoke up that delicious, dank bud you have worked so hard to grow. Before you even think about cutting the crop down, you have to decide whether you are going to wet or dry trim.
Once this decision is made, you can go ahead and set up your drying area and get the crop harvested. There are a couple of common ways that home growers both harvest and dry their cannabis crop, but don't worry - we will cover all this just below. And then, once the drying and trimming are finished, it's time to cure the buds. Cure the buds you say? Yes indeed. Curing is a vital step in ensuring you get the absolute best final product, so make sure you don't skip it. Anyway, let's dig a little deeper and find out exactly what trimming, drying, and curing weed plants are all about.
Trimming Cannabis Buds
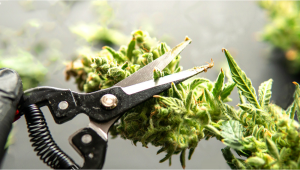
As we briefly mentioned above, trimming is split into two main categories - Wet Trimming and Dry Trimming. The decision between the two will mostly come down to your ability to control the ambient temperature and humidity, and also personal preference. The vast majority of commercial and home growers try to keep the trimming in the dry category. In terms of tools needed for trimming, the last thing you should be considering using is that crusty old pair of scissors floating around in your room. Depending on the size of the harvest, trimming can be a pretty tiresome job. Grab yourself a dedicated pair of trimming sheers or scissors if you have a decent-sized harvest, trust us when we say that you will be thankful for it later - there are lots of different options on Amazon. You will also wanna grab:
- A bottle of isopropyl alcohol - the stickier your buds, the stickier the scissors will get. Unless you want to be scratching them clean constantly, we suggest using isopropyl alcohol to clean them up.
- A trim tray - While this bit of kit isn't 100% necessary, it's a super handy tool to have. Not only will it make the whole trimming process much more comfortable, but it also catches and collects all the keif (trichomes) that fall while you are trimming, resulting in a huge stash of hash at the end.
- A mask may also come in handy - Some people, especially those among us who suffer from hay fever, may find using a mask very beneficial. Even if you are a daily smoker and have never had any issues with allergies from cannabis in the past, you might find that being covered in trichomes get you sneezing uncontrollably.
- Many novice growers use gloves - We don't recommend this though. Sure, your fingers might start out a little sticky for the first 15 mins or so, but let that layer of finger hash build up and you will find the job of handling the buds gets much easier. Plus, you can not easily peel finger hash off gloves as you can skin.
Before we get into the differences between wet and dry trimming, we need to talk about the perfect environmental conditions for drying weed - as this will usually dictate which of the two you settle on. If possible, you want to create a drying area that has a temperature range of 65 to 70°F (18-21°C) and relative humidity as close to 50% as possible. If you are not capable of maintaining these conditions, you will need to stick to the wet trimming method, especially if your dry room is hotter and more humid than desired.
If at all possible, you want the drying period to take anywhere from 7 to 12 days. Air exchange is highly important for any dry room, but even more so for areas where you are struggling to control the conditions. Just remember to never point any ac of fan units directly at the buds, as this will cause them to dry out way too quickly.
Wet Trimming
Wet trimming is the process of removing as much of the plant structure and leaf material before the buds go into the drying room or area. This style of trimming comes with a few marked advantages in certain situations, but should only be used if you are struggling to control the dry area environmental conditions (in our opinion, anyway).
For wet trimming, we suggest slowly butchering the plant branch by branch, and then cutting each branch down to the individual bud level. Carefully cut away as many of the larger fan leaves as possible, and also the majority of the sugar leaves surrounding the buds. This is done to speed up the drying process in hot and humid climates, and reduce the chances of the bud developing any mold issues during the drying stage.
Dry Trimming
If you are able to dry your harvest in a climate-controlled area, then dry trimming is the way to go. If your plants are less than 80 cm in height, we recommend keeping them as a whole as possible and hanging them upside down to dry. If you have grown big old ladies, then carefully chop off the branches and hang them.
Once the drying has finished up, bring the plants out and start the trimming. Dry trimming is a much less messy affair than wet trimming and allows for easier manicuring to take place. Remember, when trimming, the last thing you want to do is shave the buds. Use the tips of the scissors to carefully bury into the buds and snip the sugar leaves at the base, while trying to leave the flower formation as intact as possible.
Curing Cannabis
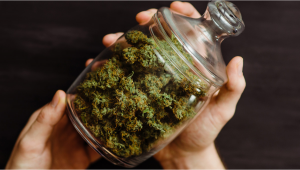
Curing weed is a super easy process, but boy will it test your patience with your first few crops. Think of it like aging a fine wine, and thank the lord it doesn't take nearly as long. Once the drying and trimming have all finished up, it's time to get those dank little bas**** in the curing jars. Any airtight container will do, and while many growers opt for mason jars, we prefer to use lightproof containers where at all possible. Light is a killer of cannabinoids and terpenes, so the more protected we can keep our buds, the better.
To cure your weed, simply fill the jars or containers and close the lid. Make sure not to fill past the 75% point, we need to give the buds room to breathe otherwise we run the risk of introducing mold into the equation. Then It's as simple as storing them in a cool, dark, dry area for the next 2 weeks to six months, depending on how patient you can be. In the first week, it's important to burp (open) the containers twice a day. There will always be a little but of internal moisture remaining in buds that have just started the curing process, and this will quickly be drawn out which can cause mold to pop up unless you are careful and diligent with this step. Once the second-week roles around, you should be fine to drop that to once every two days, and finally once a week after the fourth week of curing.
Six months?! Look, not every strain takes a full six months to reach the true potential, but most cannabis growers agree that the longer you can wait, the better the product. Over time, terpenes and cannabinoids increase in complexity, giving off a more robust flavor and effect. However, if you don’t have six months to spare, two weeks minimum is all it takes for most strains to achieve an acceptable level of curing quality.
Is curing totally necessary? Can't you just dive into the buds once the drying process has finished up? Look, after the two or so-week drying period, you can definitely smoke up. But, as just mentioned, the quality will be at least slightly below the full potential of the strain. If you have nothing to dip into whatsoever other than the buds you just harvested then go right ahead, but if you can hold off then we 100% suggest doing so.
4. Tips for growing outdoors in Italy
The best medium
If you live in a very humid place you can add perlite to help oxygenate the medium whereas if you live in a dry place coco fiber can help hold the moisture in the medium.
Choosing the appropriate genetics
It’s a good idea to choose the appropriate genetics for the weather you'll be growing in, in general, Indica dominant for lower and Sativa dominant for higher temperatures.
Masking the smell
If you are growing in a balcony, an abundance of aromatic plants can help mask the smell.
Guerilla growing cannabis
If you are planning on guerilla growing, make sure you look for the perfect spot. A place when your plant will get a good amount of light with a water source nearby and far away from bugs and animals that can eat your plant.
Animals like gophers and moles can eat the roots and are hard to spot because they live underground, you should look for holes in the ground or eaten plants before choosing where to plant your cannabis.
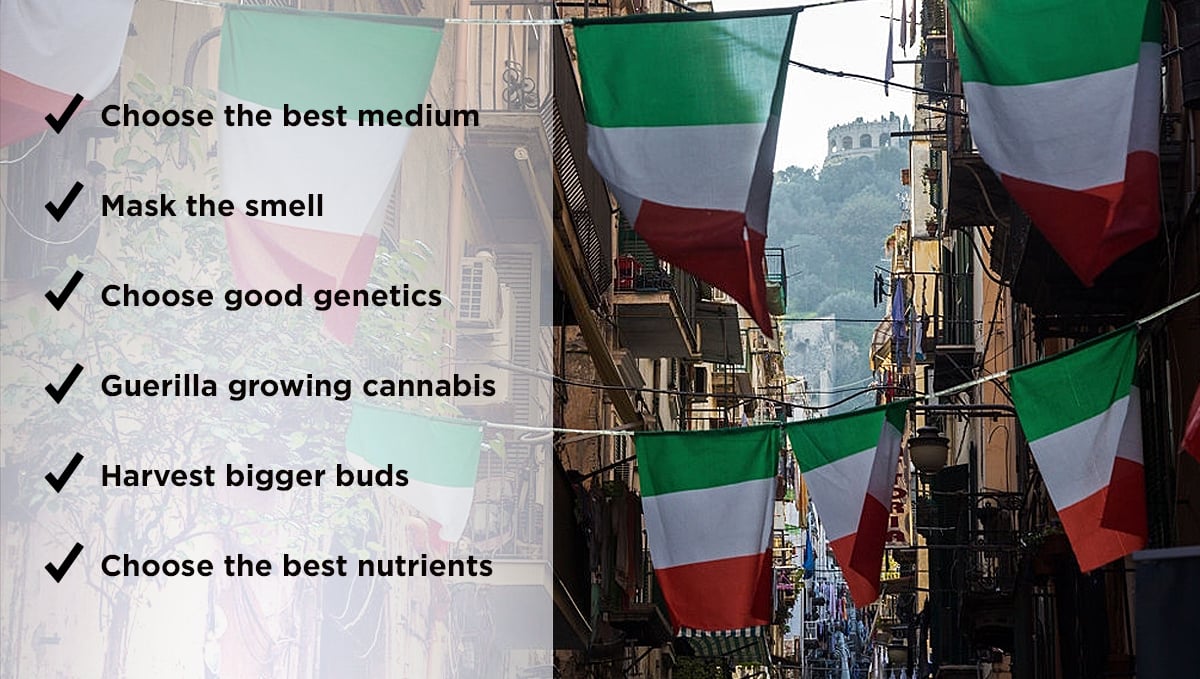
Harvest bigger buds
To get denser and bigger buds outdoors you can plan ahead so your plants are flowering when you get more sunlight, this will result in a bigger outdoor yield and better flowers.
Best nutrients
Organic nutrients will not only keep you from burning your plants but will also result in better tasting and smelling flowers. Obviously, you can use synthetic nutrients but you should be careful to not overfeed your plants.
5. Common Pests Found in Italy
Pretty much every common pest that can plague a cannabis crop is present on the Italian mainland. These include spider mites, broad mites, aphids, caterpillars, inchworms, nematodes, deer, birds, moles, squirrels to name just a small selection - and that's not even mentioning the fungal and mold issues that can arise when growing weed. Before you grow, it's always best to get advice from your local hydroponics store on the pests more regularly found in the area. If you are concerned about insect and fungal issues you can always use neem oil or synthetic sprays and run a prevention program. With neem oil, make a simple foliar spray from the following:
- 500mls tap or rainwater
- 1 ml of neem oil
- Insecticidal soap at 75% strength
Give this concoction a gentle stir while trying not to cause any bubbles to be formed. Give your plants a good spray once every 5 to 8 days, and make sure to give the whole plant a full coverage spray in the vegetative growth stage.
Many of the little nasties like to live on the underside of the leaves and in the hard-to-reach crooks, so pay special attention to these areas. This sort of preventative application should be stopped completely for the last 3 weeks of flower, and you should take great care not to spray the flowers when they do start to form.
6. Water Quality in Italy
For the vast majority of the country, tap water is perfectly suitable for cannabis cultivation. Just like anywhere else in the world, the quality and pH levels will vary from region to region, and in most areas, there will be chlorine present. The easiest way to combat this is to just believe the water sitting in the container overnight before you water your ladies with it. Can I collect and use rainwater for weed crops in Italy?
Rainwater is perfectly legal to collect in all areas of Italy and is more than suitable to use for growing outdoor weed. Your outdoor crop will be receiving the rainwater either way (when it's raining, duh). If you want to keep them more protected and have greater control over the growth cycle then build or buy a greenhouse. This will not only protect the crop from the rain but also all other weather elements. Greenhouse growing can be a huge preventative for pests and animals that may come after your precious plants It's important to always check the pH and TDS or EC levels before using any water to feed your plants. This should be done before, during, and after the mix has been made. Having the wrong pH of nutrient density in the water can lead to massive issues down the road. Every single weed grower should invest in a decent pH and EC meter. Spending a little more on quality products is always recommended for cannabis cultivation and it's no different here.
7. Is Cannabis legal in Italy?
The answer is no. Grow shops and growers, used to benefit from a legal “grey area” but a recent supreme court decision established that it no longer is a crime to cultivate cannabis at home (in minimal quantities) and for personal use only. This decision states that public health is in no way compromised or endangered by the individual who decides to grow cannabis for himself and criminal actions cannot be applied as you follow some requirements. The italian supreme court decided that as longs as it is a small-scale domestic cultivation with a small number of plants, a low yield, without using professional equipment and exclusively for the personal use of the grower without indications of commercialization to the black market.
Because there’s no law prohibiting THC they are allowed to sell paraphernalia, growing equipment, CBD products, and even flowers with less than 0.2% THC (considered hemp) although it is more expensive and worse than what you can get from a dealer or by growing your own cannabis. Have in mind that in the last official document3 the Ministry of Health does not consent the sale of CBD products to the public, so even though you can buy or grow cannabis at home, if someone calls the police on you (because of the smell, for example) you can get in trouble. If you’re growing cannabis, having too many plants, scales or ziplock bags can be used as proof that you’re commercializing cannabis and the judge may find you guilty.
8. In Conclusion
Even though you can grow almost all autoflowering strains multiple times a year, by knowing the climate for the next couple of months in your region you can optimize our grow cycle.
By knowing the amount of sunlight you not only can improve the plant's yield but also avoid stressing her and avoid problems related to high humidity levels.
We hope our week-by-week guide will help you plan and organize your outdoor grow successfully. If you've already done it tell us in the comment section what were your main problems that you've confronted.
EXTERNAL REFERENCES
- Servizio nazionale di previsione neve e valanghe (Meteo Aeronautica);
- La repubblica: Cannabis, la Cassazione: "Coltivazione in casa non è reato";
- Richiesta di parere sulla commercializzazione di prodotti contenenti THC.
This post was most recently updated on April 20, 2022.





Comments