


オートフラワー系カンナビスの最適な収穫タイミングはいつ?
- 1. オートフラワーが収穫適期かどうかの見分け方
- 2. 季節に基づく収穫
- 3. 栄養成長期(ベジ期):1〜5週目
- 4. バッズの熟成
- 5. フラッシング
- 6. 収穫の窓
- 7. おおよそのブリーダーガイド
- 8. 水の吸収が減少したとき
- 9. ファンリーフの黄変と枯死
- 10. カリックス(ガク)が膨らむ
- 11. 柱頭(スティグマ)の色変化
- 12. トリコームの状態
- 13. 早期収穫と遅延収穫
- 13. a. 早期収穫
- 13. b. 遅延収穫
- 14. カンナビスの完璧な収穫・乾燥・トリム・キュア方法
- 15. まとめ
植物を収穫するベストなタイミングは、適切なフラッシングや得たい効果など、さまざまな要素によって異なります。すべての株は異なるため、確実に判断するには、特に柱頭とトリコームの状態を含め、植物からの全サインを考慮することが重要です。観察眼が鍛えられると、カンナビスは収穫の最適タイミングを伝える多くのビジュアルサインを発していることに気づきます。葉の色が変わるなどの大きな変化から、カンナビスの解剖学という小さな変化までさまざまですが、何を見て、どこを見るべきかを理解しておく必要があります。以下では、オートフラワー系カンナビスのタイムリーな収穫を見極めるための主なサインを紹介します。
オート株を適切にフラッシュした後、「収穫の窓」が訪れます。この期間に収穫の準備が整い、具体的にいつマリファナを収穫するかを決める必要があります。考慮すべきことはいくつかあり、選ぶタイミングによってさまざまな効果が得られるので、良質なカンナビスの収穫法をぜひご覧ください。
1. オートフラワーが収穫適期かどうかの見分け方
インドアだろうとアウトドアだろうと、収穫のタイミングは必ずやってきます。植物をカットすること自体は難しくありませんが、初めての栽培者だと正確な収穫時期の判断は迷うところ。インディカ寄りかサティバ寄りか、オートかフォトかによって期間は大きく変わります。
| オートフラワー | 光周期性色 | |
|---|---|---|
| サティバ | 10週間 | 最大16週間 |
| インディカ | 8〜9週間 | 12週間 |
理想の収穫タイミングは複数の要素とあなたが得たい効果によって決まります。しっかりフラッシュしたい場合や、インディカライクな効果が欲しい場合は長めに、サティバ寄りを求めるなら少し早めに、いずれも「収穫の窓」に入ったらお好みの効果にあわせて最終決断しましょう。
2. 季節に基づく収穫
季節ごとの計画は、住んでいる地域や天候予測を知っておく必要があります。 例えば夏は15時間もの日照時間が得られますが、秋になると日照が急減します。オートは光周期に依存しないので開花には影響しませんが、収量には影響を及ぼします。

これを防ぐベストな方法は、種の発芽前に栽培カレンダーを立てること。冬には9時間30分程度の日照しか得られない地域もあります。事前計画で収量アップ&収穫タイミングをしっかり把握しましょう。収穫時の理想は、日が昇る前の早朝です。真っ暗な状態で最大48時間放置すると、植物が死を察知し、最後の力でトリコームを多く生成してくれるため、よりよい収穫につながります。
この方法はインドアにも有効ですが、室内では好きなだけ暗闇を作れるので、日の出前にこだわらなくてもOK。テント内の照明を消して約2日寝かせましょう。
3. 栄養成長期(ベジ期):1〜5週目
成熟サインを探し始める前に、植物はまずベジ期を通過しなくてはなりません。これは光合成が開始される週1から、オートフラワー系なら5週目までが目安です。ベジ期(成長期)では構造だけが成長し、まだバッズは生成されませんが、この時期に葉や幹・枝などバッズを支える重要な部分を育てます。
しっかりと成長させないと、バッズが太った時に枝が折れたり、植物自体が小さければ収量にも悪影響です。ベジ期に健康を維持することが、収穫時の大幅なリターンとなります。カンナビスはこの時期、サイズアップや大きなファンリーフ生成に注力し、光を糖へと変換します。その一部は自ら使い、それ以外は根の周り(リゾスフィア)へ放出され、微生物との共生関係を築きます。
糖質は有益な微生物(バクテリアや菌類)を引き付け、栄養吸収や病原菌耐性に寄与します。近年の研究では、土壌微生物の多様性が、開花期におけるカンナビノイド(THCやCBD)の生成量増加にも関連する可能性が示唆されています。総じて、ベジ期は構造とバッズサイト、耐病性、栄養サイクルを確立し、フラワリング期への土台となります。動画では、Girl Scout Cookies Autoの種から最終週までの成長過程を確認できます。葉や枝が毎日徐々に太くなるのは健康な証拠。良い環境を維持することで、植物はハッピー&ヘルシーとなり、良い収穫につながります。
4. バッズの熟成
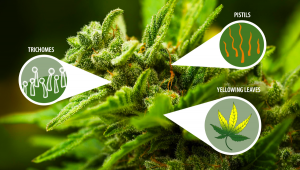
「収穫の窓」に至る前に、オートは花(バッズ)をしっかり熟成させる必要があります。これはプレフラワー期(5週目ごろ)から始まり、品種により最大5週間続きます。この期間は、カンナビス解剖学の基本が役立ちます。バッズの熟度を判断するうえで注目すべき要素は2つ。トリコームとピストルです。まずはトリコームから見てみましょう。これら小さなキノコ状の腺体は、花に雪のような層を作り、バッズ表面をベタつかせる粘性レジンも生成します。
カンナビスの花と葉に、球状・頭状・柄付き頭状の3種のトリコームが存在し、そのうち柄付き頭状型がTHC・CBD・テルペン(ピネン、リモネン、β-カリオフィレン、ミルセンなど)といった有用成分を最も豊富に生産します。下記で、それぞれの見た目がどのように熟成度を示すかを紹介します。
ピストルは成熟度を示すもう一つのポイント。ピストルは雌株の生殖器官で、さまざまなパーツを持っています。基部には「ブレクト」と呼ばれる卵形の組織があり、そこから「柱頭(スティグマ)」という毛のような構造が突き出ています。柱頭は花粉と出会うと種子を作り始めますが、収穫判断にも有効です。トリコーム同様、時間経過で見た目が変わり、熟成度を示します(詳しくは後述)。
6週目
5週目ごろ、プレフラワー期に入り、ピストルから柱頭(白い毛)が出てきます。この部分は受粉すると種を作るための器官です。

初めてのオート栽培ながら、適温・適湿を維持し、美しいダークグリーンの葉と多数のバッズサイトを育てました。
「香りが強くなり、先週は大量にデフォリエーションしLSTも多数。今週はリカバリー。すごく水・栄養を欲しがる元気なガールズ!」
7週目
2週目になると、オートは満開となり、柱頭もバッズもどんどん太くなっていきます。

この頃から香りも急激に強くなり、ニオイが気になる地域ではカーボンフィルターの設置がおすすめです。バッズサイトでは多数のピストルとトリコームが目立ち始め、品種によってスモーク臭やピストル・トリコームの量には違いがあります。
この時期は温度・湿度管理が重要です。温湿度計(湿度計)を使って両方を同時管理しましょう。屋外だと天候に左右されますが、温室・トンネル栽培では換気によって湿度調整ができます。インドアならファン・除湿機・エアコンなどでほぼ完全コントロール可能です。相対湿度は40〜50%を目指しましょう(ベジ期より約10%低め)。なぜなら、湿度が高すぎるとカビなど病原菌が発生しやすいから。湿度を下げ、風通しを良くし、収穫を守りましょう。
8週目
3週目になると、花が熟し始め、柱頭の先が茶色に変色し、トリコーム も増えてきますが、この段階ではトリコームヘッドはまだ満杯ではありません。この時期、さらに湿度を下げる必要があります。花が密度を増すことでカビも発生しやすくなるため、インドアや温室なら湿度45%前後を目安にしましょう。

この週になるとバッズが太り、ピストルが茶色に。品種によっては色のバリエーションが現れてきます。LSD-25は紫のガク(カリックス)が太くなりました。ガクが膨らむのは成熟サインなので要注目です。
9週目
4週目では、ほとんどの柱頭が茶色に変化し、カリックスも太くなり、トリコームもたっぷり。テルペンやカンナビノイドも豊富ですが、まだピークポテンシャルには達していません。

ラスト前週。この段階でバッズの密度&アロマともにトップクラス、ピストルで覆われ、トリコームも大量発生。あと少しで収穫となります。
「芳醇な香りで一貫していて、本当に美味しいバッズ。太くて美しい、私はこの品種が大好き!」
10週目
5週目には、株が完全に成熟し、トリコームがしっかりと立ち上がり主要成分が満タン状態に。

植物のライフサイクルが完全に終了したら、ついに収穫のタイミングです。なお、すぐに喫煙できるわけではなく、乾燥とキュアリングも必要です。
ピストルは一部白いまま残りますが、ほとんどが茶色になり、トリコームも曇り状態。これは収穫適期であり、やや脳に働きかける効果となります。
5. フラッシング
オートフラワーの収穫準備最初の一歩は『フラッシング』です。フラッシングとは培地や根から栄養分を洗い流す作業で、バッズをなめらか&風味豊かに仕上げるには不可欠。特に合成栄養を使っている場合、収穫の2〜3週間前に始めてください。フラッシュしないと余分な栄養素がバッズ内に残り、スモーク時に燃えて苦味や不快な味となります。

フラッシングの期間は培地によって異なりますが、最終的にはどれも同じ。フラッシュされた大麻はスムーズで格別です。開始タイミングはお好みですが、オートの場合、葉が黄変し始めたら最終段階。ファンリーフが緑で維持されていた場合、最初の黄変サインが来たら収穫準備&フラッシュ開始です。
6. 収穫の窓
収穫の窓とは、オートのライフサイクル最後の数日間です。フラッシングが始まり、葉が黄色くなり、栄養摂取が止まった時、もうほぼ準備完了。
ポイント: 収穫の窓では、バッズのさまざまな部分を観察しましょう。タイミング次第で脳作用、身体作用、その両方のミックスも得ることが可能です。
「これだ!」と思う収穫タイミングには、以下要素の組み合わせをチェックしましょう。
7. おおよそのブリーダーガイド
ほぼ全てのブリーダーが、特定の品種が種から収穫までに要するおおよその週数を提示しています。この情報は栽培環境依存なので、鵜呑みにせず目安にしましょう。

ブリーダーの情報はガイドラインですが、トップクラスの設備での値なので、ご自身の栽培環境次第で期間は前後します。光量などの条件によって早まったり遅くなったりするため、スケジュールに合わせて実際のサインも必ず見極めましょう。
8. 水の吸収が減少したとき
カンナビスが収穫直前になると、バッズの成熟に集中するため、水分吸収が減少します。
- 栽培サイクルを通じ、土壌が乾くまでの時間を見てみましょう
- 成熟し水分吸収が減ったら、収穫間近のサイン
- この方法だけで判断するのは誤差が大きいので、他の指標とあわせて使いましょう
9. ファンリーフの黄変と枯死
適切にフラッシュすれば、オートのライフサイクル末期で葉が黄変し枯れてきます。これは栄養吸収が止まり、エネルギーをバッズへ集中する証拠です。

葉の黄変は他の時期では欠乏症のサインですが、終盤は正常です。これは余分な栄養を抜くことに成功した証しで、いよいよ収穫段階。液体肥料(NPK)がなくても、土壌内の有益バクテリアから微量の窒素を吸収していることがあります。大幅な栄養減少により、植物は内部ストックを使い始め、窒素が不足すると葉が黄色〜落葉へ。フラッシング中は、バッズ内の栄養素も抜け、乾燥&キュア後なめらかなスモークが楽しめます。
10. カリックス(ガク)が膨らむ
カリックスはカンナビスの生殖器官を保護し、バッズを形成する部分。受粉時に種子を包むため、花ができ始める最初の兆候です。最終段階ではカリックスが丸く膨らむため、成熟サインの一つです。
11. 柱頭(スティグマ)の色変化
ピストルは柱頭から成長1(前述)し、成熟サインになります。最初は白緑色で、徐々に茶色や赤色に変わります。ただし、誤差もあり、茶色ピストルでも数週間早いことがあります。

柱頭は種子生産のため花粉を受け止める部分で、未受粉の場合は茶色化・しおれが進みます。60〜70%が茶色化したら、収穫適期サインです。
この方法はカンタンで特別な機材も不要ですが、厳密・確実ではありません。新たなピストルが一晩で出現し、収穫予定が数日ずれるケースも。また、品種によっては熟成に関係なくダークピストルを出すことがあります。
12. トリコームの状態
粘り気のあるトリコームは茎と頭部から構成され、テルペンやカンナビノイドが頭部で作られ香りを生みます。
開花 期になるほどトリコームが増殖し香りも強まるほか、収穫の窓にはトリコーム自体も熟成します。

より正確な収穫判断をしたい場合、ピストルだけでなく、トリコーム(樹脂の球)を観察しましょう。これらにTHCや主要なカンナビノイドが集中しています。
トリコームの色は標準的な収穫指標とされ、収穫適期にはトリコームが熟し、カンナビノイドが劣化し始めます。いつ収穫するかで、得られる効果が変わります。
肉眼でも見えますが、ルーペひとつあれば十分観察できます。本格派はジュエラーズルーペに投資するのもおすすめです。

プロ栽培者はさらにデジタル顕微鏡を使います。地域の法律によってはディスペンサリーやカンナビスクラブにも顕微鏡が設置されています。購入前の最終チェックにも使えます。
拡大すると、トリコームはキノコのような形で、熟成が進むと透明→濁り→琥珀色(アンバー)へと変化します。初めてだと見分けに時間がかかります。
13. 早期収穫と遅延収穫
収穫日を前倒し/遅らせざるを得ない場合は?
やむを得ず早め(または遅め)に収穫した場合、トリコームはまだ充分に成熟していないか、または劣化が進みます。植物の状態を見てベストなタイミングを判断してください。
早期収穫
何らかのトラブルで早期/遅延収穫した場合、最も強力な状態で収穫できなくなります。早期収穫ではトリコームが未熟なため、バッズの効果も弱めです。

未熟(透明)状態
未熟・透明なトリコームはカンナビノイドが未生成なため、精神作用もほとんどありません。収穫はまだ早いですが、まもなく曇りトリコームに変化するので要チェック。開花後や収穫済みのバッズでもトリコームが数日〜一晩で進化することもあります。狙いのタイミングを見逃さないようにしましょう。
成熟(曇り)状態
トリコームが成熟2・曇りになった時が最大効力で、「脳に効く」ハイを得たいならこの時に収穫しましょう。全トリコームが同時に成熟することはほぼないので、「約85%が曇り」状態を目安にし、残り15%がアンバーかクリアであればOKです。

85%曇りで収穫すれば、脳へのハイ作用が得られます。
遅延収穫
収穫が遅れると、トリコームがアンバー化し、THCはCBN(カンナビノール)に変化。インディカ寄りの身体作用になりやすいです。THCが他のカンナビノイドに変化するので、効果も変質。インディカハイを狙うには有効ですが、サティバ効果狙いなら適期収穫が肝です。
過熟(アンバー)状態
過熟トリコームはTHCがCBNに分解されアンバー色。人気は分かれるものの、身体的・鎮静作用狙いならこの段階での収穫が最適です。

自分好みの効果に合わせ、85%曇りや50%アンバー/50%曇りなど、タイミングは自由に選んでOK。早すぎるだけは避けましょう。
14. カンナビスの完璧な収穫・乾燥・トリム・キュア方法
ここまで育て上げて、本当にお疲れさまでした。今こそ最も重要な工程、収穫・乾燥・キュアに取り掛かりましょう。これこそ全工程の半分とも言える非常に大事なプロセスです。正しいタイミングでの収穫、正確な乾燥、そしてキュアを行うことで、至高のバッズが手に入ります。
乾燥ミスで台無しになったカンナビスも珍しくありません。テルペンとカンナビノイドの熟度を最大化したい場合、十分なキュアが不可欠です。では理想的なカット方法・干し方・キュア期間を解説します。
収穫方法
収穫サインの見極めは前述の通りですが、具体的な収穫方法は様々。インドアなら手間を省くため、株ごとまるごとカットがおすすめ。インドア株は1.5m未満が一般的ですので、スペースがあれば全体を吊るす方法がベストです。

アウトドアや乾燥スペースが狭い場合は、枝単位でカットして干すのも一案。屋外株はかなり大きくなるため、全体を吊るすのは現実的でないケースが多いです。また、湿度の高い地域ではモールド対策として枝単位で分けるのがおすすめ。逆に乾燥地帯では全体を丸ごと吊るして、乾燥が早くなりすぎるのを防ぎます。
トリム&乾燥
カンナビス乾燥は繊細なプロセスで、品質を大きく左右します。急速乾燥はハーシュで不快なバッズ、逆に遅すぎればカビ大発生…これだけは避けましょう。まずはトリムから。方法は「ウェットトリム」か「ドライトリム」の2パターン。判断基準は気候です。
ウェットトリムは収穫直後できるだけ葉を落とし、バッズを早く乾燥させる方法。高湿度環境向きで、乾燥を早めカビ防止にもなります。一方、ドライトリムは枝ごと、もしくは株ごと乾燥させてから仕上げトリムする方法で、大型オペレーターに人気。トリム作業はきちんとしたトリマーか専用のハサミを使いましょう。ただのキッチンハサミは非推奨。トリミングは地道な作業ですが、道具次第で快適になります。「バッズを剃る」ようなトリムはNG。ハサミの先端で葉を極力根元からカットし、花本体を崩さないように心がけてください。

プロのトリムトレイもおすすめ。トリミング時に落ちたトリコームをキャッチし、あとで抽出やキーフ制作に活用できます。チリも積もればかなりの量になるので、ぜひご活用ください。
理想的な乾燥室は湿度50%、温度22度前後に保ちましょう。風通し良くカビを防ぐのがポイント。扇風機やエアコンを直接当てず、暗所で乾燥させます(UVカット必須)。グロウテントの流用もOKですが、ダンボールDIY乾燥ボックスも便利。自作時は…
- 大きなダンボール
- タコ糸
- ハサミ
- テープ
- PC用ファン+バッテリー(オプション)
手順:
- 等間隔(約7cm)でタコ糸穴を開け吊るすラインを設置
- 吊りラインを複数段作り、バッズが触れ合わない間隔で干す
- 換気穴も忘れずに:下部に吸気、上部に排気。ファンを追加すればパーフェクト
- 大箱の場合は中央にドアを作り、バッズ出し入れを容易に
- 光漏れ防止テープで要所を塞ぐこと。バッズのにおいも強いので隣人への配慮も忘れずに!
キュアリング
無事に収穫・乾燥できたら…おめでとうございます!さあ、いよいよ最終工程「キュア」です。ここで本当に美味しいバッズを楽しみたいなら、しっかりキュアに時間をかけましょう。本質は「バッズの熟成」で、風味をなめらかにしスモーク感を最上級にします。やり方は超簡単。完全密閉できる容器に入れて数週間置くだけ。この時、1〜2日ごとに「ブロー(蓋を一瞬開けて余分な湿気を抜く)」工程を繰り返しましょう。2ヶ月以上キュアする猛者も。品種により期間は調整OK。
キュアこそ忍耐&根気の勝負!ゆっくり熟成させてください。バッズ内には微量の水分が残るため、稀にカビが発生することも。アンモニア臭がしたら即座に容器から出し再度乾燥室へ。キュア用にはガラス瓶が最適ですが、完全密閉容器なら何でもOK。満杯にしすぎず(最大75%)にとどめ、空気層を作って熟成を進めましょう。キュア中はずっと涼しく暗い場所に保管しましょう。
エキスパート Jorge Cervantes(共著者)より
オートフラワーカンナビスの完璧な収穫タイミングを見極めるのは、観察力・経験・植物生理の深い理解の賜物です。カンナビス栽培のベテランとして、私は最高品質・最高効力の収穫にはベストタイミングでのカットを常に強調しています。
本記事(Enzo Schillaci共著)では、オートフラワー収穫サインを詳細解説。トリコームの色や状態、ピストルの挙動、葉の健康状態など、小さな変化のすべてが植物の熟成度を物語ります。
収穫タイミングの最も信頼できる方法の一つはトリコーム観察です。この樹脂腺には株の効力や風味のエッセンスが詰まっています。それぞれの色変化や段階ごとに何が得られるのかを把握することが、THCピークや求める効果を最大化するカギです。
結論として、オートフラワーカンナビスの収穫極意は「科学・忍耐・観察力」の融合です。本記事はそのマスター手法を網羅しており、最高品質の収穫を実現します。すべての株は唯一無二。しっかりと我が子のように見極めることこそ、成功への近道です。
15. まとめ
マリファナの収穫タイミングは厳密な科学ではありませんが、今回のルールが正しい方向へ導いてくれるはずです。最高の結果を得るには、今回紹介した複数の手法を組み合わせてベストタイミングを見極めましょう。THCリッチなバッズを狙うなら、ピストルの50%〜70%が色変化し、トリコームがほとんど曇りになった頃が標準的なベスト収穫期です。
この記事を通して「いつマリファナを収穫すべきか」の感覚が掴めたなら幸いです。オート株栽培は多くの時間と労力を要しますが、その成果は十分価値があります。株が完全成熟しても、花(バッズ)を楽しむには乾燥・キュアなどまだ作業は続きます。
収穫は枝をカットして終わりではありません。その後の乾燥やキュアも非常に大切!ここが甘いと風味や効力・香りが台無し…。ガイドが参考になれば幸いですし、何か疑問や困ったことがあればコメントもお気軽にどうぞ!
参考文献:
1, 2 写真提供:Erik Christiansen - https://www.instagram.com/erik.nugshots/
外部参考文献:


コメント