Skunk Auto Cannabis Strain Week-by-Week Guide

- 1. Grow specifications
- 2. Grow set up
- 3. Germination and seedling stage | week 1
- 4. Early veg | week 2
- 5. Mid veg | weeks 3-4
- 6. Transition (pre-flower) | weeks 5-6
- 7. Early flower | weeks 7-8
- 8. Mid flower (bulk phase) | weeks 9-11
- 9. Ripening and harvest | weeks 12-13
- 10. Yield and smoke report
- 11. In conclusion
Skunk #1 was THE strain that spawned the indoor cultivation revolution in the 1970s. Up to that point, growing cannabis under artificial lights was as efficient as burning money to stay warm. Skunk genetics showed growers worldwide how stable, resilient, and productive indoor weed can be.
And people were crazy about Skunk’s mellow high, both powerful and long-lasting. Our new and improved autoflowering version of the legendary strain is everything you’ve come to love in this classic. And then some.
Read our Skunk Autoflower week-by-week guide to learn everything an indoor gardener needs: the timeline for the plant’s whole life cycle and the details of her progress through grow stages and different stages of flowering. We hope you’ll get all your questions answered to grow this classic like a pro.
1. Grow Specifications
Although she has a few Sativas among her ancestors, our Skunk Auto is 65% Indica dominant. This heritage makes her cold-resistant and resilient to many adverse conditions outdoors. So you can grow her from spring till autumn and have several consecutive harvests of 50–150 grams (2–5 ounces) per plant.
Indoors, Skunk Auto performs equally well, bringing in as much as 400–500 gr/m2 (1.3–1.6 oz/ft2). The buds are full, dense, and very easy to trim thanks to a very good calyx-to-leaf ratio. The plants don’t get very tall, perform best in a sea-of-green setup, and race from seed to harvest in as little as 8 weeks from seeds.

You’ll love it that after such a short wait, you’ll get handfuls of pungent sweet-smelling buds that produce a comfortable buzzy effect. Despite 20% THC, you can function on Skunk Auto throughout the day, staying alert and motivated. Or, better still, smoke it with friends in the evening to chill, talk, and laugh for hours at a time. The high comes on quickly and lasts long.
2. Grow Set Up
Let’s look at the Skunk Auto grow by Luv2Grow. This gardener has more than 40 grow cycles under his belt but keeps learning new things and sharing his insights with the community. For this run, he was using a 2’x4’ tent equipped with two 210W LED lights with old-fashioned red and blue diodes.
| Grow Space: | 0.74 m2 (8 ft2) | Pot Size: | 3–5 l (11.4–19 gal) |
|---|---|---|---|
| Seed to Harvest: | 13 weeks | Medium: | 75/25 soil/perlite mix |
| Flowering: | 8 weeks | Nutrients: | Organic/Synthetic |
| Light Cycle: | 18/6 | pH Levels: | 6.8 |
| Light Type: | LED | Day Temperature: | 26°C (78°F) |
| Watts Used: | 420 | Humidity: | 67% ↘ 54% ↘ 44% |
3. Germination And Seedling Stage | Week 1
Cannabis seed germination is a procedure that makes newbies very nervous, but there’s really nothing to it. Seeds germinate when it’s warm, wet, and dark. It doesn’t really matter how you create these conditions, so there are many germination methods at your disposal.
| Plant Height: | 1“ (2.5 cm) | Humidity: | 67% |
|---|---|---|---|
| Distance to Light: | 32“ (81 cm) | Water per Day: | 0.01 gal (0.04 l) |
| Day Temp: | 78°F (26°C) | pH: | 6.8 |
| Night Temp: | 68°F (20°C) | Smell: | None |
In this run, one Skunk Auto seed was placed between moist paper towels. When the bean showed the taproot, it went into a jiffy plug. It sprouted and shed the “helmet” on its own. It doesn’t always happen, and sometimes you’ll have to remove the shell with your fingers. Just make sure to thoroughly moisten it beforehand.
At this point, you don’t have to use anything but plain water because everything a seedling needs now is stored inside the seed. However, many more experienced gardeners like to boost the process of germination with various rooting stimulators. This particular grower added a bit of Technaflora Thrive Alive B-1 Green which can be used on seedlings and cuttings as well as mature plants to help with root development. This supplement is also useful when repotting.
After the first set of true leaves had formed, the jiffy plug was put into a 3-gallon (11.36-liter) smart pot filled with soil and some perlite. Using perlite is important because cannabis hates overwatering and loves to have lots of oxygen in the root zone. This is exactly what perlite does: it creates a lot of small air-pockets in a water-drenched medium.
As we shall see, this grower used too little perlite which resulted in overwatering issues. He did remedy them but only after a few weeks of stunted growth.
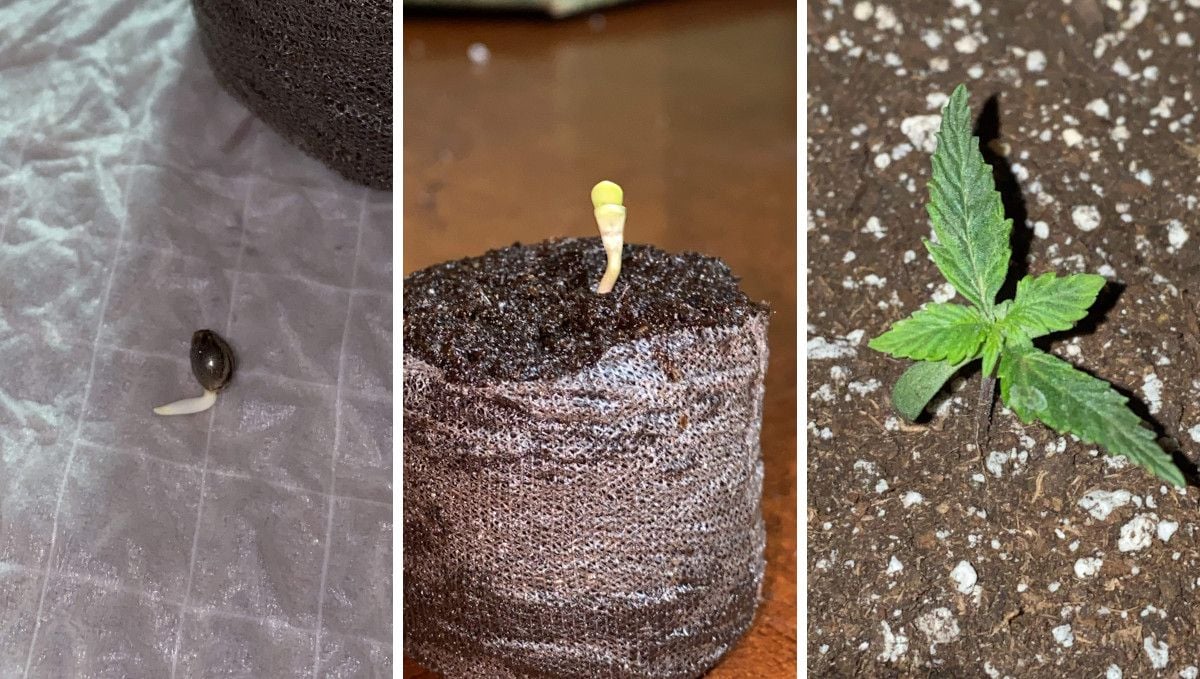
At the seedling stage, it is important to keep relative humidity on the higher side. One way to do it is using a humidity dome (something like an empty glass) to cover the seedling. You can also spray inside the glass and the surface of the soil to make the air even more humid.
The whitish spots on the leaves in the pic below are the residue from Thrive Alive B-1 Green sprays.
4. Early Veg | Week 2
In week 2, the above-ground progress of your autoflower may seem painfully slow to you. It’s because most of the change happens to the root system. It will later serve as the foundation for explosive vegetative growth. The young plant still prefers high humidity (60+ percent), and when grown in soil, only needs a small amount of water around the base every day or every other day.
| Plant Height: | 1.7“ (4.3 cm) | Humidity: | 67% |
|---|---|---|---|
| Distance to Light: | 32“ (81 cm) | Water per Day: | 0.01 gal (0.04 l) |
| Day Temp: | 78°F (26°C) | pH: | 6.8 |
| Night Temp: | 68°F (20°C) | Smell: | None |
The grower still kept his seedling under a humidity dome and watered regularly with a small amount of fresh water. Having 3 gallons of amended soil, he didn’t really have to add any nutrients just yet. However, he did: just very small doses of a few organic products. We’ll describe this diet a bit later. At this point in the timeline, feeding isn’t that important.
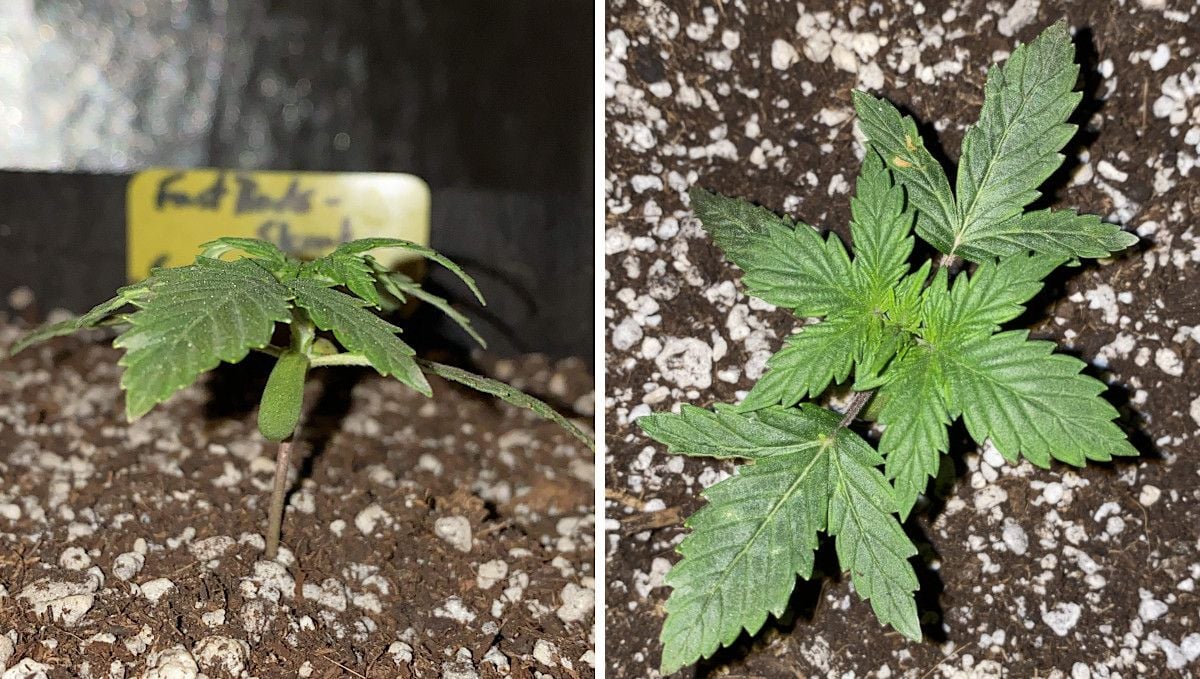
He thought his girl looked too small and tried to induce more stretch by increasing the distance from the light. It didn’t help though, and the Skunk Auto remained a very stocky plant—a stature ideal for a micro grow.
5. Mid Veg | Weeks 3-4
When you get to weeks 3 and 4, you’ll usually notice a great increase in foliage and the number of side branches. For an autoflower, these last weeks before the start of flowering determine its overall size and structure. The appetite increases, and so does the thirst. The young plant isn’t fragile anymore so you can lower relative humidity to something like 55-60%.
| Plant Height: | 1.6–2.7“ (4–6.9 cm) | Humidity: | 67% |
|---|---|---|---|
| Distance to Light: | 32“ (81 cm) | Water per Day: | 0.01–0.5 gal (0.04–1.9 l) |
| Day Temp: | 78°F (26°C) | pH: | 6.8 |
| Night Temp: | 68°F (20°C) | Smell: | None |
The grower was worried about his Skunk’s small size and extremely short internodes. He wanted to make her stretch but didn’t know how. Only much later—when real problems began—he realized that his medium was no good: too compacted to let the roots breathe. We agree that this was probably the case. In the pic below, you can see that the plant looks healthy but too stunted for her age. And the leaves claw a bit, suggesting overwatering.
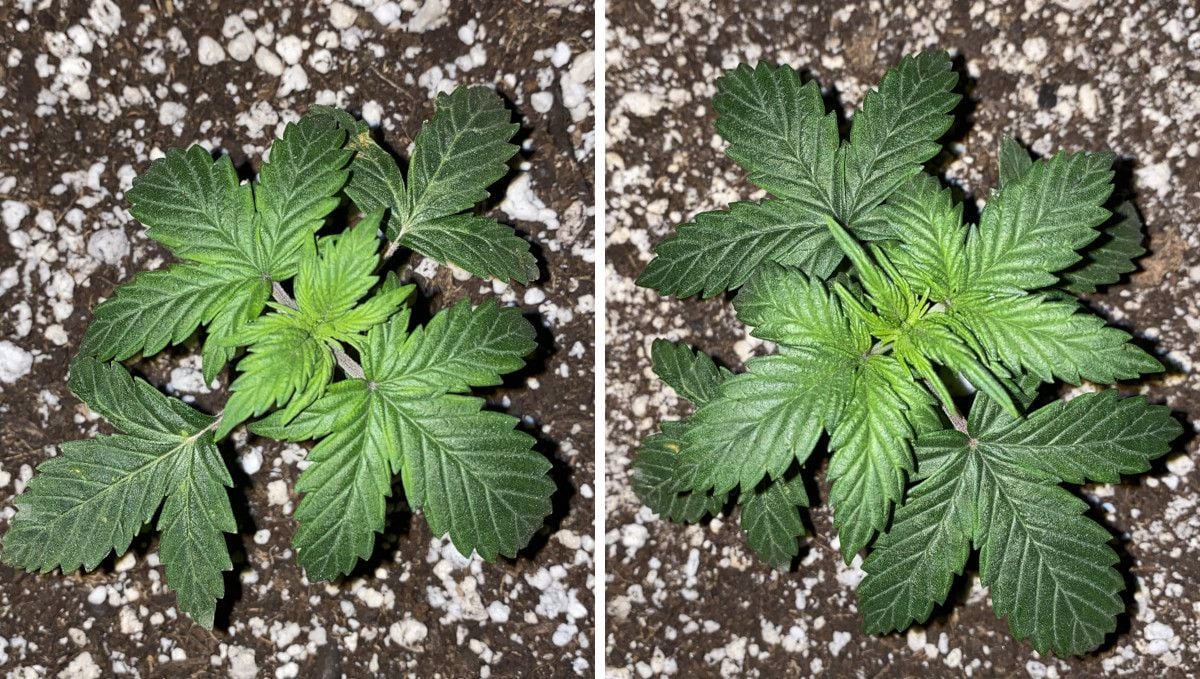
Such a compact plant didn’t really need any training, but old habits die hard, and the grower started to LST his baby. He secured the stem at its base with one piece of string and tied down the top with another. If you supply your plant with optimal lighting, nutrients, and water, it’ll reach a normal height and width by this point in the growing cycle. Under normal conditions, Skunk Auto will reach the perfect size to start applying LST by this point. In case you don’t know, this method of training is perfect for autoflowering cannabis cultivars.
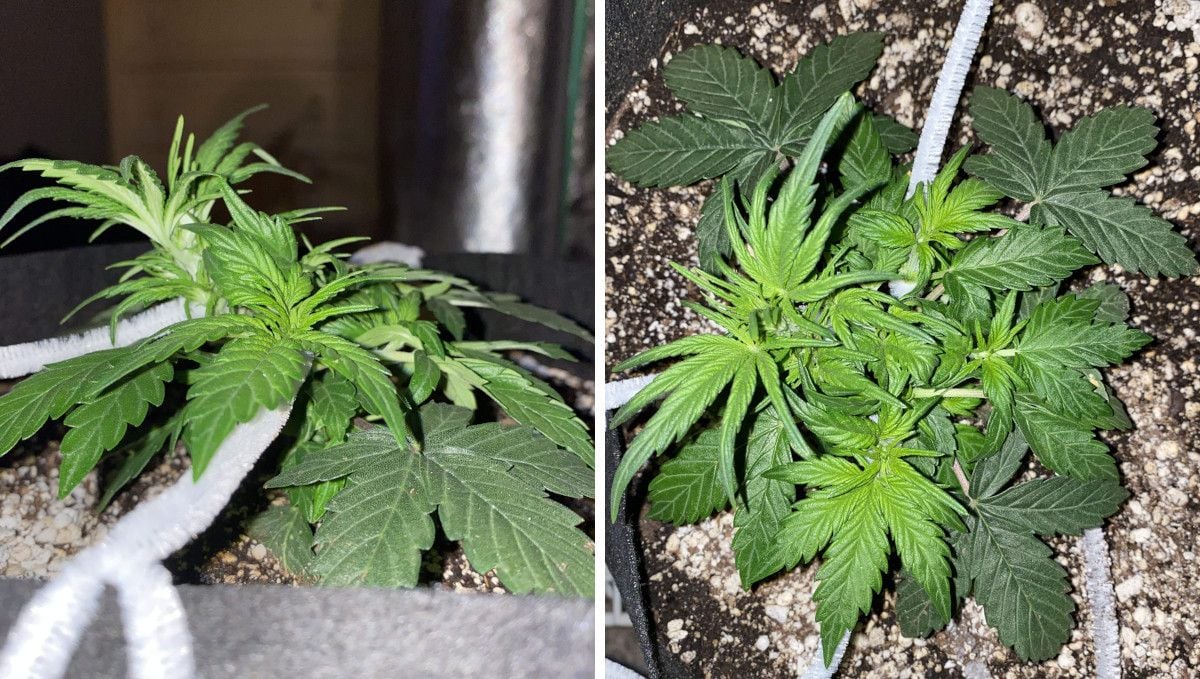
Unlike high-stress training (HST) techniques, LST doesn’t damage plant tissue in any way. This means plants don’t need to spend time recovering from unwanted stress; because autos grow so quickly, they cannot afford to dedicate time to healing from wounds. In order to apply LST, all you need is some soft garden ties and a small drill. Simply drill some holes just below the rim of your pot. Then, tie down the growing tips to the side of the pot to set the main stem horizontally to the growing medium. This will create a flatter shape and ensure that all of the buds receive ample amounts of light later on in the growing cycle. The canopy was so dense that he had to remove a few larger fan leaves to expose side branches to the light. Many gardeners simply tuck in the leaves that shade some important growth, but in this case, there was too much tangle as it is.
6. Transition (Pre-Flower) | Weeks 5-6
Around the beginning of the second month, autoflowers start to transition from the vegetative phase to the flowering stage. The process doesn’t happen overnight and begins with the emergence of the first pistils (greenish hairs) at the base of every petiole. These are called pre-flowers and mark the beginning of the pre-flowering stage. Pre-flowers refer to the very first pistillate flowers that emerge at the nodes (the point at which branches meet the main stem). If you’re growing regular cannabis genetics, then you need to pay close attention to this area during this period of the growing cycle. Female pre-flowers emerge as small teardrop-shaped structures that possess two small white hairs (these are the stigma designed to catch male pollen out of the air). In contrast, male pre-flowers appear as small spheres without any hairs.
| Plant Height: | 3.5–5“ (9–13 cm) | Humidity: | 67% ↘ 54% |
|---|---|---|---|
| Distance to Light: | 32“ (81 cm) | Water per Day: | 0.5 gal (1.9 l) |
| Day Temp: | 78°F (26°C) | pH: | 6.8 |
| Night Temp: | 68°F (20°C) | Smell: | Weak |
If you want to avoid accidental pollination, you need to remove any males from your growing space. Thankfully, Skunk Auto is a feminized strain, meaning you won’t have to worry about identifying the gender of your plants during this transition time. The Auto Skunk in this run was so short and dense that it wasn’t easy to look inside the canopy to check for pistils. However, the grower noticed the first of them in week 5. It was the same week that similar hairs emerged on the tops too, signaling the beginning of the flowering time proper.
Another telltale sign is the change in how new leaves on top look. When the flowering is about to start, they begin to look very thin, almost thread-like. And it’s hard to tell them apart from pistils (however, pistils look more white on closer inspection). Tops also change their color to a lighter green. Against the background of lower foliage, they can appear almost yellow.
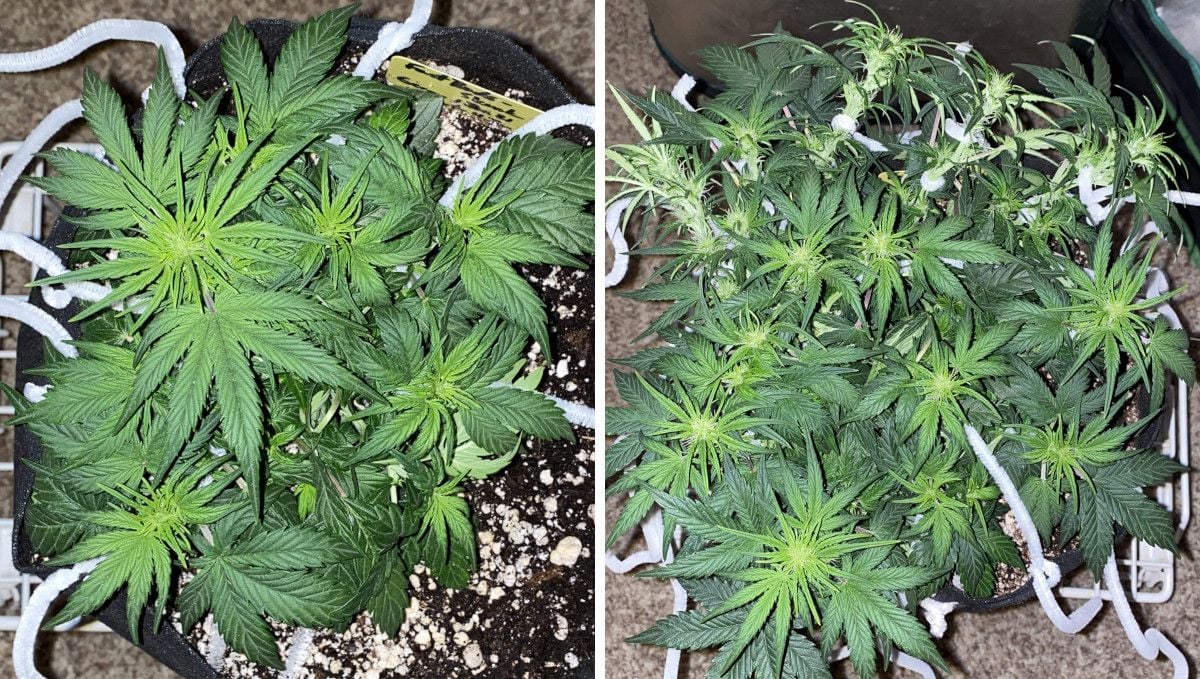
All the grower had to do at this point was adjust the ties and do very light selective defoliation to open up the canopy of this extremely low-profile autoflower.
And all the while, he kept feeding her the same set of TechnaFlora nutrients as in the earlier stages of veg. Probably hoping to induce some more growth before the flowering kicked in for real. Let’s have a look at the complete feeding schedule for the vegetative phase:
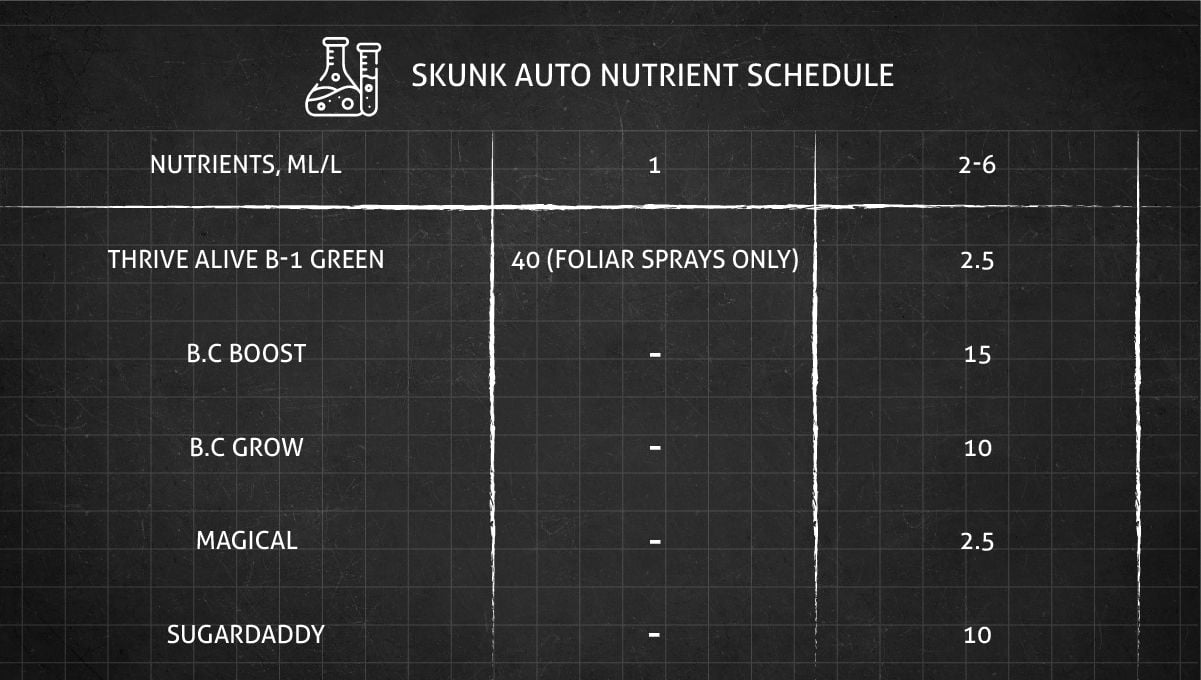
Since TechnaFlora is not a very common line of nutrients, we won’t look into any of these products in detail. Suffice it to say that they’re all specifically formulated for cannabis, contain everything a cannabis plant needs, and come with easy-to-follow instructions.
7. Early Flower | Weeks 7-8
At the beginning of flowering, you need to change the feeding schedule from one containing lots of nitrogen to something with more phosphorus and potassium in it. You can also lower the temps by a couple of degrees compared with the vegetative phase. And it’s a very good idea to lower RH to 40-45% because the bigger the buds get the more the risk of mold inside them.
| Plant Height: | 7.3–8.1“ (19–21 cm) | Humidity: | 54% |
|---|---|---|---|
| Distance to Light: | 28“ (71 cm) | Water per Day: | 0.5 gal (1.9 l) |
| Day Temp: | 78°F (26°C) | pH: | 6.8 |
| Night Temp: | 68°F (20°C) | Smell: | Weak |
Week 7 was a troubling time for this Skunk Auto because she suddenly began to look very droopy. The grower first thought it was because he didn’t water her in time, but she didn’t perk up after the watering either.

After it had gone on for a couple of days, it became obvious the plant didn’t like what was going on in the root zone. In hydro, you can simply look at the rootball (and smell it) to see if it was healthy. When you grow cannabis in soil, it’s more tricky. The guy had to actually cut the side of his fabric pot to see what was going on.
The roots looked healthy white, didn’t smell like rot, but were probably a bit root-bound. The gardener also noticed that his Auto Skunk didn’t seem to drink any water. As if the roots had stopped working. As an extreme measure, he decided to re-pot his autoflower.
There are a lot of arguments against re-potting at this stage. First, it’s best not to transplant autos at all because the procedure is a high-stress one and requires some recovery time. And the life cycle of an auto is too short to waste any time on recovery. Second, you don’t re-pot a flowering plant because cannabis stops growing new roots in flower.
So, the Skunk went into a 5-gallon pot, and the grower did his best to break up the too solid soil by gently massaging the sides of the textile bag. He also added much more perlite than before. This obviously helped, and in a week, the lady looked much better.
8. Mid Flower (Bulk Phase) | Weeks 9-11
About 4 weeks into flowering, cannabis stops the vertical growth, called the flowering stretch, and directs all resources to increase flower mass. To an inexperienced grower, the buds may now seem bulky and heavy enough to give them the axe.
But it’s an illusion. Colas will pack even more weight if you give them time, and, more importantly, they keep loading up on THC and other cannabinoids as well as terpenes and flavonoids. In plain English, they become more potent, aromatic, and flavorful.
| Plant Height: | 8.7–9“ (22–23 cm) | Humidity: | 54% ↘ 44% |
|---|---|---|---|
| Distance to Light: | 28” (71 cm) ↘ 18“ (46 cm) | Water per Day: | 0.5 gal (1.9 l) |
| Day Temp: | 78°F (26°C) | pH: | 6.8 |
| Night Temp: | 68°F (20°C) | Smell: | Strong |
In this run, Auto Skunk didn’t have a noticeable flowering stretch because it was at this exact moment that she became sick. So, she stayed uncommonly short, as you can see in the following graph:
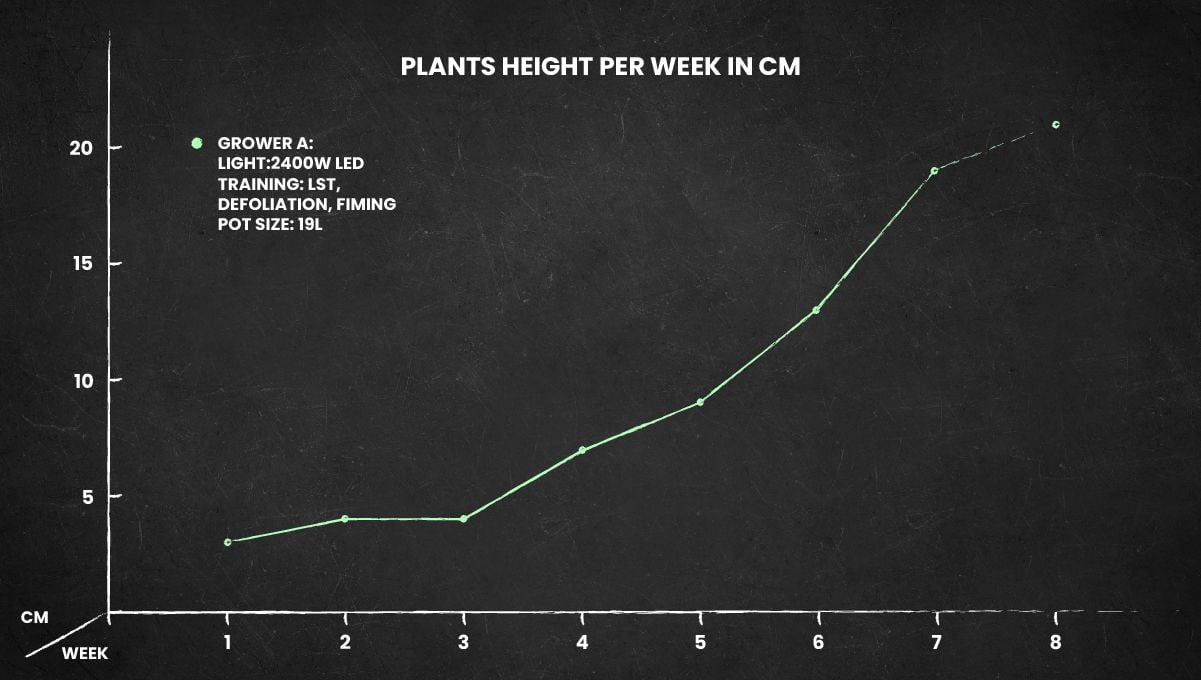
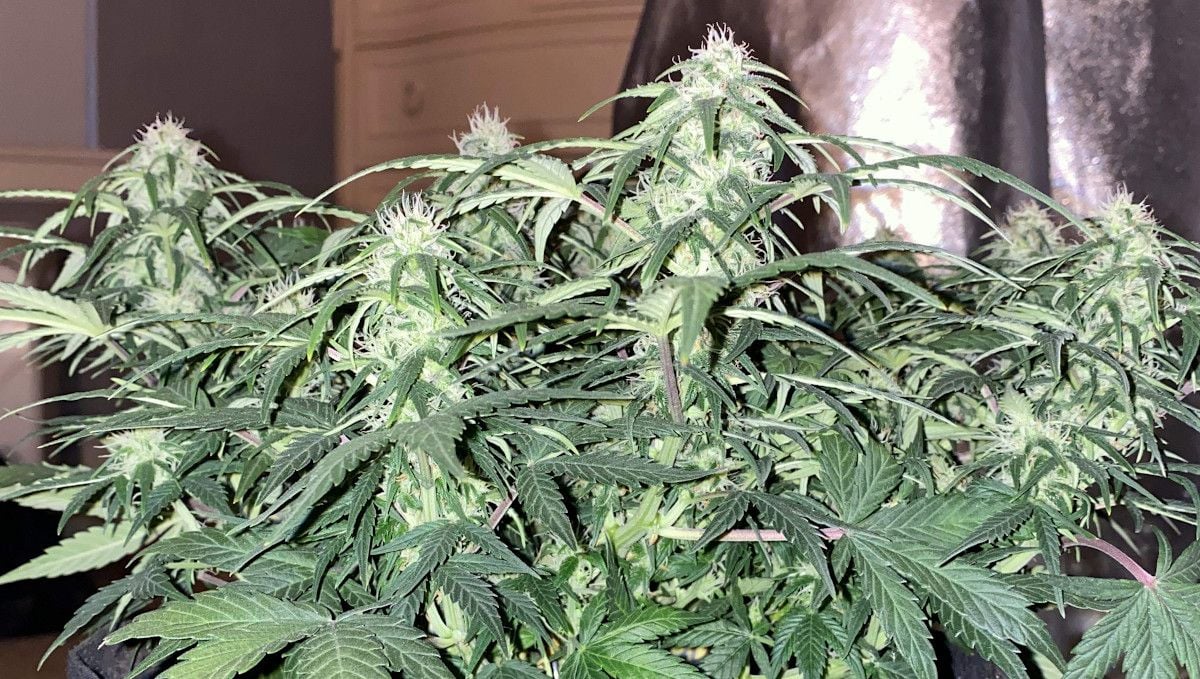
On the one hand, the stunted growth hurt the final yield, on the other, the buds were also short, fat, and solid. They all were the same size, and there were no “popcorn” buds that are often harvested from the lower portion of the plant.
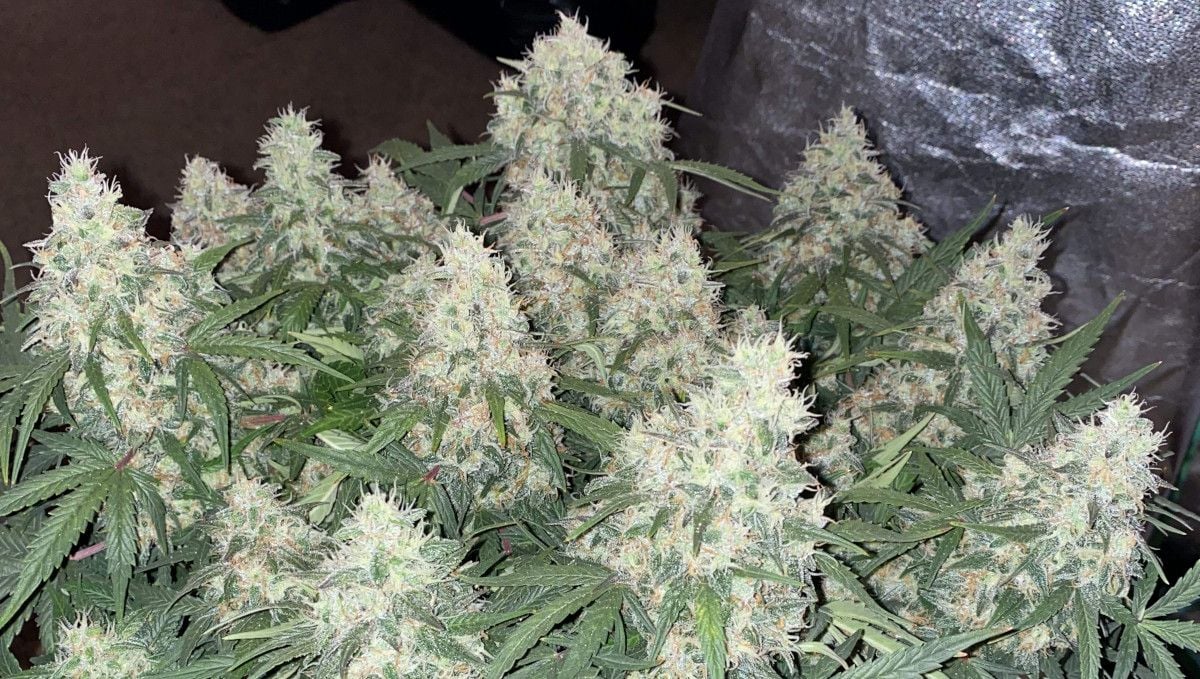
This period of autoflower flowering stages is the most uneventful. By now, you have learned how much and how often your lady needs to drink and how she reacts to nutrients, and what intensity of light she can handle.
But you have to keep an eye on relative humidity and how well-ventilated the canopy is. Mold is a very real problem, and if you think the canopy is too dense, maybe you should defoliate a bit. In this case, however, the grower preferred to keep most of the leaves and push them out of the way by tucking.
Naturally, he extended the previous diet by a new product—Technaflora Awesome Blossoms—with its extra-large doses of P and K (phosphorus and potassium). It’s exactly what is needed in cannabis flowering stages.
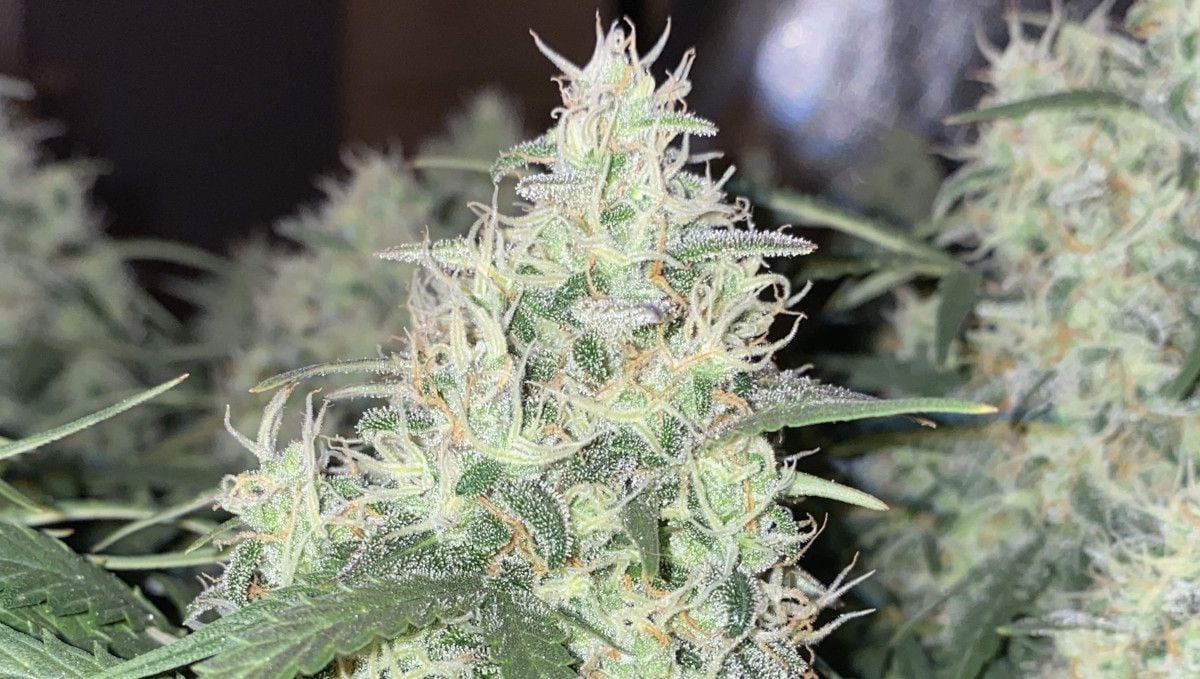
It was yet too early to start watching for the signs of maturity because even a cursory look was enough to see that most of the pistils were white. It usually means that your weed plant still has a couple of weeks till harvest.
9. Ripening And Harvest | Weeks 12-13
The last week or two before the harvest is the time when you can stop feeding your cannabis any nutrients and flush it with large amounts of water to rinse the medium of built-up nutrients. This so-called flush will clean the buds of chemicals that spoil their flavor. The side effect is the fade: when you see the fan leaves get yellow and lifeless, it means that you’ve done your job right.
| Plant Height: | 9“ (23 cm) | Humidity: | 44% |
|---|---|---|---|
| Distance to Light: | 18“ (46 cm) | Water per Day: | 0.5 gal (1.9 l) |
| Day Temp: | 78°F (26°C) | pH: | 6.8 |
| Night Temp: | 68°F (20°C) | Smell: | Strong |
In the 12th week, Auto Skunk got her last couple of meals. This time it was a mix of only two components—MagiCal (a source of calcium, magnesium, and iron) and SugarDaddy (containing magnesium and sulfur). After that and till the chop day, it was just plain water. If you don’t want to gamble with mold and bud rot, you better lower RH to about 35-40% now. Fat chunky colas are a perfect breeding ground for these fungal infections. They start deep inside the flower mass, so you may fail to discover them before it’s too late. If the RH is low enough, it’s safe to decrease the day temperature as well—to something like 21–23°C (70–75°F). And even experiment with cooler nights because emulating autumn like this may trick cannabis into producing bigger and more resinous flowers.
On the contrary, too high temps during the latter stages of flowering may result in decreased potency or lead to foxtailing—when flower clusters produce new shoots in all directions. Foxtailing spoils the bag appeal of your buds and messes up the timing of the harvest—the trichomes covering new shoots appear clear/immature under a microscope. Don’t look at THEM when you try to determine whether it’s time to chop. Look at the main bulk of flowers. You need to see almost all of the trichs cloudy and some amber.

10. Yield and Smoke Report
The grower made it a point to see some amber when inspecting trichomes under a microscope, so he harvested his Auto Skunk after almost 13 weeks from seed—on day 89. He got 372 g (13+ oz) of wet weight and 99 g (3.5 oz) dry at the start of the curing process.
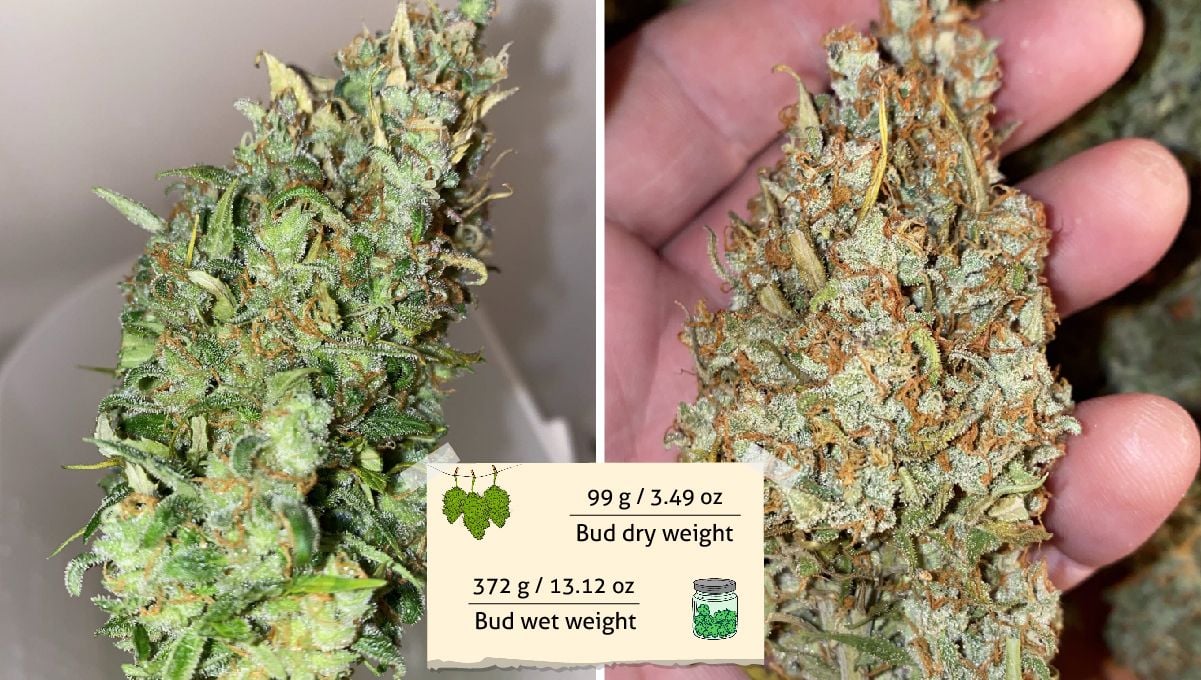
He decided to try a new technique—washing the buds. Some gardeners do it, using water and hydrogen peroxide. The procedure is supposed to clean flowers of dirt, powdery mildew, fungi spores, insects, and other impurities. Even in a very clean setup, you’ll be surprised by the color of the water in the bucket.
For this grower, bud washing was a success which became evident after 7 days of drying when he sampled his harvest.
This had to be the smoothest smoke I’ve had in a long time…
Luv2Grow
The effect was Indica-dominant, with a happy relaxation and giggling fits, and the terpene profile was dominated by sweet, earthy, and flowery notes. Beyond high levels of THC, the complex terpene profile within Skunk Auto flowers add to the overall effects. Research shows that some terpene are able to activate the endocannabinoid system—the same physiological network that THC interfaces with in order to create a high. Furthermore, cannabis scientists have come up with a theory, known as the entourage effect, that posits terpenes and cannabinoid work in a synergistic manner. In this context, both caryophyllene and pinene work to clear the mind, reduce anxiety, and plunge users into a state of euphoria.
11. In Conclusion
If the grow we have just reviewed reflects Skunk Auto’s general character, she’s a perfectly compact indoor variety with oversized solid buds and great yield potential. The grower probably made some mistakes along the way, but the lady bounced back every time. Meaning she’s hardy, resilient, and easy to grow.
Add Skunk Auto’s easy-going and mellow high (which, at the same time, is strong and long-lasting) and you’ll get the ultimate beginner strain that will make you happy both as a plant and a smoke. With Skunk genetics, you can never go wrong. Happy growing!
External References


Comments