Crop Steering Cannabis: Developing an Irrigation Plan
- 1. Developing a cannabis irrigation plan
- 2. Types of substrates
- 2. a. Different pot sizes
- 3. Calculating substrate watering volumes
- 4. Daily irrigation plan
- 4. a. Phase 0: lights on to first irrigation
- 4. b. Phase 1: first irrigation to runoff
- 4. c. Phase 2: runoff to last irrigation
- 4. d. Phase 3: last irrigation to lights on
- 5. The importance of crop steering
- 6. Foliar feeding - the best way to give your plants a quick boost
- 7. In conclusion
As mentioned in part 1, crop steering can help you achieve the desired results by controlling the growing conditions. These growing conditions not only refer to the temperature and humidity but also irrigation. An irrigation plan will allow you to get the desired plant growth by combining the right substrate with water volume and frequency of irrigation. So if you already read the first part read along to know how to improve irrigation and get perfect results when growing regular, auto and/or feminized seeds.
1. Developing A Cannabis Irrigation Plan
Irrigation is a vital element of cannabis crop steering, in order to apply this technique successfully growers must manage the root zone properly, and to do it properly, it’s essential to take the following aspects into consideration:
- Type of substrate;
- Irrigation equipment;
- Frequency of irrigations;
- And Water volume.
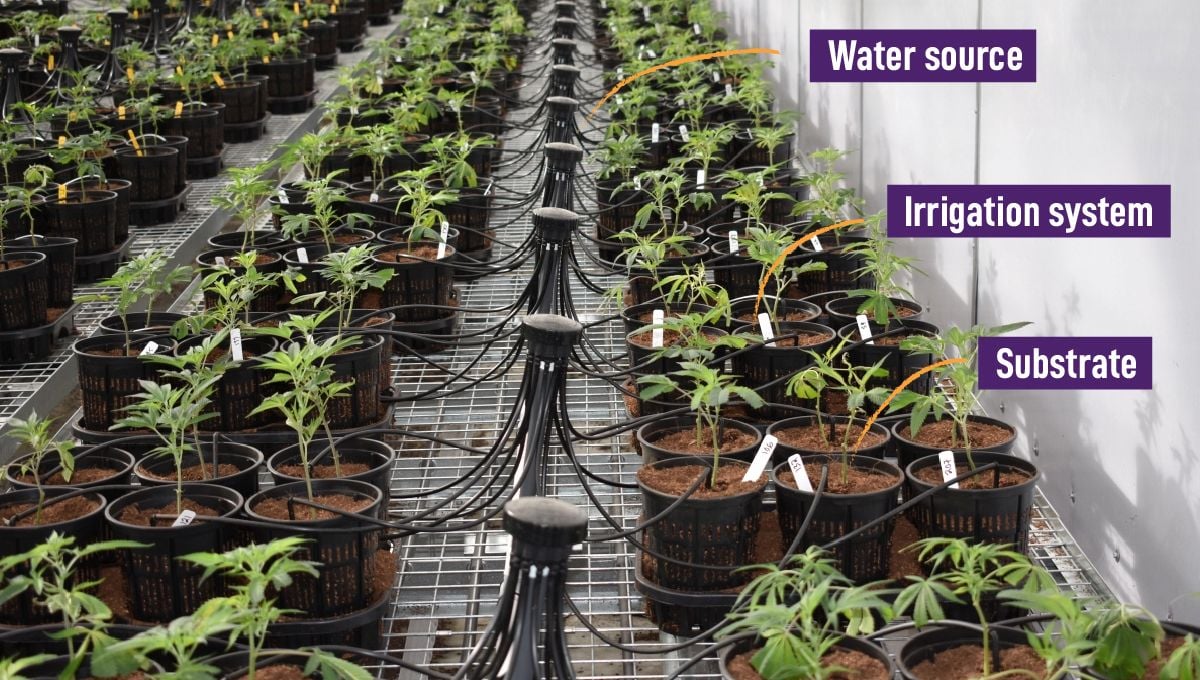
These are key elements that every grower should have in mind in order to develop an irrigation plan. Just have in mind that there are several ways to setup an irrigation system but there's no best way, as long as your plants are getting watered properly, anything goes!
2. Types Of Substrates
When developing a cannabis irrigation plan, you must check with the manufacturer if there are any special considerations to take into account. In general, rockwool is considered more steerable because it’s basically inert, this means that it has less influence on the pH and nutrients of the nutrient solution, so it requires less runoff than other substrates. Coco, soil, and other organic substrates have an organic matter that can compete for the nutrients and stop or pH changes, thus requiring more runoff to maintain ideal conditions. Also, the quality of this type of substrates can vary, so the water holding capacity and dry back speed may differ.
Different Pot Sizes
Apart from the type of substrate, the size and height of the pot play an important role in irrigation steering. This happens because taller pots can create larger differences in water content, in some cases having a difference higher than 30% when comparing the substrate at the bottom and top, so it’s important you take this into account.
Apart from the difference in water content, taller pots can make it harder to achieve the desired dry back and this can result in stress or nutrient lock in some parts of the medium so, ideally, you should use the smallest container you can while still having enough room for the roots to develop as they should.
3. Calculating Substrate Watering Volumes
As mentioned, the amount of water you use to irrigate your plants is an important factor in irrigation steering, because of this, you need to calculate the ideal irrigation volume for your substrate. This may seem a bit hard but it’s actually quite simple. The amount of nutrient solution you water with will depend on the amount of substrate you have per plant and whether you want to stimulate vegetative growth (1 - 3% of substrate volume) or flowering growth (4 - 8% of substrate volume). This means that if, for example, you had a substrate volume of 10 L, you have to multiply the substrate volume by the desired percentage, something like this:
Calculating Substrate Volume
For rockwool cubes, you first need to find out the volume, so you need to multiply the length x width x height:
Rockwool cube size = 46.5 cm x 46.5 cm x 46.5 cm ≈ 10000 cm3
Cubic volume ≈ 10000 cm3 ≈ 10000 ml = 10 L
For substrates such as soil or coco, you don’t really need to calculate the cubic volume because if you’re growing in a 10 L pot then you would already know the cubic volume of the pot.

Once you have this information, it’s time to calculate the irrigation volumes which is quite simple, you just have to multiply the substrate volume by the irrigation volume percentage.
Calculating Irrigation Volume For Vegetative Growth
Substrate volume = 10 L
Desired irrigation volume for vegetative growth = 3 % of substrate volume
Vegetatve growth irrigation volume = 10 L = 10000 ml x 0.03 = 300 ml
In order to calculate the irrigation volume for flower growth, it's quite simple, you just need to use the irrigation volume percentage for flower growth, which ranges between 4 - 8%.
Calculating irrigation volume For Flower Growth
Substrate volume = 10 L
Desired irrigation volume for flower growth = 8 % of substrate volume
Flower growth irrigation volume = 10 L = 10000 ml x 0.08 = 800 ml
As mentioned in part 1, irrigation volume is the amount of water (or nutrient solution) that you will be feeding your plants. In order to perform this technique correctly, you will have to feed this amount between 3 - 9+ times per day when the lights are on.
Irrigation Volumes
| Desired Growth Type | Volume |
|---|---|
| Vegetative | 1 - 3% of substrate volume |
| Flower | 4 - 8% of substrate volume |
Managing your irrigation plan daily is vital to successfully steer your plants into the desired growth and by measuring drain volumes, the root zone root, water content, and electrical conductivity (EC) you can adjust your irrigation plan to individual plants and steer your garden to the desired result.
4. Daily Irrigation Plan
All of the things mentioned will help you steer your crop to the desired outcome but only when combined into an irrigation steering plan. You can feed your plants however you want but a multi-phase irrigation schedule has shown the best results.
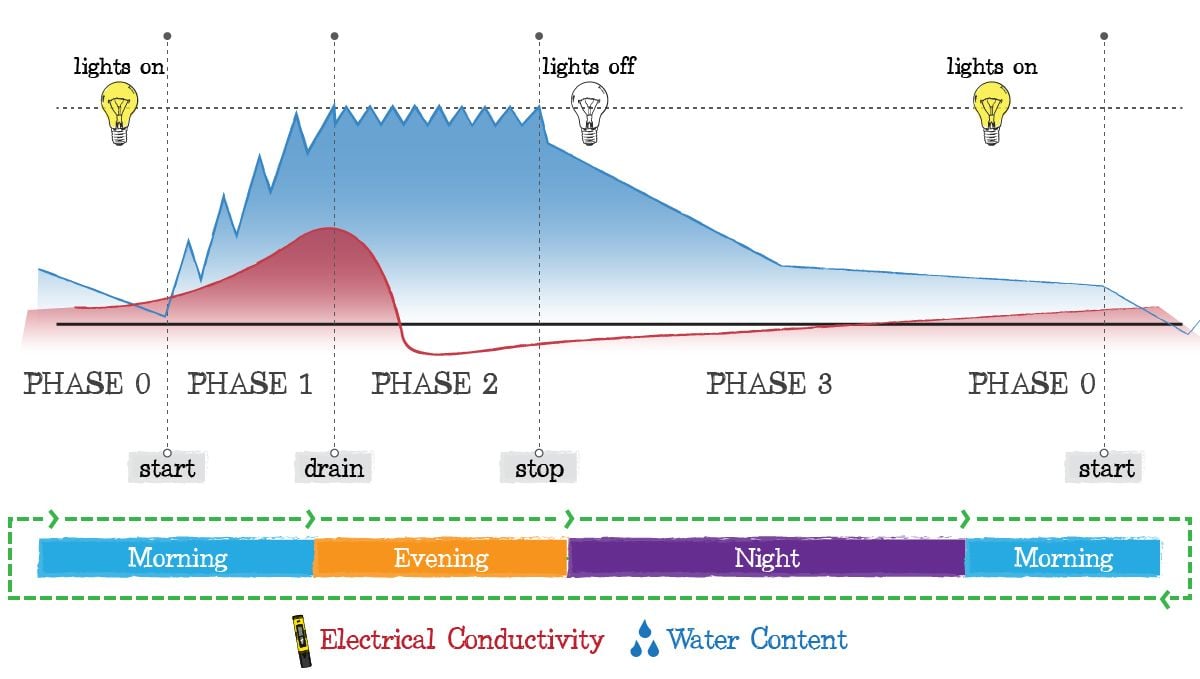
A multi-phase cannabis irrigation plant consists of four irrigation phases which take place daily throughout the entire lights-on period, and they are the following.
Phase 0: Lights On To First Irrigation
Phase 0 of this cannabis irrigation plan starts when the lights in your grow room are turned on and are actively transpiring. Before starting with the first irrigation of the day you should verify that they’re transpiring by verifying the water content in the substrate because, as the plants absorb water, the water content in the substrate will decline.
Irrigation Phases
| Phase 0 | Lights On to First Irrigation |
|---|---|
| Phase 1 | First Irrigation to Runoff |
| Phase 2 | Runoff to Last Irrigation |
| Phase 3 | Last irrigation to Lights On |
The dry back percentage before you can start the first irrigation of the day will depend on the type of growth you wish to achieve. In order to steer plant growth, the dry back should be between 1 - 4% for vegetative growth or for flower growth 4 - 6%, once the dry back is between the desired ranges you can go on and start phase 1.
Phase 1: First Irrigation To Runoff
Once your plants are transpiring, they’re ready for the first irrigation of the day, and this is when Phase 1 of this cannabis irrigation plan starts. The goal for the first irrigation of the day is to increase the substrate's water content (which will allow your plants to continue to perform transpiration properly) and get runoff 1 - 3 hours after irrigating.

The number of irrigation needed to produce the runoff required will vary depending on water content, irrigation volume, and irrigation frequency but in all cases, getting a minimum dry back of 1% between each irrigation is vital to ensure you’re not getting runoff water too quickly. If your goal is to get flower growth and the irrigation volume is 6% or higher, you should aim for a minimum dry back of 2 - 3% between irrigations to avoid oversaturating the substrate and getting too much runoff.
Phase 2: Runoff To Last Irrigation
During phase 2 of this cannabis irrigation plant, the goal is to reduce the EC to the lowest value while the light intensity and temperature are at their peak, this usually happens during the midpoint of the day and it will make your plants work their hardest.
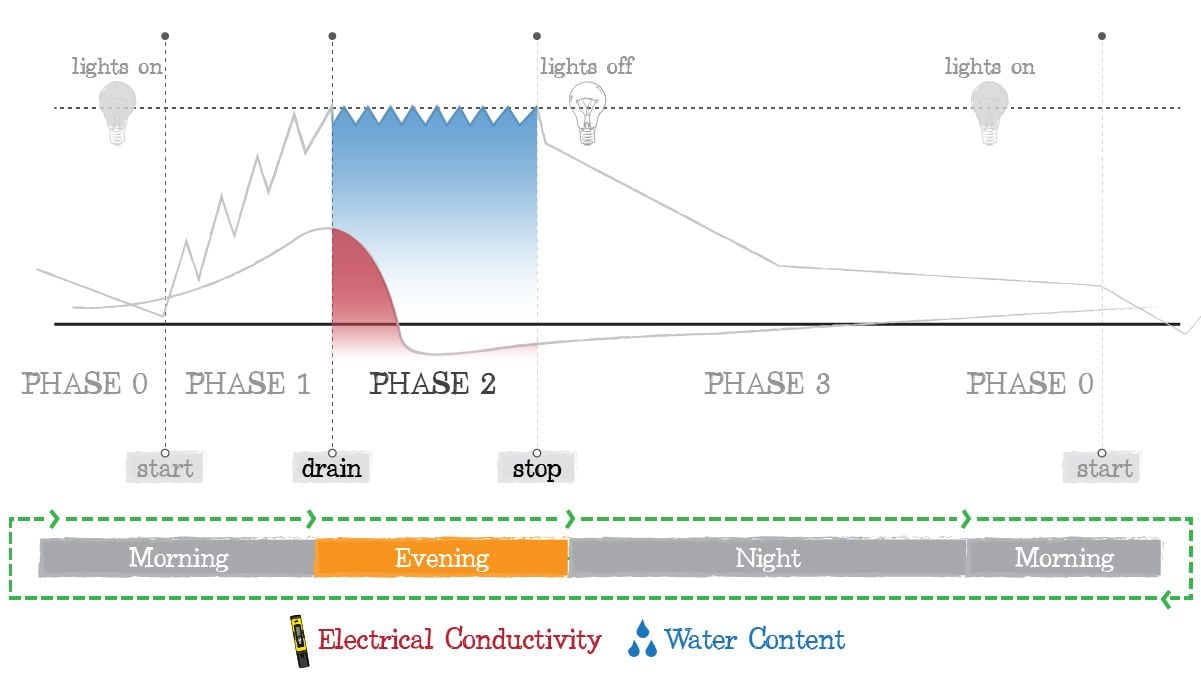
Since you’ve already provided the desired water content and drainage in phase 1, phase 2 consists of adjusting the volume and frequency of each irrigation in order to maintain a consistent water content in your substrate. You can achieve this by reducing the irrigation volume and adjusting the dry back between each irrigation; During this phase, you should aim for a minimum of 1 - 3% dry back between irrigations if you’re aiming for vegetative growth and 3 - 6% if you’re aiming for flower growth.
Phase 3: Last irrigation To Lights On
Phase 3 of this cannabis irrigation plan marks the last irrigation and it’s super important because you need to allow a certain time in order to get the proper dry back overnight; Depending on the type of growth you are aiming for, you should achieve between 2 - 6% dry back between the last irrigation and lights off.
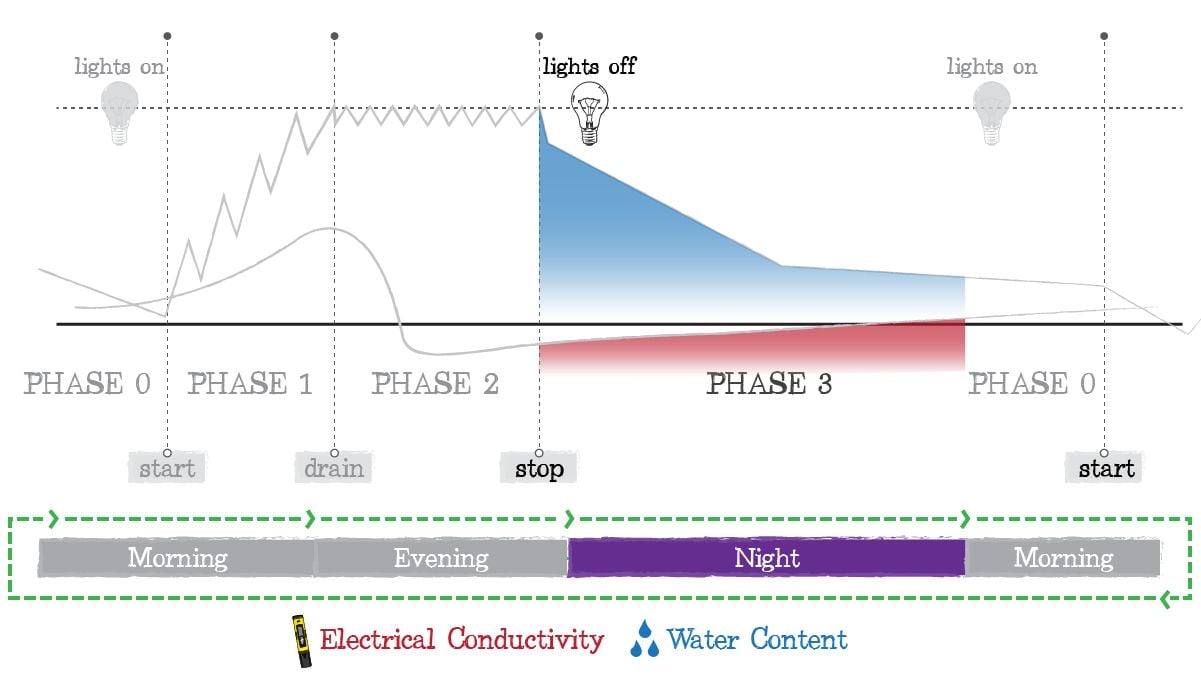
Lights off marks the end of the day but the work doesn’t stop there, once the lights are turned off you need to ensure that the dry back overnight is around 10 - 15% for vegetative growth and 20 - 30% (or more) for flower growth. This will allow you to start the next day with a blank slate and be able to repeat the whole process all over without encountering any problems regarding water content in the substrate. Remember that this is just one of the several ways to irrigate your crop and it’s essential you adjust your irrigation plan according to the specific strain and growing conditions, but you can always use this multi-phase irrigation plan as a base to develop your own.
5. The Importance of Crop Steering
When talking about feeding, every strain has its own needs so crop steering is highly important, especially for big commercial growers. Using crop steering allows growers to allow the plants to grow to their full potential and bring out the most of each plant. Independent research conducted in commercial facilities has found that crop steering can increase total terpene, THC, and overall cannabinoid content when achieving specific water content levels and dry back amounts, despite being hard, automating this process can help you bring out the full potential of the strains you’re working with. So by going back and forth between generative and vegetative growth you can ultimately grow plants that aren’t too leafy while producing excellent quality flower and maximizing quantity.
Now, all strains have an optimal balance between leaf and bud growth so for a 12-week grow cycle, it’s vital to be able to regulate the first 3 weeks of plant growth in order to set the plant for the remaining 9 weeks. This happens because the first three weeks of plant growth are essential, if you fail to steer your crop during the initial weeks of plant growth, it might be too late. Remember there’s definitely a limit and you should not push your plants too hard, in case you feel like you’re pushing them too much, you can avoid stress by decreasing the EC or watering with less frequency until you find the sweet spot.
There’s the need to experiment in order to find the right balance for each specific cannabis plant genetics, this means that in order to find the right balance you will have to experiment for a couple of grow cycles until you can provide your plant with what it needs to produce the best quality and yields that it can possibly produce. Just keep in mind that you’ll always be limited to the plant's genetic potential, sometimes you will be able to get better yields and sometimes better quality, but at the end of the day, you need to start with good genetics in order for this to work as some strains may produce excellent flower but not the yield you want or produce high yields but not very good in terms of cannabinoid and terpene content.
6. Foliar Feeding - The Best Way to Give Your Plants a Quick Boost
So, there you have it. Entirely everything there is to know and understand when it comes to developing an irrigation plan for your cannabis crop, no matter the size. But one thing we haven't mentioned at all yet is the wonderful world of foliar feeding. Foliar feeding? Yep, that's right. Foliar feeding is a great option to have in the playbook and an aspect of cannabis cultivation that is often overlooked by home growers. Alrighty then, what is it all about?
Foliar feeding is simply the process of applying fertilizer to a plant's leaves and stems, as opposed to only providing nutrients through the soil. This method is often used when a crop is in need of quick nutrition, or if you want to give your plants an extra boost during growth or flowering cycles. Foliar feeding can provide essential nutrients directly to the leaves, which then absorb the fertilizer into their cells. This method has proven to be effective and beneficial in increasing crop yield, as well as improving overall plant health. If you have ended up here, then there is a good chance that you already have a pretty solid understanding of cannabis nutrition and the fact that some nutrients are fully mobile, whereas others are less so.
This means that foliar feeding can be an incredibly useful tool if you want to provide your plants with those 'less mobile' or even totally immobile nutrients. Say you have a manganese or iron deficiency, and it is affecting your crop yield. Just adding a boost of both of these nutes to the root nutrient solution may not help, as both of these vital components do not transport around the entire plant sufficiently. With foliar feeding, the correct nutrient levels can be applied directly to the affected areas, giving your plants a much-needed boost.
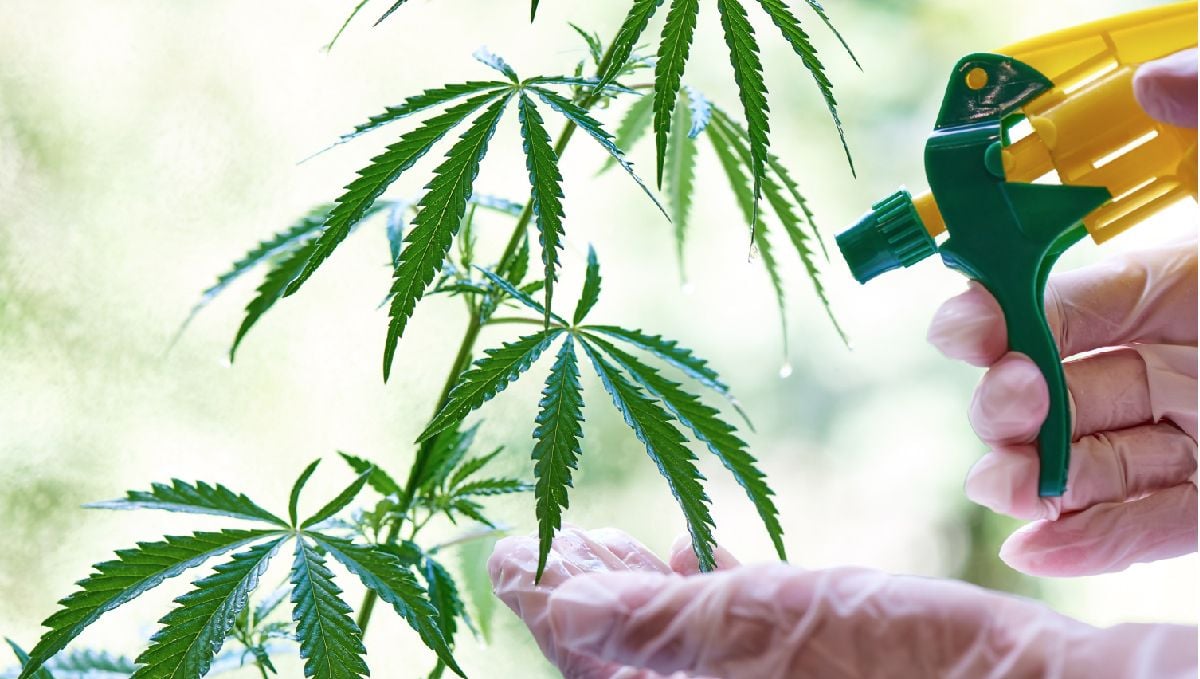
Foliar feeding can also be used if you want to give your plants an overall nutritional boost, or if you want to supplement the traditional root-feeding method. A good general rule of thumb is to give your plants a light foliar feed once a week. So, how does one go about foliar feeding? Foliar feeding is surprisingly easy! All you need is a spray bottle filled with a diluted solution of your favorite fertilizer - it's that simple. Well, kind of... Where you spray is dictated by the maturity of the plant. You can be very liberal with the foliar application all the way through the seedling and vegetative stage, but once those buds start to form you need to be a little more restrictive with where the feed ends up.
Why? Again, it's pretty simple. Look, it's not so important in the first few weeks of flower production, but the last thing you want to do is drench your buds in a nutrient solution. Not only is nutrient uptake at a bare minimum at the flowering sites, but it's also pretty risky to cover the buds in anything other than fresh water. The nutrients can cause a range of flower issues, such as bud rot or nutrient burn. It's best to stick to spraying the leaves and stems that are closest to the buds, with an emphasis on the underside of the leaves.
We recommend that you begin your foliar feeding journey with a solution of around 25% strength. Remember, this should be in combination with your regular feeding, so the last thing you want to do is make the foliar spray overly strong and indirectly cause some overfeeding issues. You can increase this as you get more comfortable with the process, but it's usually best to start out with a very light mix and see how the crop handles it. Also, keep in mind that you shouldn't ever foliar spray your crop when the sun is up or when the lights are on.
Not only will this cause the solution to evaporate too quickly, but it can actually be terrible for your plants. Foliar spraying under lights or the bright sun will end up leaving your plants crispy and burnt. The best time to give the crop a light spray is 2 hours before lights are on, as this is when the leaf pores are open and ready for nutrient uptake. Foliar feeding is a great way to supplement your regular root-feeding routine, especially if you find yourself dealing with nutrient deficiencies. With a little bit of practice, you will soon be able to provide your plants with the additional nutrition that they need.
What Are the Best Nutrient Brands For Cannabis
Medical and recreation cannabis legality is sweeping the globe, and with it comes a huge boost to the range of nutrient brands that are specifically tailored to the needs of your cannabis crop. These are less important if you are planning to (or already are) grow organically, but if you are headed down the coco-coir or pure hydroponic cultivation route, you need to look at cannabis-specific offerings - especially if you want the best chance at optimizing your yield and the crop potency.
And while the nutrient landscape is vast (and ever-growing), we usually suggest sticking to the bigger, more well-established brands. That's not to say that the new kids on the block won't provide the crop with everything it needs, just that the big names have the testing and years of grower feedback to back up their claims. Some of our favorite nutrient brands for cannabis cultivation include:
- Advanced Nutrients - overall winner of the best cannabis nutrients at Spannabis 2022
- Canna
- House and Garden
- Botanicare
- Fox Farm
- General Hydroponics (GHE)
- GrowMore
- Humboldt Nutrients
- MaxiGro
- Lotus Nutrients
- PLAGRON
- Atami
- Hesi
- B.A.C
Any and all of the above are brands that can be totally trusted to provide everything your crop will need to succeed. And try not to get married to one particular brand. DO your research, and grab products from whichever option seems to fit your regime best.
7. In Conclusion
Now, creating an irrigation plan may seem like a hard task for the average home grower but luckily, you can find equipment that will help you meet your goals. A vital component of crop steering is the management of the root zone by combining nutrient dosing, irrigation frequency and volume, and dry backs; This means that the frequency and timing of feedings are super important when following an irrigation plan, and although it can be possible to do so without proper equipment, automating your irrigation is almost essential if you want to successfully steer your crop to the desired growth, especially in commercial growing and large-scale cultivation.
If you are familiar with crop steering and have some tips, feel free to help fellow growers by leaving a comment in the comment section below!
External References
- Growers guide to crop steering - Trym
- Estimation of Irrigation Water Requirement of Young Pomegranate Plants under Drip Irrigation - Wubs, Jasper & van Heusden, Tom & Melchers, Pauline & Bezemer, T.m. (2019)
- Irrigation facilities for drip irrigation of soil in inter-rows of wood and fruit plants - Shtanko, A. & Shkura, V.. (2021)


Comments