LSD-25 Auto Cannabis Strain Week-by-Week Guide

- 1. Grow specification
- 2. Grow set up
- 3. Germination and seedling stage | week 1
- 4. Early veg | week 2
- 5. Mid veg | weeks 3-4
- 6. Transition (pre-flower) | week 5
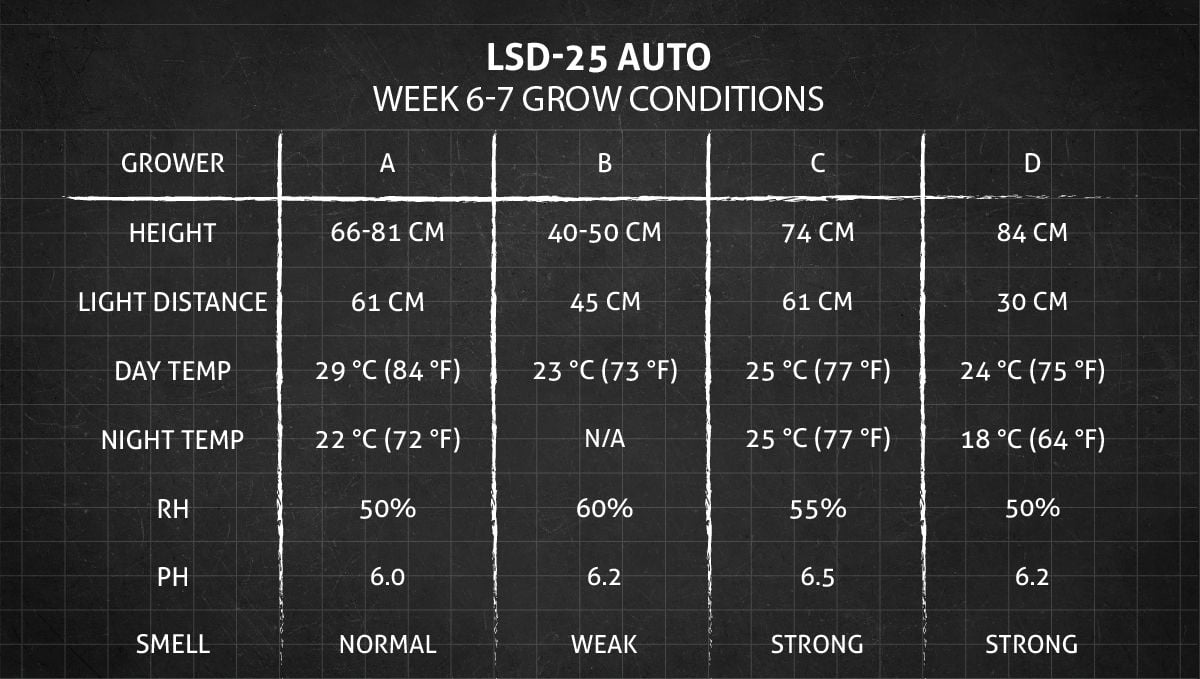
- 7. Early flower | weeks 6-7
- 8. Mid flower (bulk phase) | weeks 8-9
- 9. Ripening and harvest | week 10 (and beyond)
- 10. The outcome
- 11. In conclusion
LSD-25 Auto is a unique strain that offers growers and smokers a one-of-a-kind experience. With its beautiful purple buds and a potent, long-lasting high, it is no wonder why this strain is so popular. It’s versatile, easy to grow, and thrives both indoors and outdoors. As for the potency and distinctive flavor profile of this weed, they make it a favorite among smokers, who enjoy its cerebral, psychedelic high that is both relaxing and energizing.
In our LSD-25 Auto week-by-week guide, we’ll review several indoor grows done by gardeners with very different approaches to cannabis cultivation but all focusing on the essentials, simple methods, and straightforward practices. We shall look more closely at the conditions and results of one grow but glean useful tips from other gardeners as well.
1. Grow Specification
LSD-25 Auto is a hybrid strain with a 35% Sativa and 65% Indica genetic composition. It boasts an XL size with a height range of 70-120 cm (28-47 inches), making it an ideal choice for growers who want a high-yielding strain that is medium-large and doesn't take up too much space. When grown indoors, LSD-25 produces an impressive harvest of 400-500 gr/m2 (1.3-1.6 oz/ft2), while outdoor growers can expect 50-250 gr (2-9 oz) per plant after around 9-10 weeks from seed.
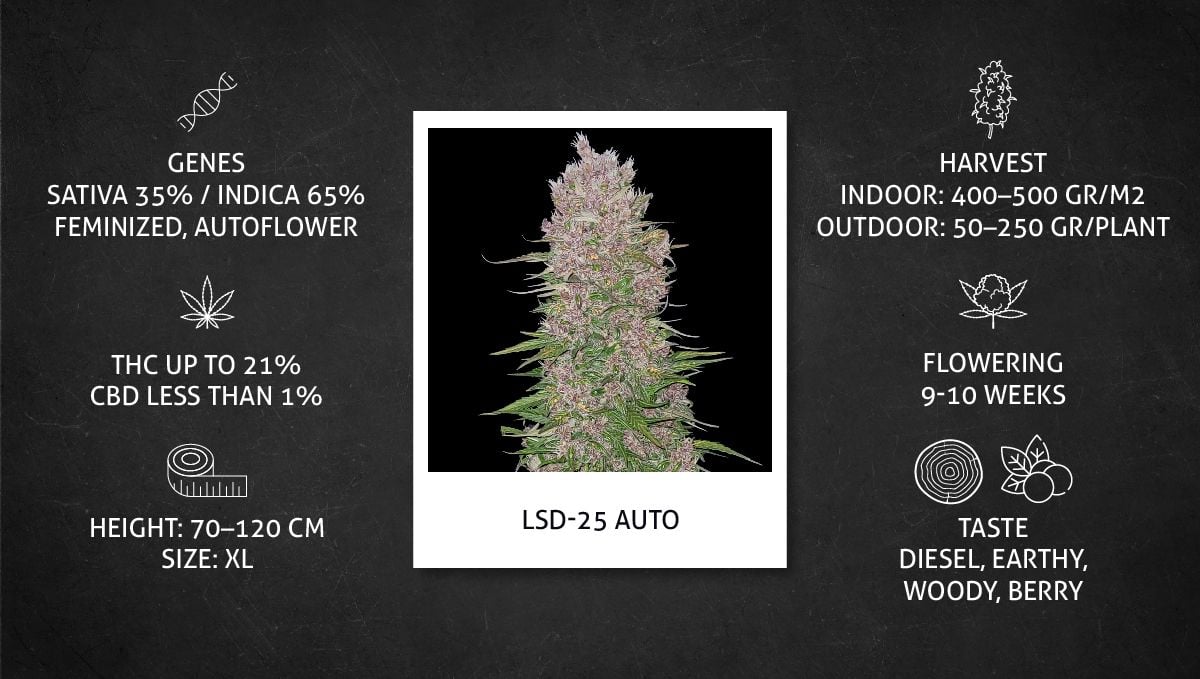
The THC percentage in LSD-25 Auto can reach up to 21%, making it a potent strain that delivers a cerebral and body high. The aroma and taste of the smoke are a delightful mix of diesel, earthy, woody, and berry notes, providing a unique and memorable smoking experience.
2. Grow Set Up
Our LSD-25 Auto strain is one of our oldest and most popular genetics, with hundreds of grow reports available online as a reference and source of inspiration. We are pleased to see that many growers have been returning to this strain time and time again.
For this growing guide, we have selected an LSD-25 journal that was definitely an outlier -- with a plant that took 14 weeks to finish and produced a record-breaking amount of bud -- but we also chose 3 others where both the length of the cycle and the weight of the harvest were more representative of the norm.
| Grow Space | Light | Medium | |
|---|---|---|---|
| A | 2.25 m2 | 1300W LED | Coco/Perlite |
| B | 1.2 m2 | 300W LED | Coco/Perlite |
| C | 1.52 m2 | 320W LED | Soil/Perlite/Vermiculite |
| D | 0.46 m2 | 240W LED | Enriched soil |
Besides these four, we have carefully reviewed dozens of other grow diaries and analyzed hundreds of pictures to reach the conclusion that LSD-25 is a robust and resilient autoflower strain that thrives in any setup, whether grown indoors or outdoors. Regardless of your growing conditions or preferred style, you can trust that LSD-25 will perform exceptionally well and make you proud.
3. Germination And Seedling Stage | Week 1
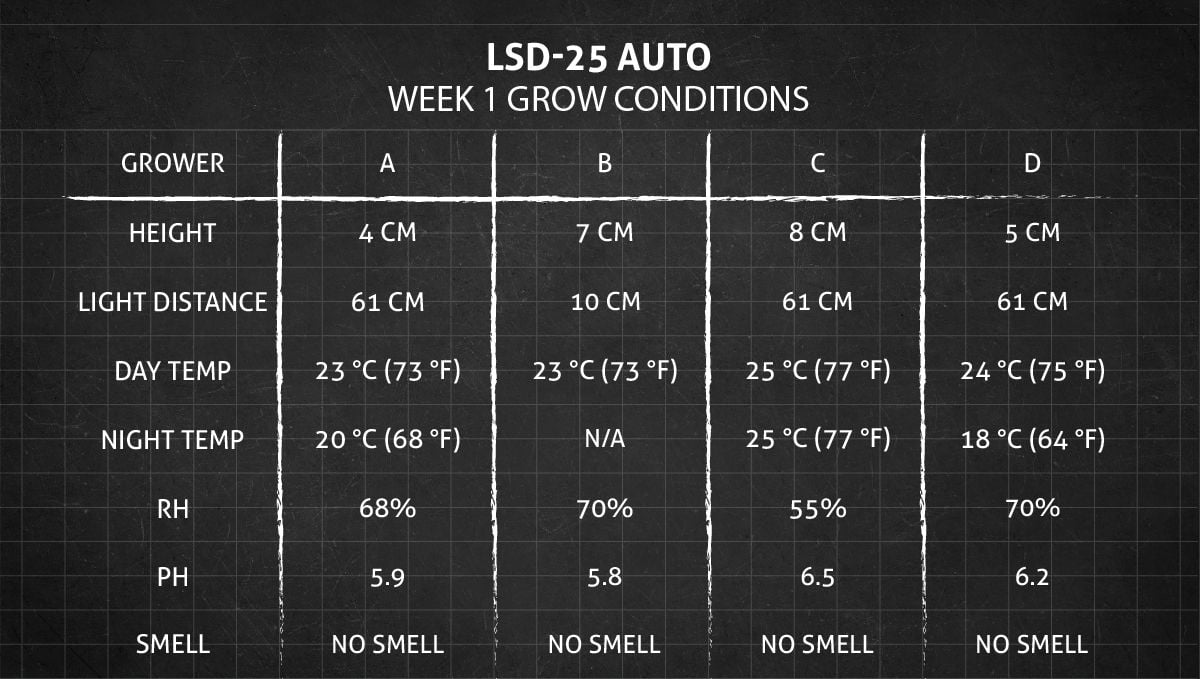
In the initial stages of germination and the first week after planting, there is not much you can do to actively promote growth. Instead, focus on creating optimal environment that allows the cannabis plant to thrive. This typically involves maintaining warm and humid conditions, as outlined in the table below. (Actually, you can make it by a couple of degrees warmer, with the RH at up to 75-80%). Additionally, it's important to keep the seeds in a dark place during germination.
There are various methods of germinating cannabis seeds, ranging from placing them in water to directly planting them in the growing medium. If you're new to germination, we recommend using a method that allows you to closely monitor the seed's progress until it develops a visible taproot. This will indicate that the seed is viable and ready to be planted. One of the most straightforward and popular methods is the wet-paper-towel method.
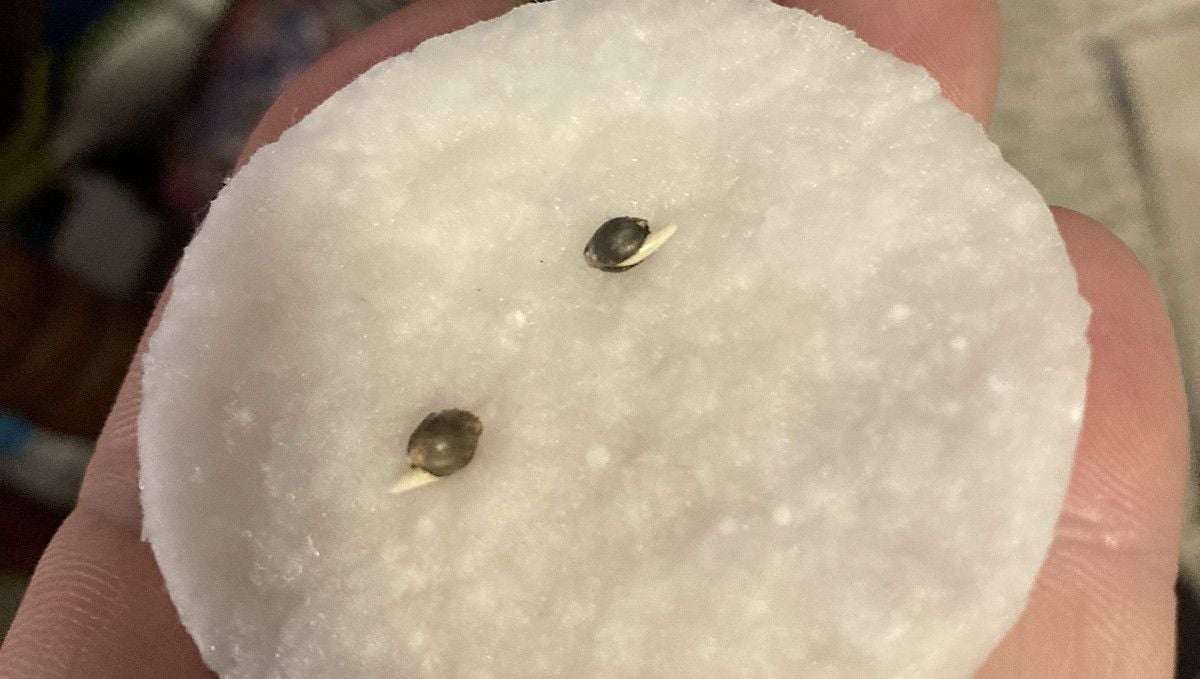
Once your cannabis seeds have cracked open and developed a taproot, as shown in the picture above, you can plant them in your growing medium. However, we recommend waiting until the taproot has grown to about half an inch in length. This has been our experience for achieving the fastest growth. Keep in mind that before the seedlings emerge from the soil, they prefer warm and humid conditions. You can create these conditions by using a heat mat and covering the planting containers with plastic bags to reduce evaporation.
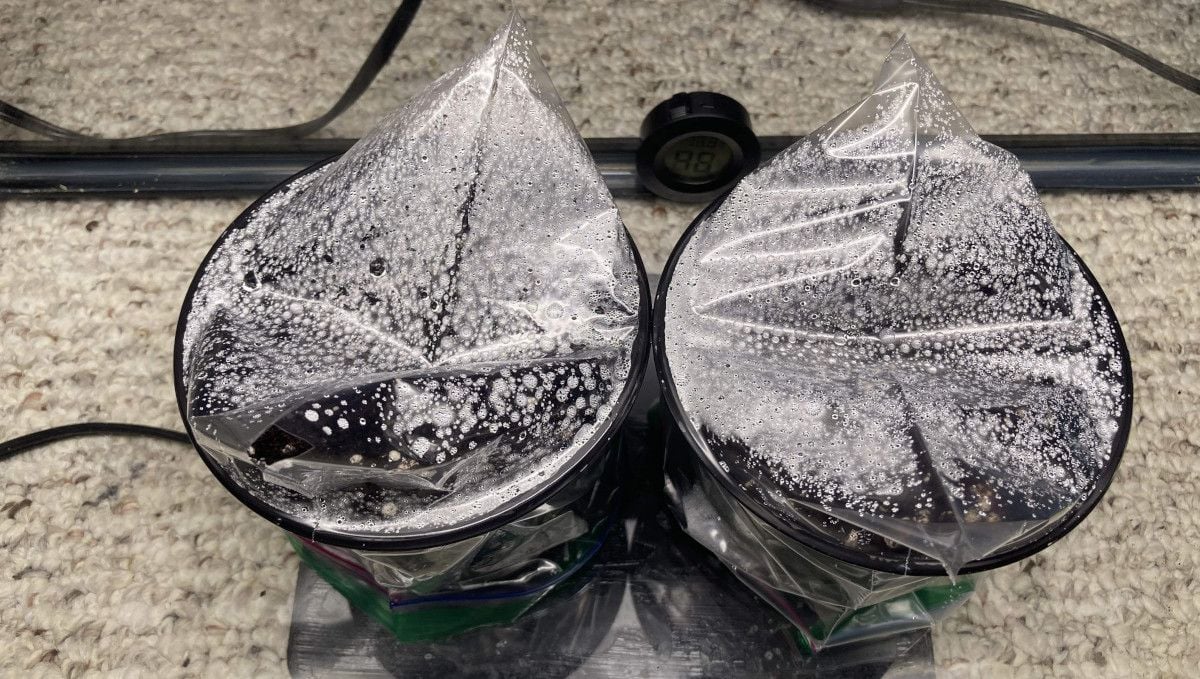
Even after your seedlings have emerged from the soil, they will continue to benefit from a higher relative humidity level. To achieve this, you can cover them with transparent solo cups or a similar covering during their first few days of life. However, it's important to periodically remove the coverings to allow the seedlings to breathe and prevent excess moisture buildup.
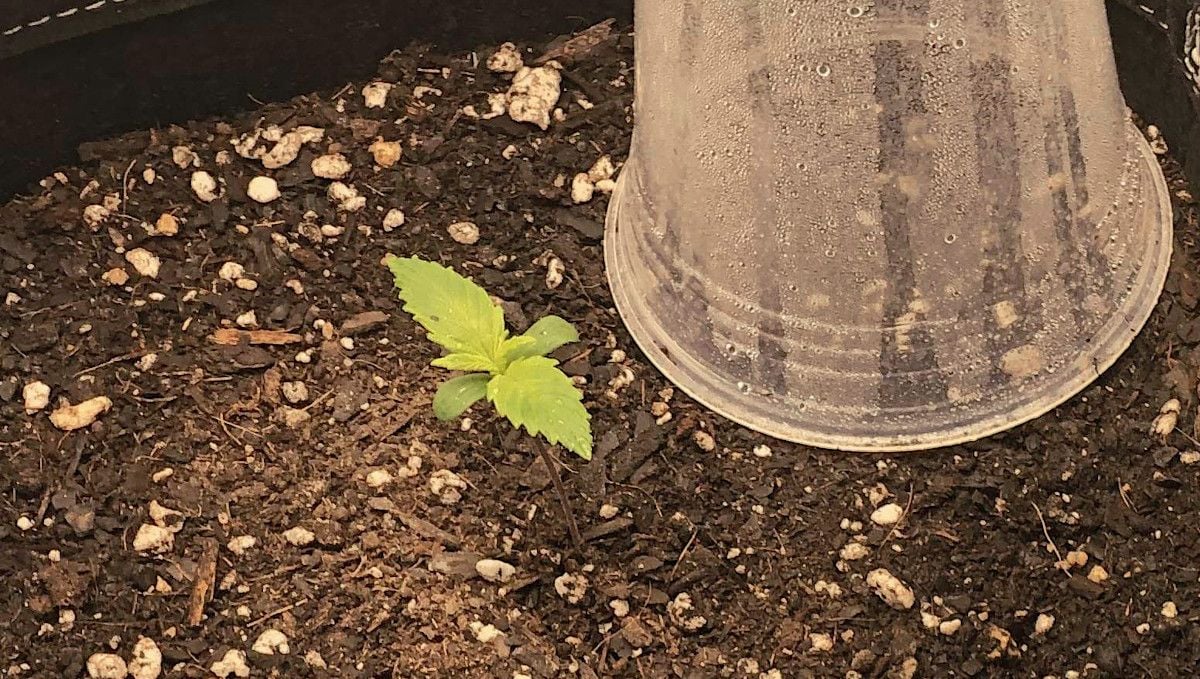
As shown in the photograph above, the grower opted to place his seedling directly into the final, larger container. This approach eliminates the need for transplanting, which can cause stress to autoflowers. However, some experienced growers prefer to begin with starter pots before repotting into larger containers at a later stage. If you choose to follow this approach, make sure you're confident in your ability to execute the transplanting process with minimal stress to the plant.
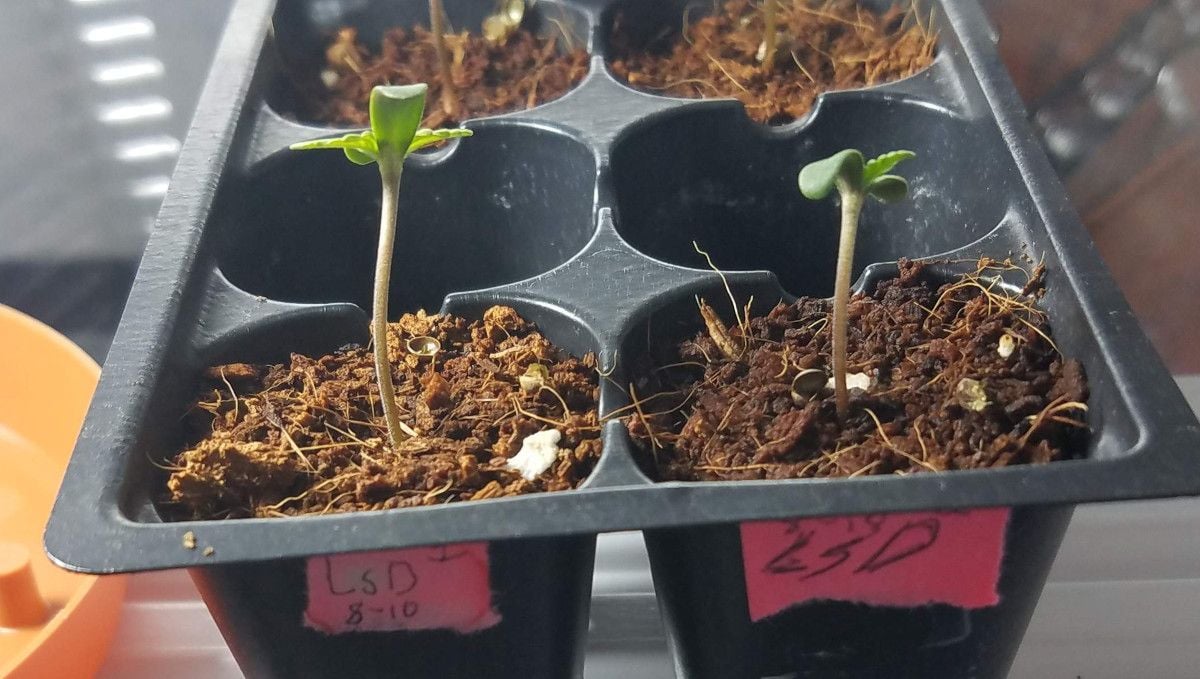
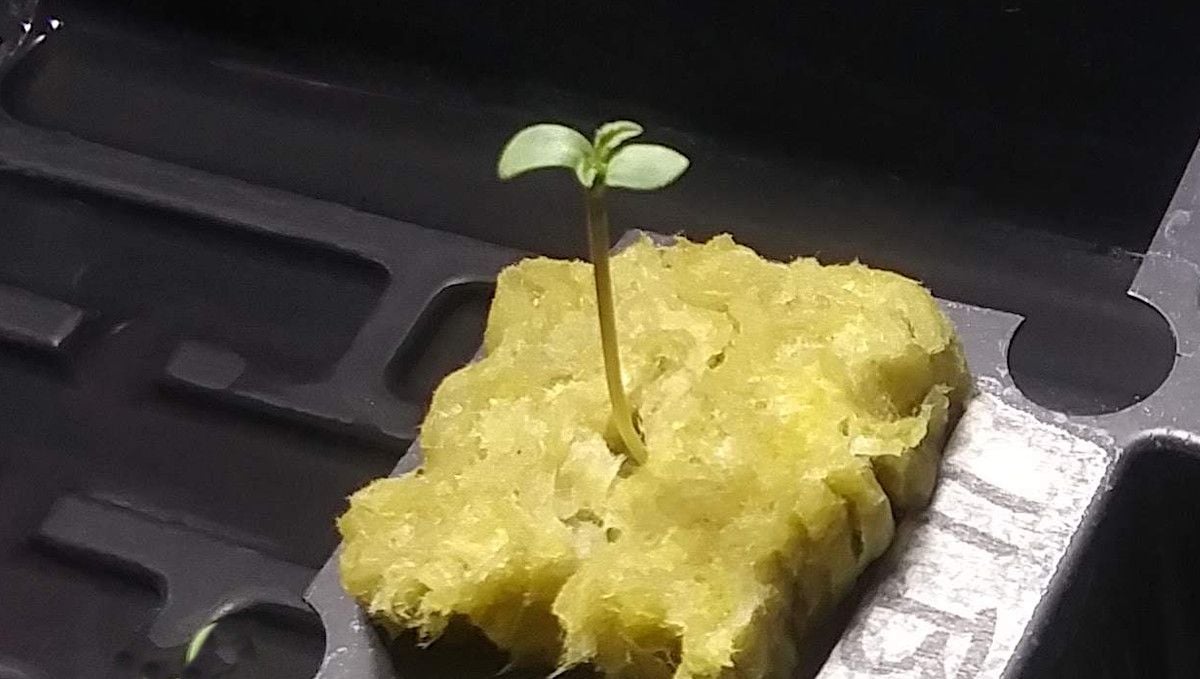
In addition to planting directly into the final container or transplanting from a starter pot, there are other methods to avoid transplant shock. For instance, you can use jiffy cups, which allow roots to grow through their walls and can be placed directly into the medium. Alternatively, use jiffy plugs thet can be inserted into the growing medium as soon as roots emerge, or rockwool plugs, like the one shown in the picture below, that can be used to introduce the plant into the growing medium with minimal stress.
If you're using soil or soilless mix pre-treated with nutrients, avoid giving your seedling anything but plain water at first. The medium already contains enough nutrients to sustain the plant during this early stage. Be mindful not to overdo it with light either. Seedlings are sensitive and can't handle high light levels, so keep the light at a distance that prevents excessive stretching but doesn't cause any light burn.
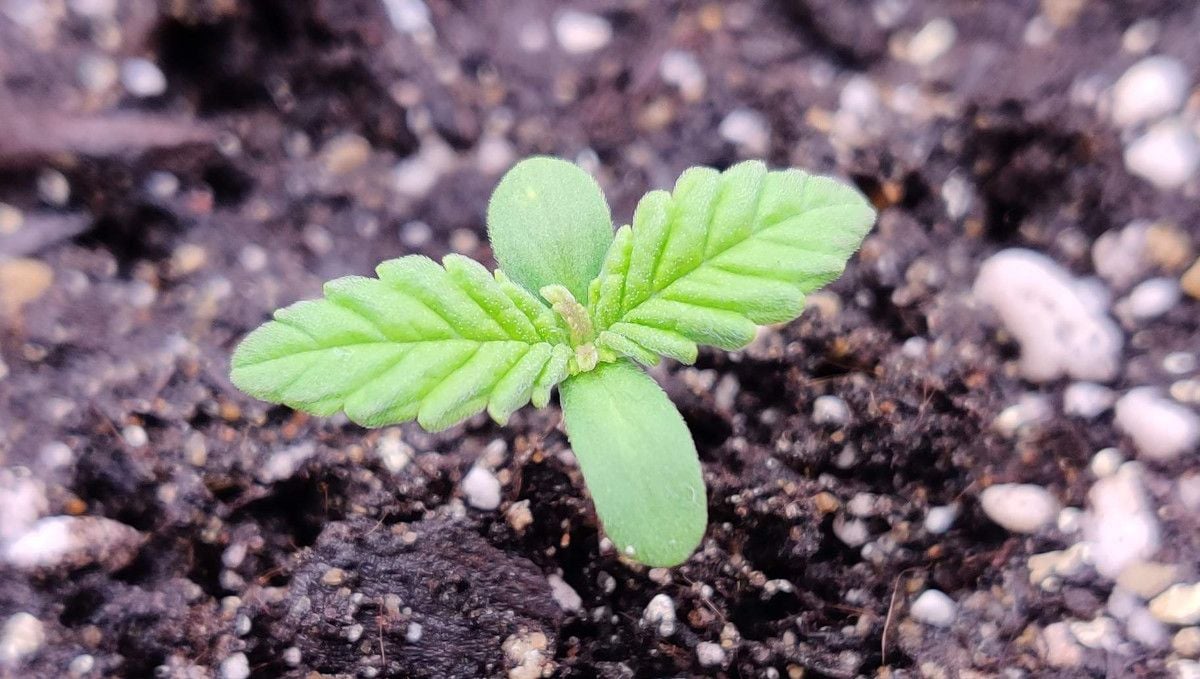
Although you won't see a lot of above-ground growth at this stage, it's important that every day brings some new changes, however small, and that leaves are healthy green and don't show any discoloration or curling. Keep in mind that the most important growth is happening underground, where the roots are developing and establishing a strong foundation for the plant's future growth.
4. Early Veg | Week 2
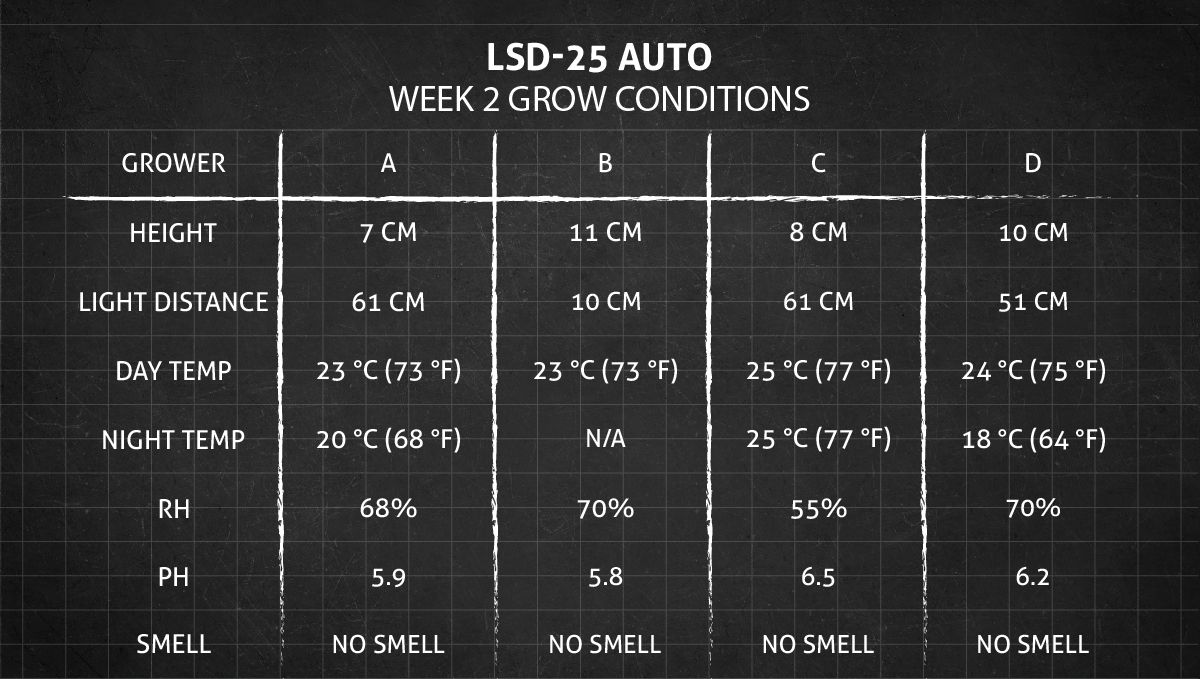
During the second week of an autoflower's life cycle, the plant will still be relatively small, usually only a few inches tall, but it will be growing quickly. The conditions should be warm and humid, with temperatures around 25°C (77°F) and humidity around 60-70%. Providing a gentle breeze can also help strengthen the plant's stem and prepare it for later stages of growth.
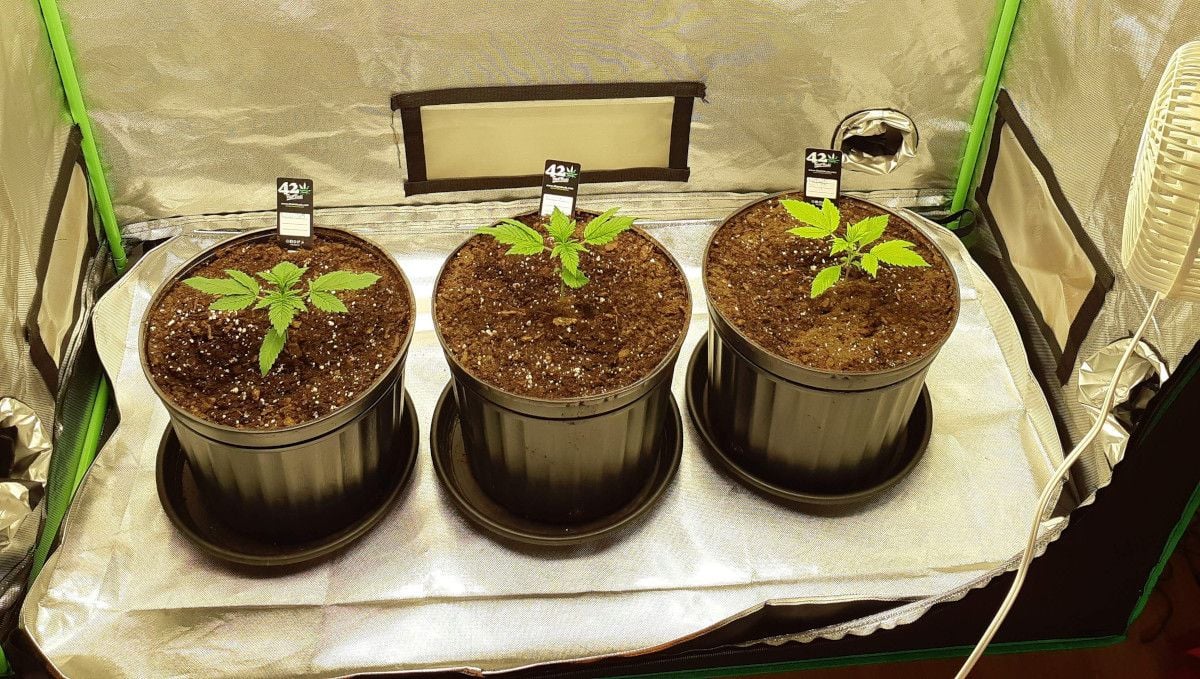
When assessing the development of your cannabis plant during the second week of its life cycle, pay attention to the size of the second set of true leaves. By day 10 or 11, the second set of leaves should be similar in size to the first set. Additionally, some cannabis strains may start to develop side branches during this time, especially those with a bushier genetic profile.
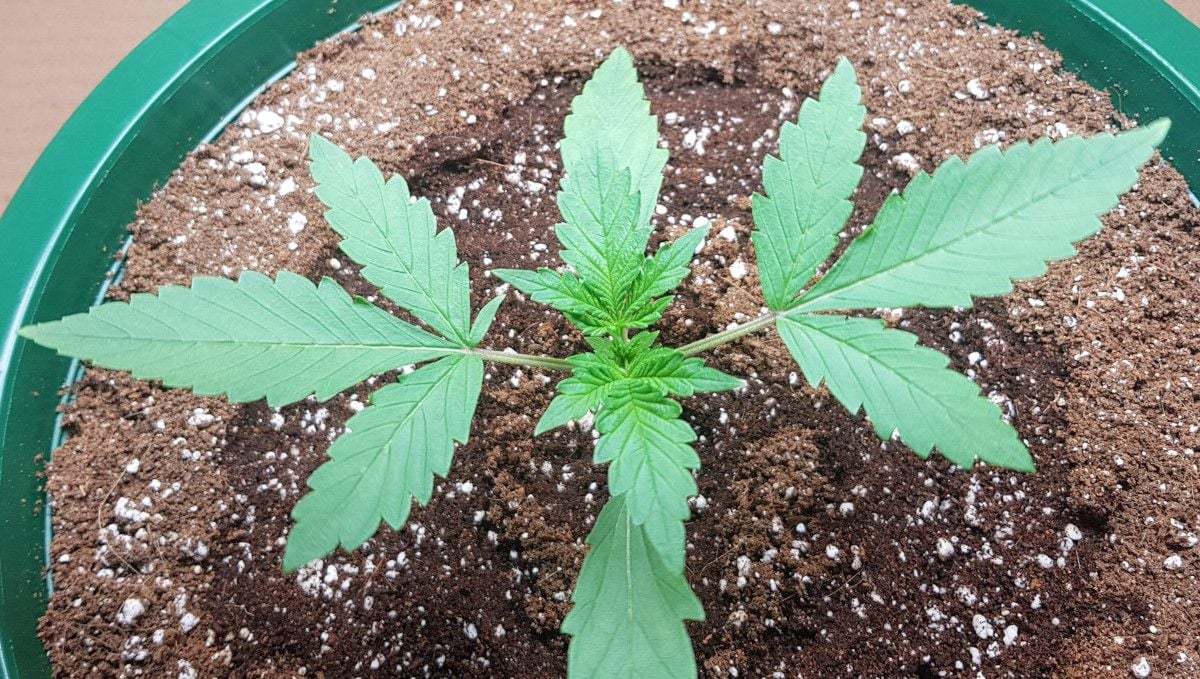
New growers often struggle with determining the appropriate amount of water to give their cannabis plant. It's crucial to avoid overwatering, particularly when the plant is in a container that's too large. A recommended approach is to start by watering around the base of the plant with a small amount of water and gradually increasing the area with each subsequent session.
Following this regimen helps prevent the soil from becoming waterlogged, which can lead to root suffocation or rot. By providing adequate drainage and avoiding overwatering, you can help ensure healthy root development and overall plant growth.
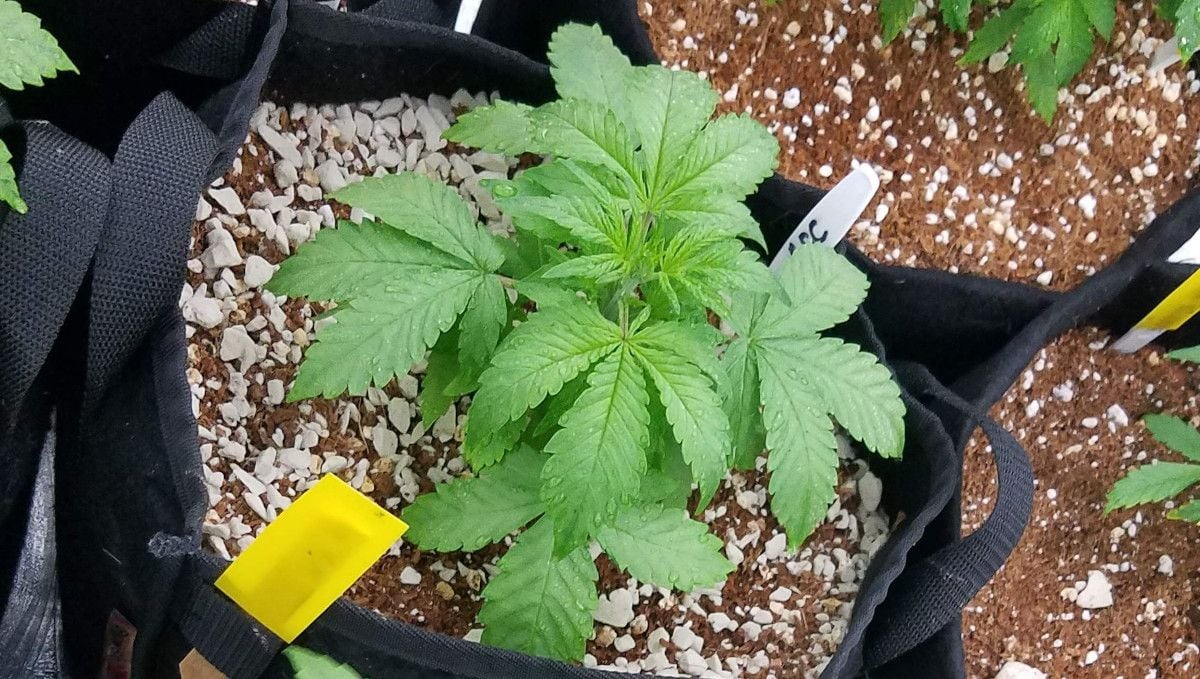
When growing weed using hydroponics or coco coir, plants require additional nutrients from the very beginning. However, when growing in soil, particularly with large amounts of growing medium, it may not be necessary to provide additional nutrients for the first few weeks or even longer, depending on the container size and soil richness.
Overfeeding your plants can cause nutrient lockouts or other issues, so it's best to err on the side of caution and avoid providing too many nutrients. It's better to keep your plants slightly hungry than to overfeed them and damage their development. By monitoring your plants and providing nutrients only when necessary, you can help ensure healthy growth and development.
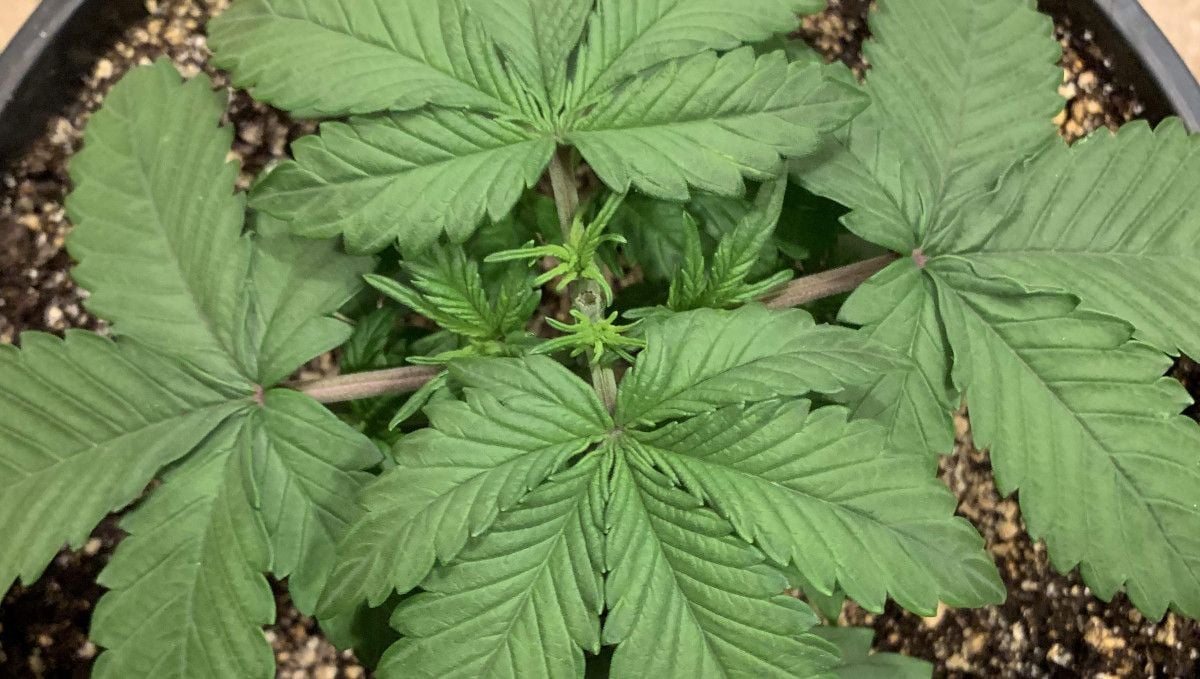
If your autoflower is healthy throughout the early veg, you can even start high-stress training it (like shown in the picture above). Just remember that if your auto is sickly or a a slow grower, HST can stop any further development and your plant will end up a dwarf.
5. Mid Veg | Weeks 3-4
During weeks 3-4 from sprouts, indoor growers should continue paying attention to creating optimal conditions although those needn't be as mild as before. Aim for a temperature range around 77°F (25°C) and humidity levels between 50-60%. Additionally, the pH level of the growing medium should be monitored and adjusted if necessary to ensure optimal nutrient absorption, especially if you stop relying on the nutrients inside the medium and start giving your plants extra food while watering. For soil grows, pH should be ideally between 6.0-6.5.
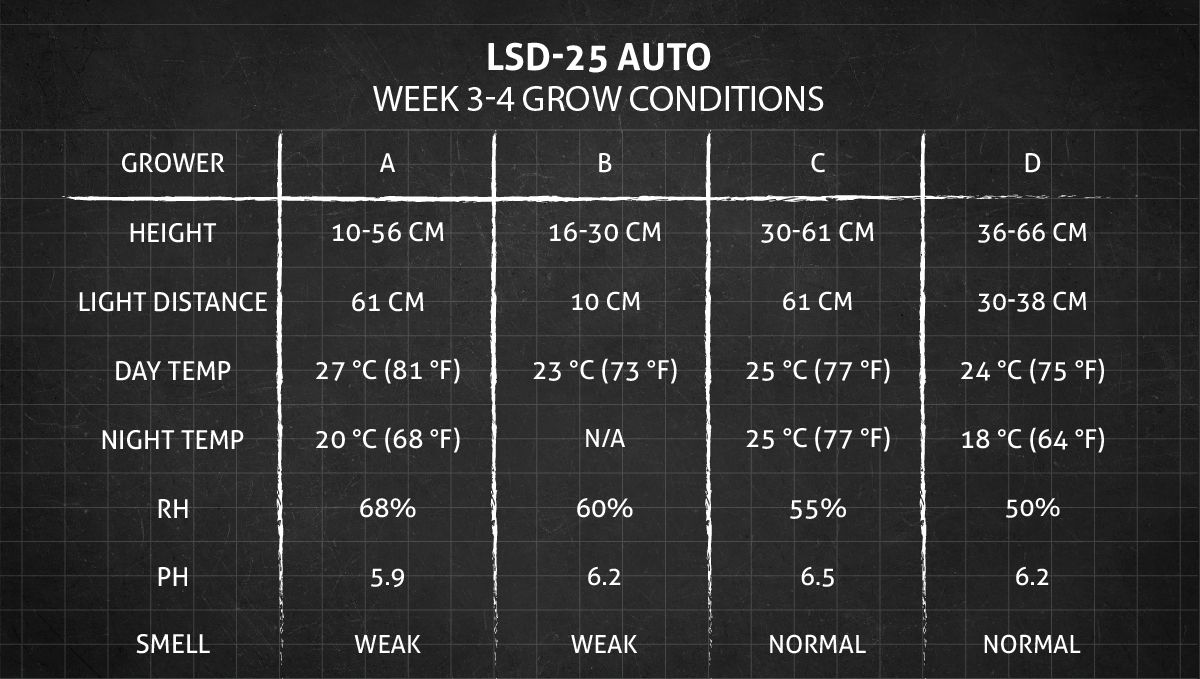
Maintaining the optimal growing conditions is important as your autoflower will experience a spurt of growth and will need every resource you can provide it. During the second part of the first month from seed, the plant will not only display some height gain but also develope numerous side branches, especially in bushier strains.
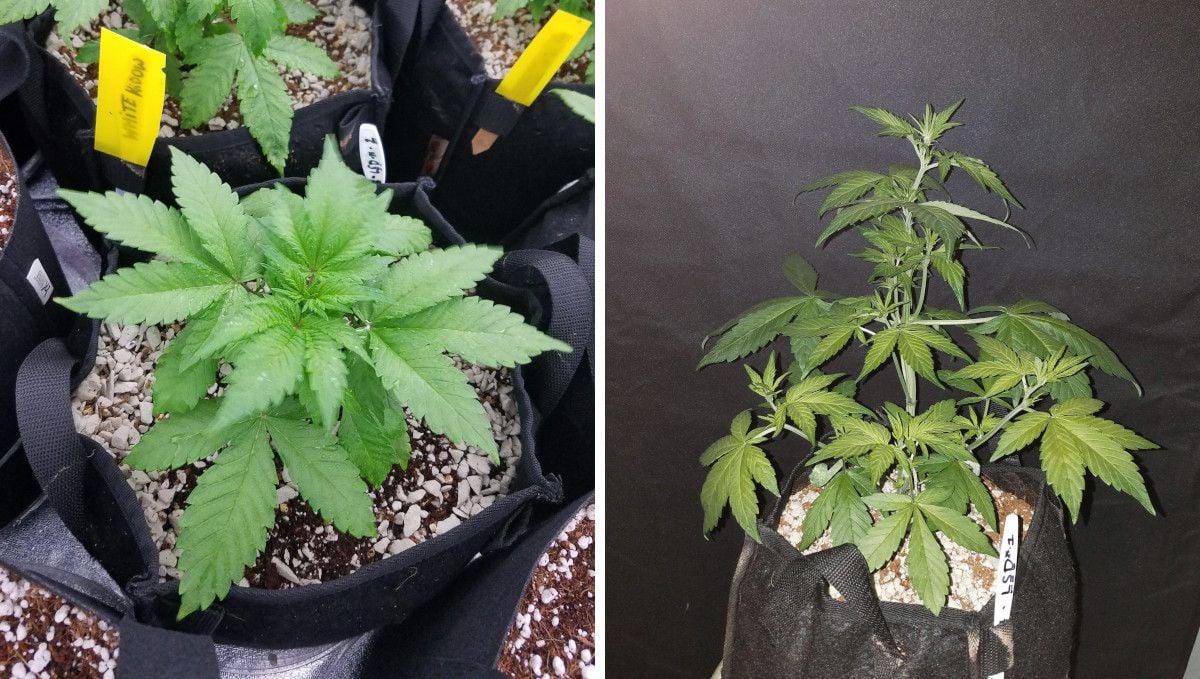
There are methods to encourage the growth of side branches in cannabis plants, such as low-stress or high-stress training techniques. However, it's important to note that high-stress training (HST) can be risky, particularly with autoflowering strains. This method should only be used when vertical space is limited and the benefits of keeping your autoflower short outweigh a possible negative impact on its growth and yield potential.
Particularly, LSD-25 appears to be a very fast autoflower with an extremely short vegetative stage, so it's better be left alone in most cases. Or if you do train it, simply tying down the branches will be enough.
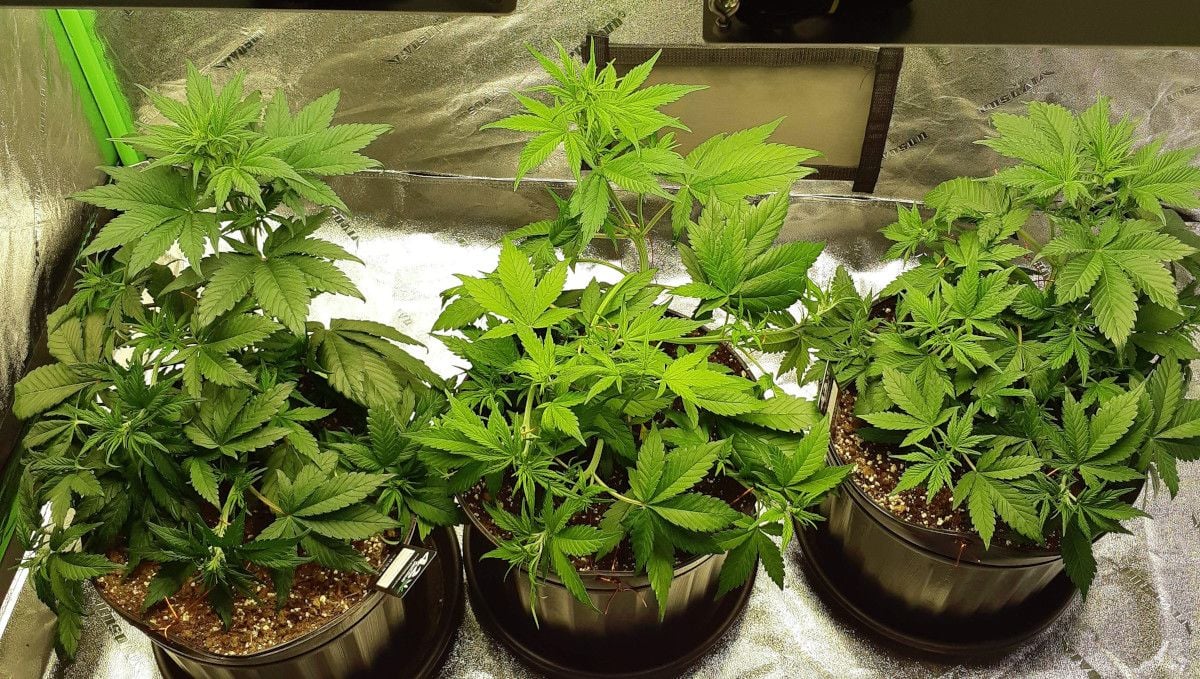
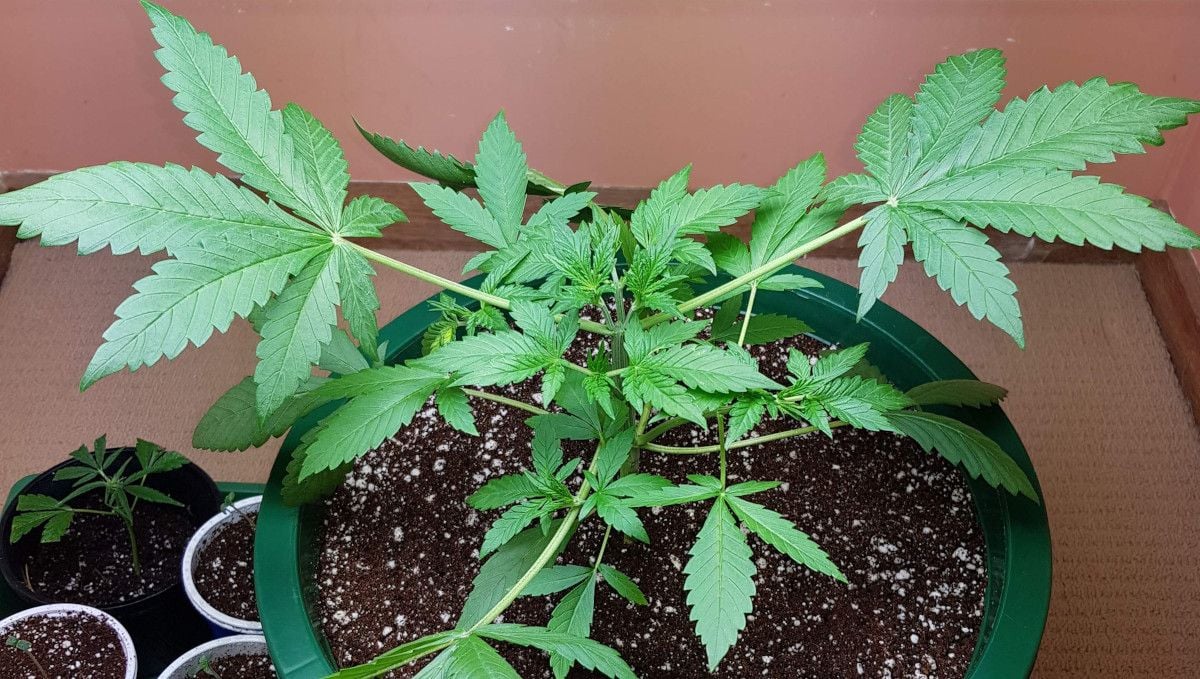
However, Grower B trained the hell out of his plant and hit the jackpot as his LSD-25 Auto had grown huge before the start of flowering and went on to producing an insane yield. In the photograph below, you can see how the auto reacted to topping (it didn't skip a beat).
Of course, you can't hope to support all this explosive vegetative growth if you keep your autoflower on a lean diet. Many growers start to introduce nutrients and supplements little by little starting from week 2 or even earlier. By mid-veg, your LSD-25 will need full (or almost full) doses of veg nutrients. Make sure you provide lots of nitrogen (N) and smaller amounts of phosphorus and potassium -- those will be needed later in flower.
Your feeding schedule doesn't have to be rocket science (or even exact science). Keeping it simple for the first couple of grows is the safest as the less complex your feeding regimen is the fewer mistakes you're likely to make. In the table below, you can find a relatively simple nutrient chart. The grower who used it had much experience and nevertheless preferred not to complicate things.
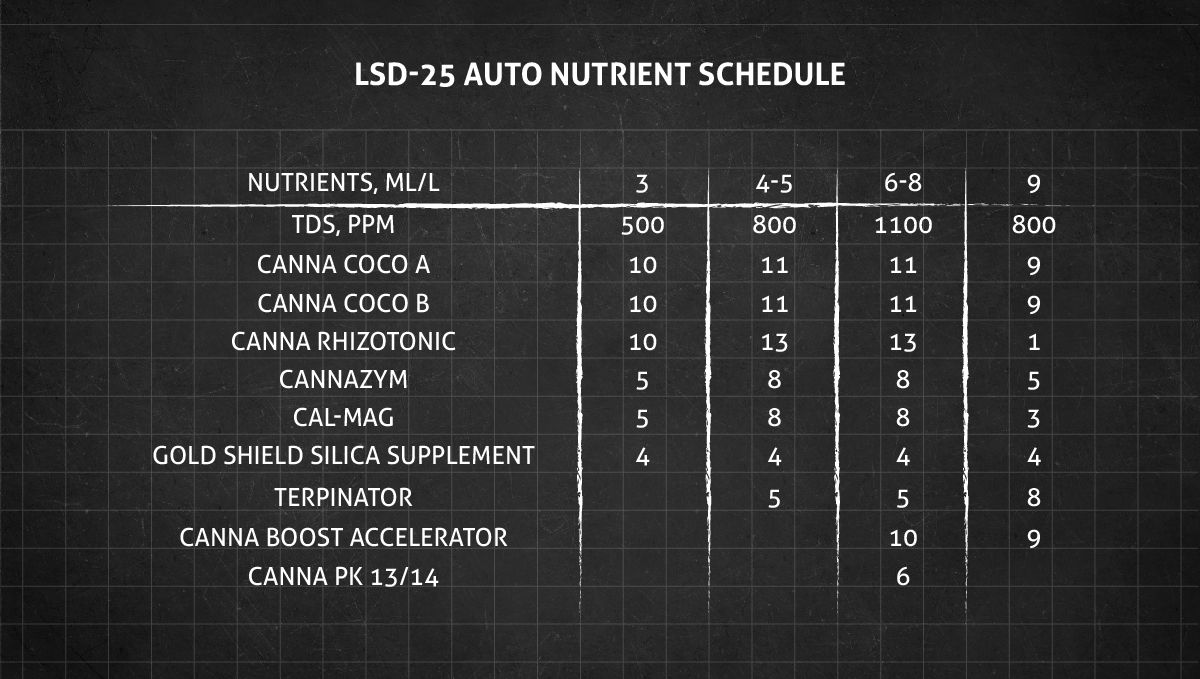
If the nutes you chose are synthetic, you probably won't make it without a pH pen and a TDS meter as measuring TDS allows you to avoid overfeeding and monitoring pH helps make sure the roots of your autoflower are able to absorb those nutrients. If you want to avoid these complications, simply use organic products and don't exceed the dosages recommended by the manufacturer.
6. Transition (Pre-Flower) | Week 5
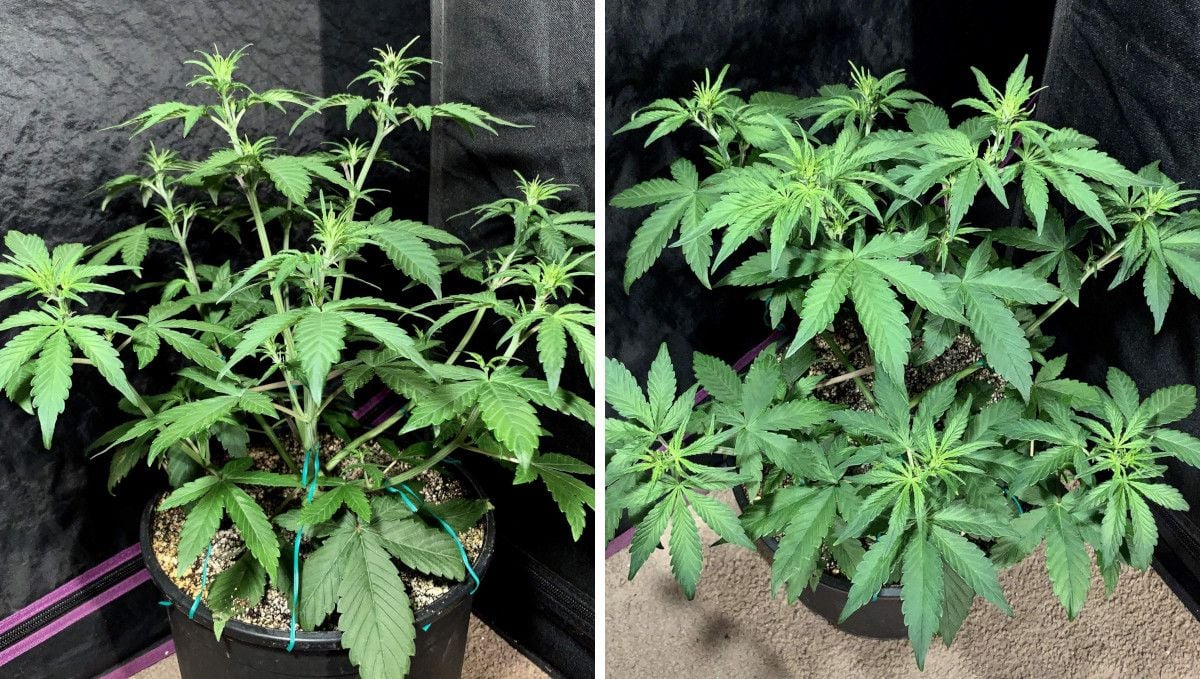
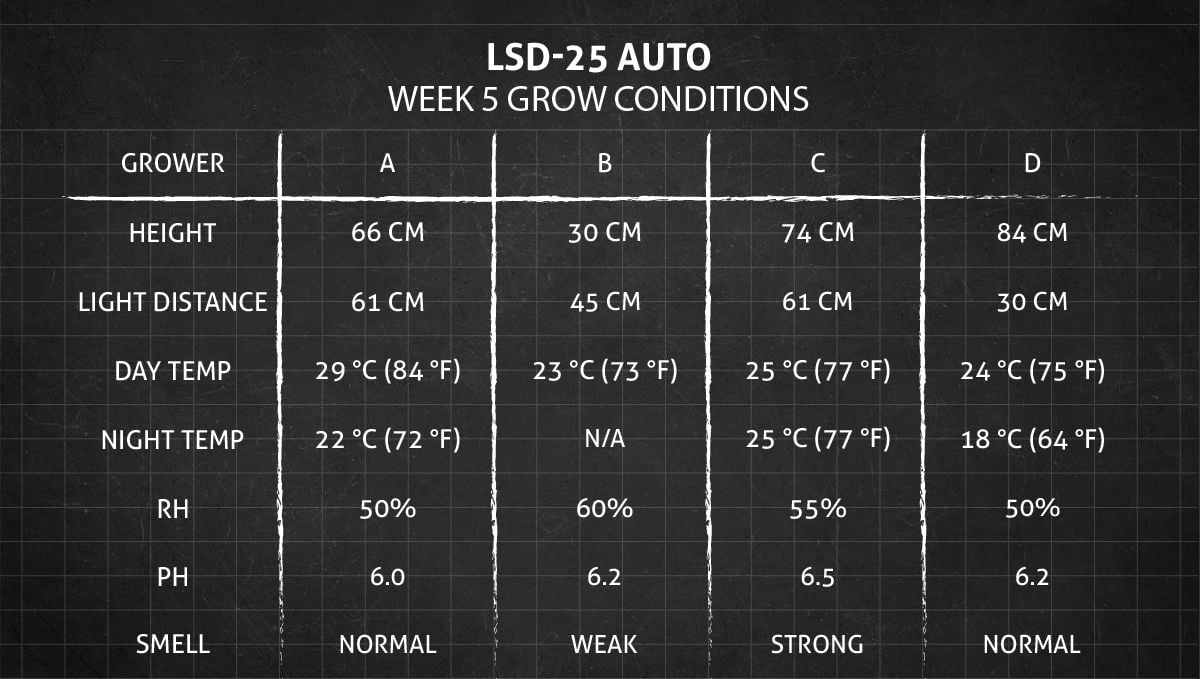
The pre-flower stage in cannabis plants is a critical time when growers can identify the gender of their plants and then watch them produce the first flowers. Autoflowering varieties of cannabis do not rely on changes in light cycles to initiate flowering, and instead, they will start flowering automatically based on their genetics and age. While it's not necessary to change the conditions when the plant starts flowering, some growers choose to slightly lower the temperature and humidity, and increase light intensity to optimize yields and growth during the flowering stage.
It's hard not to notice that your autoflower is about to start flowering. The plant tops that have been green before -- just like the rest of the foliage -- now change their color to a more yellowish hue. The new leaves growing here change their shape too -- they become thinner and whispier. At the same time, you'll see tiny white hairs growing among those thin leaves, and before you know it, the tops will become fluffy and look a little like future buds.
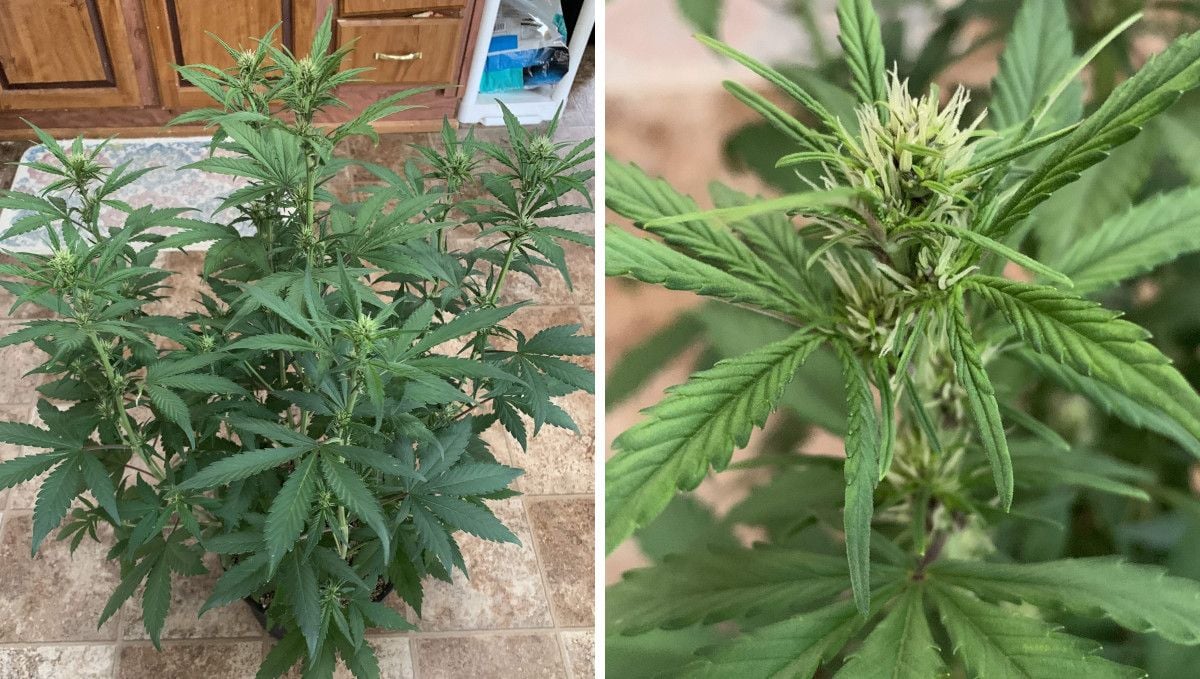
In most cases, the development of flowers doesn't really kick in at this stage, so your atoflower doesn't need high amounts of phosphorus and potassium yet. This makes some growers postpone the introduction of bloom nutrients for another week. However, most prefer not to overcomplicate things and change their nutrient schedule to something more appropriate for the flowering stage as soon as the plant transitions.
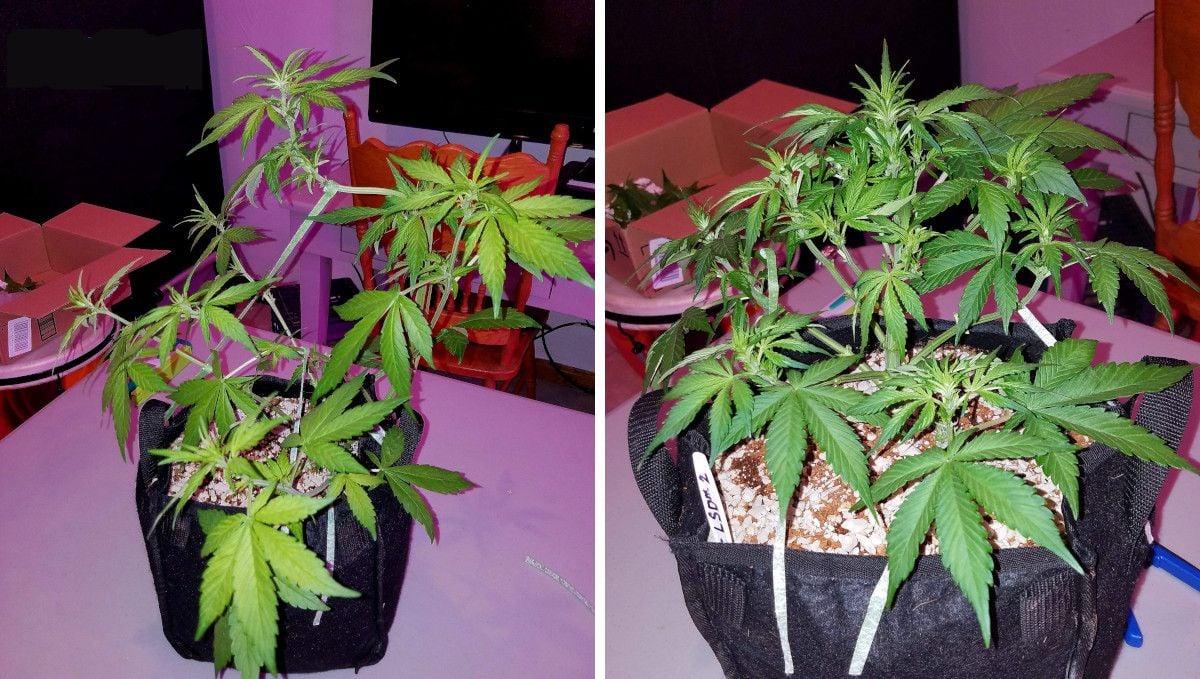
It's remarkable that even at this stage, purple autoflower varieties, such as LSD-25, already display the first signs of this exotic and highly sought-after color in their forming flowers.
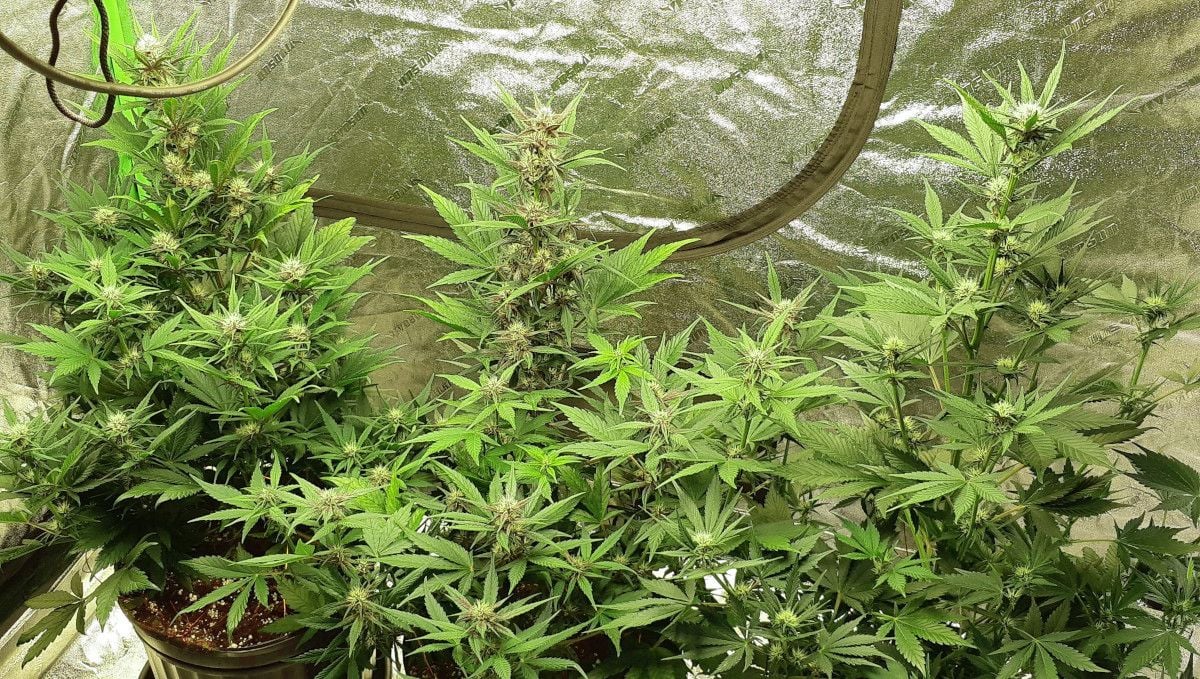
Be prepared to see most LSD-25 plants transition to flowering around week 5 or even 4, and its extremely rare to get a slower (and much bigger) phenotype like the one you see in the pic below. These are actually weeks 6 and 7, and the plant had reached enormous proportions before budding kicked in.
7. Early Flower | Weeks 6-7
During the early flowering stage of cannabis plants, they go through a growth spurt known as "the stretch", where they rapidly increase in height and begin to stack up flowers. This stage can last anywhere from 1 to 3 weeks, depending on the strain and growing conditions. It is essential to maintain the right distance from the light to the flowering tops to prevent light burn but also to provide the plants with high-intensity lighting to encourage flower development. The plants will now require more water and nutrients, but be sure to monitor the leaves for the signs of overfeeding, as this can lead to nutrient burn and other issues.
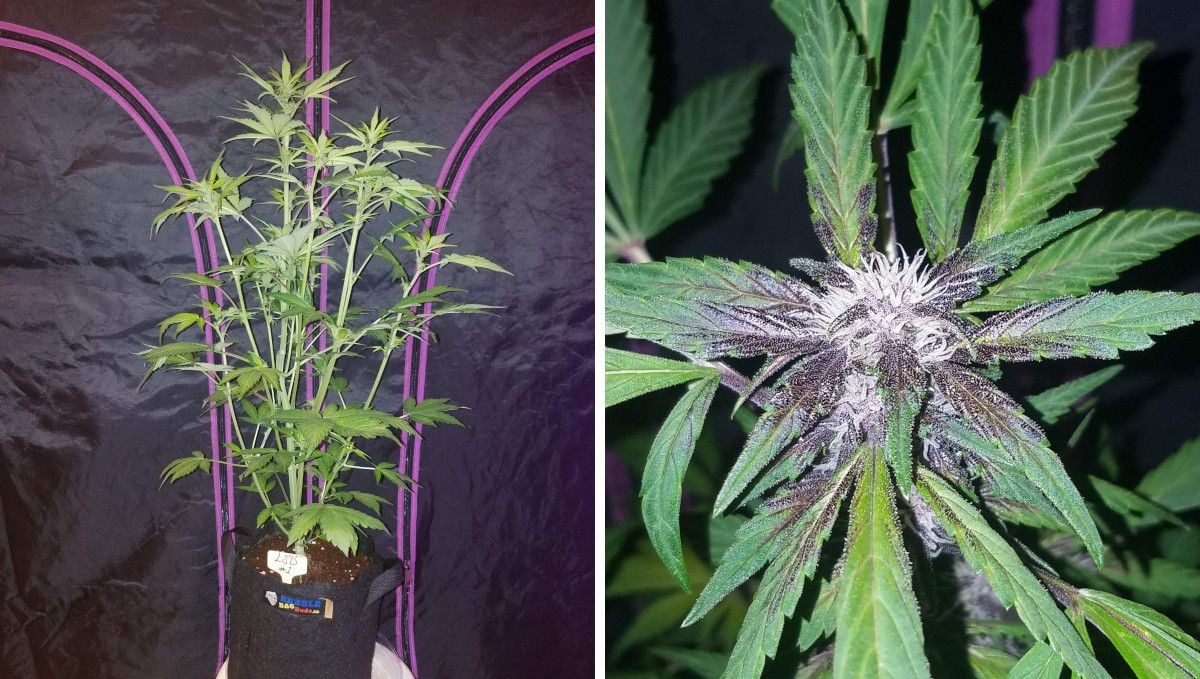
Newbie growers may not expect it, but the most conspicuous thing that is happening at this stage is not the formation of flowers, but the elongation of the main stem and side branches. The result of this so-called flowering stretch can be a doubling or even trippling in size of your autoflower. The flowers that are just forming may look pathetic compared with the size of these long branches, but don't worry -- soon, they'll start to stack up and fill out and will turn into continuous long 'colas'.
Of course, if you have trained your autoflower at an earlier stage, it'll now look very different than the one in the photo above. It will have many more branches, and since they are all at a more or less the same distance from the light, they're likely to have the same size and texture by harvest. At least, those buds that are on top. The ones down below should better be get rid of -- they are too far from the light and probably shaded by the leaves above them. The technique of removing them is called lollipopping and allows you to channel all the energy of your autoflower to the top and have almost no 'popcorn' buds at harvest.
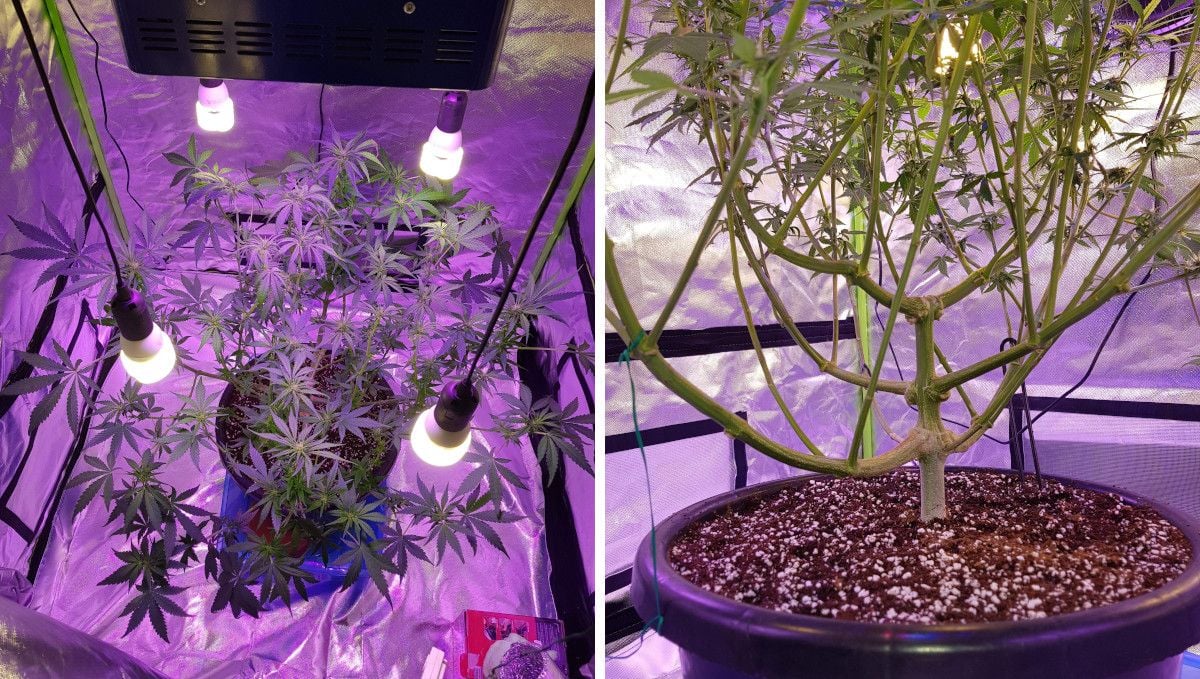
The other canopy management technique that you can see in the photos above is defoliation. By plucking all that foliage, you make sure that the light penetrates down to every bud site and that the airflow is unrestricted.
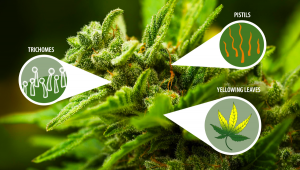
As your autoflower keeps on stretching (and making you nervous in the process), it will also get visibly more mature. The tops will grow more and more white hairs called pistils. If the strain has purple genetics, like LSD-25 does, this color can start to show rather early. Sometimes, it affects only flowers, sometimes only leaves, and often both.
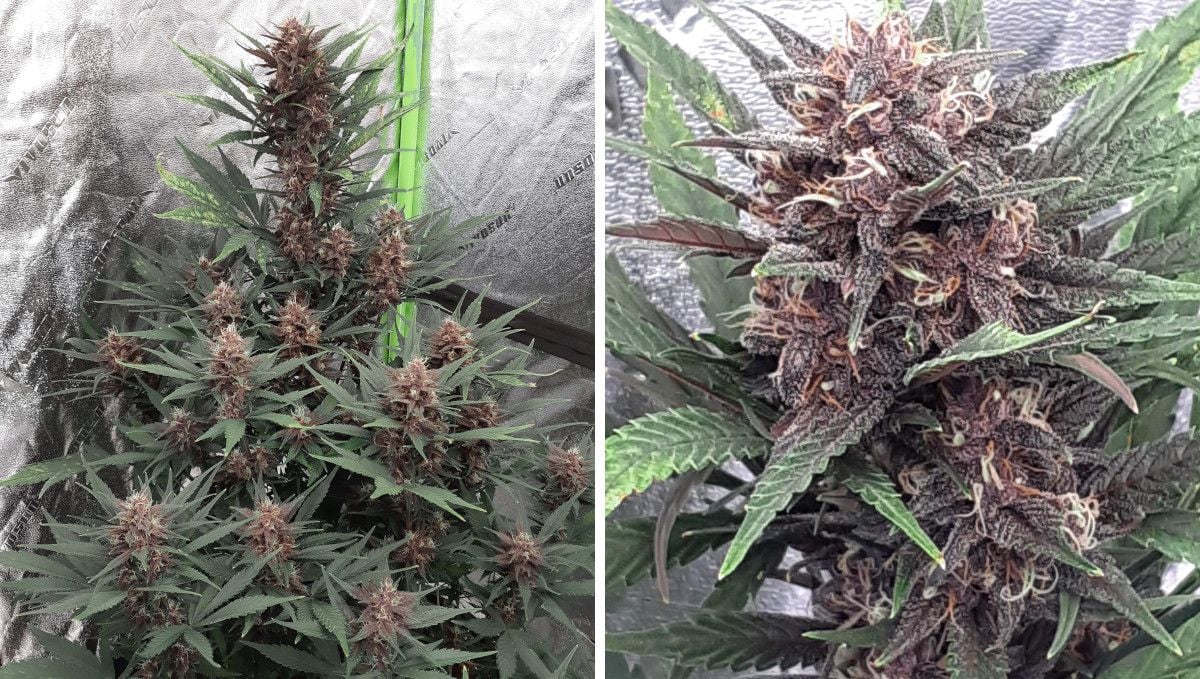
Also, if you've been lucky enough to choose a resinous variety for your grow, your plants will start to get sticky this early into the grow cycle. Even while the pistils are still white and totally immature, you'll notice tiny 'crystals' appearing on the little leaves that grow out of the flowering clusters. Of course, these are not crystals but tiny resin glands called trichomes -- under a microscope, they look more like mushrooms, with a long stalk and a bulbous head. The trichomes are where the majority of the plant's THC and terpenes is stored, so you may be sure that as soon as your plants get frosty, they'll also start to smell.
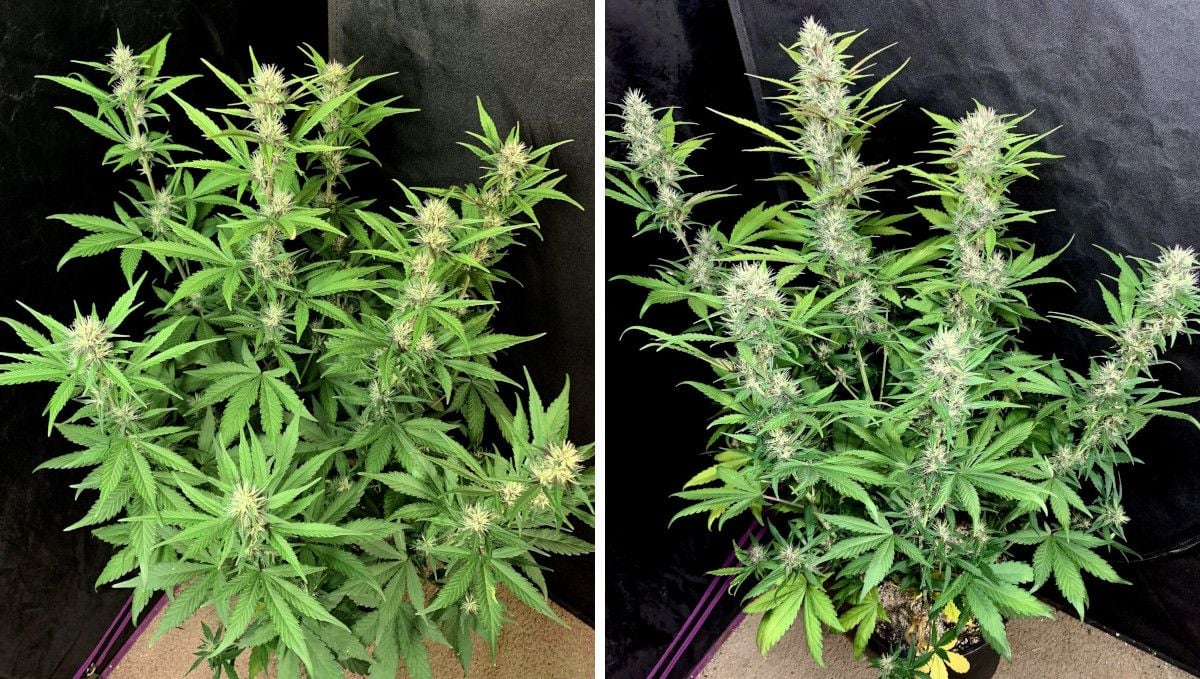
If you didn't change your nutrients during the pre-flowering stage, do it now. The needs of vegging plants and flowering plants are totally different, so you should choose a product that has a lot of phosphorus and potassium while you can safely wean your auto off of nitrogen. It's not needed in such great amounts as before and can even interfere with the processes of budding.
8. Mid Flower (Bulk Phase) | Weeks 8-9
As buds start to bulk up, you should take more care than ever of ventilation -- the 'jungle' in the grow room will hinder normal air flow, and the big and dense colas can get moldy. For the same reason, we recommend lowering the realtive humidity to 35-45%. The temperatures can be lowered too -- by a couple of degrees -- as this will help prevent terpene evaporation and THC degradation.
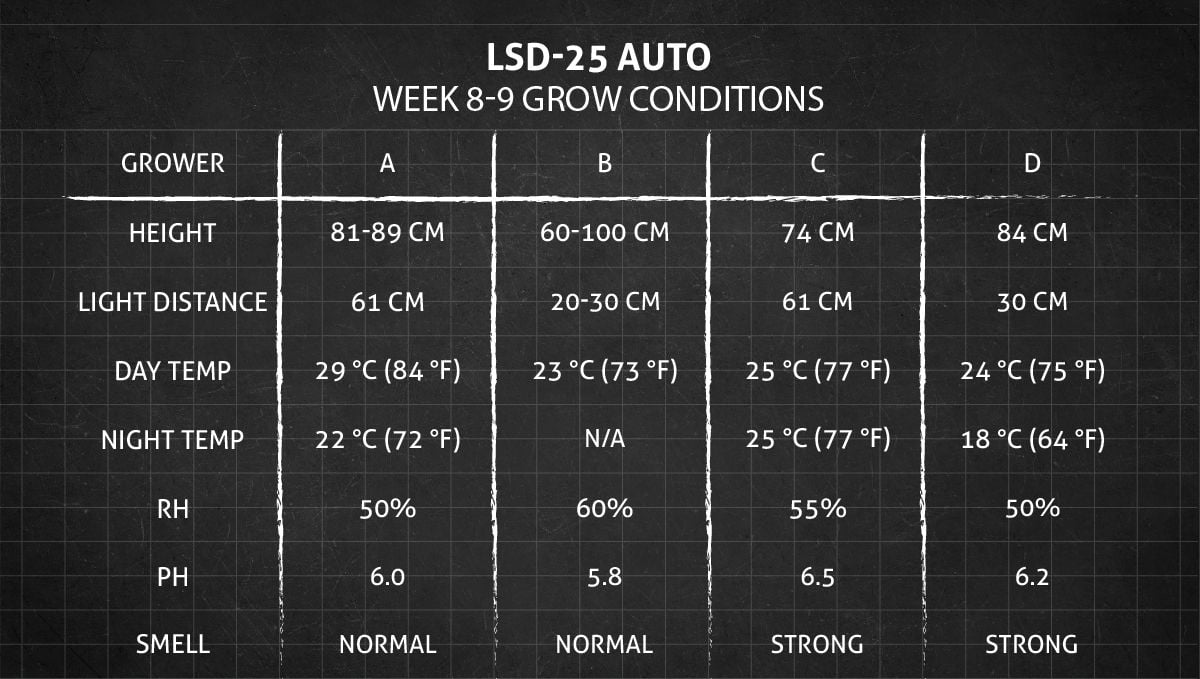
As the flowers are fattening up, the plants are the hungriest, and you can feed them more nutrients than ever, especially P and K. Now is the time to give them bumper doses of nutrients, as long as the leaf tips don't start to burn, of course, signalling overfeeding issues. During this time, most of the pistils will remain white, but some of them will wither and dry. That means the the day of the harvest is slowly approaching.
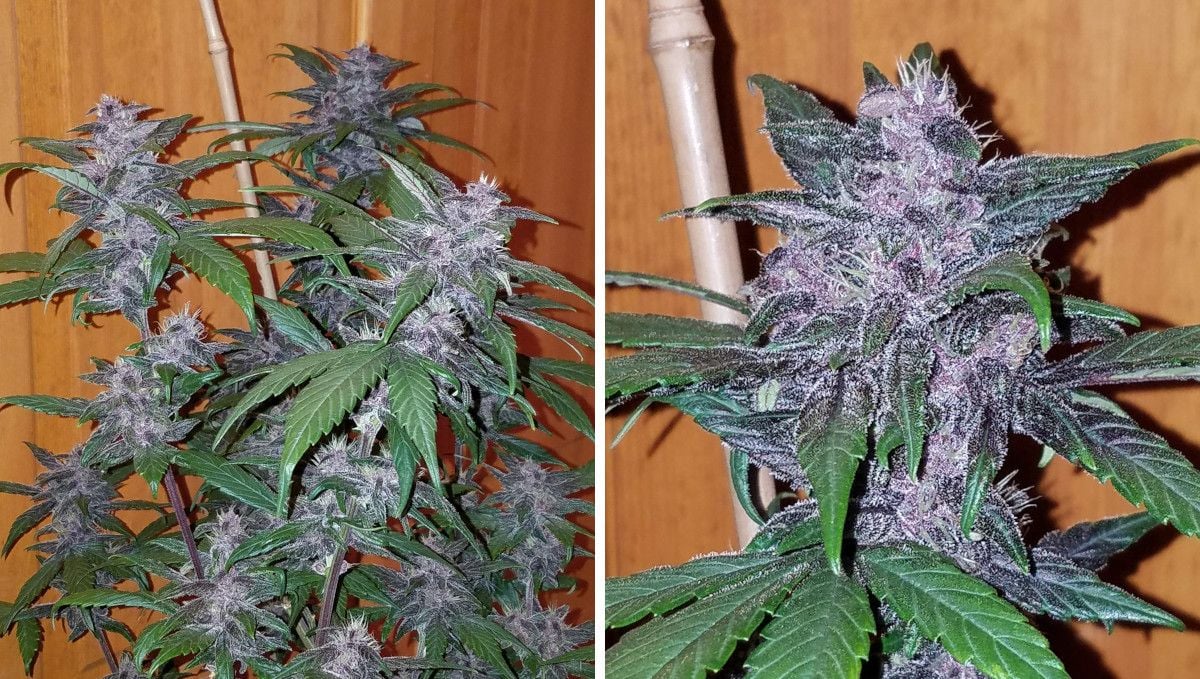
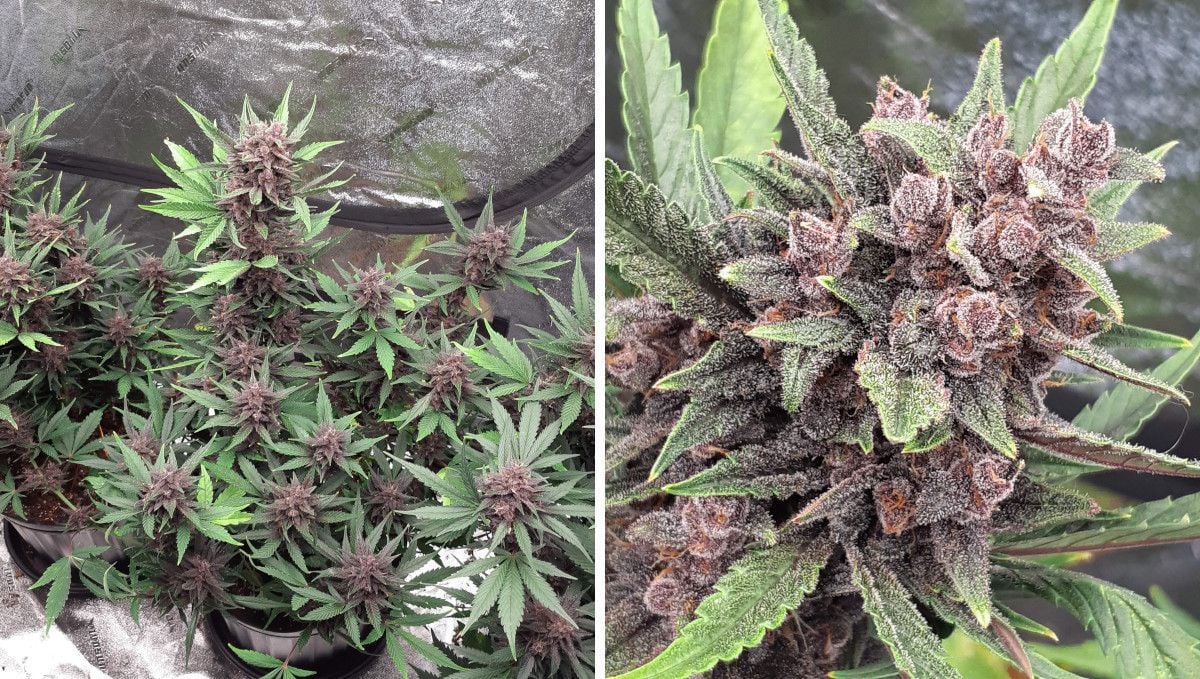
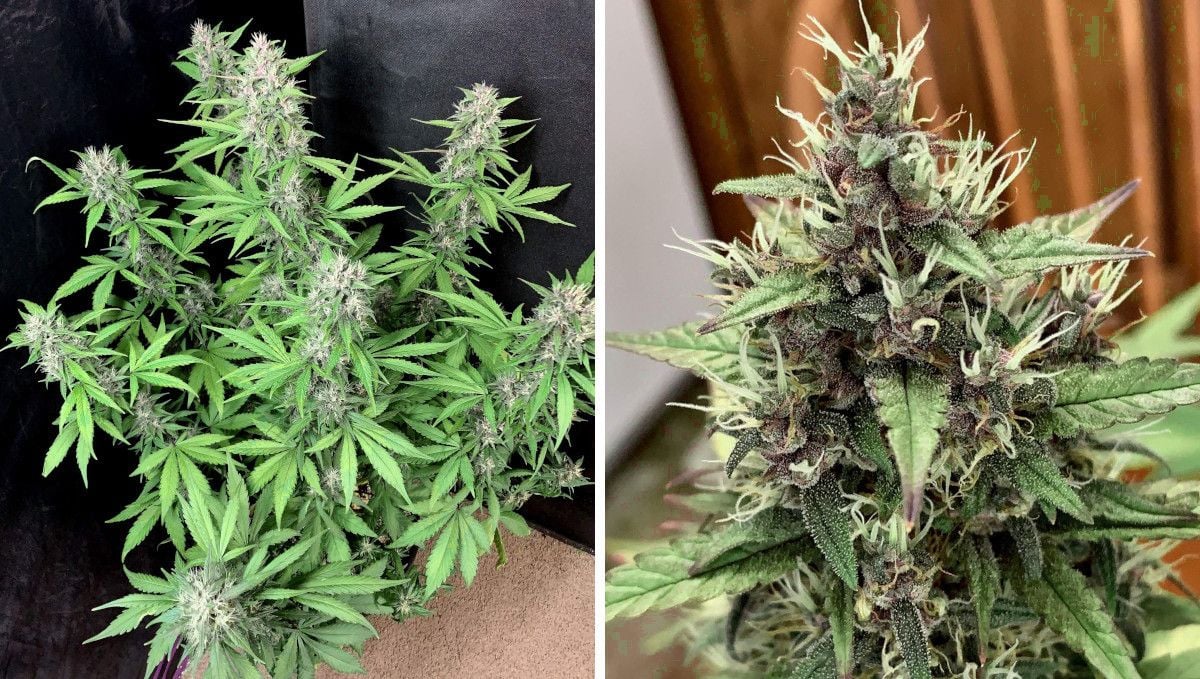
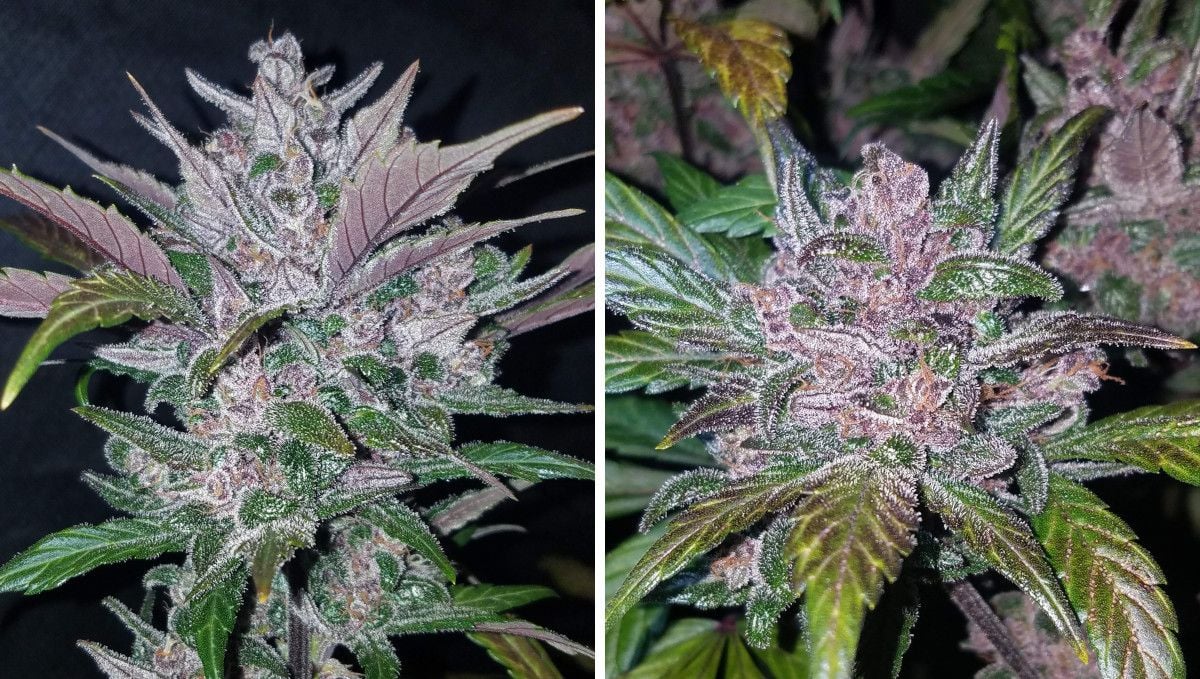
You may expect most LSDs turn purple, and it's only very rare phenos that may have greener buds, sugared all over with white trichomes.
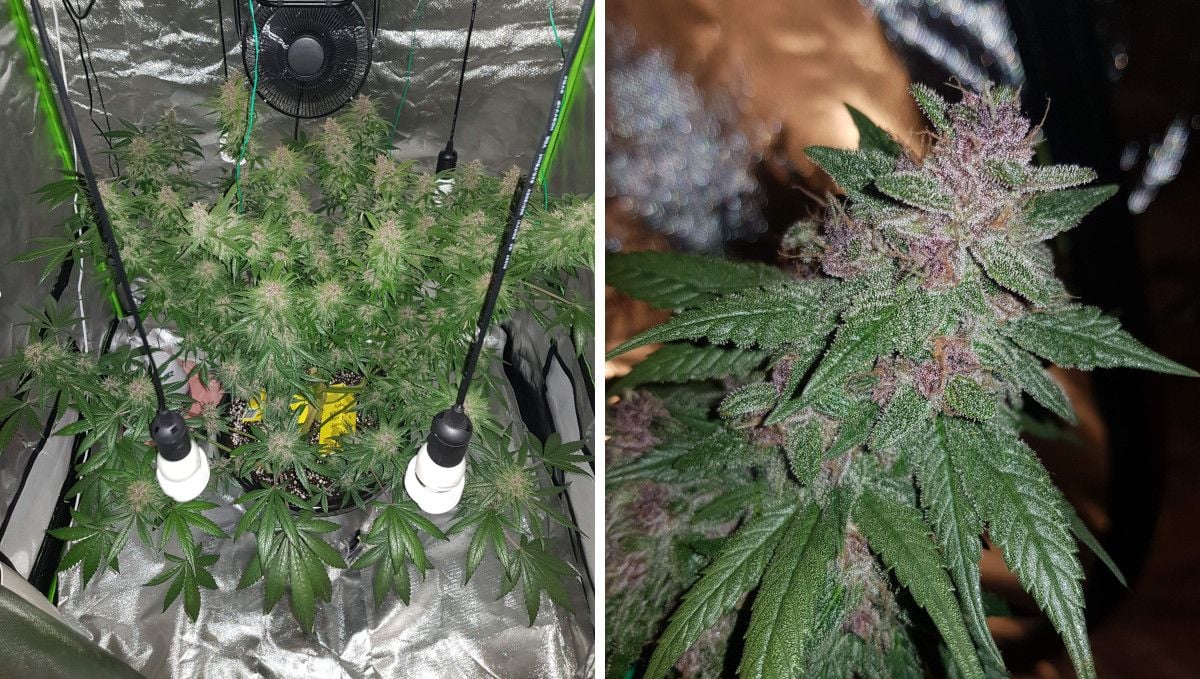
We've looked at hundreds of images of LSD-25 buds and one thing that was characteristic of most of them (besides the purple color) was their great calyx-to-leaf ratio. Look at the pics below or any others in this grow guide and you shall see that you basically only need to remove a few fan leaves and be done with trimming.
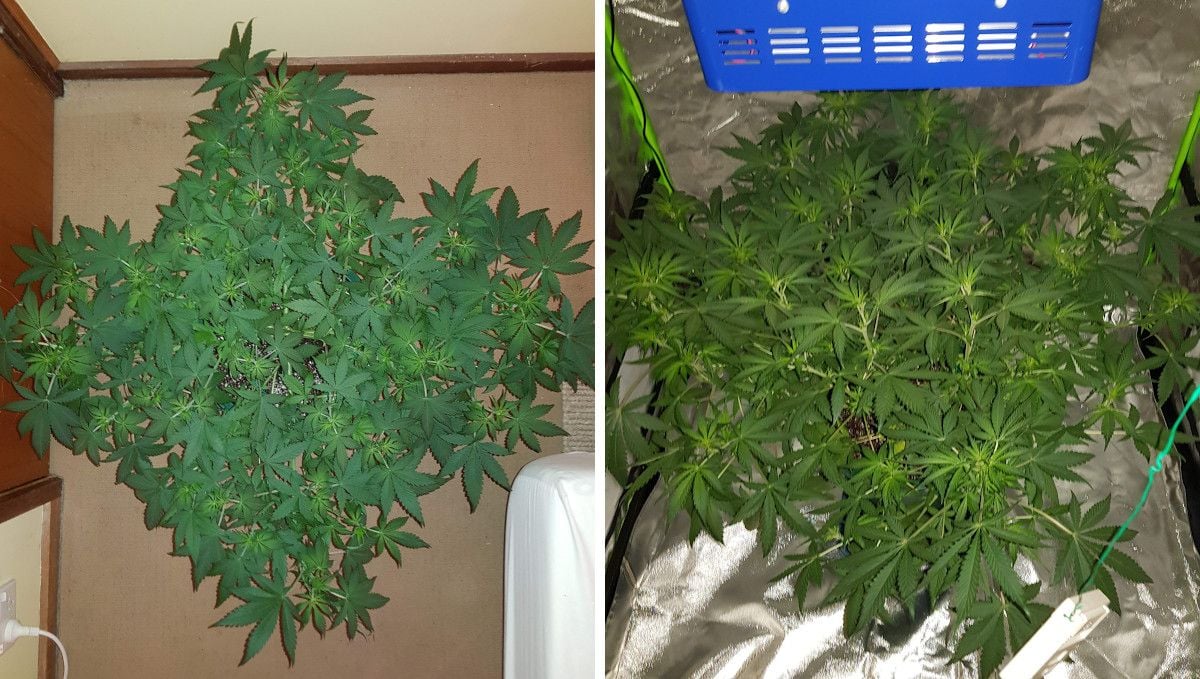
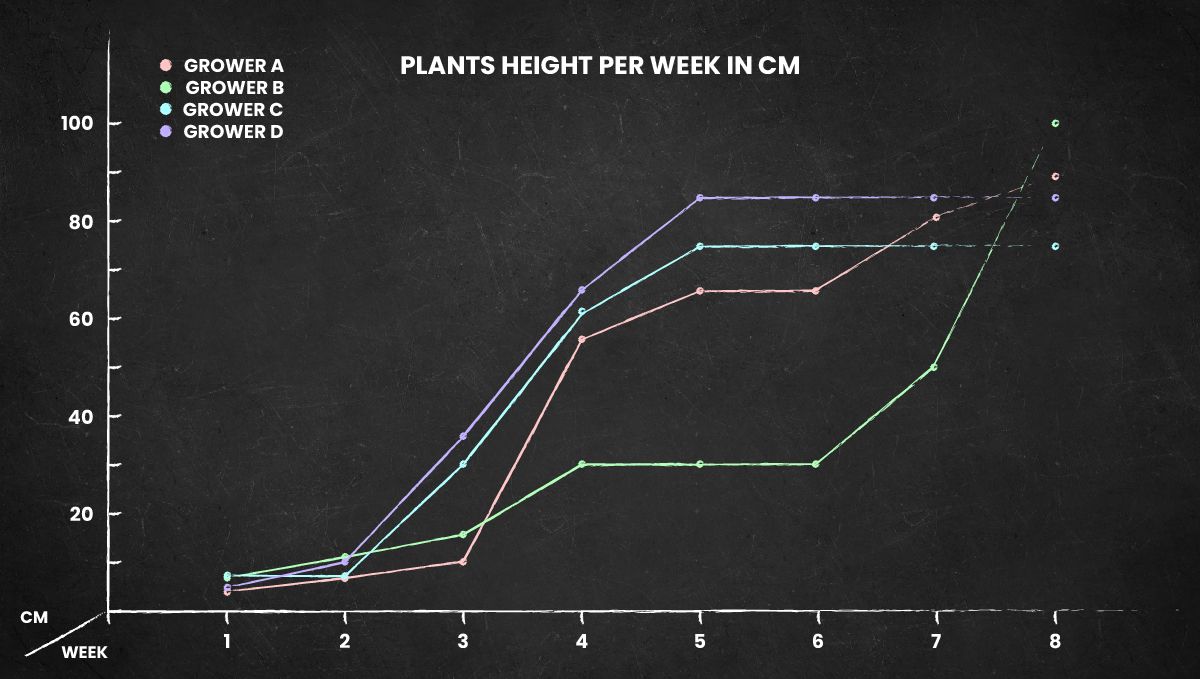
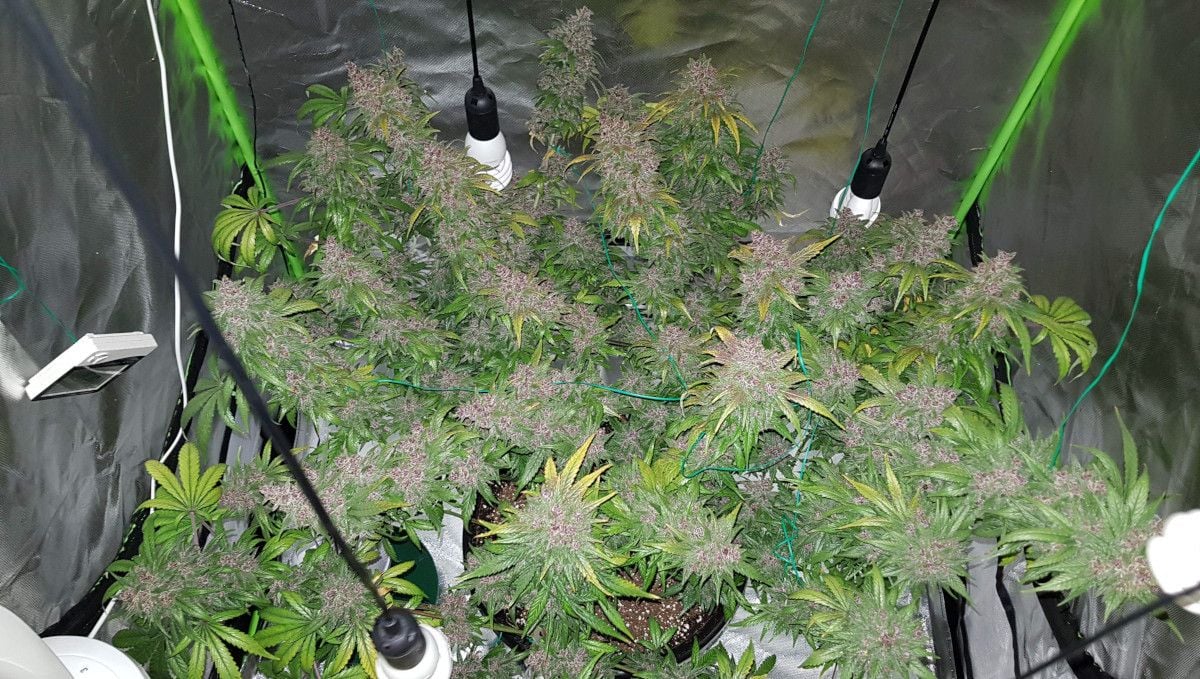
By the time buds start to fill out, most cannabis plants will have finished stretching, so you can stop worrying about running out of vertical space. In the graph below, you can see how uniform the plants were though they were cultivated in totally different setups and conditions.
Be prepared to handle the smell which gets intense at this stage in the life cycle. Even one plant can stink up the whole house without proper ventilation, and with several plants, you'll definitely need a carbon filter.
9. Ripening And Harvest | Week 10 (And Beyond)
The last week or two in the life cycle of an autoflower is when you need to ensure low relative humidity and cool day and night temps. The first condition is important as high humidity is probably the greatest enemy of mature buds because of mold and bud rot, while the lower temperatures help save the terpenes and THC inside them.
We should also note that half of all LSD-25 Autos that we have reviewed were actually harvested prior to week 10. The table below gives you the conditions from the two remaining grows.
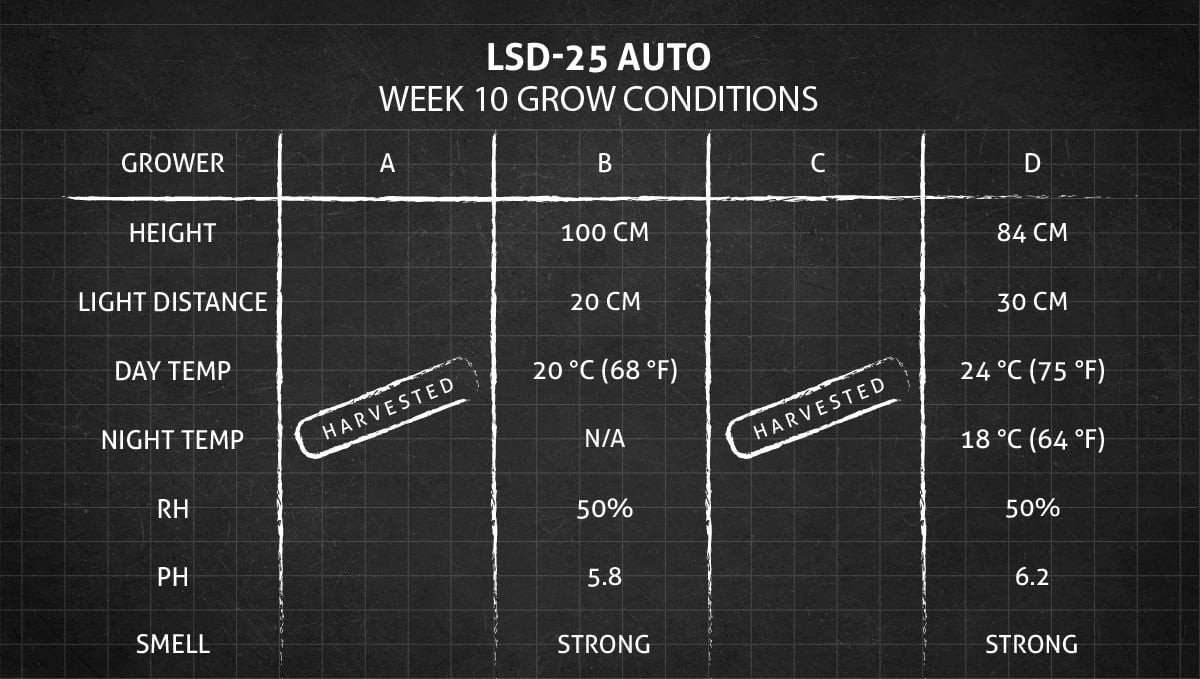
In the last couple of weeks leading to the harvest, the buds most probably won't gain in size at all, and that can make you wonder whether they have finished maturing and should be cut right away. However, they still change in important ways even now: their texture gets denser so that they get heavier, and more importantly, the levels of THC in trichomes keeps rising. All this means that you need a more reliable indicator of your plant's readiness for harvest than the lack of any change in size.
Of course, you can rely on the breeder's specifications -- the good ones give honest numbers regarding the length of time that their strains take to mature -- but this is the least accurate method. The reason is that when you grow from seeds, there's also some phenotypic difference, and besides, the flowering time depends to some extent on growing conditions and techniques.
A more accurate method that amateur growers use is too look at the color of pistils (female hairs) -- when they're still white, the buds are immature; when all of them have turned brown or orange, the perfect window for harvest is probably very near. Yet another sign that your plant is nearing the end of its life cycle is the fading of the leaves as the plant assumes a more and more 'autumn' look.
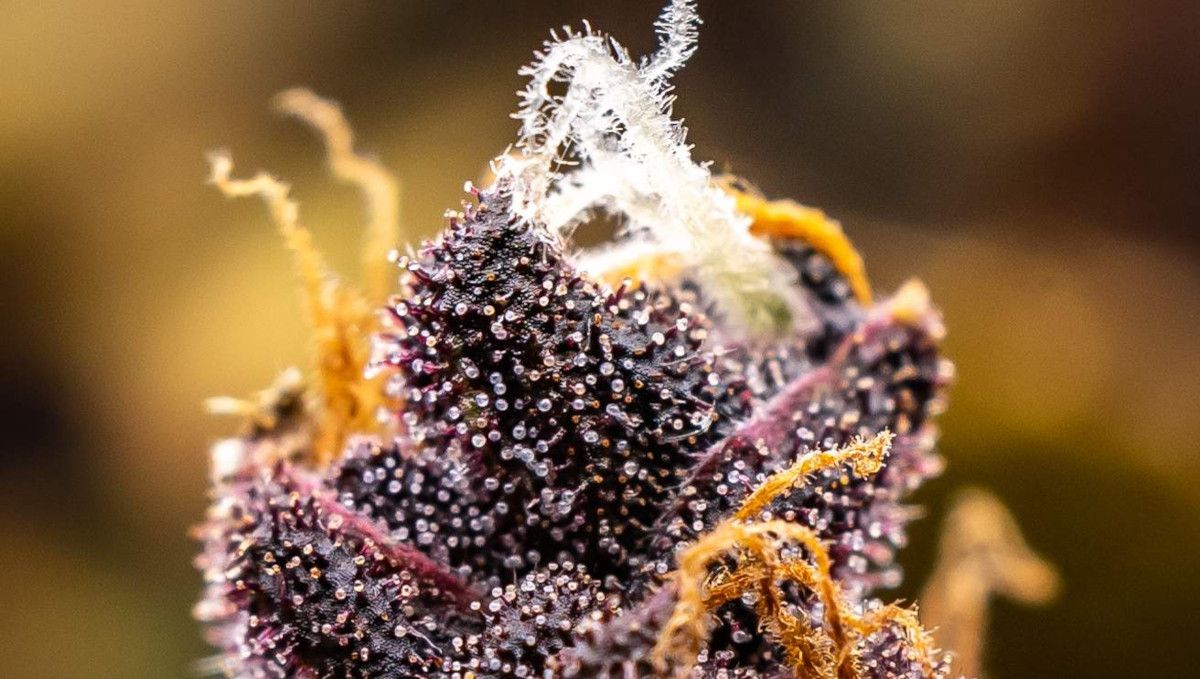
Finally, the most reliable way of judging whether your marijuana plant is ready for harvest is to inspect its trichomes under a 60-power hand microscope. When magnified like this, the trichomes will reveal their color and tell you the exact moment when the level of THC in them has reached its peak. Clear trichomes mean they're still low on THC; cloudy trichomes mean the THC content is the highest, and when it starts to degrade, the color changes to amber.
While watching the trichomes and waiting for them to mature, don't forget that at some point, you'll need to stop feeding your autoflower any nutrients and give them only pure water. This procedure is called flushing and takes up to two weeks in soil and less in hydroponics and coco grows. The idea of flushing is to get rid of as much built-up salts as possible so that your future smoke is clean, flavorful, and not harsh on the throat. While you flush, the fading of the plant accelerates as the plant cannibalizes its stored-up resources and chlorophyll in the leaves degrades.
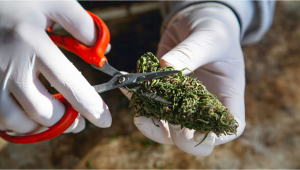
The good practices of weed growing don't stop after you've chopped your autoflower. Make sure you're at your A-game while you dry and cure your plants. Don't rush either of theese processes. Drying should happen in a cool, well-ventilated room and take about 7-10 days. When the buds have lost most of their moisture content, you can snip them off from branches and put into glass jars to cure for 2-3 weeks -- opening the jars once or twice a day to 'burp' the excess humidity.
10. The Outcome
LSD-25 Auto is a versatile strain that is compatible with different growing methods and setups and ensures great results to growers with any level of experience. You can compare the outcomes for both masters/grandmasters and apprentices in the graphic below and see that the final weight of LSD-25 plants doesn't depend much on the cultivation skills.
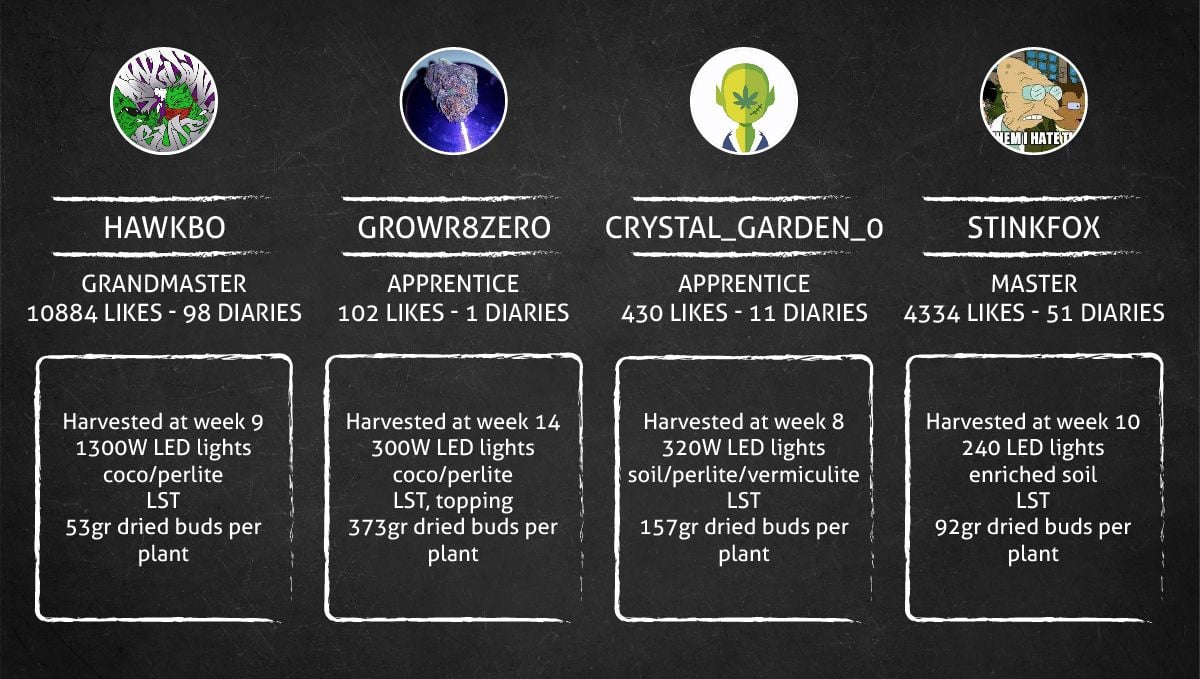
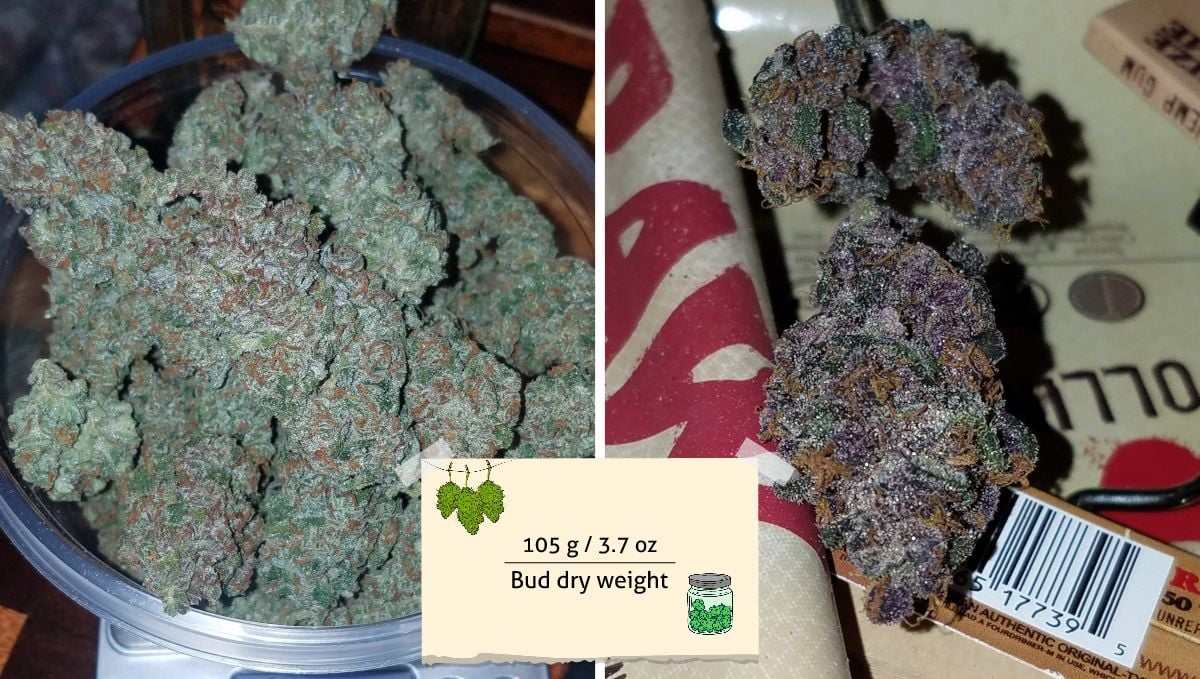
In the first grow that we've been following, the gardener harvested 3.7 ounces (105 grams) from his two LSD-25 Auto plants. Not bad at all, considering that these two were just a small part of a large multi-strain SOG grow and they were cultivated in 3-gallon (1.36-liter) pots. And the whole life cycle took just 9 weeks, and this is just about average for this autoflower. Some LSD-25 plants that we have seen took 8 weeks, a few took 10. More than that would be an outlier.
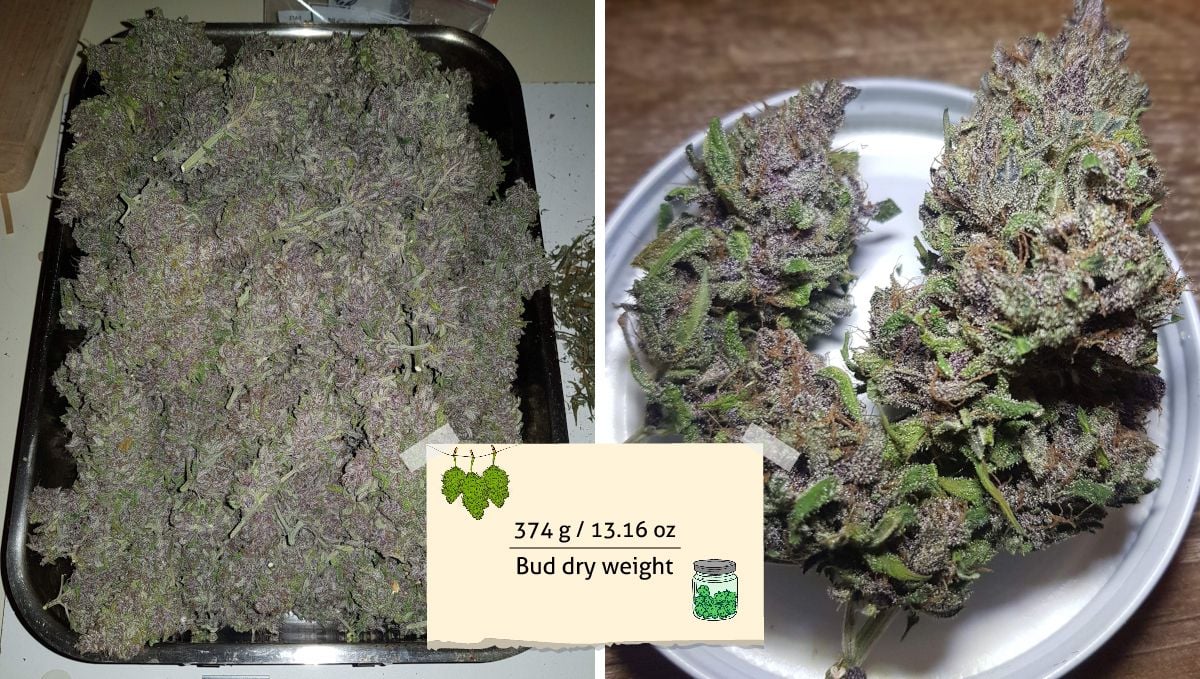
Our second grow was one of those outliers. Here, LSD-25 took 14 weeks to mature and brought an outstanding 373g (13.16 oz) of dry bud from just one plant.
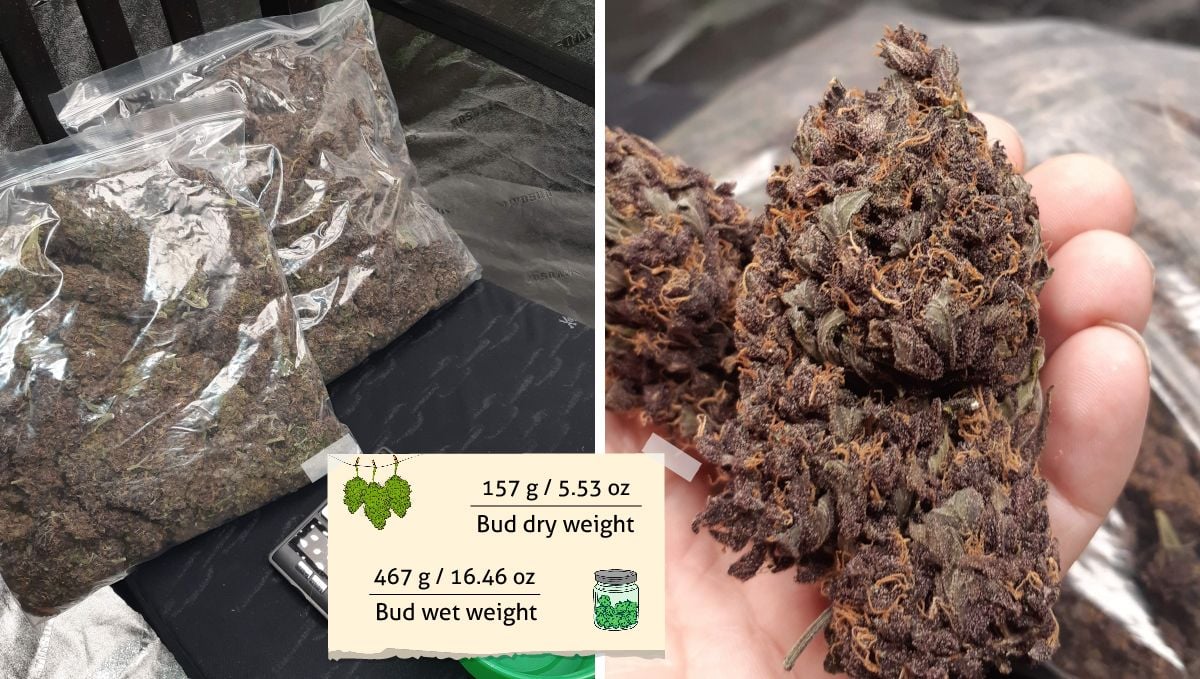
The third one was amazingly productive as well -- 157g (5.53 oz) of well-manicured nuggets in just 8 weeks from seed to harvest.
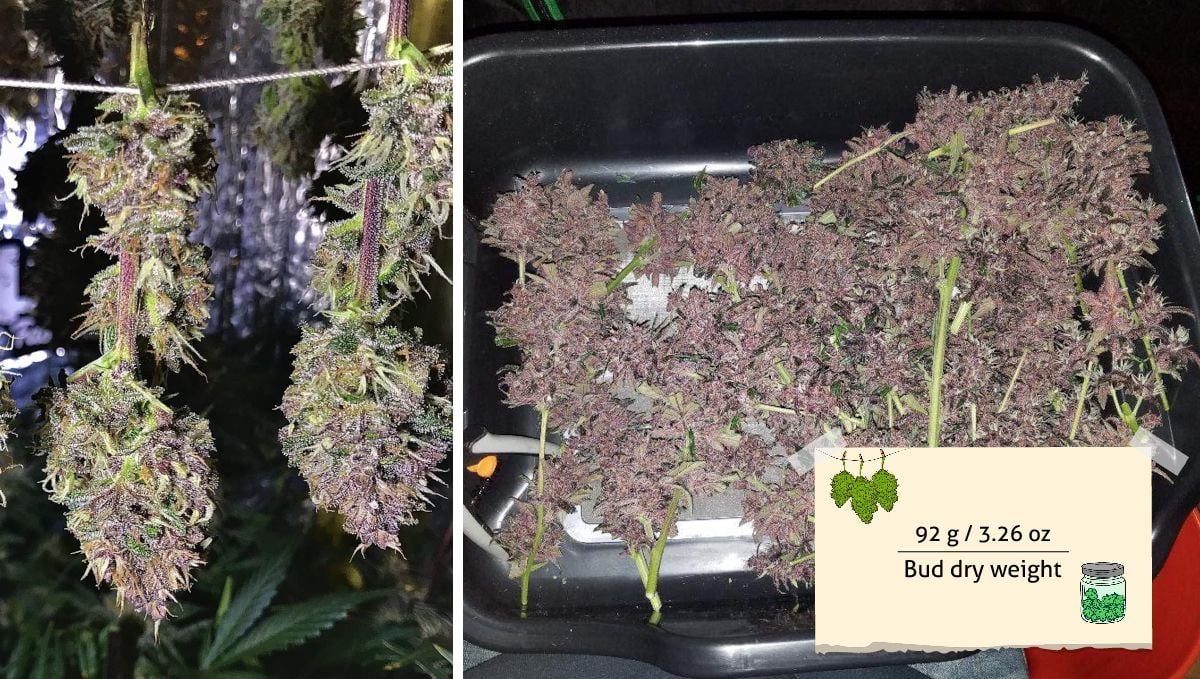
The fourth one was a soil grow -- not the most productive of mediums. However, it also produced a respectable 92g (3.26 oz) in 10 weeks.
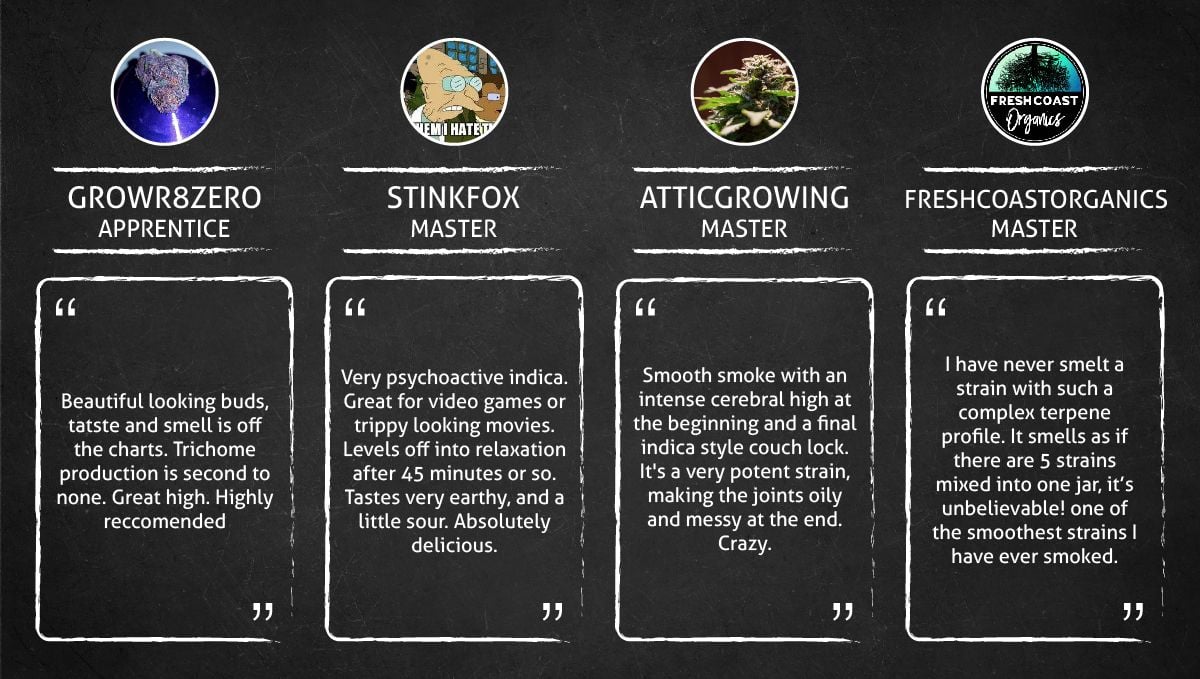
All reviews that we have seen agree that LSD-25 is highly potent and provides both cerebral and body effects. It can be smoked during any time of day, and its effects last for a long time. The taste and aroma of LSD-25 Auto vary from earthy and fruity to sweet and sour, and it has a complex terpene profile. The smoke is best used for relaxation and entertainment purposes, making it suitable for playing video games or watching trippy-looking movies. Overall, this strain is highly recommended for those who enjoy a potent and long-lasting high with a variety of flavor and aroma profiles.
10. In Conclusion
We have seen enough LSD-25 Auto grow diaries to draw a conclusion about this strain’s cultivation patterns and its reaction to different growing techniques.
One common theme about most of the grows we’ve followed is that this autoflower is very fast. It routinely finishes in 8-9 weeks from seeds which also means that it doesn’t have enough time to grow very big. So, don’t choose very large pots and use training sparingly – even if left to develop naturally, LSD-25 Auto will stay compact enough in most cases.
Any heavy training attempts are likely to be hit-and-miss, but in rare cases (see Grower B in our guide), you may run into a long-flowering pheno that will benefit from training and produce an outstanding yield.
We have also seen very few green phenos, so if you like purple weed, you can count on buds turning this beautiful shade – sometimes lighter and sometimes deeper. In all other important ways, LSD-25 Auto is like the best of the modern autoflowers – a low-maintenance, easy-to-grow plant that anyone can bring to harvest. Happy growing, all!






Comments