Zkittlez Auto Cannabis Strain Week-by-Week Guide

- 1. Grow specifications
- 2. Grow set up
- 3. Germination and seedling stage | week 1
- 4. Early veg | week 2
- 5. Mid veg | weeks 3-4
- 6. Transition (pre-flower) | week 5
- 7. Early flower | weeks 6-7
- 8. Mid flower (bulk phase) | weeks 8-9
- 9. Ripening and harvest | weeks 10-12
- 10. Yield and smoke report
- 11. Zkittlez auto cannabis strain grow guide faqs
- 12. In conclusion
Preface
Immerse yourself in the growing world of the Zkittlez Auto marijuana strain with this complete week-by-week guide. This is why this resource is the real gold for farmers, both newbies and experienced growers. It offers a complete overview of the stages of one of the most fragrant and potent autoflowers. The guide contains essential information and valuable ways for Zkittlez Auto to grow from the seed to a heavy harvest. Zkittlez Auto is famous for its delicious sweet candy taste and high THC level. Specific culturing systems are to be used to get the full power of the strain. This blog covers all developmental phases of the plant, with particular emphasis on the key points of growth, nutritional needs, and effective growing methods. It is an invaluable medium for creating a base conducive to a successful crop.
Although Zkittlez Auto is difficult to grow, it presents a few peculiar challenges and rewards. This section will discuss the most frequent cultivation problems and give recommendations in the form of expert opinions that will help you specify the details of cultivating this well-known variety. The information in this article regarding light exposure adjustment and nutrient absorption by the plant is essential and will make cultivation more rewarding. The guide is enriched by Enzo Schillaci’s practical farming experience and his talent to convert it into a vivid and exciting narrative. He brings content from a diversified background, from studying plants in the Amazon Basin to working in different cannabis-growing environments.
Jorge Cervantes is a cannabis grow guru who has been growing plants for over 40 years and has published many highly influential works. He offers deep and authoritative information in the guide. Their combined knowledge also provides a practical growers’ handbook.
Intro
Zkittlez Auto is one of the top-grossing varieties in Fast Buds’ collection. The obvious reason for her popularity is carefully stabilized genetics that results in not too tall compact plants with strong side branches and huge bloated flower clusters. The finished product is also reliably great — with sweet candy-like flavor and an aroma of berries and fruit and a pleasant hybrid high that starts with mental stimulation and gradually settles in the body as an anxiety-free relaxing buzz.
1. Grow Specifications
Growers appreciate Zkittlez Auto for her moderate size that seldom exceeds 100 cm (39 inches) and a flowering time of only 70 days on average. But, thanks to her vigorous growth from day one, this cultivar manages to cram a lot of progress into this short stretch of time. The indoor yields under the most favorable conditions reach 450–500 gr/m2 (1.5–1.6 oz/ft2) while outdoors, you can harvest 70–300 g (3–11 oz) per plant.

This 60% Indica-dominant strain has a very sturdy structure with a towering main cola and several well-developed side branches. They are thick but still require support because of the sheer weight of buds at harvest. Zkittlez Auto is a resin-producing monster, with a thick layer of trichomes carrying as much as 23% THC as well as loads of terpenes with sweet, berry-like, and fruity notes.
2. Grow Set Up
Zkittlez Auto is a very popular variety on Growdiaries. So we have been choosing among the most detailed and informative grow journals out there. We hope our guide answers all your questions about the Zkittlez Auto timeline and life cycle.
| Grow Space: | 0.84 m2 (9 ft2) | Pot Size: | 12 l (3.17 gal) |
|---|---|---|---|
| Seed to Harvest: | 12 weeks | Medium: | 100% coco coir |
| Flowering: | 7 weeks | Nutrients: | Synthetic/Organic |
| Light Cycle: | 18/6 → 19.5/4.5 | pH Levels: | 5.8–6.1 |
| Light Type: | LED | Day Temperature: | 27↘10°C (81↘50°F) |
| Watts Used: | 135 | Humidity: | 64% ↘ 58% |
The grower that we feature in our review uses two grow tents equipped with LED lights. His one Zkittlez Auto along with a few other autoflowers was grown under a 135W LED light. He used a 3-gallon container with a coco/perlite mix and thought it was a perfect amount of medium for a cultivar of this size and speed.
He started with the standard 18/6 light cycle but then switched to 19.5/4.5. You can use any schedule, including 24/0, for true autoflowers (of which Zkittlez Auto is a great example).
3. Germination And Seedling Stage | Week 1
Germinating an autoflowering seed is a straightforward process, but it can be very stressful for newbies. That’s why we advise that you should use the most common germination method for the first couple of grow cycles — the one described below. Also, take notice of the conditions — they were close to ideal in this garden.
| Plant Height: | 2“ (5 cm) | Humidity: | 64% |
|---|---|---|---|
| Distance to Light: | 24“ (61 cm) | Water per Day: | 0.13 gal (0.5 l) |
| Day Temp: | 81°F (27°C) | pH: | 5.8–6.1 |
| Night Temp: | 72°F (22°C) | TDS: | 375 ppm |
The guy started with pre-soaking one Zkittlez Auto seed in a glass of water and then put it under moist paper towels. The bean cracked within 24 hours, was kind of slow in growing the taproot at first, but then picked up the pace. After another 18 hours, the taproot was ¾ inches long and quite thick.
At this point, you can safely put it in the medium, about half an inch (1 cm) from the surface. Some gardeners prefer to leave the shell just above the surface (only burying the root), but in this case, the shell won’t probably come off on its own. So, you’ll need to remove it with your fingers once the seedling comes up.
Some people use starter pots or cups for their seedlings. However, with autoflowers, it’s safer to plant the seed straight in the final container. As this guy did. This helps avoid unnecessary stress. The grower used Royal Gold coco fiber. It comes pre-charged with calcium because this nutrient is needed in larger amounts in coco grows.
Of course, you need to amend coco coir with perlite because coco is great at retaining water, but cannabis roots also need oxygen and this is where perlite comes into play by creating air pockets in the medium.
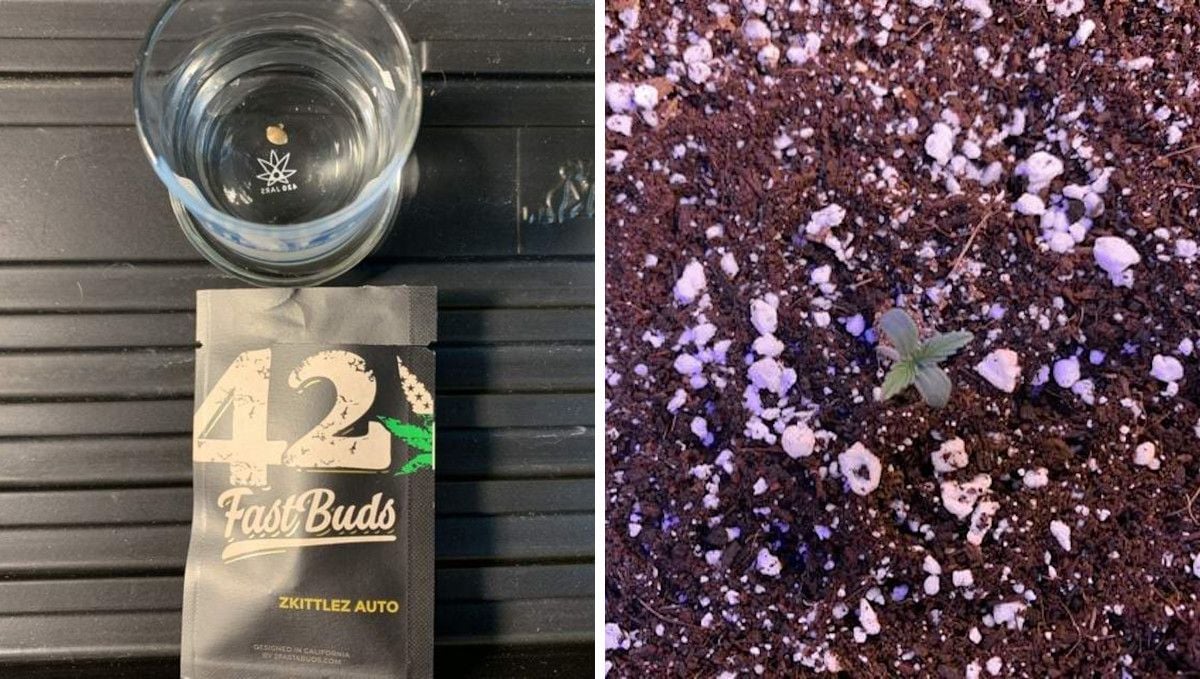
From the start, Zkittlez Auto showed her Indica character — she had dark-green and wide leaves. She didn’t stretch much, probably due to a wrong distance from the light. Over the whole cycle, the grower kept experimenting with the optimal distance. In the seedling stage, we’d recommend letting the seedling stretch a bit. It’s much better than pounding it with too much light

In the first few days, a weed seedling has enough resources to develop without any extra nutrients, but then they are a must. And since coco is an inert medium, you have to provide extra nutes with water.
This guy had started with inoculating the medium with beneficial microbial life even before he planted the seed. For this, he used Advanced Nutrients Voodoo Juice and Piranha. Besides, he amended the coco with more calcium and magnesium using General Hydroponics CaMg+. And he started the staple fertilizer for this grow which was Green Planet Nutrients Dual Fuel.
This 2-part formula can be used throughout the grow cycle. The guy had his doubts because he had never used this line of nutrients and noticed it was kind of heavy on nitrogen (N). But lots of nitrogen is exactly what you need in the vegetative phase. The flowering stage is a different story.
One more product that he introduced from the start was Remo Nutrients VeloKelp. He used it as a foliar spray. In the seedling stage, this seaweed kelp extract helps with root development and in the vegetative phase, it contributes to the development of side branches. So, if you need a bushier plant, VeloKelp is the way to go.
4. Early Veg | Week 2
In the second week from seed, young plants stop being vulnerable and can take lower humidity and cooler temps. However, be careful with the distance from the light just yet.
| Plant Height: | 3“ (8 cm) | Humidity: | 59% |
|---|---|---|---|
| Distance to Light: | 22“ (56 cm) | Water per Day: | 0.26 gal (1 l) |
| Day Temp: | 77°F (25°C) | pH: | 5.8 |
| Night Temp: | 72°F (22°C) | TDS: | 375 ppm |
The second week from seed in the life cycle of an autoflower is also the time when the visible changes start to happen overnight: every next pair of leaves grows bigger than the previous one and you may notice the development of side branches, at least for branchier varieties.
The plant doesn’t drink much water at this stage. Nor does she require much food. Nevertheless, in coco, you’ll have to water to runoff regularly to replace the nutrient solution in the root zone with the new one. Otherwise, even if you add just a little amount of fertilizers, the roots will absorb mostly water and the concentration of fertilizers will increase. This may lead to the burning of the roots. You may monitor what’s happening in the medium by measuring the TDS of the runoff water.
Also, pay attention to pH. When growing in coco, let pH fluctuate slightly in the 5.5–6.0 range. This will be ideal for nutrient intake. For soil, ideal pH values are a bit higher — 6.0–6.5.
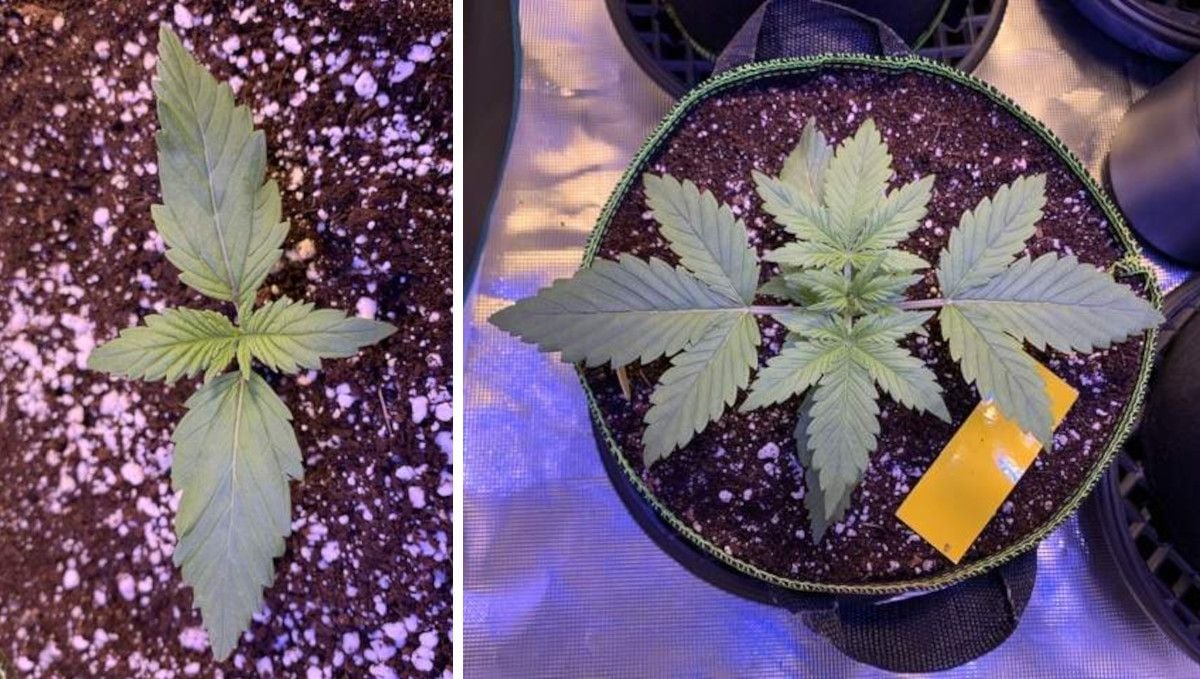
You can judge how your autoflower is doing by the color of her leaves: they should be uniformly green. Too dark a shade may point to N toxicity, too light color with a yellowish tint is a signal that the plant isn’t getting enough food. Burnt tips say you’re giving her too much. This Zkittlez Auto, as you can see in the pictures, looked totally happy with her diet.
5. Mid Veg | Weeks 3-4
The vegetative growth picks up the pace in the second half of the first month, and the plant requires heavier feeding now (look at the TDS numbers which went up compared with the previous week).
| Plant Height: | 7–11“ (17–28 cm) | Humidity: | 59% |
|---|---|---|---|
| Distance to Light: | 22“ (56 cm) | Water per Day: | 0.4 gal (1.5 l) |
| Day Temp: | 79–80°F (26–27°C) | pH: | 5.8–5.9 |
| Night Temp: | 70°F (21°C) | TDS: | 600–875 ppm |
Although the size of the plant isn’t really impressive at this point in the timeline, prudent gardeners start to train their cannabis anyway — before the stretch gets out of control. This is what the grower in our review did. He used the most simple and least stressful tie-down method, noting how soft and pliable Zkittlez Auto’s branches were.
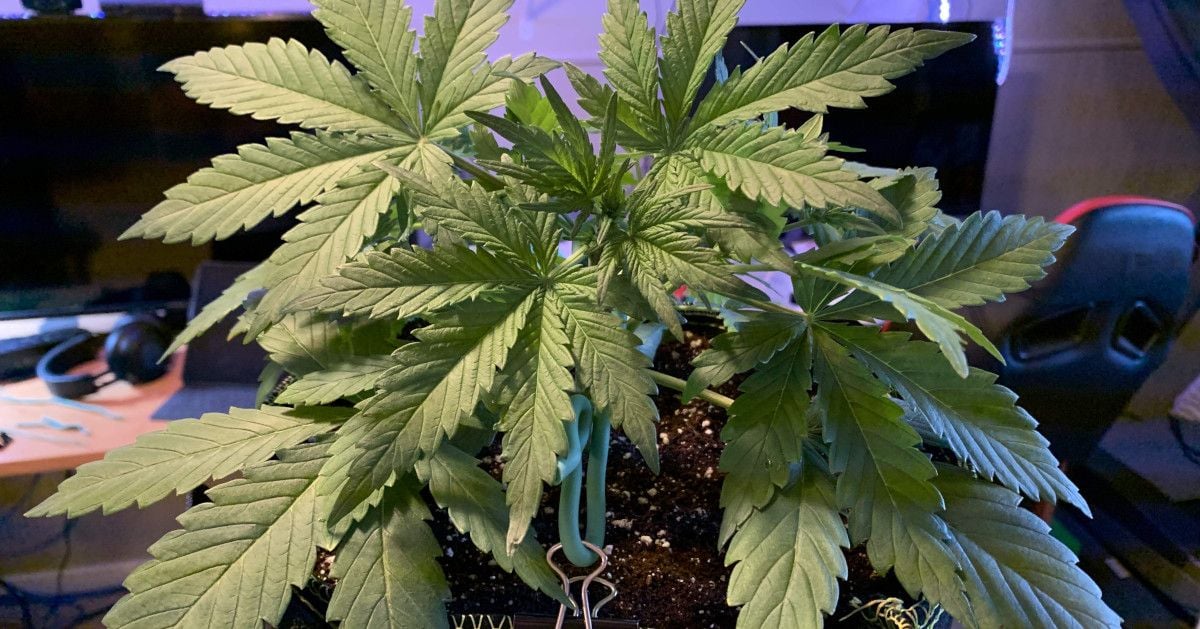
This autoflower looked bushy even before the training, and after LST, the side branches started to grow even more rapidly. By the end of the vegetative part of grow stages, the canopy was wide and even.
6. Transition (Pre-Flower) | Week 5
This is about the standard time for an autoflower to enter the pre-flowering stage. It’s marked by the emergence of pre-flowers — tiny hairs that you can see at the nodes and later on growing points.
| Plant Height: | 16“ (41 cm) | Humidity: | 58% |
|---|---|---|---|
| Distance to Light: | 24“ (61 cm) | Water per Day: | 0.53 gal (2 l) |
| Day Temp: | 79°F (26°C) | pH: | 6.0 |
| Night Temp: | 70°F (21°C) | TDS: | 950 ppm |
In week 5, Zkittlez Auto (and the rest of the girls in the garden) became a little moody. The leaves were starting to droop too early before lights-out. As a matter of fact, this process is perfectly natural because cannabis rests during the night and doesn’t spend any energy on looking perky. However, if leaves begin to droop a few hours before you turn the lights off for the night, something about your grow is suboptimal.
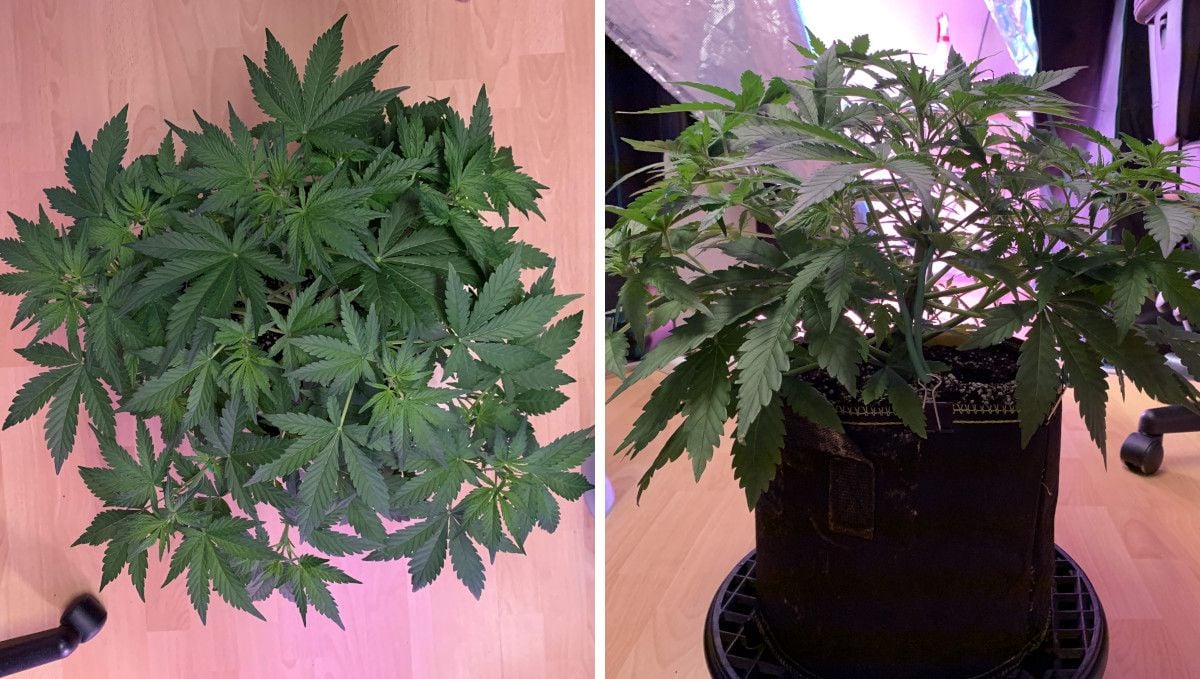
The grower thought he was keeping his Zkittlez Auto too wet and hadn’t raised the light high enough. He skipped a watering and raised the light, and the girl recovered. He also sprayed her with Lost Coast Plant Therapy as a precaution against possible thrips infestation. In the pic below on the left, is the result of this evening shower.
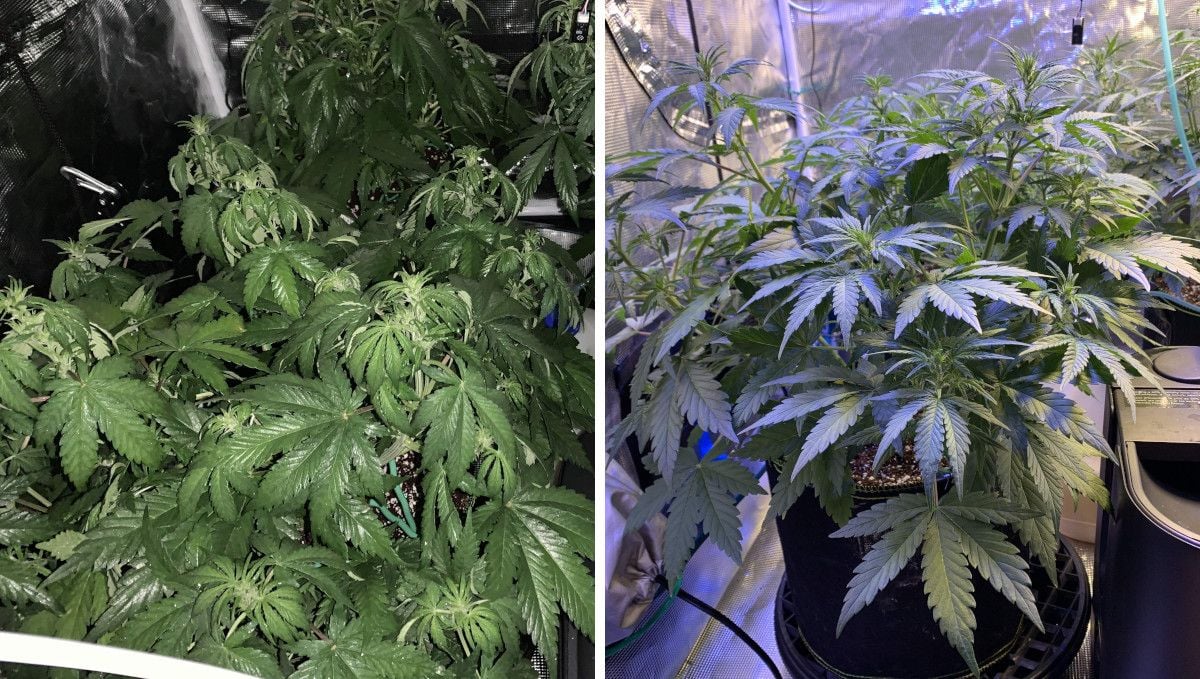
Several longest branches were way above the rest now, and the guy decided not to train them. He read that this particular strain had especially fat buds on the central stem, and so he wanted to see how the taller colas would compare with the rest. We don’t have anything against some experimentation, but as a general rule, you’ll harvest more if all of your tops are at the same level (at the same distance from the light).
7. Early Flower | Weeks 6-7
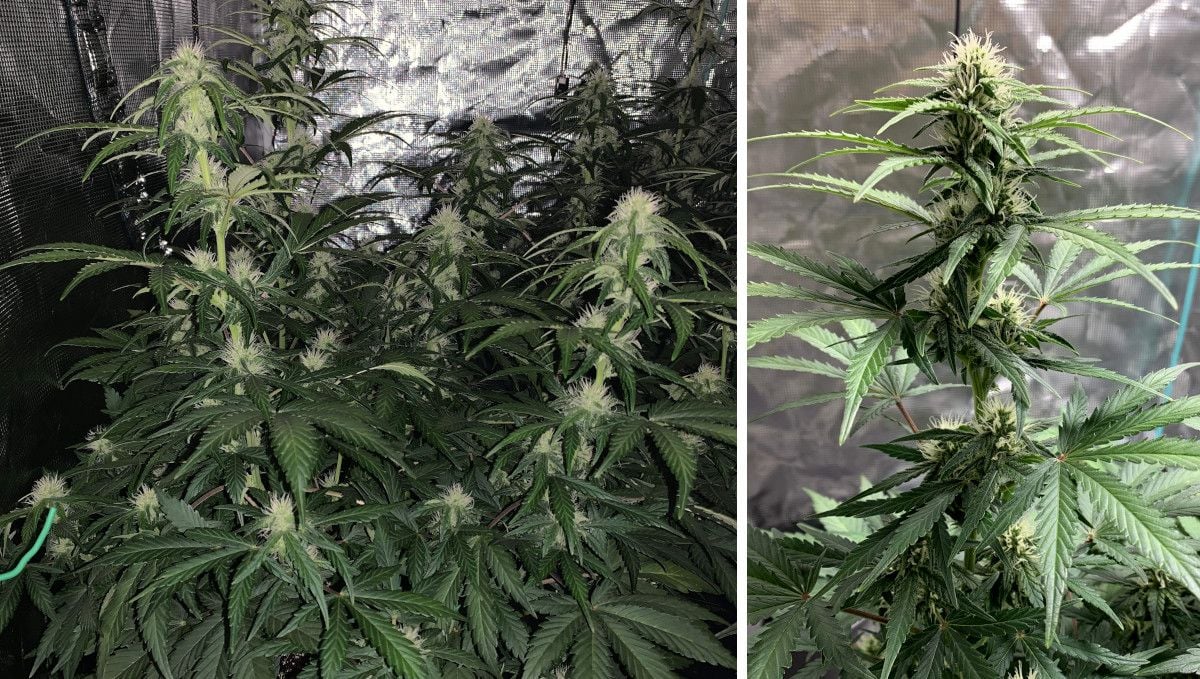
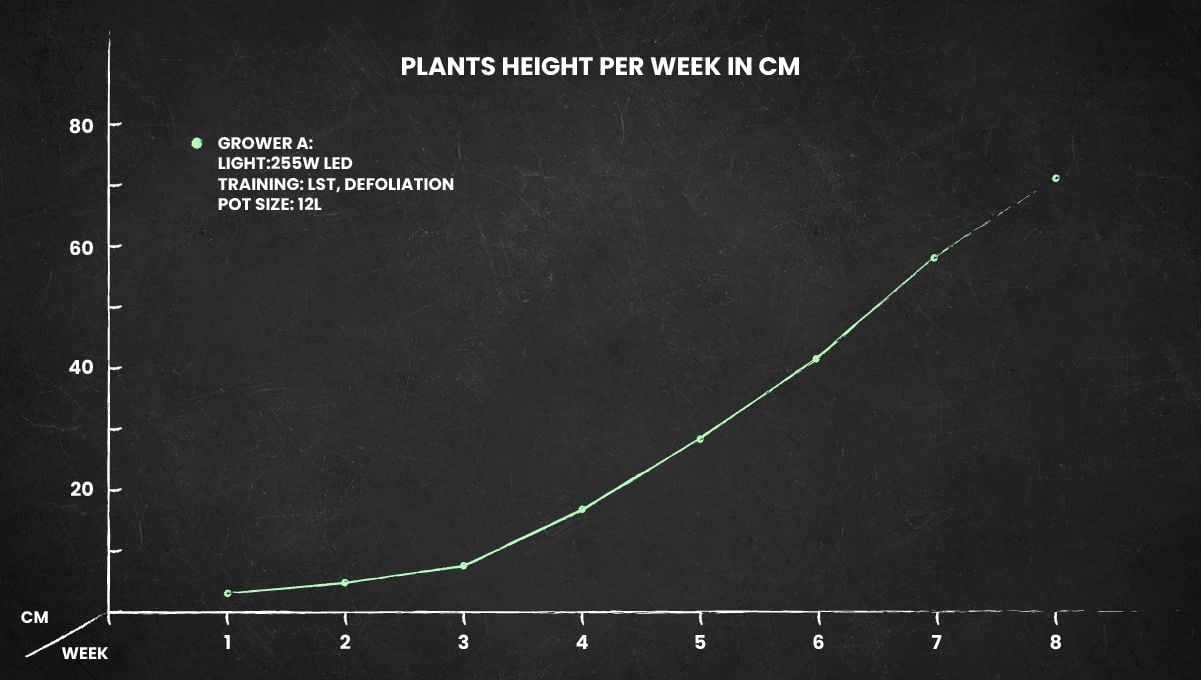
The start of cannabis flowering stages doesn’t mean that your plant stops growing. It’s the exact opposite really: this is when the flowering stretch begins. You can see in the table below how much height Zkittlez Auto gained compared with the pre-flowering stage.
| Plant Height: | 23–28“ (58–71 cm) | Humidity: | 58% |
|---|---|---|---|
| Distance to Light: | 22↘18“ (56↘46 cm) | Water per Day: | 0.79 gal (3 l) |
| Day Temp: | 81°F (27°C) | pH: | 6.0 |
| Night Temp: | 66°F (19°C) | TDS: | 1000–1100 ppm |
As the first flowers start to form, the branches get longer and longer by the day. It also becomes obvious by this point which of the branches have a chance to reach the canopy and which are destined to remain in the shadows. The latter need to go — no point keeping them.
So the grower pruned several weaker shoots inside the canopy and removed many nodes in the lower third. This technique is called lollipopping, and it helps the plant concentrate its resources where they have the greatest chance of doing good, meaning on top.
He also continued with defoliation which he had started in the previous week. The goal was to facilitate air circulation and remove those fan leaves that were blocking the light for the buds sites below them.
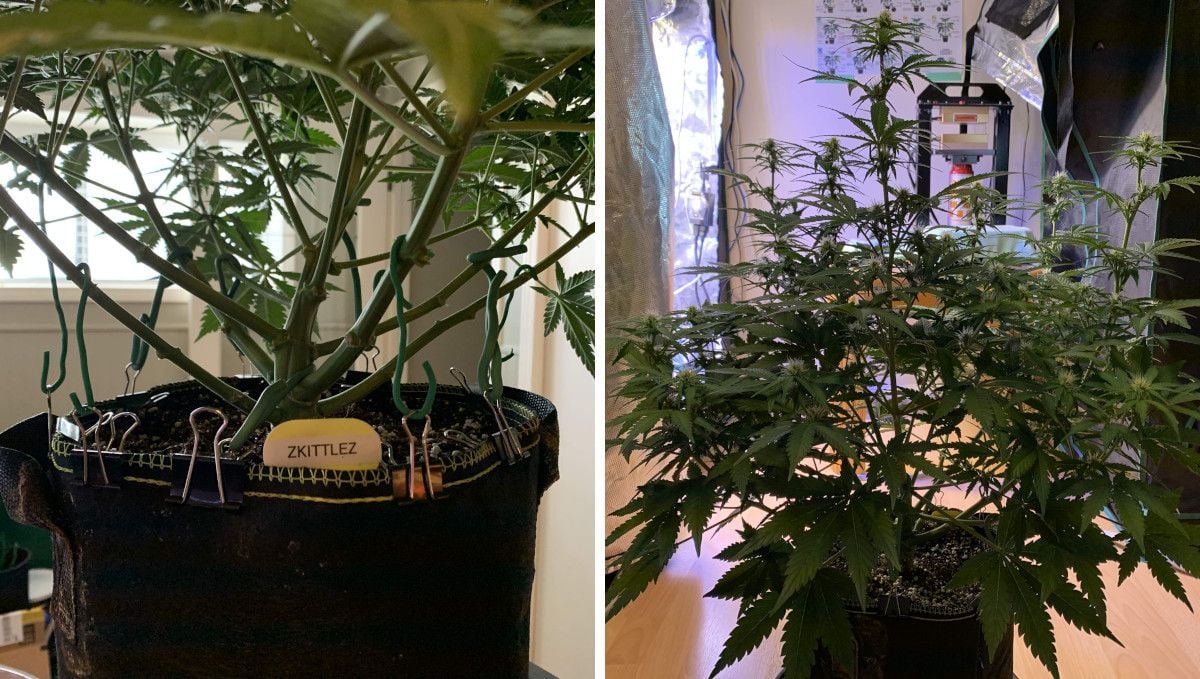
When the flowering really kicks in, it’s time to push nutrient levels to the max and change the diet to something more suitable to the flowering time. At this stage, cannabis needs less nitrogen and more phosphorus and potassium (P and K). The grower kept the staple of his feeding schedule but added the following products:
- Terpinator. Contains 4% potassium, facilitates the production of terpenes in buds.
- Liquid Weight. A source of carbs for microbes in the root zone.
- Rezin. Another enhancer of aroma and flavor.
- Rhino Skin. Provides branches with silicon for tougher cell walls.
- Sensizym. Enzymes are natural catalysts that break organic debris in the root zone.
- Massive Bloom Formulation. A supplementary NPK product that stimulates the budding process.
- Vitathrive. Facilitates plants’ normal functioning while also protecting them from stress.
As you can see, most of these products contain lesser minerals, vitamins, and stimulants which may contribute to your success but, strictly speaking, aren’t essential. So, don’t be intimidated by this long list. You can go a much easier route of just giving your cannabis a standard NPK product and microelements and save sophisticated feeding schedules for later runs.
As most of the vertical growth happens around this time, let's look at the height chart for this Zkittlez Auto from the first week and all the way to week 8:
8. Mid Flower (Bulk Phase) | Weeks 8-9
The bulk phase that starts sometime 4 weeks into flowering is probably the most uneventful among the different flowering stages. At this time, all you have to do is continue with your feeding regime and make sure all bud sites receive enough light.
| Plant Height: | 28“ (71 cm) | Humidity: | 58% |
|---|---|---|---|
| Distance to Light: | 14↘12“ (36↘30 cm) | Water per Day: | 0.66–0.79 gal (2.5–3 l) |
| Day Temp: | 81↘50°F (27↘10°C) | pH: | 6.1 ↘ 6.0 |
| Night Temp: | 66°F (19°C) | TDS: | 1150 ppm |
At this point in the flowering stage, the grower started to wonder whether his Zkittlez Auto would have enough time to work through all that nitrogen stored in her foliage. The leaves looked very green (indicating a lot of N). Most marijuana growers believe that too much N interferes with the budding process, hurting the yields.
However, this was only a minor worry. The girl looked happy. If you remember, there had been an issue of drooping leaves a few hours before lights out, but now the situation was exactly the reverse — the lady stayed perky till the very end of the day. So the grower decided to extend the day to 19 hours and a week later, to 19.5.
He was also making sure all the buds received enough light. He achieved this by another bout of defoliation, removing probably some 20 percent of fan leaves. He was also rotating the container every day for even lighting. Looking back at the result of this run, the guy decided he could have clipped more bud sites at the bottom. They remained underdeveloped and could only be used for rosin. Removing them in time would have redirected the energy to the top flowers.
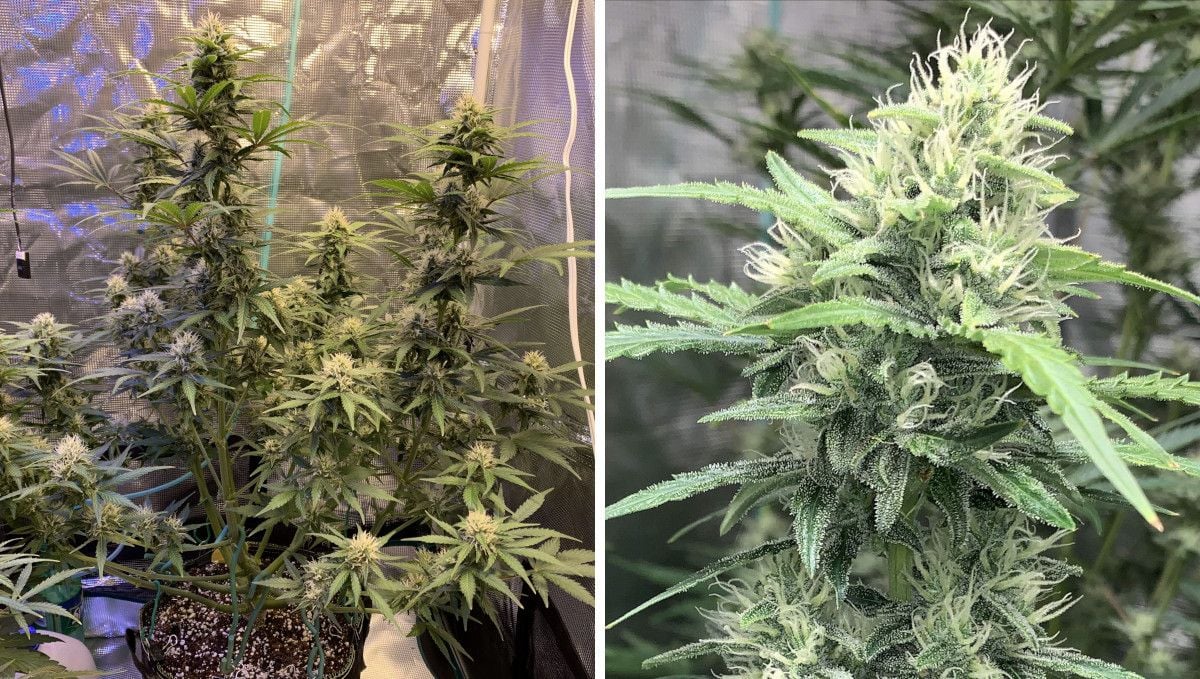
In week 9, the buds continued to swell and stack up. They got very frosty, too. Most of the hairs were still white, but a few reds appeared on the tops, indicating that Zkittlez Autoflower flowering stages were coming to an end.
It’s about this time that you should start thinking about the final flush. When growing in soil, you should flush for 2 weeks to get rid of all the built-up salts in the medium and plant tissues as well. In coco and other hydroponic setups, one week is enough. And it was probably a mistake on the part of this grower that he started flushing too early. It took him a whole 17 days in the end which is clearly overkill.
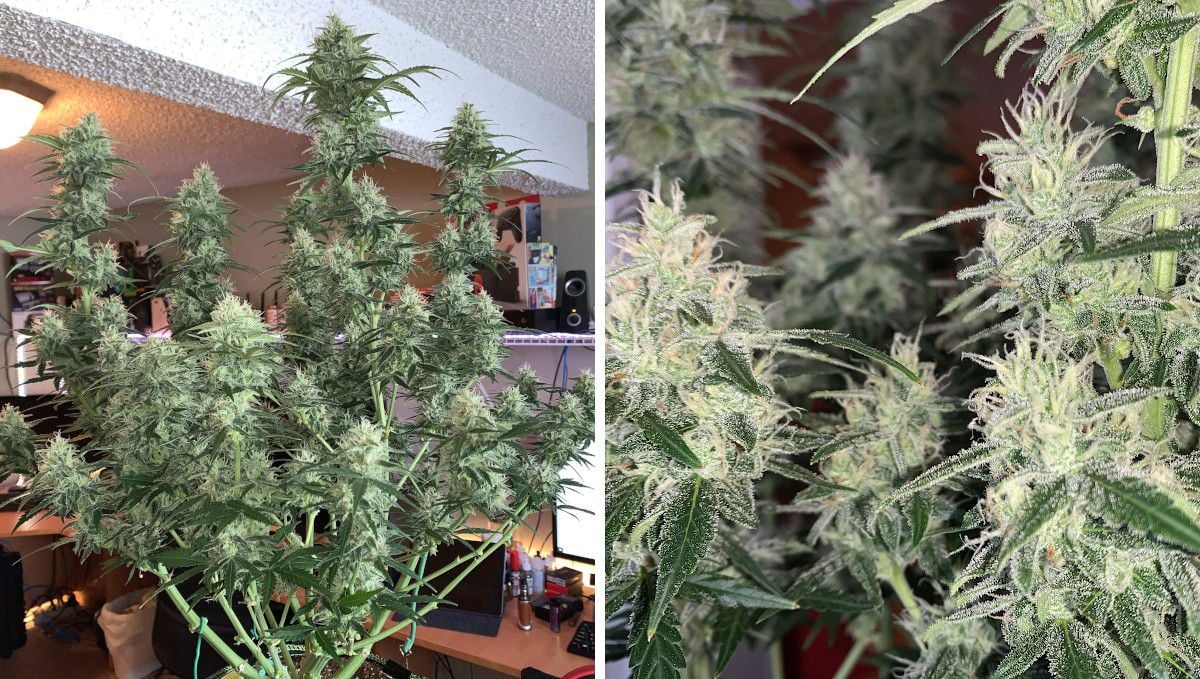
9. Ripening And Harvest | Weeks 10-12
You shouldn’t underestimate the importance of the last couple of weeks for the final weight and quality of your buds. You can give your cannabis a bumper dose of nutes right before the flush, especially those rich in phosphorus and potassium.
| Plant Height: | 28“ (71 cm) | Humidity: | 58% |
|---|---|---|---|
| Distance to Light: | 12–20“ (30–51 cm) | Water per Day: | 0.53 gal (2 l) |
| Day Temp: | 81°F (27°C) | pH: | 6.0 |
| Night Temp: | 50°F (10°C) | TDS: | 80 ppm |
When buds are in the home stretch, it’s important to keep humidity levels in check. Something like 35–45% will be just fine. It’s a good preventive measure against mold and bud rot which are common scourges, especially if you grow high-yielding strains with bulky and dense colas.
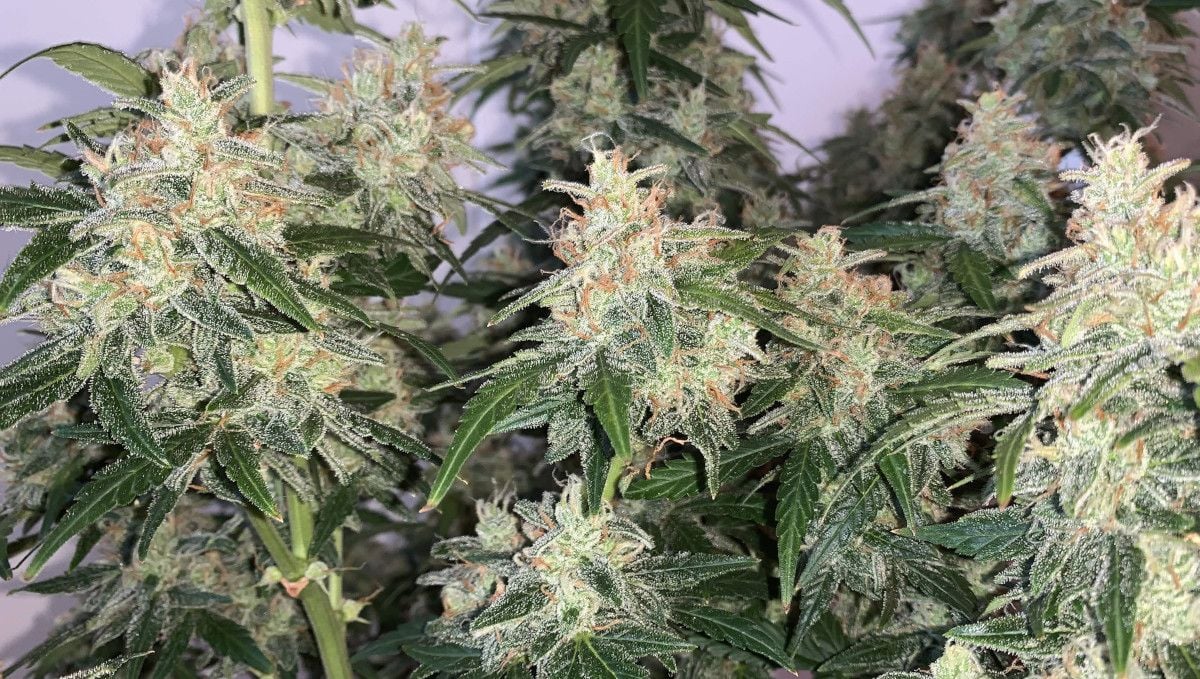
The day temps should also be in the lower range of the normal, somewhere between 21°C and 23°C (70–73°F). This will help conserve precious terpenes that easily evaporate at higher temperatures. With night temps 5-10 degrees cooler, you may see purple and other interesting colors in leaves and buds if your strain is prone to displaying them.
The grower in our review kept the temps even lower and RH on the higher side (see the table above), but he got away with it which speaks well of Zkittlez Auto’s resistant genetics.
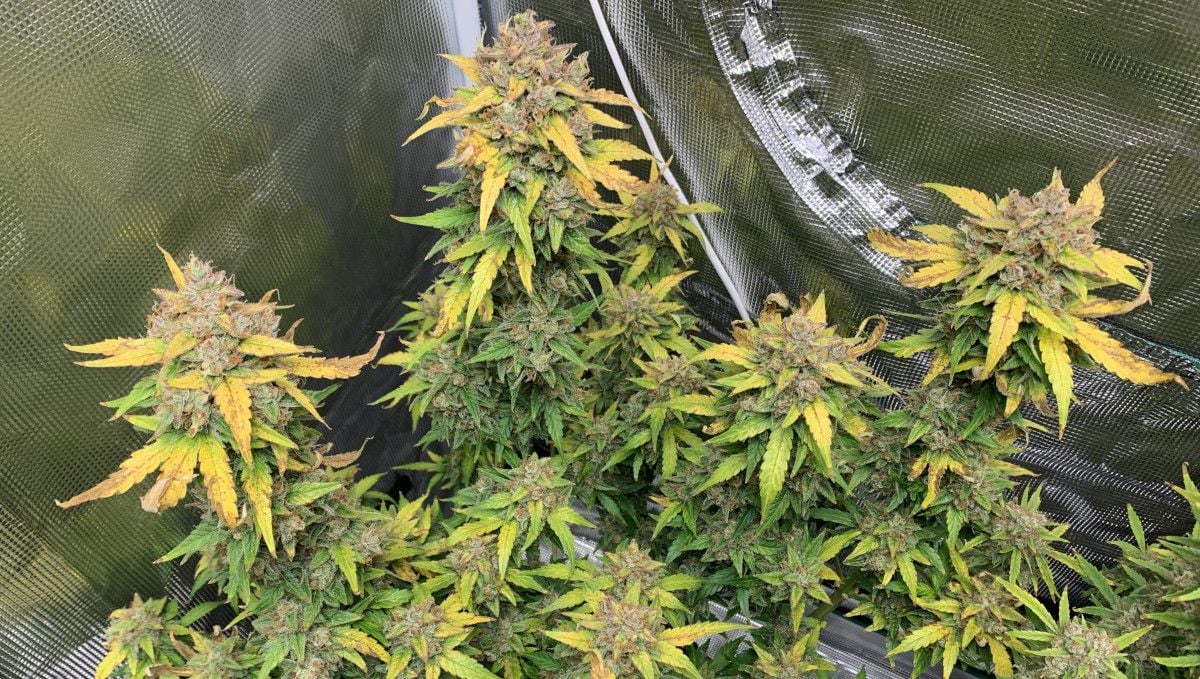
In the 12th (and last) week from seed, Zkittlez Auto began to fade beautifully, with trim leaves getting yellow and pistils orange and red. She obviously was very hungry from the long flush. The grower decided to give her axe on day 79, but he thought she would have run for full 12 weeks. If only he timed the start of the flush better!
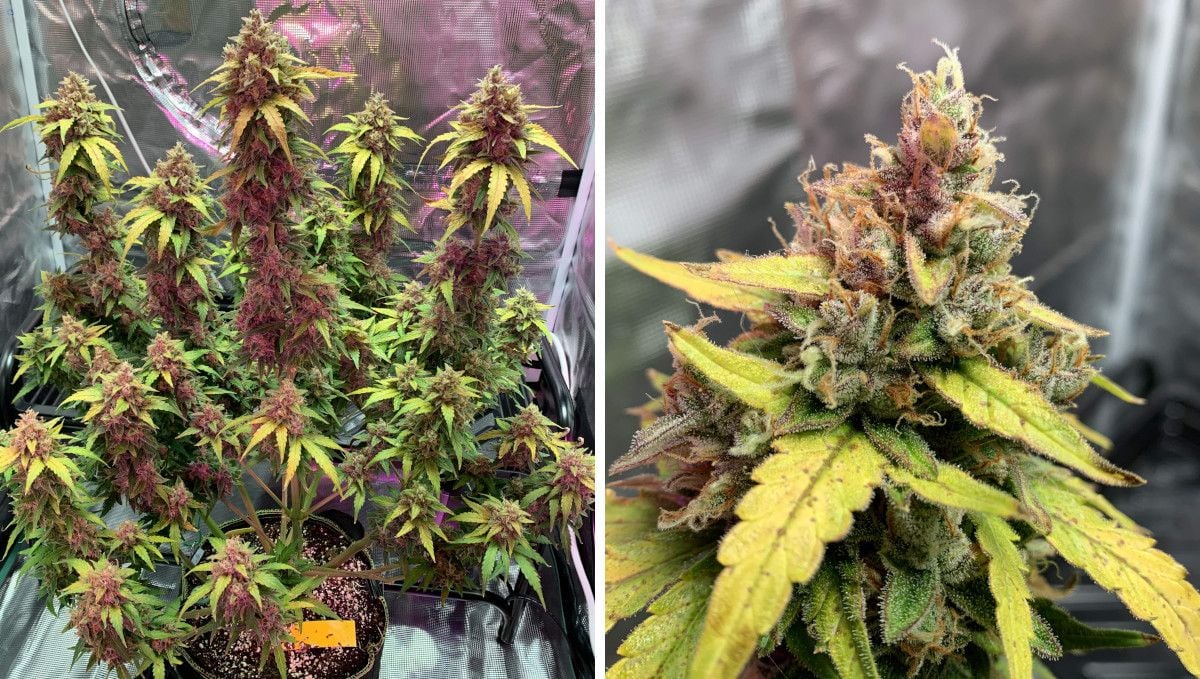
The guy didn’t mention the state of trichomes. This is the most telling sign of whether a plant is ready for harvest. You should chop when all trichomes have gone from clear to cloudy (you can see this with a 60x hand microscope) and there are a few amber ones as well. If you wait for a greater percentage of amber trichs, you may get a less active and more sedating stone. With clear trichomes, the effect is more clear-headed and noticeably weaker.
Since the branches weren’t too long, the process of drying didn’t take much time — 9 days before the nugs were ready to be put in glass jars for the cure. During the dry, the temperature was between 17-19°C (62-66°F) with humidity at 60%. This is about right. Just don’t forget that buds shouldn’t touch each other. Also, provide adequate ventilation and keep the dry room dark because THC degrades when exposed to direct light.
10. Yield and Smoke Report
The grower couldn’t be happier with how his Zkittlez auto performed. He got 145 g (5.12 oz) from just one plant. The buds were extremely easy to trim and also dense enough, but they would have benefited from a few more feedings before the final flush.
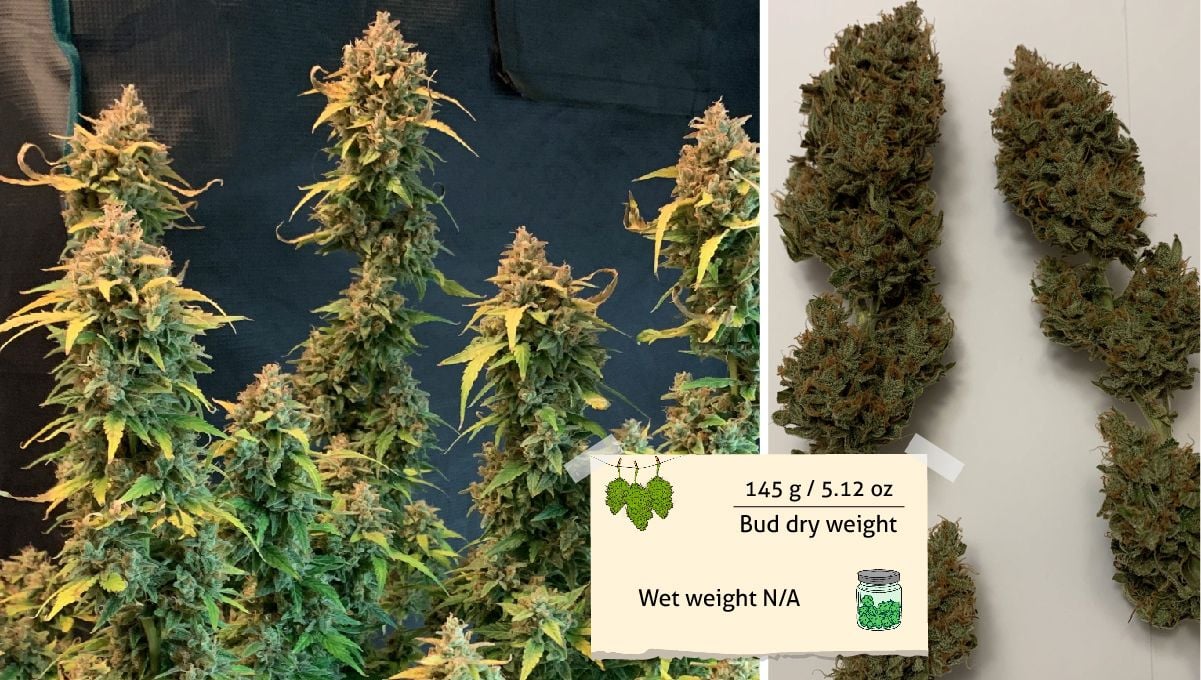
After a 17-day flush, any bud should be exceptionally clean and smooth-tasting. The grower sampled some before the cure, and the high was a strong relaxing stone with a happy vibe. The smoke tasted sweet, with pleasant fruity and piney notes.
Expert Opinion by Jorge Cervantes - co-author
Auto Zkittlez is a beautiful illustration of the development of cannabis genetics and cultivation practices. Zkittlez Auto is the closest thing to an ideal model of these advances, and with many years of experience growing and writing about all kinds of weed strains, the creation of this strain demonstrates a big advance to me.
The fast-growing and high-yielding growth pattern of such a strain has made growers adore it. Co-written with Enzo Schillaci, the relevant guide represents a week-by-week description of what the grower should be waiting for in each phase of the crop’s life. The plants’ activity and productivity from germination to flowering and harvest are of the utmost importance, and all information should be considered carefully.
The most evident is the abundant trichome production of Zkittlez Auto, which further boosts the potency of the strain's high and appealing scent and flavor. The guide gives ideas on how to cultivate these qualities so that growers can maximize the advantages of the wonderful strain.
11. Zkittlez Auto Cannabis Strain Grow Guide FAQs
Although the week-by-week guide for Zkittlez Auto is comprehensive - some growers, especially new ones - will always have a few questions. So, let's run through the most frequently asked questions, and answer them in a simple and concise way. One of the best ways to learn is by asking questions, so don't hold back if you feel we may have missed something - let us know down in the comment section and we will add it to this list!
How many weeks does Zkittlez Auto take to be ready for harvest?
There's no one comprehensive answer to this, as it depends on how it is grown and the climatic conditions. When allowed to grow in optimal conditions, and in a controlled indoor environment, then Zkittlez usually takes around 9 to 10 weeks. But she can take a little longer if the conditions are not ideal. In our experience working with the strain, it has never taken longer than 77 days from seed to harvest - but keep in mind that there will always be some variation between phenotypes. While we take huge pride in the genetic stability of our seeds, there will always be a small chance that seeds from the same batch may show some differing characteristics.
Do not take for granted that just because one Zkittlez plant in your crop has finished, it means the rest also have. Always use a portable microscope to have a good look at the state of the trichomes before pulling down any plant. You want to see a 50/50 mix of amber and cloudy trichomes, as this indicates that the cannabinoid potency has peaked.
What are the effects of Zkittlez?
This strain is a pretty well-balanced hybrid, with a Sativa 40%/Indica 60% split. This means that you get the best of both worlds, with the high starting as a soft cerebral buzz and then working its way into the body. The Indica effects are not going to get you super couch-locked, and the Sativa head high shouldn't spark any anxiety. With THC levels of around 23%, Zkittlez isn't going break any world records but new smokers should still be careful and dip their toes before they dive in headfirst.
Are there any grow tips for Zkittlez Auto?
Yep, there certainly are. Zkittlez is one of the heavier producers in the whole Fast Buds catalog and will definitely need a bit of support in the last 3 weeks or so. There are a few ways of going about this, but why not kill two birds with one stone and set up a SCROG? Not only will the SCROG net help support the heavy weight of the buds, but it will also help with keeping the entire canopy even. When using a SCROG net, the nutrients are more evenly distributed throughout all the buds, which should help boost the final yield.
We also recommend growing Zkittlez Auto in coco-coir. This medium has fantastic drainage and breathability, which is perfect for preventing root problems that can often occur with heavier strains. It is also super easy to flush, which can help greatly with combating any nutrient issues you may face during the grow. As always, make sure to keep an eye on the humidity levels in the grow room - especially in the last few weeks before harvest. You don't want to let it get too high as this can encourage bud rot and other molds to take hold.
What sort of yield can you expect from Zkittlez Auto?
This is definitely a strain that knows how to pack on the weight, and you can expect to see some pretty hefty buds come harvest time. When grown indoors, under optimal conditions, we have seen growers achieve yields of up to 450 – 500 gr/m2 which puts her in a pretty rare position of being able to produce over a pound per square meter! When grown outdoors, you can expect Zkittlez to yield around 100 - 300 grams PER PLANT. We have even had a few that broke the 350-gram mark. Crazy stuff.
What growing conditions work best for Zkittlez Auto?
Like most cannabis strains, Zkittlez likes it warm and semi-humid, but not hot and muggy. Basically, you want to try and recreate the conditions of a Mediterranean climate. The daytime temperature should be around 24ºC, with a slight drop at night to around 20ºC (68ºF). The humidity levels should also be kept in check, as you don't want them to get too high or low. To start with you want relative humidity levels around the 60% mark. Once she is into the third week you can drop them down to about 50%, and then again to 45% for the last month of flower.
What size dosage of nutrients is best for Zkittlez Auto?
As with most cannabis strains, Zkittlez Auto will need a slightly higher level of nutrients than other plants. She is a pretty big eater and will really love some extra food during the grow. We always recommend using a high-quality cannabis-specific nutrient regime, as this will give her everything she needs without having to worry about giving her too much of one thing or the other.
As always, make sure to start off with lower levels of nutrients and then work your way up as she gets bigger. It is much easier to add more nutrients than it is to remove them! Nutrient companies are businesses that make money from - you guessed it - selling nutrients. So, this can mean that they will sometimes inflate the dosage requirements so you end up having to buy nutes more regularly. We always go for a 1/4 dose to begin with and see how the plant handles it before increasing.
What sort of taste and smell can you expect from Zkittlez Auto?
Named in honor of one of the most popular candy brands on earth, it is probably unsurprising that this strain is full of sweet berries and tropical fruit notes. If you are looking for a strain that will let you 'taste the rainbow' then this is the one for you! The taste is finished up with a soft earthy flavor that really rounds it all out The smell is also pretty sweet, with a lovely mix of berries, citrus fruits, and candy. Aroma is one of the most important aspects of the appeal of a cannabis strain, and Zkittlez does not let you down.
Is there a perfect pot size and type for growing Zkittlez Auto?
As with all autos, you need to try hard and not stress her too heavily. Autos have a finite veg growth period, so the last thing you want to do is stunt her growth. One way around this is to start in the pot you intend to leave her in and never transplant. This means that she can put all of her energy into growing, rather than having to recover from the trauma of being transplanted.
We recommend an 11-liter pot (that's 2.5 gallons) for Zkittlez Auto. This will give her enough room to grow and reach her biggest size. If you are growing indoors or trying to be stealthy then you can go for a smaller pot, but remember that pot size is directly relative to the size of the plant.
12. In Conclusion
As you can see from our Zkittlez Autoflower week-by-week guide, this variety is predictable and resistant, vigorous from day one, and amazingly productive. Just don’t rush her at the end of the flowering stage if you want her to reach her peak potential.
She turns into a wide bushy plant of manageable height, and you don’t need high-stress training methods to achieve this. Simple LST is enough. Channel the plant’s energy to the tops by lollipopping the lower part. These are very easy measures, but they ensure yields that are well above average. Happy growing, everyone!
External References
- Genetic tools weed out misconceptions of strain reliability in Cannabis sativa: implications for a budding industry, Journal of Cannabis Research, 2019
- Cannabis sativa and Cannabis indica versus “Sativa” and “Indica”, In book: Cannabis sativa L. - Botany and Biotechnology (pp.101-121), May 2017











Comments