


Rolling A Perfect Joint: Step-by-Step Guide
- 1. Joint-rolling gear you’ll need
- 2. Step 1: grinding
- 3. Step 2: making the filter
- 4. Step 3: packing the joint
- 5. Step 4: time to roll
- 6. Step 5: the final touch
- 7. Extra tips and advice
- 8. In conclusion
The most iconic and at the same time simple way of consuming cannabis is smoking a joint. Every stoner knows how to roll a joint the same way every skater knows how to do an ollie, it's basically the first thing you must learn. And just like every learning process: practice makes perfect.
If you’re reading this, chances are you’ve already tried rolling a joint by yourself before and found it looked more like a wrapped candy than an actual joint. Don't be discouraged, every stoner has been there in their beginnings. We don't even think Snoop Dogg’s joints were perfect when he first started smoking, whenever that was.
"When I first started smoking weed, I told myself that I would only smoke on special days.. little did I know, everyday is a special day." -Snoop Dogg.
Although we can’t promise you’ll be a master of the joints-rolling-art once you’ve finished reading this article, we’ll make sure this detailed step-by-step explanation serves you as a sensei on your new path towards becoming a professional joint roller.
Joint-Rolling Gear You’ll Need
There are some basic things you'll need in order to roll a joint, so here is the ultimate joint-rolling starter pack:
- Rolling papers
- Grinder, scissors or knife and cutting board
- Carton filters or any similar thick paper to make one
- Sharp object
- Rolling tray (optional)
- Weed

In case you don't have some of the items on the list, you can probably replace any of them for other elements, except for the weed part. You have probably heard about joints being rolled with chewing gum paper, printer paper, corn husk, and, our personal favorite, bible paper.
Although these are all fun things to try, they aren't the healthiest options and, since you're a beginner at rolling, it will probably be more complicated for you to roll with these elements too.
Let's start at the beginning with the basics on how to roll a normal joint so that then we can dive into the rest of the fun.
Step 1: Grinding
The first thing you’ll need to do to roll a nice joint is to grind your marijuana. If you have a grinder that’s great. Take your buds and part them into pieces until they get to a size where they fit into the grinder. Close and grind for a few seconds but don't overdo.
A well-dried bud should break easily, if the flowers are still humid they’ll be chewy and get stuck in the grinder.

If you don't have a grinder you can also use a couple of scissors and a small recipient to grind your weed. A cutting board and a knife will also do the job.
It's important that you don't leave any big chunks of bud after grinding because they may block the joint as you smoke, and you’ll have to keep your lighter close because you’ll need to keep on lighting the joint over and over again. On the other hand, grinding your flowers in excess will result in powder looking weed, which is also not good as it tends to block the marijuana cigarette as well.
{post: 642}
Step 2: Making the Filter
To make the joint’s filter, crutch or tip, you're going to need a small piece of stiff paper. You can purchase a block of pre-cut filter papers at any marijuana supplies store, or cut one off from business and personal cards, magazines, index cards, or basically any kind of paper that’s thinner than a cereal box and thicker than normal printer paper.

To make the crutch, take the piece of paper of choice and add a few accordion-style folds on one end, turning the paper for each fold until you've folded the paper between 4-6 times or as many as you like.
Then, simply finish rolling the rest of the paper around your accordion. Don't make the tip too tight otherwise you won't be able to smoke later.
There are people who engage in a whole art of filter making, going for specific shapes such as the letter M, S, or even more elaborate shapes, like a weed leaf. We’re going to skip these for now as they aren't more than aesthetic filters.
{post: 1554}
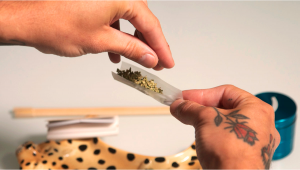
Step 3: Packing the Joint
If you decided to use the rolling tray, this is where you’ll need it. Rolling trays are useful for collecting all the falling pieces of weed and keeping the space around you clean. They are also extra useful if you find yourself rolling in a moving car.
In case you don't have one you can always use books, old CDs, or any flat surface you find on your way.

Take a rolling paper of any size of choice -we recommend the standard size for beginners- place the filter on the left or right side, depending on what's more comfortable to you, and pack it up with your grinded weed, evenly distributing it on the paper.
Make sure the sticky side of the paper is facing your side, opposite of you, so you’ll avoid later inconveniences. It happens.
If you want to go for a cone-shaped joint then you should distribute your marijuana in a way that more amount is reaching the end of the paper, and it goes thinner as you approach the filter.
Step 4: Time to Roll
This is the make or break part of the whole rolling process. The number one advice is to get a good grip of the filter as you roll, as you will need the paper around the tip to be tight.
Grabbing firmly on the crutch’s side of the joint, press the rolling paper to make both sides meet as you sift the paper back and forth, a.k.a the rolling motion, to distribute the weed. If some crumbs fall it’s okay, you can stick them through the end when you finish.

Once the weed gets into a nice cylinder shape, with the help of your thumbs, keep holding tight onto the filter while you tuck the unglued side of the paper into the joint.
When the whole unglued edge is tucked in, roll all the way up until you reach the adhesive edge, trying the paper to look polished -this is what makes the difference between experienced and first-time rollers. Lick the glue and seal the joint from the filter to the outer edge.
Step 5: The Final Touch
Once you’ve rolled and sealed your joint successfully, take any pointy, poking object you have in hand - usually a Clipper lighter’s head is perfect for this, a pencil, shoelaces tips, the drawstrings on hoodies, car keys, or basically anything that fits in through the joint’s edge will work.

Softly pack your joint with your poking object of choice and if you want to add up any of the fallen crumbs lost during the rolling process this is where you should do that. When you pack, don't push too much that you end up blocking the joint but also not too soft or you’ll need to keep a lighter handy.
To close the joint, twist the extra paper on the edge tightly.
{post: 1606}
Extra Tips and Advice
After getting some practice done with your rolling skills -and well, smoking a lot- you’ll start noticing that every joint looks a little bit better than the one before. When you already feel comfortable with your rolling mastery there are a few extra techniques to impress your friends.
Our favorite one is cutting the rolling paper to make it slightly thinner before we start to roll. We do this in order to get rid of the excess paper in the joint and therefore smoke less paper, which according to some people also enhances the joint’s flavor.
| Type of paper | Paper Color | Health Affections | Flavor | Material |
|---|---|---|---|---|
| Bleached rolling papers | White color | Bad for your lungs | Negatively affections on flavor | Full with chemicals like chlorine and calcium carbonate |
| Unbleached rolling papers | Brown color | Fewer lungs' health affections | Fewer flavor affections | Made out of organic material, like 100% hemp |
Another important aspect of the rolling papers relies on quality. Although any rolling paper will work for rolling a joint, we strongly recommend using good quality papers, specifically aimed for rolling weed. Usually, joint rolling papers are thinner and there are even some made of hemp paper or rice instead of wood pulp.
Lastly, try to stick to organic, unbleached papers if you have the choice, they are healthier and provide a cleaner taste while smoking. Bleached papers are made of chemicals like chlorine and calcium carbonate, which both affect your lungs negatively, while unbleached papers come in versions made of 100% hemp.
{post: 787}
In Conclusion
Practice, practice, and more practice! Practice does make perfect. The key is taking your time and feeling comfortable -in space and mind- when you are rolling a joint. This is one of the parts in the ritual of smoking marijuana that stoners cherish the most, there is no such feeling like sitting down, grabbing your grinder, and start rolling yourself, and perhaps your friends, a nicely rolled joint.
Trust us, rolling a joint makes a huge relaxation moment in a lifetime, completely stress-free and it will put a small grin on your face.
Appreciate every part of the learning process of rolling a joint, even take pictures of your lousy-looking candy-joints, these will make funny stories in the future when you’ve already become a joint-rolling expert. We still get a warm feeling thinking of all those badly rolled joints we’ve made when we were newbies.
Once you improve your skills you’ll have a whole new world of double-paper, cross-shaped joints, and more to dive into!


Comments