Automatic Drip Irrigation Setup for Indoor Cannabis Grow

- 1. How does automatic irrigation work?
- 2. The components of an irrigation system
- 3. Irrigation options
- 3. a. Drip rings
- 3. b. Individual drippers
- 4. Setting up your automatic irrigation system
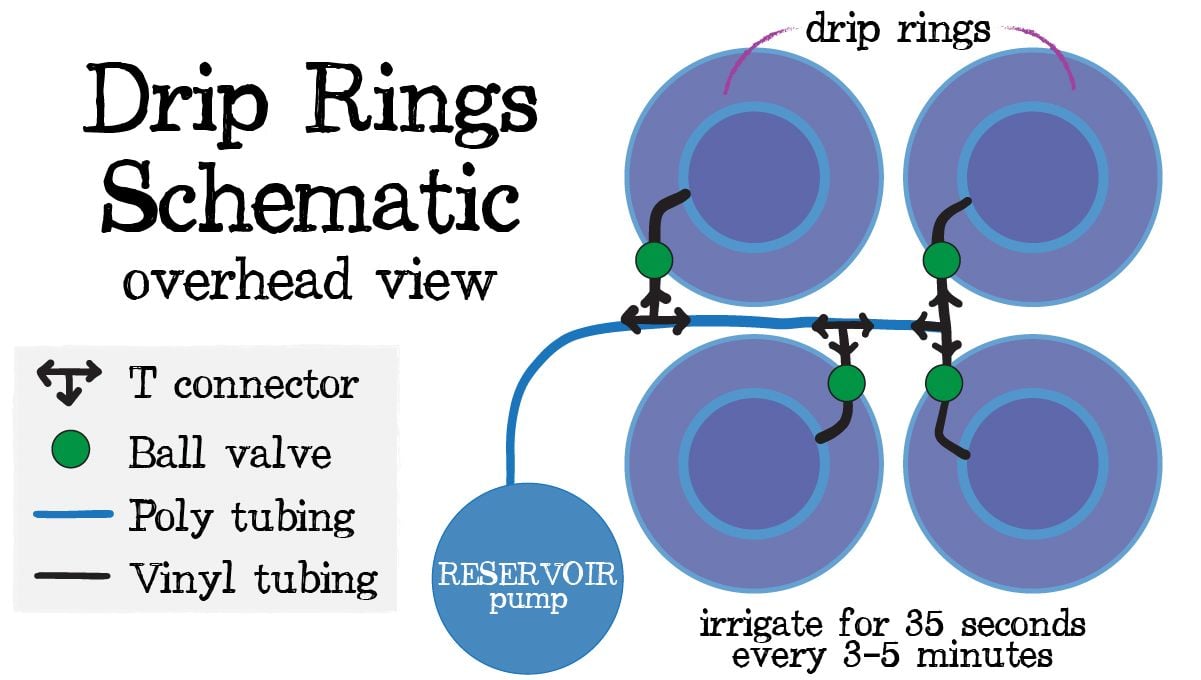
- 4. a. Setting up drip rings
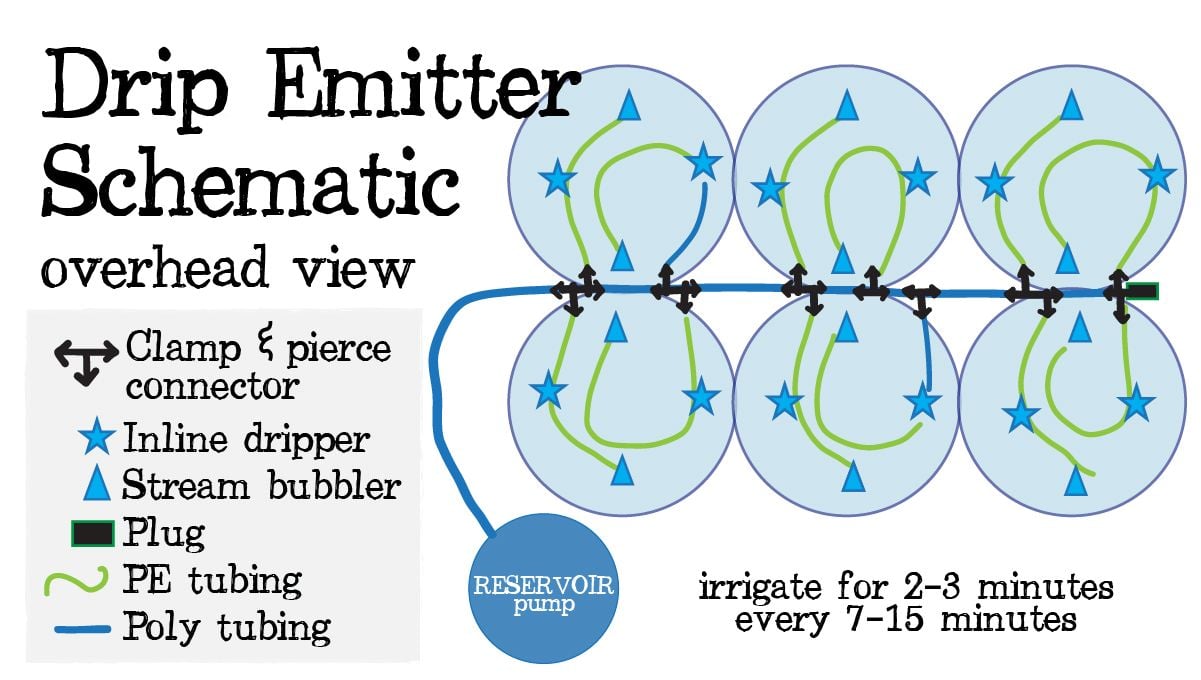
- 4. b. Setting up drippers
- 5. Adjusting water flow
- 6. Drip irrigation with organics
- 7. Automatic cannabis drip irrigation setup - faqs
- 8. In conclusion
An automatic irrigation system may seem like a hard task but it doesn't require any skill and can help you save time and effort when growing cannabis indoors. Obviously, buying an irrigation system can be expensive but if you make yours from scratch it’s just as easy and far cheaper. An automatic irrigation setup allows you to water multiple times a day without manually turning on or supervising your equipment, saving you time and effort. So read along if you want to learn how to build your own cannabis automatic irrigation system!
1. How Does Automatic Irrigation Work?
An automatic irrigation system consists of a large water reservoir that is usually placed outside the grow tent, this water reservoir has a water pump inside which is plugged on a timer. The water pump sends water through one main water tube into the grow tent, where it’s then distributed to the cannabis plants. Some growers also buy or make draining saucers that drain to a bucket outside the tent, allowing you to remove run-off water without having to raise each pot individually.
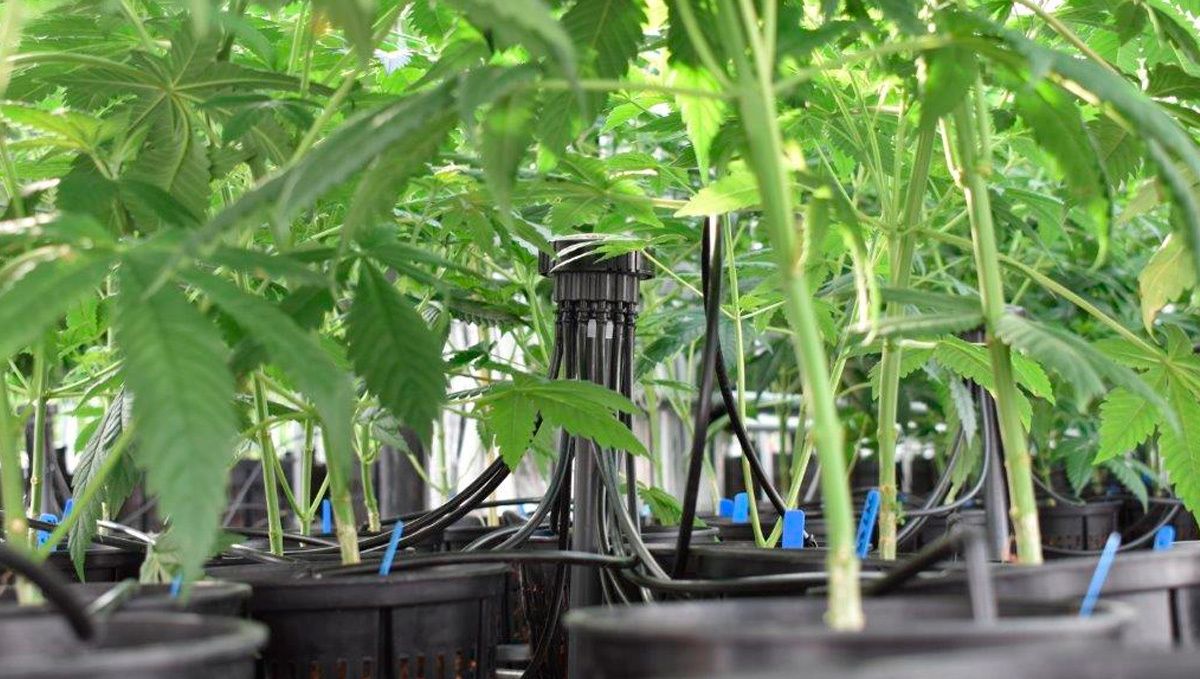
This is basically how an automatic irrigation system works, obviously, there are several different ways to do so, depending on your grow setup, number of plants and your personal preferences but, in most cases, here’s what you need to buy or build your own automatic irrigation system.
2. The Components Of An Irrigation System
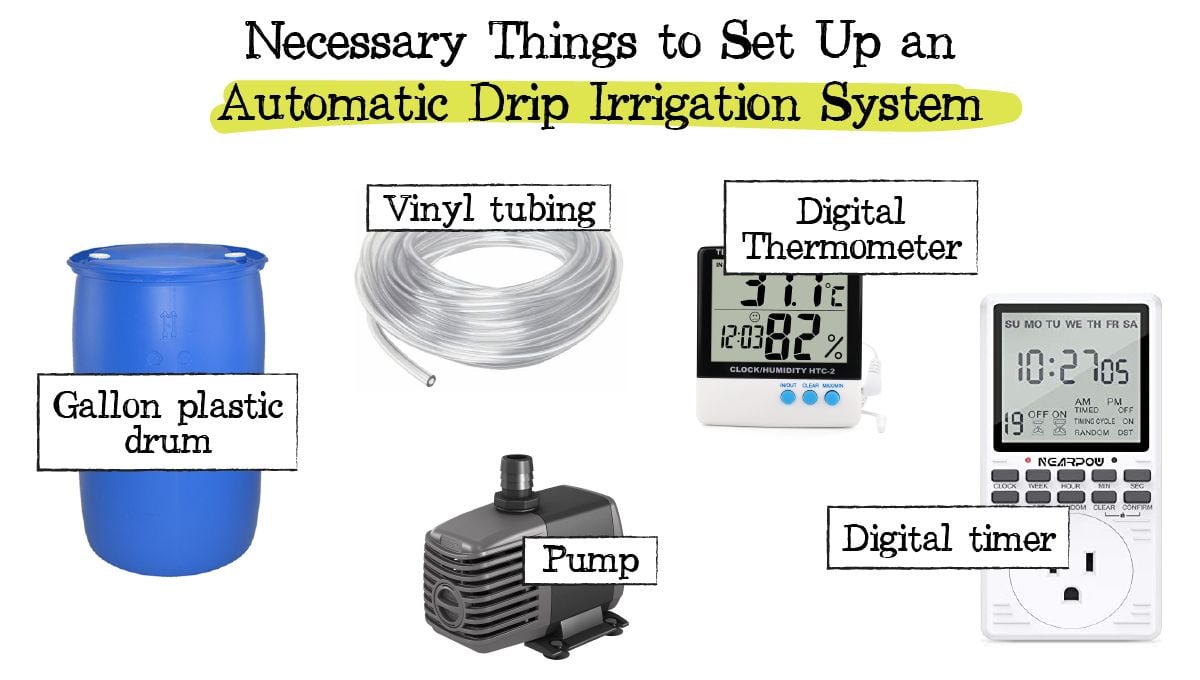
As mentioned, there are several ways of making an automated irrigation system so you can build it however you want as long as it has the following components.
Water Reservoir
The water reservoir is one of the most important elements of an automatic irrigation system because it stores water. When choosing the reservoir, you can use a barrel, bucket, or even a tub, as long as it can hold water there shouldn't be a problem at all. To have the best success when growing your plants the ideal water temperature of the reservoir should be no lower than 62 °F or 16 °C and no higher than 75 °F or 24 °C. But, there are a couple of things you should have in mind, they are:
- Reservoir size: a 120x120cm grow tent can use up to 12 liters of water a day so make sure you do the math and know exactly the size of the reservoir. Have in mind that you want to have a reservoir that can hold enough water for your irrigation system to run for at least 3-4 days.
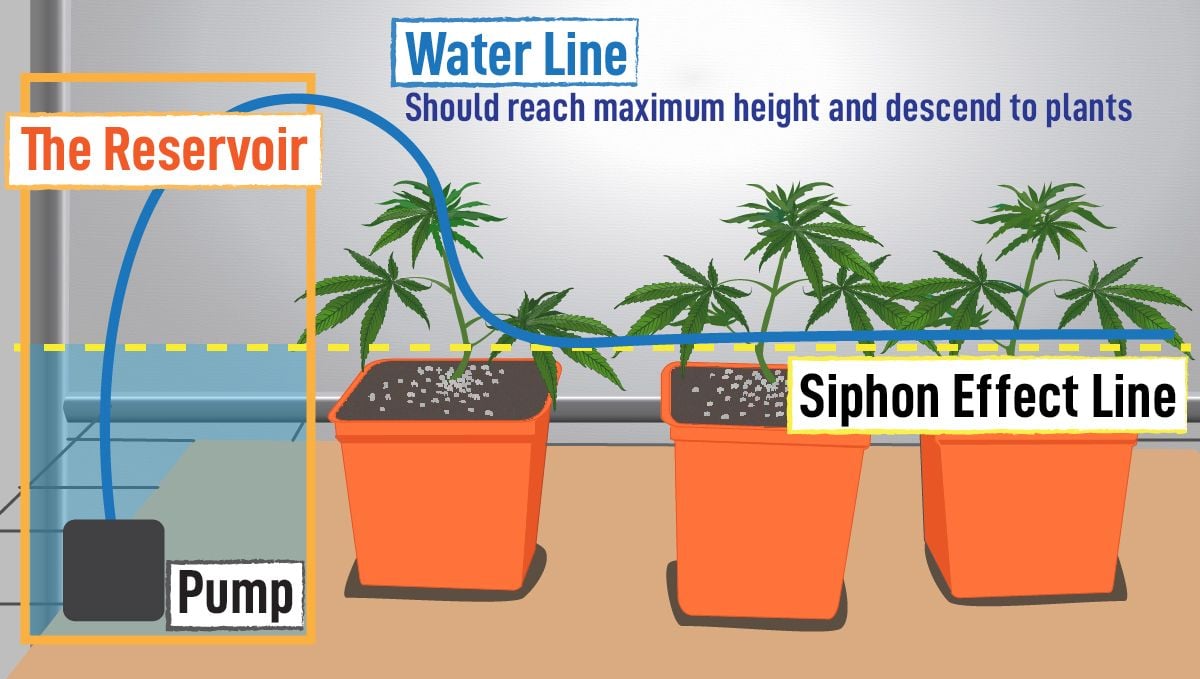
- Height: when talking about reservoir height, you want to get a reservoir that’s taller than the tips of the tubing that goes on top of the pots, this will cause gravity to pull water down and avoid water pressure-related problems.
- Color: avoid clear plastic or white reservoirs because the water or nutrient solution should be protected from sunlight as much as possible. When possible, go for dark blue or black reservoirs.
Water Pump
The pump needed to water your plants automatically shouldn’t be too big but it needs to have enough power to pull water into your grow tent and have enough pressure so that water gets distributed to all plants equally. If you’re growing less than 10 plants, you can go for an 1100 L/h pump, which should be the minimum for any automatic irrigation setup.
If you’re making an irrigation system for more than 10 plants, you can estimate around 200 L/h per plant, this way you can determine how large the water pump should be. Also, have in mind that it’s recommended you have 8 - 10 cannabis plants per water pump because having more than 10 plants for one single water pump can make it hard to balance water distribution, meaning that some plants will get more water than the others so if you’re growing more than 10 plants make sure you make two irrigation systems with two separate water pumps.
Timer
Most growers use analog timers but they only allow you to turn on or off every 15 minutes, so in order for you to establish the watering intervals, you need a digital timer with one second intervals, this allows you to fine-tune your irrigation system down to the second.
Oxygenation
It’s vital you keep water or nutrient solution in the water reservoir oxygenated, this helps prevent harmful bacteria and also helps oxygenate the substrate. If you’re using water reservoirs up to 120 liters, you can use regular air pumps and air-stones to oxygenate the water or nutrient solution inside but if you’re using larger reservoirs, you should use a stirring pump to mix and keep the nutrient solution oxygenated. Making sure there is adequate oxygen is not only reduces the chances of harmful bacteria, but also allows the plant to receive the proper proportion of oxygen into the plant roots. Plants need just as much oxygen as water and without the correct proportions of oxygen, you can risk downing your plant which is the most common way cannabis plants die.
Digital Thermometer
You need a simple digital aquarium thermometer to keep the nutrient solution’s temperature in the acceptable range. It’s vital you keep the temperature between 18 - 20 °C to prevent harmful bacteria and maintain the dissolved oxygen.
Main Water Line
The main water line is what transfers water from the reservoir, into the tent, and to the plants. For the main water line, you can use any type of tubing, although using poly tubing is recommended due to being more resistant, semi-rigid, and easily found in black. Obviously, anything works. As long as you can transfer water from outside the tent to your plants, you can use whatever you want to. It is best to avoid using clear water lines because the grow lights and constant moisture content in the tubs will allow algae to grow and clog your system.
3. Irrigation Options
Once you have everything mentioned before ready, you have to choose how you’ll be irrigating your plants. There are a lot of different ways but most are similar to the following: Individual drippers or drip rings, both work very well but have their pros and cons. Drip rings are considered superior because they do not leave dry spots in the substrate but you cannot move them after they’ve been placed, so they can only be used in the final containers.
Irrigation Methods Pros and Cons
| Irrigation setup | Pros | Cons |
|---|---|---|
| Drip rings | Saturates all the substrate equally | Cannot be moved |
| Individual drippers | Can be moved as you please | Can leave dry spots in substrate |
On the other hand, drippers are much more flexible, so you can have a dripper on a small pot and continue using the same dripper as you transplant to bigger pots, but the downside is that drippers usually leave some parts of the substrate dry if you don’t plan it properly and you’ll end with a lot of plastic tubes all over your grow tent.
Drip Rings
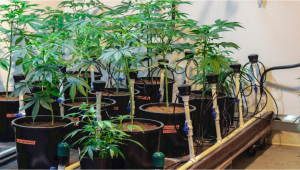
Drip rings are probably the best option if you’re planting in the final container because they improve water distribution and can eliminate eventual hand-watering. In order to install drip rings you’ll need:
- 15 cm or 22 cm drip rings: if you’re growing in 20-liter pots or less, you should go for 12 cm drip rings. If you’re growing in 20-liter pots or larger, go for the 22cm drip rings instead.
- 1.2 cm Tubing: almost all drip rings require 1.2 cm tubing to connect the drip rings to the main water line, but make sure to always measure the tubing and connectors before buying them.
- Connectors: they are needed to connect the tubing that goes from the drip rings to the main water line. Sometimes it can be hard to connect the tubing to the connectors so it's recommended you dip the tip of the tubing in hot water in order to make it more flexible and easier to attach it to the connectors.
- Ball valves: ball valves are small valves that connect to the tubing and allow you to control water flow to each individual drip ring. These are not always needed when using individual drippers but are essential to adjust water flow when using drip rings.
Individual Drippers
Individual drippers offer more flexibility because they’re not fixated on the substrate but they don’t distribute water as effectively. In most cases, when using drippers you will have to hand-water 1 to 2 times a week in order to keep the substrate saturated properly. The best way to properly utilize individual drippers is with salt nutrition using coco coir as the media of choice. First of all, we would recommend salt nutrition with individual drippers because the nutrition is already in liquid form which means it's bioavailable and does not have to get broken down to be absorbed. We would recommend using coco coir as the media of choice because of its ability to soak up water compared to other media of choice.
The beautiful part of coco is that no matter how dry it gets you can always re-saturate the media making it moist within seconds. While being able to soak up water easily it also holds more oxygen than peat moss and will aerate your root zone ten times better. This also makes it harder for people to overwater and kill their plants. We would strongly advise against using peat-based media for individual drippers because if peat is too dry in certain areas it will become hydrophobic which means it will be extremely hard to re-wet the material. In order to install individual drippers, you’ll need:
- End Cap: The end cap goes into the end of the main water line this prevents water from coming out the end of the tube and forces it to run through the tubes that water each plant.
- 0.6 cm Tubing: This smaller tubing goes attached to the main water line and brings water to each individual cannabis plant. This tubing size is needed when using 1 or 2 tubes per plant but you can use bigger or smaller size tubing, depending on what you want to achieve.
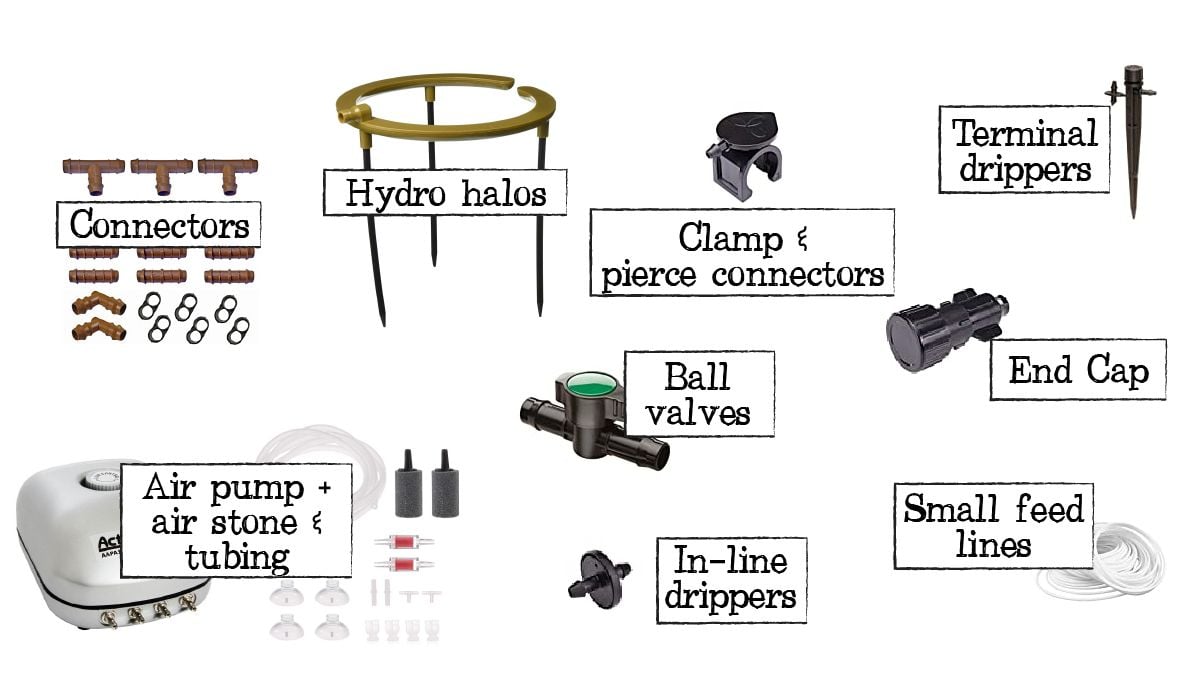
- Pierce Connectors: In order to attach the tubing mentioned above to the main water line, there are several ways but the best option is to use pierce connectors. This type of connector is super easy to use, you just have to pierce the main water line and then attach the tubing to the fittings and that’s it.
- Drippers: In-line drippers go at the end of the 0.6 cm tubing and are what distribute the water around the pot. Installing them is super easy, just slip the tubing on the drippers and you're done.
4. Setting Up Your Automatic Irrigation System
Setting up an automatic irrigation system is super easy, you don’t even need special knowledge, all you need are scissors, and a drill or something with a sharp tip to make the holes on the water reservoir for the tubing to pass through.
First of all, you need to prepare the water reservoir so drill a hole on the side of the reservoir, make sure to make the hole according to the size of the tubing you’re using; The tubing should exit the reservoir near the top edge (as high as possible) so that water can flow easily and water drains back into the reservoir when irrigation stops.
Once you’re done with the hole, place the water pump, airstone, and thermometer in the reservoir and cut a hole in the lid to be able to pass the thermometer probe, the water pump’s power cord and the air pump tubing.
You’ll also have to make sure the main water line enters into the tent at the top of the pots, so you have to make a hole in your grow tent for the main water line to enter. Once you have the main water line in the tent, you have two options: Either drip rings or individual drippers, so here’s how to assemble both of the irrigation methods.
Setting Up Drip Rings
Setting up any type of irrigation system can be tricky if it’s your first time doing it but fortunately, is quite simple. All you have to do is measure the length of the tubing you need and use scissors to cut them to the right size. Once you have everything ready it’s just a matter of sliding the tubing onto the connectors and then attaching the drip rings.
Setting Up Drippers
If you’re installing drippers, use the pierce connectors to pierce the main water line and install the drippers. It’s a good idea to place the empty pots just to give you an idea of where to install the drippers. If you feel like the tubing is too long, just use a pair of scissors to cut a piece and then try again until everything is in place.
5. Adjusting Water Flow
After installing the drippers or drip rings you need to run the irrigation system to adjust water flow for each plant. So, right after installing it, turn the irrigation system on and close the ball valves or drippers, and turn on the water pump. After turning on the pump, open each dripper or ball valve slowly until water comes out slowly and evenly.
After starting your grow cycle, you may notice your plants are getting too much water or not enough water, so wait until your system is running again and continue adjusting water flow. Your objective is to dial in every irrigation until all plants produce the same runoff at the same time.
Once all drippers or drip rings are watering with the same amount of water, you have to adjust each irrigation so your plants get enough water to produce around 10% of run-off.
“Depending on where you’re growing, you may want to look into self-draining saucers so you don’t have to lift the pots to remove the water after each irrigation.”
It’s impossible to say exactly how long each irrigation should last, so it’s a matter of trial and error. Each irrigation should be long enough to produce at least 10-15% run-off from each plant. Most growers water for 35 seconds with drip rings and up to 2 minutes with individual drippers. When using dry amendments with drip irrigation it is important to note that you do not have to water the plants until runoff.
With organic nutrition your goal is not to flush it through the entire system, you just want to water enough to saturate the media to allow the feeder roots to absorb the nutrition. Feeder roots are on the top two inches of the soil which is why when top dressing you only need to massage the fertilizer on the surface of the soil. So make sure you know exactly how much water each plant gets so you know exactly when the irrigation system should turn off, this will help you schedule irrigations. Everyone's system will be different to stay vigilant the first few days to ensure that the plants stay healthy.
6. Drip Irrigation With Organics
Another huge positive of drip rings vs individual drippers is that they will allow you to use organic nutrients. The reason you can use dry amendments when using drip rings is that it allows you to get full saturation of the pot. When using dry amendments you distribute the powders evenly throughout the medium and for the nutrition to become bioavailable it needs water to reach every inch of the pot. Without water, your dry nutrients will never break down. When using dry amendments with drip irrigation it is important to note that you do not have to water the plants until runoff. With organic nutrition your goal is not to flush it through the entire system, you just want to water enough to saturate the media to allow the feeder roots to absorb the nutrition. Feeder roots are on the top two inches of the soil which is why when top dressing you only need to massage the fertilizer on the surface of the soil.
7. Automatic Cannabis Drip Irrigation Setup - FAQs
Oftentimes, first-time growers are worried about spending too much on their automatic cannabis drip irrigation setup. But, the truth is, you can actually save a lot of money in the long run by investing in a quality irrigation system—especially if you plan on growing weed regularly.
How does automatic drip irrigation save money?
A lot of the water that you use to hand-water your plants is actually lost to evaporation. But with an automatic drip system, the water is delivered directly to the roots where it can be used most efficiently. This means that you'll use less water overall, and your plants will be healthier as a result.
In addition, automatic drip systems can help you to avoid over- or under-watering your plants. These are two of the most common problems that growers face, and they can both lead to serious problems (like root rot) down the line. By using an automatic drip system, you can fine-tune the system to ensure that your plants always have just the right amount of water.
What are the main benefits of an automatic drip irrigation system?
In addition to saving money and water, there are a few other key benefits that come with using an automatic drip irrigation system:
- Convenience: One of the best things about an automatic drip system is that it can be completely automated. This means that you can set it up once and then forget about it—no more hand-watering your plants every day! Anyone who has hand-watered more than a couple of plants for an entire run will tell you how time-consuming and monotonous it can be.
- Better growth: Because they deliver water directly to the roots, automatic drip systems can lead to better overall plant growth. In addition, by avoiding over- or under-watering, you can help your plants to avoid common problems that can lead to stunted growth.
- Fewer pests: Because automatic drip systems keep the leaves of your plants dry, they can actually help to deter pests. Pests like fungus gnats and powdery mildew love damp conditions, so by keeping the leaves of your plants dry, you can make it much harder for them to take hold.
- Less chance of mold issues: In addition to deterring pests, keeping the leaves of your plants dry can also help to reduce the chances of mold issues. Again, mold loves damp conditions, so by keeping the leaves dry, you can create an environment that is much less conducive to mold growth.
Are there any major disadvantages to implementing an automatic drip irrigation system?
Yes, like anything really, automatic drip irrigation comes with some downsides. Would we call them major? No, not really, but it's good to be aware of all the factors before making a decision on whether to spend your hard-earned cash or save that extra coin and just hand water.
- The initial set-up can be expensive, and these systems come with maintenance costs - like replacing pipes every 12 months or so, and water pumps every few years. But, when you factor in long-term savings (in terms of both water and money), an automatic drip system is definitely worth the investment.
- Clogging: Another potential downside to automatic drip irrigation is that they are prone to clogging issues, and can be tricky to troubleshoot if something goes wrong. If you're not familiar with the inner workings of the system, it can be difficult to figure out where the problem is and how to fix it. However, there are plenty of resources available online that can help with this, so it's not really a deal-breaker.
- Root zone salt build-up: Another potential issue with automatic drip irrigation is that, over time, the roots of your plants can become oversaturated with nutrients. This can lead to a number of problems, including stunted growth and leaf burn. However, this is easily avoidable by flushing your system on a regular basis (at least once every two weeks).
- Plastic degradation: an automatic drip irrigation system is almost always completely made up of plastic components. These can degrade over time, especially if they are exposed to UV light or high temperatures. This can cause problems with the performance of the system and may eventually lead to a complete failure. However, most manufacturers offer extended warranties on their products to account for this, so it's not really a major issue. It can also lead to issues with plant growth, so keep an eye out for any parts that are looking a little worse for wear.
How often should I water my crop while running an automatic drip irrigation system?
This will depend on a number of factors, including the size and type of plants you're growing, the climate you're growing in, the power of the pump, and the medium you're using. In general, though, most growers will water their plants once or twice a day for anywhere between 50 and 80 seconds while using an automatic drip system. Of course, it's important to keep an eye on your plants and make sure that they're not showing any signs of stress (like wilting or drooping leaves). If you see any of these signs, it's possible that you're either over- or underwatering your plants. In general, it's better to err on the side of under-watering, as it's much easier to correct than overwatering.
What are some other things I need to know about automatic drip irrigation?
- Make sure that your timer is set correctly: One of the most common problems growers face is setting their timer incorrectly. If you don't set the timer correctly, your plants will either be over- or underwatered, which can lead to a number of problems.
- Make sure that your drippers are working properly: Another common issue is that drippers can become clogged or blocked, which can reduce or stop the flow of water to your plants. Make sure to check your emitters on a regular basis and clean or replace them as needed.
- Consider the weather: The weather can have a big impact on your irrigation system. Since this article is referring mostly to indoor systems, it's not something you should be having to really worry about, but do keep in mind that environmental fluctuations can lead to changes in the plant's water needs.
8. In Conclusion
Building your own automatic irrigation system may seem like a hard task but it’s actually really simple. You can make your own irrigation system with cheap and easy-to-find components. An automatic irrigation system allows you to travel for a couple of days or just keep your plants fed when you’re busy, saving you time and effort. But hand watering can also be made incredibly easy by utilizing popper-sized pots. Most people are working from home and avoiding travel so most have a lot of time on their hands. Whether you want to take the steps to set up a drip system or you just want to hand-water the most important thing is that you are growing your own amazing flower at home.
If you use an automatic irrigation setup in your indoor grow space, feel free to share your tips with fellow growers in the comment section below!



Comments