


How to Prepare for Indoor Growing Emergencies
- 1. Precautions: avoiding electrical emergencies
- 1. a. How to identify your circuit amperage
- 1. b. How to calculate circuit capacity
- 1. c. How to calculate your power consumption
- 2. What to do when there’s a power outage?
- 2. a. What to do when lights go off
- 2. b. Simple tips to fight lack of light during a power outage
- 2. c. Humidity starts dropping
- 2. d. Simple tips to fight low humidities during a power outage
- 3. What if i’m growing in hydro or aeroponics?
- 3. a. Keeping the nutrient solution oxygenated
- 3. b. Keeping the nutrient solution at the right temperature
- 3. c. Simple tips to fight a power outage in hydro
- 4. What if the crop becomes contaminated?
- 5. In conclusion
Unlike growing outdoors, when growing cannabis seeds indoors you are the one in charge of making sure every piece of equipment works properly, meaning that you are responsible for checking, controlling, and adjusting the lights, fan, exhaustion, and everything else. This happens because your equipment is responsible for maintaining a good growing environment, playing a vital role in the quality and yields so you need to be prepared for a power outage.
Many of us take up growing cannabis as a hobby because we’re fuelled by idealistic visions. These moments of wishful thinking involve picturing pristine grow rooms and healthy plants. We get very excited at the idea of daily inspections in our own private botanical paradise. While creating such a space is definitely achievable, you can’t remain ignorant of the inevitable challenges that you’ll come across along the way. Every seasoned cannabis grower will tell you that cultivating the herb is as much troubleshooting and fixing things, as it is simply enjoying the process as a pass time. However, these mistakes are valuable in the long run; they help to learn, adapt, and ultimately become better growers. Below, you’re going to discover the most common blunders that can occur indoors, and how to deal with them if you’re unfortunate enough to have them pop up.
1. Precautions: Avoiding Electrical Emergencies
If you’re new to growing cannabis or you have grown outdoors before and are just starting to set up your grow tent don’t have basic electrical knowledge, you need to have in mind there are a couple of things you have to be aware of before you plug everything in.

Apart from making sure everything inside your grow tent is proper, you should also make sure that the plugs you’ll be using can take the amount of power you need, so once you know how many plugs you’ll be using you will need to know how much power your equipment will need. All electrical outlets in your house, office, or anywhere else are on a circuit, this means that the outlets in your grow room are on a circuit, so before calculating you will need to know which outlets belong to which circuit.
How To Identify Your Circuit Amperage
This can be quite easy to know because the circuit breaker panel should have labels on it but, if it doesn’t, you will have to figure it out yourself or hire an electrician.

Once you’ve identified which circuits the outlets you’ll be using belong to, you need to see the amperage; The amperage should be on the label mentioned before, listed as either 10A, 15A, 20A, and so on.
How to Calculate Circuit Capacity
So now that you know which circuit you’ll use and the amperage, it’s just a matter of doing simple math, so if you’re using 220V outlets and your circuit is labeled as 15A it means that the circuit can handle 3300W. To help you understand it better here’s the simple formula:
Outlet Voltage x Amperage = Max Wattage
220V x 15A = 3300W
If you don’t want to deal with math, here’s a quick table to make your life easier:
| Voltage | 110 | 220 | ||||
|---|---|---|---|---|---|---|
| Amperage | 10 | 15 | 20 | 10 | 15 | 20 |
| Max Wattage | 1100 | 1650 | 2200 | 2200 | 3300 | 4400 |
Remember that this is NOT the maximum wattage that a single outlet can handle, this value is what the whole circuit can handle so if you need more power you can use an extension cord to connect some of the equipment to other plugs in another room, they should be on a different circuit.

How to Calculate Your Power Consumption
Now that you know approximately how much your circuit can handle, it’s essential you calculate how much your growing equipment will need, this can be easily calculated by checking the label on your LED light for example.
What you’ll need to know is the voltage (120V or 220V) and the wattage (power consumption), in this example we’ll be using an LED light with a consumption of 100W at 120V, so once you have this information you just do the following:
Wattage ÷ Voltage = Amperage
100W ÷ 120V = 0.83A
This means that this specific LED light only consumes approximately 0.83A, meaning that your circuit can still handle 14.17A (following our example of a 15A circuit) so you won’t have to worry if you’re only having one light in your grow tent but remember that for the best conditions possible you’ll also need a couple of fans and an exhaust fan so you will also have to take that into account and add them up.

This is super important because if the total wattage in your circuit adds up to more than what your circuit can handle, your circuit may shut off to prevent even worse problems. Also, have in mind that when you’re keeping your equipment on for more than 3 hours (aka continuous load) the wattage your circuit can take is 20% lower so make sure you always keep this in mind to avoid problems. Overloading a circuit can cause a power outage, and as said before, your equipment is basically responsible for keeping your plants alive, so what to do when there’s a power outage?
2. What To Do When There’s A Power Outage?
When there’s a power outage either caused by overloading the circuit or caused by something else, the conditions in your grow room will start to change, your plant will not be getting light and if you’re growing in a hydroponic setup, your plant’s won’t be getting enough oxygen after a couple of hours. Obviously, the best solution would be to have an alternative source of power but if you don’t have a backup generator or solar panels, what can you do to minimize plant stress?
What To Do When Lights Go Off
The most important thing when there’s a power outage is to make sure your plant gets some light during the light period (when the lights should be on), because a plant left in complete darkness can end up deteriorating and dying but giving it a minimal amount of light can slow that down.

The plan is to help them maintain their light cycles so you can even do it with weak light such as a flashlight because, at this point, your objective is to prevent them from getting too stressed or dying. So, if possible, hang a flashlight or any other source of light inside your grow tent to minimize stress. Have in mind that if there’s a power outage your timer won’t work so you will have to remember to turn the flashlight on and off according to the light cycle your plants are.
Simple Tips To Fight Lack of Light During A Power Outage
You don’t need to spend a lot when facing an emergency like this one, so here are a couple of things that can end up saving your crop when there’s a power outage.
- Strong flashlight and a couple of battery packs;
- Battery-powered lights of any kind (lantern, Christmas lights, etc.);
- Solar-powered generator.

Humidity starts dropping
If you live in a dry place and the power goes out your humidifier will stop working and the humidity will start dropping and this can be very bad; Cannabis plants need a relative humidity of around 60-70% during the vegetative stage and 40-50% during flowering, so depending on the stage your plants are in, you’ll need to try to fix this. Maintaining humidity in the external environment is important because this variable actually helps to keep plants hydrated. You see, when the air surrounding a plant lacks moisture, water from inside the leaf more readily evaporates into the immediate environment via the process of transportation.

This happens due to osmosis—the movement of a substance from an area of high concentration to an area of low concentration. In this instance, the plant leaf is full of water, while the air outside is dry and lacking in water. This causes a movement of water outside of leaf tissues that can leave them becoming excessively dry over time, resulting in eventual wilting.
Just like with the temperature, there isn’t much you can do, you can fill a couple of buckets with water and place them inside your tent, spray your plants and inside of your tent with water, or even do both but this is just a temporary solution. Doing this can help your plants survive for a couple of hours but depending on how long it takes for the power to come back and how dry it is, it may not be enough; Unfortunately, there’s no easy solution other than doing this continuously or having a portable generator.
Simple Tips To Fight Low Humidities During A Power Outage
There aren’t any simple solutions when talking about humidity levels, you can solve this by having a battery-powered humidifier but if you don’t have one there’s not much you can do, unfortunately.

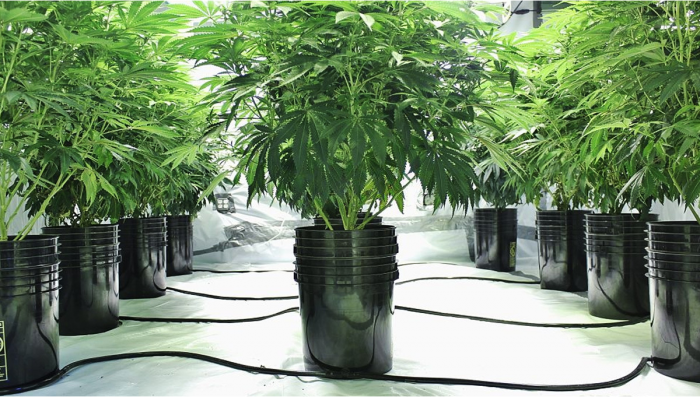
3. What If I’m Growing In Hydro or Aeroponics?
If you’re a hydro grower you’ll experience the problems cited above but the main issue will be a lack of oxygen, this happens because roots need oxygen to live.
Keeping the Nutrient Solution Oxygenated
Normally, you would have a couple of air stones oxygenating the water but when there’s a power outage, the air stones won’t work anymore and the roots will use the oxygen until there’s no more oxygen in the water. Now, depending on how many plants you have in the reservoir, the oxygen can last for a couple of hours but if the power outage lasts more than 1-2hs and your plants start drooping, you will have to take drastic measures.

So, in the first place, drain all the water from the reservoir and then slowly pour it back in, this should provide a good amount of oxygen for another hour. In the second place, if the power doesn’t come back, you will have to drain the water again and change the water; Make sure you check the pH, PPM, and everything you usually do because despite being an emergency change of water, this is the same nutrient solution change you would normally do.
You can repeat these two steps until the power comes back, this is obviously quite exhaustive but it’s the only way to save your plants, also, depending on how cold it is, you may have to heat the water a bit.
Keeping The Nutrient Solution At The Right Temperature
As you may know, when growing hydroponically you need to adjust the temperature of the nutrient solution, which is usually around 20°C and when there’s a power outage, you may find it hard to do so. If, for example, you’re in the winter season and your tap water is too cold, you will have to heat up a small amount of water to mix it in your nutrient solution because if the nutrient solution is below 13°C it can have a toll on your plants.

To try and fix this, heat up a couple of liters of water (in your fireplace or gas stove if possible) and slowly pour it into the reservoir with the cold water, using the thermometer to check the temperature, once it has reached around 20°C you’re all good to go. By providing a nutrient solution at the right temperature, your plants may be able to survive for longer even if it’s cold, just remember that you should never feed your plants with hot water!
Simple Tips To Fight A Power Outage In Hydro
It’s quite hard to deal with a power outage for cheap when growing in hydro or aeroponics due to this kind of setup needing a lot of equipment, but here are a couple of things that could help you save your plants.
Battery-powered air pump
A battery-powered air pump comes with an airstone and will allow you to oxygenate your nutrient solution for up to 24hs with a pair of batteries, this way you won’t have to drain and change the water.

Inverter
An inverter allows you to connect it to your car’s battery, this way you can run up to 300w which should be enough for the basic things to keep your plants alive, the downside is that you will need a long extension cord to be able to connect your equipment to the inverter.
Gas-powered generator
A gas-powered generator would be the ideal choice but can be very expensive, this equipment also makes a lot of noise so it may not be what suits you better but it will definitely allow you to keep everything going as it should until the power comes back.

4. What if The Crop Becomes Contaminated?
Crop contamination is a huge issue for indoor growers. Outdoor crops come with a certain level of inbuilt natural defenses that indoor crops sometimes lack, as they have lived their entire lifecycle in what should be as close to a fully sterile environment as possible. This tightly controlled environment is perfect for cannabis cultivation, but it is also the ideal climate for many of the plant’s enemies - pests and pathogens. There is no one true cure-all for all the different issues that a cannabis crop can potentially face, but let’s quickly run through the list of the most common issues and how to combat them.
PEST INFESTATIONS
The most commonly found pests on cannabis crops are spider mites, fungus gnats, aphids, whiteflies, caterpillars, and thrips. Now, each of these pests has its own protocol of how to rid the crop of the infestation, but there are a few easy things you can do to try and prevent these issues from ever arising. Neem oil is your number one friend here. Mix up a solution containing a tablespoon (5 to 15 ml) of neem oil, a liter of warm water, and a few drops of insecticidal soap. This can be used as a foliar spray throughout the entire lifecycle of the crop, right up until the last two weeks of flower. Only mix-up enough for one day use, as a batch, cannot be used after about 24 hours of it being mixed up.
When the crop is in the vegetative growth stage, you can cover the entire plant with this spray. Make sure to cover both the top and bottom of all the leaves, as many of these little nasties live and lay their eggs on the underside of the leaf growth. During the flowering growth period, try to not spray the budding sites as this can potentially affect the flavor of your flowers. You can also consider introducing beneficial insects into the growing area. Bugs such as Ladybeetles, Green Lacewings, Insidious Flower Bugs, Delphastus Catalinae, Rove Beetles, and Praying Mantis all eat the insects we want to keep away, and the neem oil foliar spray will not affect these beneficial buddies whatsoever. For more info on dealing with pest infestations and how to use neem oil to combat them, head over to our comprehensive guide.

FUNGAL ISSUES
There is quite a wide range of fungal issues that can plague an indoor cannabis crop, but the three most common are bud rot, root rot, and white powdery mildew. All three of these issues can quickly spell the untimely end of a crop if not dealt with at a very early stage, and depending on your cultivation style they can be hard to find early on. Unless you are growing with a hydro setup, root rot can go unnoticed until it’s all too late. Bud rot can wreak havoc on a crop in just a few short days, to the point where the whole thing may be lost, and powdery mildew is a true bitch to get rid of once it has set in.
Grow areas with poor air exchange, especially in the canopy and when the lighting is inadequate is where you will most commonly find fungal and mold issues. These pathogens can also find their way into your indoor grow through contaminated substrates or water, where they are able to lay dormant for years just waiting for the right conditions to thrive. Preventative action is always the best practice when it comes to combating fungal issues with cannabis crops.
Be sure to check your plants every single day for any tell-tale signs of the beginnings of a mold or fungal attack. Keeping control over environmental variables, like the temperature and humidity ranges will go a long way in keeping these issues at bay. Providing adequate air exchange in and out of your grow space, and adding a few oscillating fans at the canopy level is highly important. Monitoring grow medium moisture levels, EC values, pH ranges, and making sure each plant has space to grow into without the area becoming overly crowded are all key to preventative success. Head over to this full guide to find everything you need to know about combating mold and fungal infestations.
5. In Conclusion
Now that you know how to save your plants from a catastrophe, make sure you are extra cautious when plugging a lot of equipment in the same room, it may be a bit hard to calculate everything but it’s definitely worth it. If you have basic electrical knowledge, feel free to help fellow growers, leave your tips in the comment section below!


Comments