


Durban Poison Cannabis Strain Week-By-Week Guide
- 1. History
- 2. Specifications
- 3. Week-by-week guide
- 3. a. Germination - week 0
- 3. b. Vegetative stage - week 1
- 3. c. Vegetative stage - week 2
- 3. d. Vegetative stage - week 3
- 3. e. Pre-flowering stage - week 4
- 3. f. Flowering stage - week 5 and 6
- 3. g. Flowering stage - week 7 and 8
- 3. h. Flowering stage - week 9 and 10
- 3. i. Harvesting - week 11
- 4. Terpene profile
- 5. Type of effect
- 6. Drying, trimming, and curing your durban poison harvest
- 7. In conclusion
If you’re planning on growing or are currently growing Durban Poison, here’s all you need to know about this wonderful strain. This week-by-week guide will provide what you need to make the most out of your feminized seeds and help you prevent any eventual problems, so read along!
1. History
Originally from the city of Durban, South Africa, this legendary strain has become more and more popular since the ‘70s, where Ed Rosenthal first discovered it. Back then, growers were surprised by the quick flowering time and eventually brought it to Holland, where it became adapted to rainy conditions but despite the Indica-like characteristics, it offers mostly-Sativa genetics. So what really makes this strain stand out is the fact that it’s an original landrace strain that doesn’t have a lot of cross-breeding such as other popular strains. This happens because this landrace strain was discovered back when cannabis plants had little to no human interference, which also made it amongst the most popular for creating new strains.

2. Specifications
The world-famous Durban Poison offers huge yields, reaching up to 3 meters in height and yielding 650 gr/m2 of extremely resinous buds in around 8-9 weeks of flowering. This huge strain’s THC ranges from 16-25%, offering a full-on Sativa effect that comes hand-in-hand with a delicious terpene profile of lemon, licorice, and cloves that leaves your mouth watering after every puff.
3. Week-By-Week Guide
As you may know, the growing conditions play a huge role in the final quality of the harvest, so here’s the temperature, humidity, and overall growing conditions this beautiful Durban Poison was grown in.
| Grow Specifications | |||
|---|---|---|---|
| Light Fixture: | LED | Nutrients | Synthetic |
| Grow Space: | Indoor | PH level: | 6.5 |
| Temperature: | 18 - 25°C | Flowering | 8 - 9 weeks |
| Humidity: | 45 - 80% | Substrate | Soil |
This serves to remind you that the same strain can exhibit several different phenotypes, meaning that this grow guide shows what you would get when growing in similar conditions to those shown in the table above, if you were to grow in different conditions the results could vary. Genetic variations between phenotypes include differences in height, leaf shape, productivity, pest and disease resistance, and even phytochemical content in the form of cannabinoid and terpene profiles. Aside from the slight genetic differences inside the genomes of each plant, environmental factors play a huge role, from temperature and humidity to soil type, nutrients, and abiotic stressors.
Germination - Week 0
As always, this grow guide starts with the germination of 1 Durban Poison seed directly in the substrate. We usually recommend letting seeds soak in a cup of water for around 12hs, once the taproot appears, transfer the seeds to a paper towel until it grows 2 - 3 cm and then plant it in the substrate so germinating directly in the substrate is not our recommended germination method but it definitely is the simplest.

You shouldn’t give nutrients yet, especially if your substrate already contains a bit of food, but you can definitely add mycorrhizae to help your plant develop roots faster. Applying mycorrhizal fungi means including another product during your cannabis grow, so is it worth it? Absolutely. These fungal inputs will help your cannabis plants prosper more than you can imagine. Firstly, they are very important during the seedling stage. These fungi exist as threads of mycelium in the soil.
These threads work their way into plant roots and form symbiotic structures known as mycorrhizae. Once established, this synergistic network can help to fend off pathogens that cause problems during the seedling phase, such as damping off. Later down the line, as your plants start to photosynthesize at a higher rate, they’ll feed the fungi with sugars, and the fungi will help plants to uptake nutrients and water. Once the seedling comes out of the substrate, the first you should be able to see is two tiny round leaves called Cotyledons, this initial pair of leaves are super fragile so make sure to handle your baby plants very gently.

It’s essential to remember that the relative humidity should be around 80% and the temperature ranging between 20-25°C; If good conditions are not maintained or if you overfeed before your plant can handle it, you’ll definitely see signs that your plants are not happy so make sure to be super careful during the seedling stage. Your seedling will need some amount of water during this time in order to carry out key physiological processes, but not too much. Beginner growers often run into trouble because they tend to their plants excessively. Once you’ve watered the growing medium, wait until the top couple of centimeters become completely dry before watering again. Administering water too often can cause the growing medium to become anaerobic, meaning it lacks oxygen. Over time, this can suffocate roots and enable harmful bacterial and fungal pathogens to proliferate in the growing medium.
Vegetative Stage - Week 1
Once your plant has developed the first pair of three-fingered leaves, it’s officially in the vegetative stage. Throughout the vegetative stage, you’ll notice how the number of fingers increases as your plant grows and this is a good sign! But before you see the 5 or 7-fingered leaves, there are other things you should pay attention to.

Depending on if the substrate is amended or not, you will have to start feeding a really low nutrient dose for your plant to start absorbing nutrients and eventually grow into a huge plant so make sure to start with the lower recommended dose, see how your plant develops and increase the nutrient dose if needed. Cannabis plants accomplish several things during the vegetative phase. During this period, they strive to grow as much as possible. By uptaking high levels of nitrogen from the growing medium, they are able to create amino acids and larger proteins, which enable them to build new tissue at a rapid rate.

The creation of new leaves then drives photosynthesis further, fueling growth even more. As the canopy develops, your vegetative plants will develop more nodes (the point at which branches meet the main stem) and internodes (the space between nodes). The nodes are the points at which flowers will grow during the bloom stage. Ultimately, the vegetative phase sets the stage for this important time, so it’s important to keep your plant as healthy and vibrant as possible using the tips presented below.
Vegetative Stage - Week 2
In the second week of the vegetative stage, your plant should have grown quite a bit, making it the perfect moment to perform plant training techniques like SCROG, Sea of Green, or topping among others. Keep in mind that you should always have a gentle airflow so that the stem and branches strengthen up properly and can handle the dense buds during flowering.

Remember that proper airflow serves not only to strengthen your plant’s structure but also to help avoid bugs such as spider mites, white flies, and fungus gnats. Also, proper airflow can prevent mold spores from landing on the plants, saving your whole garden, so make sure you have at least one oscillating fan!
Vegetative Stage - Week 3
By week 3 your plant should have started growing exponentially and become quite bushy, this is when you want to start increasing the nutrient dose to allow your plant to continue growing vigorous and healthy. This explosion of growth will also allow you to see the characteristics inherited by the parent plants; Sativa-dominant strains usually grow taller and thinner leaves while Indica-dominant strains usually grow shorter and wider leaves. How you feed your plant at this point all boils down to the approach that you take. Growers that prefer using synthetic nutrients will proceed by following the instructions on their product of choice. If you prefer using organic nutrients, you can apply liquid feeds such as fish and seaweed. Likewise, you can also start topdressing with worm castings or bat guano that will feed beneficial soil life and benefit your plant further down the line.

It may not be clear at first glance but you’ll definitely see the leaves growing bigger and bigger, with more fingers each time. In fact, if everything is going correctly, the flowering sites should start turning light green and the growth rate should be so fast that you can see a big difference from one day to another. This happens because your plant is getting ready to transition into the flowering stage, which means that the long-awaited time has come and your plant will soon start developing the flowers.

Pre-Flowering Stage - Week 4
The pre-flowering stage starts as soon as your plants start developing white hairs. Obviously, you decide when to start flowering when growing indoors, but outdoors you just have to let your plant do its thing. Anyways, the pre-flowering stage marks the beginning of the transition from the vegetative stage to the flowering stage, this means that you should start slowly changing from Grow to Bloom nutrients in order to provide what your plants need to develop fat buds.

Depending on the growing conditions, it may take a couple of days for the white hairs to become visible, but it will definitely happen if you’re growing feminized seeds. If you’re growing regular Durban Poison seeds, then make sure to be on the lookout for possible male plants and remove them from the grow space as soon as possible.
Flowering Stage - Week 5 and 6
Make sure to be on the lookout for signs of deficiencies when switching from Grow to Bloom nutrients, identifying and correcting these deficiencies fast will prevent more serious problems throughout the grow cycle. Week 5 and 6 is also when you’ll experience the “flower stretch”, which is a growth spurt right after switching to 12/12.

During this flower stretch your plant will need more nutrients than ever, so make sure to keep your garden well-fed. Also, if you’ve performed plant training techniques, such as tying down the branches, now it’s the time to remove the ties because continuing with plant training may end up stressing your plant, so be careful.
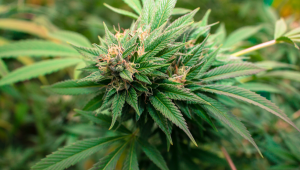
Flowering Stage - Week 7 and 8
By weeks 7 and 8, your plant should be in full-flowering mode and you should be able to see lots and lots of trichomes starting to appear. The increased trichome production means that you’ll have to install a carbon filter anytime now because the smell will only get stronger and stronger. Also, remember to keep the growing conditions on point.

Bugs and mold love to feed on cannabis plants and they can make them unsafe for consumption, easily infecting the other plants around so remember to always check your thermometer and adjust the conditions if needed. Bud development requires a lot of energy so at this point you should already be feeding a full nutrient dose, always making sure to not overfeed your plants. Other than that, just let your plants grow and do their thing, they should be ready in no time!
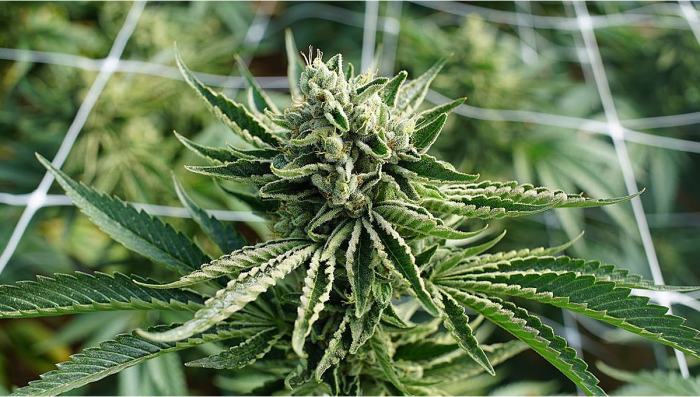
Flowering Stage - Week 9 and 10
Week 9 and 10 marks the last week before harvesting. As your plant gets closer and closer to harvesting day, you’ll see the white hairs starting to turn brown and wilt, and an extremely delicious smell. It’s super important to check your plants daily because these bugs love this delicious smell and a bug infestation can ruin your harvest at this stage.

Before harvesting, it’s highly recommended to flush thoroughly. The flushing process consists of feeding plain water for a couple of days (up to weeks) to remove the excess nutrients in the substrate. Just remember that flushing is not obligatory and it’s optional depending on the type of nutrients you’re using.

Harvesting - Week 11
Week 11 marks the last week of this Durban Poison week-by-week guide. If you’ve flushed your plants, remember to let the substrate dry before chopping your plant. If done properly, the leaves should slowly wilt and die, this is a sign that you’ve flushed properly and your plant is ready for harvest day.

As you may know, drying the flowers is the next step so a couple of days before harvesting have your drying room prepared and get your tools ready. You should use latex gloves to avoid contaminating your plants and a clean pair of scissors to trim the excess foliage off the beautiful buds. Remember there are several different ways to trim your plants so make sure to get your dry room ready in order to know the conditions and understand what suits you better when it comes to trimming and drying.
5. Terpene Profile
Durban Poison is a mostly Sativa strain that contains a mix of the following terpenes: Terpinolene, Myrcene, Limonene, Pinene, and Caryophyllene, resulting in a unique flavor that makes it super sought-after by growers and consumers.

This terpene mix results in an overall hazy aroma with spicy undertones and lemon, aniseed, and licorice hints that slowly reveal after every puff.

6. Type of Effect
Along with the pungent terpene profile comes a potent uplifting effect that improves your mood and stimulates social skills and creativity. The perfect daytime strain, ideal for those who want to start the day focused and energetic without getting couch-locked or too relaxed.
7. Drying, Trimming, and Curing your Durban Poison Harvest
After chopping down your cannabis plant, it’s vital to properly dry and cure the buds as this will help preserve the terpenes and cannabinoids, resulting in better tasting and smelling flowers while getting rid of the harsh taste caused by chlorophyll. So the first step is to opt between dry trimming and wet trimming.
Dry Trim vs Wet Trim
Before drying the buds you should choose between dry and wet trimming. As the name suggests, wet trimming consists of trimming the flowers while they’re still fresh (aka before drying) and dry trimming consists of trimming the buds after drying. This is extremely important because there’s a high chance that your harvest gets mold if the drying room conditions aren’t optimal, this happens because the leaves will release moisture so if the humidity in your dry room is low, go for dry trimming and if it’s too high, go for wet trimming.
Drying Cannabis Flowers
The drying process of cannabis plants takes place in a dark room with temperatures between 15 - 21 °C and humidity levels between 55 - 65%, taking anywhere from 7 to 16 days but can be shorter when wet trimmed as the big fan leaves are trimmed away so there’s less plant material to dry. If you opt for dry trimming, all you have to do is hang the whole plant upside down on a hanger or inside your grow tent, this will prevent the flowers from getting flattened but when wet trimming. In order to check if the plants are dry enough, bend a branch, if it snaps it means the buds are fully dry, if they don’t then leave them one more day and check again.

Now, in the case you wet trimmed, you will not be able to hang the buds so you’ll have to use a drying rack. All you have to do is place them on the drying rack and check daily until they’re dry enough, just keep in mind that they will dry much faster which can affect the flowers’ smell and taste, so it’s always advised to dry trim whenever possible.
Curing Cannabis Flowers
After your flowers are properly dry, it’s time to cure your harvest. The curing process consists of storing your flowers in airtight glass containers to control the loss of moisture and preserve terpenes. Curing takes a minimum of 2 weeks with the humidity inside the curing jars ranging from 55 to 65%. But remember that during the first week of curing you should burp the jars, this means that you have to open the curing jars 1 or 2 times a day to release moisture and exchange air. If you smell ammonia coming from the jars it’s a sign that mold is starting to form so leave the lid off for a whole day to prevent mold!
8. In Conclusion
Durban Poison is a must for Sativa lovers. This excellent landrace strain will definitely be amongst your top 5 Sativa strains due to the delicious flavor and unique psychoactive effect, old-schoolers will definitely fall in love with this one! If you’ve grown Durban Poison seeds before, feel free to help fellow growers by leaving your tips and tricks in the comment section below!


Comments