


New version of Lemon Cherry Cookies Auto
Lemon Cherry Cookies RF3 : Germination Phase
For the Lemon Cherry Cookies RF3 run, we germinate 200 seeds to eventually select the top 50-100 standout phenotypes that will define this generation’s expression.

The germination process follows the simplest and most reliable method soaking seeds in water. We use tap water adjusted to 0.6 EC, balancing the pH between 5.9 and 6.2. Proper water chemistry ensures that the seeds hydrate evenly and roots develop with stable vigor. Always use room-temperature water never cold or hot as temperature shock can drastically slow down germination or deform early root growth.
Each batch goes into standard disposable cups, no more than 25 seeds per cup. Over multiple runs, we’ve learned that this setup consistently produces straighter, more uniform roots, making the transplantation into Sabika Peat faster and cleaner.
When working at scale, small optimizations like this multiply into massive efficiency gains.Always place your cups in a dark, warm space with stable room temperature. Avoid cold surfaces like concrete floors - they can quickly pull heat from the water, leading to delayed or uneven germination.
After roughly 36 hours, you’ll notice healthy roots reaching 0.5 - 1 cm in length a perfect signal to move into the next stage of our cycle.
Planting in Sabika Peat : From Shell to First True Light
After germination, all seedlings are transferred into Sabika Peat, where they spend the next 3-4 days making their first real push into the world. During this phase, we keep the light intensity gentle, up to 100 PAR, and raise the humidity to make it easier for them to shed their seed shells and open their cotyledons for photosynthesis.

Over the course of four days, you can see the first clear signal that it is time to move on: from below, the seedlings start to break through the Sabika Peat, and most of them have already dropped their shells.
Once the majority stand with clean, open cotyledons, it is the ideal moment to prepare the next substrate. That is when we start mixing coco and get ready for the next transplant stage.
Preparation for Transplant : Setting Up Coco and Environment
For this stage, we prepare the substrate with a simple but effective mix: 90% coco and 10% humus. This is our standard blend, but you must stay especially attentive to plant behavior later during the transition from vegetative phase to preflower we will get into that in a separate entry.
If your coco has been stored in a cold room, always let it warm up to stable room temperature before transplanting. Young, fragile seedlings are highly sensitive at this moment, and even minor temperature stress can slow them down.
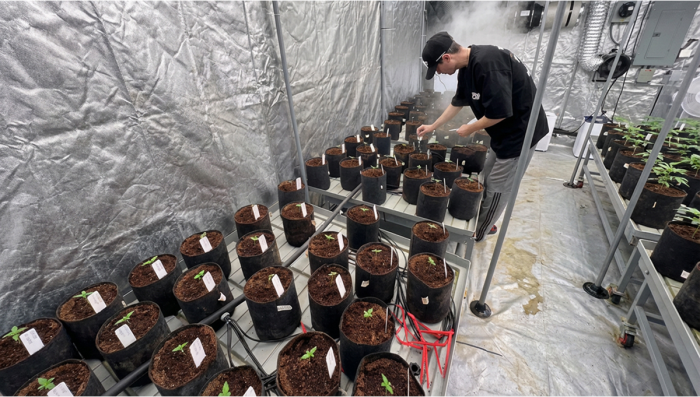
We carefully fill 1-gallon grow bags with the prepared coco mix, making sure there are no holes, air pockets, or uneven spots in the substrate, but also avoiding over-compaction. This structure helps roots rapidly colonize the entire pot : strong, expansive roots mean a healthy, vigorous plant. For this cycle, 160 one-gallon bags are fully prepared. In each pot, we also create a small planting hole and enrich it with Mykos : a mycorrhizal inoculant that forms a symbiotic relationship with the root system, improving nutrient uptake, root mass development, and overall plant resilience.
Next, we dial in the environment climate is a key factor for success. During the first weeks after transplant, seedlings need warmth and high relative humidity: ideally around 24 degrees Celsius (approximately 75 degrees Fahrenheit) and 70-73% RH. This gives us an optimal VPD range of 0.45-0.56, which is perfect for freshly transplanted seedlings.
Light intensity remains gentle at this stage no more than 130 PAR for the first five days. At the same time, we make sure there is active ventilation and a light airflow over the canopy, which works as both training and hardening for young plants.
Once the substrate, climate, and light are on point, it is time to transplant now the seedlings are ready to move into their coco homes.
Transplanting into Coco — First Watering and Root Protection
When transplanting into coco, the priority is to protect the delicate root system that has formed in the Sabika trays. Gently remove each plug, making sure not to tear or bend the young roots, then carefully place the plug into the prepared planting hole and lightly backfill with coco so the seedling stands stable but not buried too deep.
For the first irrigation, we keep the nutrient solution mild, in the range of 0.6-0.8 EC. At this early stage, it is crucial not to give the plants more nutrients than they can actually consume flushing excess salts from coco later is much more complicated than gradually increasing feeding once the plants clearly start demanding more. The pH is adjusted to 5.7-5.9, with a solution temperature of 20-22 degrees Celsius to keep the roots comfortable and active.
We also add Azos to this first watering, working in synergy with Mykos from the planting hole. Azos is a beneficial nitrogen‑fixing microbe that helps convert atmospheric nitrogen into a plant‑available form, supporting strong early root and vegetative growth, while Mykos (mycorrhizal fungi) extends the effective root zone and improves nutrient and water uptake together they create a powerful biological foundation for young plants.
A volume of around 250 ml per 1-gallon pot is enough in the conditions we set up earlier, and this initial watering will comfortably sustain the seedlings for the next two days before the substrate begins to dry back and invites the next irrigation.
Smooth Transition into Active Vegetative Growth

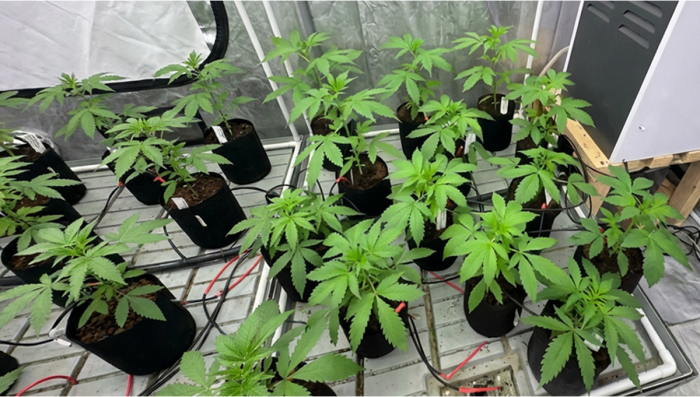
Now we are really in the game from here, the plants begin their steady transition into active vegetative growth.
Over the next two and a half weeks, we rely entirely on controlled hand‑watering, carefully adjusting the volume only as the plants actually demand more. This is a heavy workload, but it gives us full control over each pot’s dry‑back and root development, setting a clean foundation before switching to automation.
From the second week, as plants gain mass and start feeding more aggressively, the nutrient solution can be gradually increased up to 1.0 EC to match their rising demand.
We are already looking forward to connecting the automatic irrigation system, but until then it is all about precision and consistency.
Early Selection Continues
Another week has passed in our Lemon Cherry Cookies run, and the plants have continued to develop steadily. Growth over this period has been clearly visible, with most individuals maintaining a strong and uniform pace.

At this stage, small differences begin to appear. We can already identify a few plants that are slightly lagging behind the main group. These are not major deviations, but even minimal inconsistency at this point is enough for us to take action.
In total, this represents only around 3 to 6 plants, but they are removed immediately. If a plant does not meet our expectations from the start, we do not keep it just to fill space. Every position in the cycle must be occupied by a plant that fully aligns with our standards.

This approach keeps the population clean, balanced, and focused on quality. As a result, the remaining plants continue to develop in a more uniform and controlled environment, which becomes increasingly important as the cycle moves forward.
Two Weeks of Growth
Around two weeks of growth have passed, and our Lemon Cherry Cookies have reached a point where proper selection can now be carried out.
The plants have developed enough structure to clearly show differences in vigor, balance, and overall behavior.
In the video, you can see how the primary selection is being performed.
This is not the final selection of the fathers, but an important early filtering stage.
At the same time, mothers that do not meet our criteria are removed from the cycle.
Only plants that match our expectations in structure, stability, and growth behavior are allowed to continue.
At the same time, the males have already been treated with STS and are moving toward the stage where they will soon be ready to release pollen. Their development is progressing as expected, and timing across the cycle remains well aligned.

Defoliation Stage
After completing the selection process, we move into defoliation. This is a key stage in the cycle and should not be overlooked.
Removing large fan leaves and performing lollipopping by clearing the lower skirts helps reshape the plant structure and prepare it for the next phase.
These actions significantly improve airflow within the middle layers of the canopy and allow light to reach deeper into the plant. As a result, growth becomes more directed and efficient, and the plant is able to develop in a more controlled and balanced way.
Proper defoliation at this stage creates the conditions needed for strong and uniform progression into the next phase of the cycle.
Perfect Timing
At this stage, we move into one of the most important moments of the entire cycle - selecting the right window for pollination. By now, the males are fully ready and showing strong, stable expression. Their development has reached the point where pollen production is imminent.
However, readiness of the males alone is not enough. Timing must be perfectly aligned with the mothers. For successful pollination, stigmas must be properly formed and fully receptive. This is a very specific window, and missing it can directly affect the overall result.
In our case, we have hit this window exactly as planned. The mothers are at the right stage, with well-developed stigmas ready to receive pollen, while the fathers are fully prepared to deliver it. This synchronization is the result of careful planning and precise control throughout the entire cycle.
From this point forward, we enter an active pollination phase that will last approximately 7 to 10 days. During this period, pollination will be carried out consistently to ensure full coverage and strong seed development across the entire population.
This is where the cycle truly comes together, and where the future of the next generation is defined.
Post-Pollination Routine : Shaping the Final Lineup

After successful pollination, each plant goes through a strict selection based on a full set of predefined criteria, followed by grouping and arranging plants by phenotype expression. If a plant does not meet the required parameters, it is removed from the production run immediately, without compromise.
Once this selection stage is complete and only the best keepers in each phenotype group remain in the grow room until the end, it is time for a thorough defoliation. All weak or unproductive branches are removed, giving the plants more space to breathe and grow, allowing light to penetrate deep into the lower canopy for even seed maturation and helping to normalize airflow throughout the room.
In this cycle, after selection and phenotype sorting, we ended up with 67 plants that earned the right to stay until harvest.
Two Weeks Before Harvest : Data, Color and Harvest Prep

By this point, the buds are fully formed and every plant has settled into its true color and expression.
At around day −14 before harvest, it is time to lock everything in: all key parameters for each plant are recorded, and a final document is created for the entire run. A full set of pre-harvest photos captures each keeper in its final state before the chop, so every plant has its own history for future reference.
Over the following 14 days, the room slowly shifts into an artificial autumn. Each day, light intensity is reduced step by step, encouraging the plants to finish, fade and redirect their remaining energy into the seeds. At the same time, the plants naturally start drinking less, so irrigation has to be strictly controlled.
If earlier they were on automatic watering 5–6 times per day, during these last two weeks individual events are gradually removed from the schedule. Too much water at this stage means excess moisture in the medium, which is the opposite of what is needed. The goal is to keep a careful balance where the substrate slightly dries back overnight, helping the plants to finish clean, without stress or over-saturation.
Harvest Complete
And just like that, our Lemon Cherry Cookies cycle has come to an end. And honestly, it was a beautiful one. Each harvest brings a sense of pride in the work that goes into every stage of the process. From early selection to final pollination, every step played its role in shaping the outcome.
However, this is not the end of the story. This part of the blog may be complete, but there is still much more ahead. In the upcoming updates, we will show how the seeds are processed after harvest, how they are prepared, cleaned, and stored.

Most importantly, the journey continues with a full testing cycle of the next generation. What we have produced now will go through another complete run, this time focused on flower production rather than seed making. Over the next four months, we will observe how these genetics perform in terms of structure, bud formation, and overall expression.
This stage is one of the most important parts of our work. It allows us to truly understand the result we have achieved and determine which lines are ready to move forward.
The cycle may be complete, but the real evaluation is just beginning.
FAQ
Large populations allow breeders to compare a wide range of phenotypes and identify only the individuals that best represent the desired traits. Strict selection at the beginning of the cycle increases the consistency of future generations.
Manual watering gives breeders complete control over each plant's development during its most sensitive stage. This approach helps establish a strong root system before plants move into a more automated production environment.
Microbial inoculants help create a healthier root zone by improving nutrient uptake and root development. Strong roots provide the foundation for vigorous growth and more consistent plant performance throughout the cycle.
Why is defoliation performed before pollination?
Removing excess foliage improves airflow, increases light penetration, and allows pollen to reach flowering sites more efficiently. It also creates a healthier environment for both seed development and overall plant performance.
Successful pollination depends on perfect synchronization between receptive female stigmas and viable pollen release. Even slight differences in timing can reduce pollination efficiency and affect seed quality.
Grouping similar phenotypes allows breeders to compare genetic expression more accurately and identify the most stable individuals. This makes future selection decisions more precise and consistent.
Harvested seeds must prove their quality through germination and cultivation trials before they can become part of future production. Testing confirms that the selected genetics consistently express the desired characteristics.
Lemon Cherry Cookies Auto already possesses many of the qualities growers appreciate. The goal of this breeding project is to improve consistency, plant structure, and overall performance while preserving the cultivar's recognizable identity.
Particular attention is given to maintaining the cultivar's signature sweet citrus and dessert-like terpene profile, along with its productive structure and balanced growth. Any improvements are made without compromising the characteristics that define the variety.
Its stable genetic foundation, distinctive terpene expression, and reliable growth make it an excellent candidate for long-term refinement. By selecting the best-performing phenotypes generation after generation, breeders can further improve uniformity while keeping the cultivar true to its original character.

Comments