


Transplanting Cannabis: The Ultimate Guide
- 1. Reasons for transplanting cannabis
- 2. When should you transplant?
- 2. a. How long should you wait between repotting?
- 2. b. What size pots should you transplant to?
- 2. c. Can you transplant during flowering?
- 3. Transplanting a cannabis plant step by step
- 3. a. Step 1. water in advance
- 3. b. Step 2. prepare the new container
- 3. c. Step 3. prepare the hole
- 3. d. Step 5 (optional). loosen the roots of a rootbound plant
- 3. e. Step 6. put the plant in the hole
- 3. f. Step 7. create mild conditions to facilitate recovery
- 4. Transplant shock: how does it look and how to avoid it?
- 5. What time of day is best to transplant
- 6. Using fertilizers when transplanting cannabis
- 7. Some tricks of stress-free transplanting
- 8. Moving plants from indoors to outdoors
- 9. Transplanting autoflowers
- 10. Transplanting mother plants
- 11. Final thoughts
You can easily grow a cannabis plant from seed to harvest without transplanting it even once, but sometimes, transplanting becomes a highly desirable and even unavoidable procedure. So, it’s best to come prepared and learn all about the ins and outs of repotting cannabis.
Reasons for Transplanting Cannabis
The main reason is obvious – to give roots more room and thus get a bigger and higher-yielding plant at harvest.
You may ask, why not choose a large container then right from the start? Many growers do exactly that, especially when cultivating autoflowers. That’s a perfectly acceptable technique. However, starting your seedlings in smaller containers and moving them to bigger ones as you go has its benefits:
- to save on space at the beginning of the plant’s life cycle,
- to start many seedlings, selecting the strongest ones and discarding the rest,
- to not waste resources on plants until they reveal their sex,
- to enjoy easier and more frequent watering in smaller pots.
Another case when you can’t avoid transplanting is when you plan an outdoor grow but start your seeds indoors. Finally (and this doesn’t happen very often), the reason for repotting is to provide new soil because the old one was poisoned by fertilizers or infested by pests.
When Should You Transplant?
Basically, the plant will benefit from a transplant when its roots have finished filling in the available medium. Usually, you don’t see that, but you can tell it’s time to repot by some indirect signs. The most obvious one is when your young plant’s leaves start stretching beyond the edges of the pot. You can bet the roots are now pushing their boundaries as well and start to feel constrained.

If you don’t hurry with a transplant at this point, you may see the growth slow down or even stop. Don’t take it that far – transplant as soon as the plant has clearly overgrown its container.
However, sometimes, you’ll need to repot sooner. So, how do you know when a plant is big enough for a transplant and the procedure won’t hurt it? Make sure the seedling is at least a couple of inches (~5 cm) tall and has two pairs of true leaves. Also, it better not be sickly or stunted as transplanting is likely to add more stress on top of what’s already troubling the little guy.
How Long Should You Wait Between Repotting?
There’s no one-size-fits-all answer. Rather than transplanting on a set schedule, monitor the size of your plants and repot them whenever they seem to be overgrowing their current container. Obviously, it all depends on pot sizes and growth rates.
What Size Pots Should You Transplant To?
Choosing a pot of the right size is an art and science in itself, and it all depends on whether you grow an autoflower or a photoperiod strain, use SOG, ScrOG, or none of the two, and of course, what plant size you want to achieve by harvest. You’ll need to run quite a few experiments to see what works best for you, but as a point of reference look at a few examples in the following table:
| Seedling | First Transplant | Second Transplant |
|---|---|---|
| Imperial System | ||
| Solo cup (9-18 oz) | 1 gallon | 3-7 gallons |
| 3.5-Inch Pot | 1 gallon | 3 gallons |
| Solo Cup | 5 gallons | - |
| 32 oz | 5 gallons | - |
| Metric System | ||
| 0.2-0.4 L | 2-3.5 L | 6-11 L |
| 0.5 L | 3.5 L | 7-18 L |
| 0.5 L | 1.5 L | 3.5 L (SOG) |
| 1.5 L | 3.5 L | 10-20 L (ScrOG) |
The available statistics for autoflowers show that 11-12-liter (3-3.5-gallon) final containers are used the most often, followed by 18 and 15 liters (4.75 and 4 gallons). The correlation between the pot size and the yield is hardly linear, so, if you aim for a high yield, anywhere between 11 liters (3 gal) and 18 liters (4.75 gal) will do and the rest depends on your growing skills.
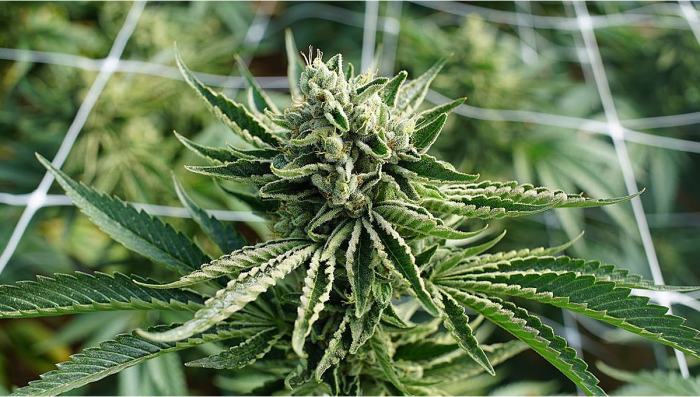
Can You Transplant During Flowering?
Well, yes, you can if you really have to, but you must have good reasons for that, and giving more space to the roots in hopes of bigger yields isn’t one of them. Roots don’t really grow that much during the flowering stage, so chances are that all that extra soil will remain unused.

So, please remember: transplanting is for the vegetative stage only, and the last transplant should be performed at least a week or two before the start of flowering. This is what makes repotting so tricky when growing autoflowers (with their shorter veg), but more of that below.
Transplanting a Cannabis Plant Step by Step
Ok, let’s say you have a good reason to transplant and have picked the right moment to do it. What’s next?
Step 1. Water in Advance
Watering is an important consideration here. First of all, never forget that transplanting is a potentially stressful procedure and your job is to make sure your plant is in the best shape. Among other things, your cannabis must be fully hydrated. So, water it a day or two before repotting.
If the soil in the root zone is moist but not soaked, the whole thing is less likely to disintegrate during repotting. Very wet soil is heavy, and you may see chunks of it fall off, tearing some of the roots in the process. Very dry soil, on the other hand, is crumbly, and outer crumbs are likely to fall off too.
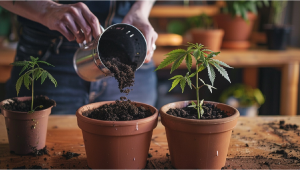
Step 2. Prepare the New Container
Take a bigger pot, fill it with a soil mix, accounting for the volume of the old pot, water it sparingly – so that the medium is damp but not soaked, and leave everything for a day or two to settle. If you grow organically, it would be a good idea to perform the procedure a couple of weeks before the transplant – inoculating the soil with beneficial microbes all the while.
Step 3. Prepare the Hole
The easiest way to make a hole of the right size is by putting your old container into it and seeing how it fits. You may want to wipe clean the outer walls of the old container first – to avoid introducing pathogens into the new medium.

When the hole is ready, spray its walls with some water. You may add a rooting hormone/stimulator if you like.
Step 4. Slide the Plant Out of Its Old Pot
To do this, turn the pot with the plant upside down and tap the bottom so that the root ball slides into your palm. It’s a good idea to hold the stem between your middle finger and ring finger. Sometimes, the soil and/or roots stick to the walls of the old pot. In this case, gently massaging the pot walls will help. If it didn’t or if the walls are rigid, you can gently run a knife between the walls and the root ball.
Step 5 (Optional). Loosen the Roots of a Rootbound Plant
If a plant has spent too much time in a pot that’s too small for it, it becomes rootbound. The roots of a rootbound plant start circling around the walls, getting entangled with each other and sometimes turning into a kind of a yellowish crust around the root ball. In this case, you may try to pull the roots apart and untangle them with your fingers. Better have latex gloves on to reduce the risk of infecting the roots with bad bacteria.

You can also cut the entangled roots if they have become severely root-bound, but that will probably cause considerable stress to the plant and it may require more time to recover, thus prolonging the vegetative stage.
Step 6. Put the Plant in the Hole
Do it quickly to reduce the exposure of roots to light. The roots of cannabis plants prefer darkness. When the plant is in place, fill in the gaps with the soil mix, compacting it gently by tapping. Water everything lightly – this, among other things, will help make sure there are no empty spaces in the contact area. However, don’t overdo the watering – the roots should have an incentive to grow outwards in search of moisture, so they mustn’t be water-clogged.
Step 7. Create Mild Conditions to Facilitate Recovery
Transplanting may compromise the ability of the roots to absorb water. This means that you may want to reduce the transpiration of moisture by the leaves. So, dial down your grow light or move it farther from the plant tops. Make sure the temperature is on the cooler side of the optimal spectrum and the relative humidity is around 60%.
All this will help the plant lose less moisture until its roots fully recover the ability to absorb water. When the growth continues or if it doesn’t stop at all, it’s business as usual.

Transplant Shock: How Does It Look and How to Avoid It?
If repotting was successful, you’ll know it immediately: the plant will continue changing daily just as it was doing before the transplant. The existing leaves will continue to get bigger and span wider and the new ones will keep appearing.
The transplant shock, on the other hand, usually manifests as a considerable slowing down of that progress. Sometimes, the shock is so severe that any growth stops – day after day, the plant looks exactly the same as the day before. In the worst case scenario, the leaves will wilt and even yellow, signaling that they transpire moisture at a greater rate than the roots can replenish. Sometimes, it simply means that the roots are in so much stress that they can’t absorb water at all.

The best way to avoid this issue is to make sure your plant doesn’t even notice the transplant. The procedure should be quick, the roots shouldn’t be disturbed at all (not broken, cut, compressed, ruffled, whatever), the new soil exactly the same as the old one (that includes not just its composition, but also the temperature and moisture levels). In such cases, the roots just keep extending downward and outwards as if they were in this large pot from day one.
If transplanting wasn’t as smooth, the transplant shock is more likely. It’s hard to say how long plants go through it normally, as ‘normally’ doesn’t apply here. It may be a couple of days, it may be a week or two – it all depends on the amount of stress that the procedure has caused and on the resilience of the genetics. Well, you’ve handled your plant too roughly, now you deal with it – by maintaining a perfectly mild environment and hoping for the best.
What Time of Day is Best to Transplant
It’s the one likely to offer the mildest conditions. Our adage about their importance is worth repeating for the third time, so here it is: make sure your repotted plant doesn’t spend too much energy on moisture transpiration. Keep the temps cool, the humidity high, and the light subdued. Generally, it also means making the transplant in the evening so that the plant has the whole night to settle in.
Outdoors, this becomes even more important. Most of the time, you want to protect your transplanted seedlings from extreme heat and direct sun, so plant them in the evening or choose a cool and cloudy day. However, gardeners living in cooler climates may need exactly the opposite – avoid transplanting at nightfall and choose the warmest and sunniest part of the day instead.

Using Fertilizers When Transplanting Cannabis
When putting your plant in a bigger pot, you provide it with a fresh supply of fertile soil, so it may be a good idea to reduce the dose of nutrients compared to what you used before or even stop giving anything extra altogether, at least for a while. Also, when you reduce the intensity of light during the recovery period, your cannabis will automatically need less plant food.
Using some kind of a rooting powder or rooting stimulant is a different matter. They’re likely to help the roots thrive and grow at an accelerated rate. The same can be also said of mycorrhizae as well as various organic inoculants that boost the well-being of the root zone.
You’ll obviously need to feed your plants if you transplant them into old soil. In this case, the soil doesn’t have enough nutrients and performs the same role as any inert medium, such as rockwool, clay pebbles, or coco – it simply gives support to the roots and holds water and nutrients for them to absorb.
Some Tricks of Stress-Free Transplanting
An experienced grower has a few tricks up their sleeve to reduce the stress of transplanting, and we’ll share some of them with you.
- Use nursery pots with permeable or biodegradable walls. The industry offers enough planters whose walls are either made of thin porous material, through which the roots can easily grow, or of material that is both permeable and biodegradable, such as peat or coco coir. Naturally, you won’t have to take the plant out of such a pot; you just put it all in a new, bigger pot without the slightest disturbance to the roots.
- Germinate in a rockwool plug or peat pellet. As soon as the roots of the seedling start to show, you can transplant it into a starter pot or final container, and it will be a very stress-free procedure.

- Use a nursery pot that is easy to cut. When it’s time to repot, cut the wall of this pot lengthwise and then cut off its bottom. After that, just put the whole thing into the hole in the soil and gently pull out the old, cut pot.
- Just cut off the bottom of the starter pot and don’t worry about its walls. Downward is the main direction of root growth anyway, so unless your starter pot is very tall compared with the next container, leaving its walls in place won’t make much difference. This method works like a charm in larger grows, such as raised beds outdoors.
- Just place the old pot (sans bottom) on top of the new pot. Again, the roots will grow downwards, making use of the additional volume of medium.

Moving Plants From Indoors to Outdoors
Starting your outdoor grow inside is the most common practice, as it spares the seedlings the stress of being exposed to harsh outside conditions at the most vulnerable stage in their life. Usually, you want to keep your seedlings indoors for the first 10-14 days after the germination and then move them to their permanent home outdoors. At this age, the seedling will be robust enough to both handle the transplant and to adapt to temperature fluctuations, wind, and direct sun.
However, it’s always a good idea to harden the seedlings before transplanting. This means placing them in dappled sunlight and later in direct sunlight for a few hours every day. If they get accustomed to the outside conditions in advance like this, they will take the double stress of the transplant and the change of the environment much better.
Transplanting Autoflowers
For years, autoflowers were considered very finicky and easy-to-stress plants, and the standard advice was to avoid transplanting them at any cost. However, recently, autoflowering genetics have become much more resilient, and many growers ignore that old (and probably outdated) piece of advice.
That doesn’t mean transplanting autoflowers isn’t tricky, mostly because their vegetative stage is so short. You get a very narrow time window when it’s worth the trouble to repot your auto, and you must perfect the procedure so that your little plant doesn’t spend even one day on recovery. With autos, the clock is ticking and every day of the veg spent on the recovery from stress is a day lost and will result in a decrease of the yield.
So, whatever trick we mentioned before that helps you reduce the amount of stress during transplanting is worth trying while repotting autoflowers. We mean the preparation stage, the procedure itself, and the post-transplant treatment. Bring your A-game, and you’ll be thanked come harvest time.

Transplanting Mother Plants
When it comes to transplanting, mother plants are radically different from those you grow for buds. Normally, the purpose of transplanting is to get a bigger root system and a bigger above-ground part. With mother plants, you need neither one nor the other.
Mother plants are kept deliberately small. They spend months or sometimes years in a very small container, but their roots can also become crowded or rootbound. So, they require periodical rejuvenation.
How do you do that? Prepare a new pot of the same size as the old one. Put some soil mix in the bottom. Take the plant out of the pot and with a sharp knife, cut off about a third of the root ball from every side, including the bottom. Then insert this drastically diminished root ball into the new pot and fill in the gaps with more soil. Here you go: your mother plant has been successfully transplanted.
Final Thoughts
Transplanting is a potentially stressful procedure, but there are some situations where the benefits of repotting outweigh the risks. Moreover, the procedure can be perfected to such an extent that your plants won’t even notice you’ve moved them to a new home. We hope our article has provided a glimpse into the best practices of transplanting cannabis stress-free. Happy growing!


Comments