


Auto Mazar Cannabis Strain Week-by-Week Guide
- 1. Grow specifications
- 2. Grow set up
- 3. Germination and seedling stage | week 1
- 4. Early veg | week 2
- 5. Mid veg | weeks 3-4
- 6. Transition (pre-flower) | week 5
- 7. Early flower | weeks 6-7
- 8. Mid flower (bulk phase) | weeks 8-9
- 9. Ripening and harvest | week 10 (and beyond)
- 10. Yield and smoke report
- 11. In conclusion
Auto Mazar boasts an array of qualities that cater to both cultivators and connoisseurs. This Indica-dominant autoflower is a breeze to grow, flourishing in various conditions. Its robust development showcases thick side branches and a substantial main bloom, resulting in generous yields of top-notch quality. Novices and seasoned users alike are sure to relish this autoflower's potent high, delivering a relaxing, yet invigorating experience. With a decade-long legacy and a history as a pioneer in the autoflower revolution, Auto Mazar remains a trusted choice for both beginners and experienced growers, producing buds of unrivaled excellence.
With our Auto Mazar week-by-week growing guide, you'll get the front seat in watching this autoflower perform indoors, with a timeline from seed to harvest and tips and tricks for the different stages of growth. We hope that this information will help you grow the best possible plant this strain deserves.
1. Grow Specifications
Auto Mazar is an extraordinary strain that brings both ease of cultivation and exceptional quality to your garden. This Indica-dominant autoflower boasts a harmonious blend of genetics, resulting in a compact structure adorned with lush side branches and a robust main bloom. Standing at an average height of 70 to 80cm, this Indica-dominant autoflower thrives indoors and out, with a rapid flowering time of about 10-14 weeks. When cultivated in optimal conditions, Auto Mazar dazzles with impressive yields ranging from 50g for novice growers, all the way up to a staggering 200+ grams per plant for seasoned cultivators.

The finished product of Auto Mazar presents an enticing bouquet of flavors that delight the senses. This strain's pungent earthy aroma is complemented by spicy and citrusy notes of lime and haze. The taste mirrors the fragrance—earthy, Kush-like, and infused with a touch of lemon zest. But what truly sets Auto Mazar apart is its potent high, delivering a well-rounded experience that combines relaxation, energy, and upliftment.
2. Grow Set Up
Selecting grow reports to highlight this strain proved to be a bit challenging. On one hand, there's certainly no shortage of grow diaries available online. On the other, many of them contain photographs of less than stellar quality. Nonetheless, we managed to locate a couple of reports that provide ample valuable information and include some appealing photos. Besides, we have selected pictures from many other grows to illustrate this week-by-week guide. The data in the table below, was taken from one of those grow diaries. We hope you'll find it useful.
| Grow Space: | 0.11 m2 (1.22 ft2) | Pot Size: | 3 gal (11.36 l) |
|---|---|---|---|
| Seed to Harvest: | 9 weeks | Medium: | Soil |
| Flowering: | 5 weeks | Nutrients: | Synthetic |
| Light Cycle: | 18/6 | pH Levels: | 6.0-6.5 |
| Light Type: | LED | Day Temperature: | 22-27°C |
| Watts Used: | 95W | Humidity: | 40-50% |
Of course, there's no necessity to duplicate this specific setup and conditions because Auto Mazar, like many other contemporary autoflowering strains, is highly adaptable. It typically needs sufficient vertical space, but aside from that, it can readily conform to various grow setups and cultivation styles.
3. Germination And Seedling Stage | Week 1
In indoor cultivation, there's nothing more important for the grower than establishing stable conditions tailored to each specific growth stage. This is particularly crucial during the initial weeks of a cannabis plant's life when it's most vulnerable. Give special consideration to temperature levels, both day and night, as well as the relative humidity within your grow space. Aim for daytime temperatures in the range of 25 to 28 degrees Celsius, with a slight decrease of about 5° at night. Ideally, maintain a relative humidity level as high as 80%.
| Plant Height: | 5 cm | Humidity: | 50% |
|---|---|---|---|
| Distance to Light: | 76 cm | Water per Day: | 0.2 l (0.05 gal) |
| Day Temp: | 23°C (73°F) | pH: | 6.5 |
| Night Temp: | 19°C (67°F) | TDS: | 150 ppm |
Germinating cannabis seeds isn't overly complicated. In essence, you just need to create warm and humid conditions while keeping the sprouting seed in darkness. There are several effective germination methods, but perhaps the simplest and most straightforward one is the wet paper towel method. This involves placing the seed between damp paper towels until it shows a taproot. Afterward, you can simply plant the sprouts into your chosen growing medium and wait for it to emerge.

It's crucial to consistently keep the surface of the growing medium moist until the seeds sprout. Under these conditions, the outer shell of the seeds is more likely to shed naturally, providing the seedling with a smoother start in life. Conversely, if the medium is too dry or if you plant the seed too shallow, the shell may remain stuck, requiring manual removal with your fingers. This is a delicate procedure, and when performing it, it's advisable to first thoroughly moisten the shell to soften it as much as possible.

Many growers choose to turn on the lights even before the seedlings emerge, but this isn't strictly necessary. The seedling only requires the lights to be on (for at least 18 hours a day) after it has emerged. When determining the light distance, opt for one that prevents excessive stretching of the seedlings while avoiding overly intense light that could potentially hinder their growth.

We've previously emphasized the significance of maintaining high relative humidity during the first week of an autoflower's life cycle. If you struggle to establish sufficiently humid conditions throughout your entire grow room, you can boost the humidity locally by employing humidity domes. These can be as basic as the top section of a transparent plastic bottle.

4. Early Veg | Week 2
During the second week from seeds, weed plants exhibit significantly increased robustness compared to the previous week. Nonetheless, they continue to thrive under mild, meticulously regulated conditions, characterized by warm temperatures and high humidity. Ensure you maintain these conditions within your grow space, and your seedlings will reward you with rapid development.
| Plant Height: | 10 cm | Humidity: | 44% |
|---|---|---|---|
| Distance to Light: | 71 cm | Water per Day: | 0.42 l (0.11 gal) |
| Day Temp: | 23°C (73°F) | pH: | 6.0 |
| Night Temp: | 19°C (67°F) | TDS: | 250 ppm |
If the young plant is content with its environment and the care you provide, it will accelerate its growth in the second week. The primary change you'll observe is the emergence of new fan leaves. Additionally, in bushier strains, you'll also detect small new growth at the nodes – these are the future side branches beginning to develop.

The second week from seed typically represents a relatively tranquil phase in the life of an autoflower. Your main responsibilities involve ensuring that the light maintains the correct distance, the temperature and humidity levels remain suitable, and that you avoid overwatering or overfeeding your young plant.

Feeding requirements primarily hinge on your chosen growing medium. If you're cultivating your autoflower in soil, you likely won't require fertilizers until week three or even until the onset of flowering. Some growers can even forgo nutrients altogether by preparing what's known as super soil, which contains sufficient organic plant food for the entire cycle. However, in hydroponics, coco coir, or other inert mediums, you'll need to provide additional nutrients from the very first week. In the table below, you'll find a sample feeding schedule for the entire Auto Mazar growth cycle.


5. Mid Veg | Weeks 3-4
Weeks three and four mark the first time when you'll likely need to change the distance of your lights due to noticeable growth in your plants during this period. While the plants still benefit from controlled conditions, they have become robust enough to tolerate less ideal environments if necessary. You can slightly reduce the temperatures at this point and maintain a relative humidity level of around 60% for optimal results.
| Plant Height: | 15-30 cm | Humidity: | 40% |
|---|---|---|---|
| Distance to Light: | 51-64 cm | Water per Day: | 0.5 l (0.13 gal) |
| Day Temp: | 22°C (71°F) | pH: | 6.0 |
| Night Temp: | 19°C (67°F) | TDS: | 720 ppm |
Auto Mazar is likely to remain short and compact even as it experiences the explosive vegetative growth. In the majority of grow diaries we have seen, this autoflower forms a large number of well-developed side branches without any canopy management efforts.

Experienced growers, however, don't underestimate these modest beginnings and rightly anticipate that growth may become unruly later on. This is why, especially if the headspace in your grow tent is limited, we recommend implementing some form of training, such as Low Stress Training (LST), and initiating it quite early in the growth process.

Canopy management goes beyond the simple control of stretching. Many growers successfully use various training techniques to utilize the lights in the most efficient way and thus increase the yields.
6. Transition (Pre-Flower) | Week 5
As you approach the onset of flowering, you've hopefully mastered the art of maintaining optimal conditions for your indoor garden. However, there's one aspect that novice growers frequently overlook: monitoring and controlling pH levels. In soil grows, the pH should ideally fall within the range of 6.0 to 6.5, while in soilless mediums, it's best to maintain a pH level between 5.5 and 6.0.
| Plant Height: | 46 cm | Humidity: | 40% |
|---|---|---|---|
| Distance to Light: | 51 cm | Water per Day: | 0.5 l (0.13 gal) |
| Day Temp: | 23°C (73°F) | pH: | 6.3 |
| Night Temp: | 21°C (70°F) | TDS: | 114 ppm |
With autoflowers, the budding stage seems to begin overnight, so that you can probably miss the onset. However, if you're attentive enough to your plants and inspect them daily (for signs of trouble), you'll probably notice the first signs of the beginning flowering as soon as they appear. These will be tiny white hairs called pistils that emerge at the middle nodes of the plant, where the leaf petiole is attached to the main stem. Later, you will see the same white pistils at the tops. The new leaves growing on tops will also become almost hair-like at this stage.
 | week 5 | the top of a marijuana plant on the cusp of flowering")
As the flowering progresses, the hairs and the tiny thread-like leaves will form something that already starts to resemble future buds, though of course, they are still very small at this point.
 | week 5 | closeups of the tops of a marijuana plant with the first pistils forming")
If you have been working with the canopy shape before, there is no reason to stop your efforts now that the flowering has begun. Your plants can still tolerate a little abuse, including low-stress training and selective defoliation. It's better to do it now and avoid stressing your plant at later stages.
 | week 5 | an indoor plant in a pot heavily LSTd and defoliated")
With the start of flowering, your plants' needs for nutrients change dramatically. If nitrogen played such a huge role before (as this nutrient was needed for the growth of foliage), now, phosphorus and potassium come centerstage. These two macronutrients are essential for flower formation.

7. Early Flower | Weeks 6-7
When the flowering stage begins, the plant stops to shoot out new branches and form new bud sites. However, the existing branches will continue growing, making the whole plant stretch for at least 50% and sometimes much more, depending on your genetics, phenotype, and the type of training you've been using. As the plant tops grow into the light, be sure to check that they are not too close or else it may cause the light burn.
| Plant Height: | 46 cm | Humidity: | 40-45% |
|---|---|---|---|
| Distance to Light: | 41-56 cm | Water per Day: | 2 l (0.53 gal) |
| Day Temp: | 26°C (79°F) | pH: | 6.2-6.3 |
| Night Temp: | 19°C (66°F) | TDS: | 500-550 ppm |
Don't expect the flowers to become full and plump right away. At first, they might even look pathetic compared to the elongated branches. However, don't be nervous – it's perfectly normal, and the buds will have enough time to plump up and get heavy in the later stages.

As for the stretching, we have seen enough Auto Mazar grow diaries to draw a conclusion that this is a relatively tall strain despite its almost pure Indica heritage. In fact, it often looks like a pure Sativa – with its towering central cola, long side branches, and narrow leaves.

If you look at the height chart below, you will understand that we have chosen two relatively short plants for our week-by-week guide. Most other plants that we have seen were much taller and stretchier. In many cases, the out-of-control stretch or your Auto Mazar may make you nervous. However, even in this strain, the stretch will be over sometime around week 8 or just a bit later.

While watching your autoflowers gain in height, you will also notice that its buds begin to stack up and gradually fill in the gaps on the branches. However, this process of bulking up will be much more noticeable during the next stage.


8. Mid Flower (Bulk Phase) | Weeks 8-9
As the flowering plants gradually fill in the grow tent, it becomes more and more challenging to control temperature and humidity. That's a big issue as it's now more important than ever to keep the temps and humidity in check. If you can, bring down the day temperature by a couple of degrees compared to the earlier stages and keep the RH within 40-45%.
| Plant Height: | 46 cm | Humidity: | 45% |
|---|---|---|---|
| Distance to Light: | 41 cm | Water per Day: | 2 l (0.53 gal) |
| Day Temp: | 27°C (81°F) | pH: | 6.2 |
| Night Temp: | 20°C (68°F) | TDS: | 550 |
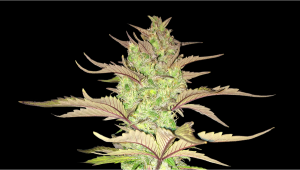
It's usually very easy to tell Sativas and Indicas apart both in veg and flower. Sativa buds are airier and fluffier while Indica flowers are more compact and dense. Although Auto Mazar is supposed to be an Indica dominant strain, in many grow diaries that we have seen, its buds are more Sativa-like in texture.
 | weeks 8-9 | a maturing, Sativa-looking plant in a small grow-tent and a closeup of its fat but fluffy cola")
However, in some other cases, Auto Mazar buds will look more like what you'd expect from an Indica. They will be big, roundish, firm, and heavy. You might even wonder if they are nearing maturity, but the closer look at their pistils will tell you that they are not. As you can see in the picture below, most of the pistils are still greenish-white at this stage, giving a clear signal that the harvest is nowhere near.
 | weeks 8-9 | a closeup of a relatively tight and moderately resinous bud")
9. Ripening And Harvest | Week 10 (And Beyond)
With your autoflower entering the final stages of its life cycle, it's more important than ever to keep the environmental conditions mild and comfortable. Lowering the temperature to around 23-25°C will ensure that the terpenes (aromatic compounds in the buds) don't evaporate too quickly and THC does not degrade. Even more important is keeping the relative humidity in check. Anything more than 50-60% is likely to cause trouble with such fungal infections has mold and bud rot. 35-40% is a much safer scenario.
| Plant Height: | 46 cm | Humidity: | 40% |
|---|---|---|---|
| Distance to Light: | 41 cm | Water per Day: | 2 l (0.53 gal) |
| Day Temp: | 27°C (81°F) | pH: | 6.2 |
| Night Temp: | 20°C (68°F) | TDS: | 80 ppm |
Sometime during this final stage, you may notice that the buds have stopped growing. It doesn't mean though that the final weight of your harvest is already set – the buds continue to get denser and, as a result, heavier. You will notice more and more pistils turning brown or amber, although in some strains, the flowers may continue to shoot out new white pistils almost till the end.

In the photos below, you can see two buds on two very different plants as they are nearing harvest. At the first glance, they look nothing alike, but actually, these plants are both ready to be cut down. It shows you that the presence of white pistils is not such a reliable sign of maturity. To make sure that your flowers are at the peak of potency, the only reliable way is to look at them through microscope and see the color of trichomes.

Trichomes are the main receptacle of THC and other cannabinoids in marijuana buds. The more of these compounds they contain, the more opaque they become. The peak potency is the moment when most trichomes look cloudy and some of them have started to turn amber – this signals that THC has already started to degrade.

We recommend not just waiting till the moment when the trichomes are that far along. About a week before that happens, you need to stop giving your plant any nutrients and start flushing the medium with pure water. In this way, you can make sure that plant tissues are fully cleaned of any built-up minerals, so that the final smoke is clean, flavorful, and not harmful to your airways.

Many growers keep their mature plants for up to 2 days in complete darkness before they finally cut them down. This technique is controversial, and the decision is up to you. What we can recommend with confidence is to slowly dry your harvest and then cure it for two or three weeks in glass jars to bring out your weed's rich terpene profile and enhance its potency.

10. Yield and Smoke Report
At the first glance, the yield harvested by the first grower whom we've been following wasn't very impressive – 30g (1.06 oz). However, it was really proportionate to his Auto Mazar's very modest size.

The second grower had a much bigger plant, and it yielded significantly more – 115g (4.06 oz). The buds weren't particularly dense, but very easy to trim – people familiar with the concept of "trim jail" understand how important that is.

Relishing the smoke of Auto Mazar, users have a diverse array of experiences, yet there's a common theme in the overall sentiment. The flavor profile is described as notably hashy and earthy, intertwined with hints of fruitiness that playfully dance on the palate. This complex fusion of tastes seems to be a common thread among reviewers, with some describing it as a smooth and delicious encounter.
When it comes to effects, the majority seems to agree that Auto Mazar leans towards a relaxing, laid-back high. Many users find it ideal for unwinding during the evening, particularly thanks to its strong Indica characteristics. While it might not be the absolute strongest bud in terms of potency, it offers a clear-headed buzz that allows for functionality—making it a choice option for various activities without overwhelming sedation.

11. In Conclusion
Looking back now at our Auto Mazar week-by-week growing guide and the materials we have gathered in the process, we see that this strain has definitely a few special features that the grower should take into account if they want outstanding results.
It turns out that many phenotypes of Auto Mazar display perfectly Sativa-like characteristics during flowering: the plants stretch a lot and usually grow tall, have long branches and not necessarily compact buds. For gardeners with limited space who expect a short-statured Indica, this may potentially lead to an unpleasant surprise.
On the other hand, Sativa-like colas are much more resilient to mold. If you had second thoughts about your ability to keep the RH in check, breathe out – with Auto Mazar, it isn't likely to become a problem.
What you should definitely pay attention to is how you're going to judge if the buds are mature or not. You may see young white pistils emerge on top of the matured ones all the way to harvest. We recommend disregarding this and, if the older trichomes look mature under a microscope, chop the plant.
That's it! We hope our guide was helpful for you and gave you enough useful insight to get a great result cultivating Auto Mazar. Happy growing, everyone!


Comments