


OG Kush Auto Cannabis Strain Week-by-Week Guide

- 1. History
- 2. Specifications
- 3. Week-by-week guide
- 3. a. Week 1 - germination
- 3. b. Week 2 - vegetative stage
- 3. c. Week 3 - vegetative stage
- 3. d. Week 4 - vegetative stage
- 3. e. Week 5 - pre-flowering stage
- 3. f. Week 6 - flowering stage
- 3. g. Week 7 - flowering stage
- 3. h. Week 8 - flowering stage
- 3. i. Week 9 - harvesting
- 4. What to expect?
- 5. Drying, trimming, and curing your og kush auto harvest
- 6. In conclusion
1. History
OG Kush is the most popular cannabis strain up to this day, although there are various theories about its origins, the most accepted one begins back in 1990 in Florida, where a grower known as “Bubba” bought a bag of mixed seeds. What he didn’t know was that in that bag of seeds he would find a very special plant, this unknown cultivar that he thought to be a Chemdawg phenotype had lots of potential and he crossed it to a Hindu Kush landrace from Amsterdam, and due to the unique terpene profile and strong high, he called it “Kryptonite”.

“Kryptonite” (aka “Krippy”) became very popular among Bubba’s friends and clones started going around until one of them ended up in the hands of Josh D. At that time, Josh D was in LA and had a lot of friends that were very good cannabis growers so he gave them all a couple of clones and started a phenotype hunt to get something similar to what he had seen before. After a couple of years, he was able to develop what is known nowadays as OG kush, a name the strain got because of the OG status, due to it being one of the first famous strains.
2. Specifications
The auto version of this old-school classic comes from the original OG Kush clone, straight from Cali, and was selectively bred with our own autoflowering genetics, resulting in one of the most potent autoflowers from Fast Buds’ original line. This is a true expression of the famous strain, tested at 23% THC, OG Kush Auto grows up to 110cm, and thanks to her Indica heritage, you can expect up to 550gr/m2 of potent medicine in around 63 days.

Such high levels of THC mean that OG Kush Auto fires up the CB1 receptors of the endocannabinoid system—the universal regulator of the human body. This system is composed of receptors, signalling molecules, and enzymes, and occurs all over the human body, from the central nervous system to the digestive system. By binding to this site, THC catalyzes the cannabis high. However, this mechanism also contributes to the medicinal effect of cannabis. Researchers are currently trying to find out if the herb can help to combat pain, inflammation, and anxiety through this cellular pathway. Medicinal potential aside, OG Kush Auto is an excellent recreational variety. It’s a great choice for Indica lovers or medicinal users, the pungent terpene profile of citrus, earthy, and kerosene overtones comes hand in hand with a potent corporal high that will leave you couch-locked for long and easily help you sleep.
3. Week-by-week guide
As always, here’s a general guideline on the conditions throughout this grow report, this week-by-week guide serves to give growers an idea of what to expect when growing Fast Buds’ genetics.
| Grow Specifications |
|---|
| Light Fixture: LED |
| Light Cycle: 18/6 |
| Humidity: 45% - 65% |
| Temperature: 21-27°C |
| Grow Space: Indoor |
| Nutrients: Synthetic |
| PH level: 5.8 - 7.0 |
| Seed to Harvest: 9 weeks |
Remember that this is a written timeline to help you, even though you can follow these specifications, you should adjust the conditions depending on your style of growing and what you have available.

Week 1 - Germination
This grow cycle started by germinating a couple of seeds of our OG Kush Auto by soaking it in water for 24hs and then transferring it to a jiffy pellet. This is what we always recommend and is a way to improve the chances of germination because the water slowly moistures the shell, making it easier for the seedling to come out. Depending on your growing style, you can germinate your seeds directly in the medium or, like the grower did, jiffy pellets if you prefer to, just ensure you keep the temperature in between 18-25°C and the humidity levels around 70%.
| Height: 1cm |
|---|
| pH: 6.8 |
| Humidity: 80% |
| Temperature: 27°C |
| Watering: 65ml |
If you’re germinating in jiffy pellets, as soon as your seedling has come out of the soil you can plant the whole jiffy in the medium of your choice. Have in mind that if you are growing in hydroponics setups you shouldn’t germinate in jiffy pellets, if you’re going for hydro it’s better you germinate your seeds in rock wool cubes as it’s more appropriate for soilless grows. If you’re germinating in a paper towel, as soon as the radicle has approximately 3cm, you can plant it, just make sure it’s moist enough so your seedling comes out of it without any problems.

It’s essential you keep not only the temperature and humidity levels controlled, but also make sure your seedling is getting light, although not too potent. If you see your seedling is stretching too much, it can be bad and the stem may end up breaking so check if the light is at the right distance (or intensity) from your plant. Remember that seedlings don’t need that much light, you can have them under weak CFLs and they’ll grow properly, this is a good way to save up on the electricity if you have a lot of baby plants, just make sure that after the first couple of true leaves are fully developed, you transfer them to a stronger light.
Week 2 - Vegetative stage
When the first pair of true leaves have completely developed, your plant is officially in the vegetative stage, this is when you will have to start feeding your cannabis plants a light nutrient dose. It’s recommended to feed in a 3-1-2 nutrient ratio, these numbers refer to the NPK amount the fertilizer contains, which are the macronutrients your plants need to grow properly.
| Height: 5cm |
|---|
| pH: 6 |
| Humidity: 70% |
| Temperature: 25°C |
| Watering: 100ml |
Cannabis plants need more Nitrogen during their growing phase so following this ratio will ensure you are giving everything your plant needs at the proper amount.
“The 3 of these little ladies are doing great and growing strong from all I can see. Showing no signs of nute burn and still only watering 1 solo cup of water per day. They have minimal stretching which is always nice and temps have been staying steady. Feeling excited about this week as all 3 are starting to take off. Happy Growing.”-Chubbs
Remember that when feeding your plants, you should always check the pH, now this is usually not necessary with organic feeding but with synthetic nutrients, it’s a must, the pH level is what determines which nutrients your plants can absorb so if you don’t check and adjust it, your plants may not be able to absorb minerals, even though you are feeding them properly.

As you can see, in the photos below, the growers were feeding around 100ml of water, despite seeming too little, it’s essential you avoid stressing your autos because you can end up stunting growth and affecting their size, which can result in smaller yields so it's better to feed with less water than usual and water if needed.

Week 3 - Vegetative stage
Depending on if you transplanted your seeds and how you’ve watered them, your seedlings should have around 3-4 pairs of leaves, so now is the time to start your plant training (LST or HST), although have in mind that you should only top or fim your plants if you have a bit of experience.
| Height: 15cm |
|---|
| pH: 6 |
| Humidity: 55% |
| Temperature: 28°C |
| Watering: 250ml |
If you don’t want to risk it, you can start low stress training your plants by tying down the branches, or growing in a SoG or Scrog so the light can reach all of the branches (and future flowering sites) equally. In this case, the OG Kush was left to grow without any form of training so you will see it get quite bushy along the grow journal.

Remember that autoflowers can get stressed easily so make sure you train them carefully and pay attention to the signs your plants give you. Also, due to the bushy foliage, pests can be attracted to your plants so check them every day, if you think your plants are too bushy, you can defoliate slightly but have in mind that just like plant training, defoliation should be done gradually. It’s recommended you remove up to 2 leaves at a time and repeat after 3-4 days if needed and if your plants don’t show any signs of stress.
Week 4 - Vegetative stage
By the fourth week, your plant should have grown quite a bit and already has the roots established so you should be able to see new growth fully developed day after day.
“...I can’t get over the increase in growth this past week ... I decided that because it was my first autoflower grow that I wouldn’t Top or F.I.M. the plant in an attempt to see it grow to its full natural ability and structure as space isn’t so much an issue."-Sawyer1909
| Height: 25cm |
|---|
| pH: 7 |
| Humidity: 65% |
| Temperature: 25°C |
| Watering: 500ml |
As said before, you should gradually increase the nutrient dose and by now, you should be feeding a full dose of Grow nutrients, this is the last week before the pre-flowering stage so it’s essential you take good care of your plants so they grow properly and are able to withstand the fat buds they’ll develop in the flowering stage.

If you’re not growing regular seeds, soon you’ll be able to sex your plant but if you’re growing feminized seeds, in the next days you’ll see signs of female flowers.
"After watching a video on how a grower tucks his leaves in rather than LST or HST methods due to the fast lifespan of Autoflowers and not wanting to stunt or stress them in the short veg period before preflower and flower .... and it worked tremendously as the canopy evened out and the shadowed growths began to sprout up.”-Sawyer1909
As you can see in the pictures above, the flowering sites have started to turn light green, this means your plant is almost ready to start producing stigmas (hairs) which means your plants is a female and will soon start developing beautiful buds.
Week 5 - Pre-flowering stage
After a couple of days of the flowering sites turning light green, you’ll see the first signs of stigmas, these stigmas develop on the calyxes and as your plants grow, the calyxes will start to swell and the stigmas wilt and turn brown. The pre-flowering stage is an important period of plant development, depending on the types of genetics that you’re running. If you’re growing feminized strains, you can cruise through this stage with almost no worries at all. Why? Because these varieties are 99.9% certain to emerge as female plants.
This means you are more than likely to see stigmas emerge at the nodes (the point at which the branches and main stem meet). This is an indication of female flowers forming. However, if you’re growing regular genetics, you’ll need to pay careful attention during this time.
| Height: 35cm |
|---|
| pH: 6.5 |
| Humidity: 55% |
| Temperature: 34°C |
| Watering: 600ml |
These varieties have an even chance of emerging as either male or female. Instead of developing stigmas, male flowers emerge as small spherical pollen sacs. Unless you’re intentionally breeding cannabis, you’ll need to remove any male plants from your growing space as soon as possible. If males get to the stage where they release pollen, they’ll certainly fertilize your female flowers. This will force your buds to stop producing as many cannabinoids and turn their attention towards the formation of seeds within the protective bract tissue. In the case of OG Kush Auto, you will almost always see female flowers form. If you’re a beginner grower, then congratulations to you for reaching this important milestone in the cannabis plant growing cycle! A couple of days before the pre-flowering stage you should give the first dose of Blooming nutrients, just like with Grow nutrients, you should start with a lower dose and gradually increase it.
You will have to start feeding Bloom nutrients in a 1-2-3 ratio while slowly decreasing the dose of Grow nutrients throughout a couple of days until you’re just feeding Bloom. The Bloom nutrients provide a small amount of Nitrogen and more Phosphorus and Potassium so your plant can still develop green matter while being able to property produce buds.

As you can see, throughout the week, your plants will slowly show stigmas and start producing trichomes, this is when you want to install a carbon filter because your plants will start smelling strong. You can still get away for a week or two but have in mind that this strain smells quite strong so you’ll definitely need it. Also, if you did any kind of training that involves tying down the branches or cutting a certain part of your plant, you should stop now, training your plants during the flowering stage can extremely stress them so unless you’re growing similar to Scrog (with a trellis net), you should remove the ties or stop topping (or fimming).

Week 6 - Flowering stage
By week 6 from seed, you’re officially in the flowering stage. If you haven’t installed a carbon filter, you’ll definitely need it by now, so make sure you have one ready to go or if you’re growing outdoors, you can use companion planting as a way to help mask the cannabis smell.
| Height: 45cm |
|---|
| pH: 6.5 |
| Humidity: 55% |
| Temperature: 35°C |
| Watering: 900ml |
Also, if you didn’t see a lot before, now you’ll start to see an abundance of trichomes in the buds and in the surrounding leaves, meaning your plant is full-on flowering. Organic matter attracts pests so, especially if you’re growing in soil, so check your plants for bugs every day, ideally a couple of days a day.

Remember that some bugs can even rot the buds, ruining your harvest, so if you’ve grown in the same place before and you know bugs could be a problem, you can hang a couple of yellow sticky papers in your growing tent or spray your plants with a tiny amount of organic pesticide to avoid any kind of bugs.
Week 7 - Flowering Stage
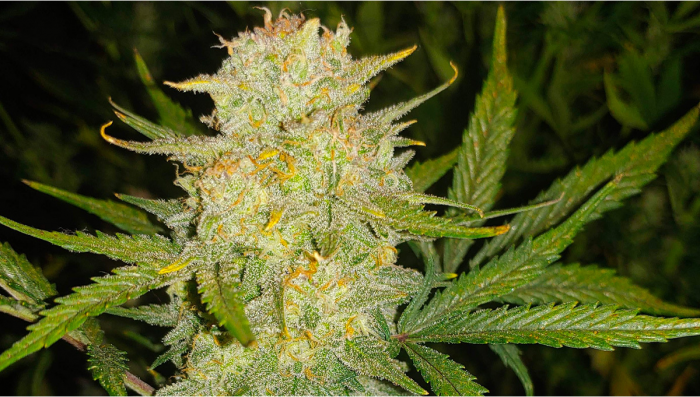
The seventh week of your OG Kush Auto marks the second half of the flowering stage, by now your plants should look beautifully frosted and smelling super delicious but there won’t be a huge difference other than fatter buds and more and more trichomes.
| Height: 50cm |
|---|
| pH: 6.4 |
| Humidity: 50% |
| Temperature: 29°C |
| Watering: 1100ml |
By now you should already be feeding a full dose of Bloom nutrients and especially, make sure your plant isn’t hungry or showing signs of deficiencies. Depending on the medium you’re using, you should also see if your plant is getting Calcium and Magnesium, if you’re growing in sterile mediums (like coco fiber) you should use Calmag supplements but if you’re growing in soil it’s most likely you won’t need to.

Also, it’s extremely important you check for bugs, especially at this stage because some bugs can hide inside the buds and start eating them from the inside, so you’ll only be able to see the infestation once your buds are starting to rot. There’s no need to worry if you don’t see anything odd but if you start to see white, yellow, or brown spots on the leaves take your time to check your plant thoroughly, if you have bugs you’ll probably see them on the underside of the leaves.
Week 8 - Flowering stage
This week marks the week before the last of this grow guide, by now the buds should look almost done, with dense buds covered in long white hairs and an intense trichome production, depending on the light fixture you’re using, the stigmas may already start to turn brown and wilt but don’t worry, your plants aren’t ready just yet.
| Height: 65cm |
|---|
| pH: 6.4 |
| Humidity: 51% |
| Temperature: 21°C |
| Watering: 1200ml |
The standard practice to know exactly when to harvest is by looking at the state of the trichomes so get a loupe ready, some growers even use their phone’s macro mode but a 10x jeweler’s loupe is the best tool to do this. Depending on the type of nutrients you’re using, you’ll also want to start flushing your plants with plain pH’d water to start removing the excess nutrients in the medium and roots.

As you can see, the flowers are already looking beautiful and even though you may want to harvest now, they still need a couple of days before the trichomes haven’t matured yet so you’ll get high but the effect won’t be as potent as when they reach their full potency.

Week 9 - Harvesting
After waiting for long, you’re now in the last week of your grow cycle and the time to reap your rewards is near. By now you should be flushing and see the big fan leaves slowly changing color, some turn yellow, others can show purple or red tones, by either way, this is a sign that you washed the medium and roots and it’ll only take a couple of days to start chopping down your plants.
| Height: 75cm |
|---|
| pH: 6.4 |
| Humidity: 51% |
| Temperature: 21°C |
| Watering: 1200ml |
As said in the specifications at the beginning of this article, the OG Kush Auto can grow up to 110cm but, unfortunately, due to overwatering this plant grew shorter than usual but as you can see, still produced huge buds.

A couple of days before harvesting you should get your drying room ready, not everyone has a room dedicated to drying their cannabis so if you’re drying in a cardboard box, in a closet, or even in a growing tent, you should start getting this ready, it won’t take long until your plants are completely mature.
“The OG ... began to gain weight day after day more and more. I blocked all the nutrients starting only with flawless finish. I will give my girls three washes with it ...fabulous and abundant harvests to all of you” -PEAKYPLANTERS

4. What to expect?
The long 9 weeks have ended and once you’ve finished the drying, trimming, and curing process, your buds will be ready to consume, finally! We had the grow reports come in and you’re in for a treat with this one, you can expect a complex and strong aroma that consists mainly of the following terpenes.

As you can see in the chart, this strain contains terpenes that can bring benefits to everyone, especially medicinal consumers which can be used for therapeutic benefits, remember that cannabis will not cure your illness but can be of great aid to treat chronic pain, migraines and other types of illnesses. This mix results in a true expression of the classic strain and provides consumers a pungent mix of earthy, piney, and citrusy aromas that will make new growers fall in love with and will take old-schoolers back to the old days.

This terpene blend provides an almost 100% Indica type of effect with a slight and pleasant head high that will leave you deeply relaxed while staying motivated and happy. Growers didn’t report any negative effects other than laziness, dry eyes, and mouth which Indica lovers should already be used to and have no problem at all with it.
5. Drying, Trimming, and Curing Your OG Kush Auto Harvest
We have briefly mentioned the post-harvest routine above, but let's take a deeper look into exactly how you go about drying, trimming, and curing your buds. After all, growing the stuff is only half the battle. If you want to get the absolute best final product then you just simply can not overlook the importance of this process, or try to rush it.
How do you go about properly drying cannabis?
What a question that is! A quick google search will show that this is a pretty heavily debated issue, and one with a bunch of answers. The one thing that absolutely everyone agrees on is the need to fully control the dry room environment. The first thing you have to consider though is whether you are going to wet or dry trim. In general, we usually recommend dry trimming. Wet trimming is when you remove a bunch of the unwanted plant material before the drying process begins, and while there is a time and a place for this technique, it does reduce the control you have over the drying period. The less plant matter, the quicker the plant dries - simple. Really, we only recommend wet trimming if you live in a really humid climate where you cannot control the dry room environment and you are worried about the bud going moldy. For the rest of this guide, we will assume you are dry trimming.

To get the best possible results you want the drying process to be nice and slow, without offering a chance for mold or other fungal issues to develop. Some cultivators try to get the drying over and done within less than a week, but we reckon that’s a little quick. The reason we want to slowly dry the plant is that although the terpene and cannabinoid production has ceased, the maturation is far from finished. Terpenes are pretty sensitive to temperature and humidity swings, so to ensure the terps have the best chance of fully developing we need to keep the temps and humidity under our control. A range of 60-70°F (that’s 15-22°C) with a relative humidity level of 55-65% is what we are looking for. You want a drying period of 8 to 14 days, if at all possible.
You might be one of the lucky ones and live in a place where the ambient temps and humidity match what we are looking for, but for the rest of us, a few pieces of kit are necessary. A humidifier or dehumidifier to bring the moisture into the acceptable range, an AC unit or space heater to control those temps, a few hygrometers to keep a close eye on where everything is at, maybe a few fans to help with air exchange, and a high-quality carbon filter and extraction fan if you want to keep things discreet.
Always space out the plant on the drying racks or line so they all have enough room to breathe and dry evenly. Never have any heater, fans, or AC units directly blowing on the buds, and make sure the room is pitch black with the door closed. Sunlight is the biggest enemy to cannabinoids and terpenes. After 2 weeks have passed on the buds are perfectly dry.

What’s the next step?
Trimming! Everyone’s favorite…. Not. Look, if this is your very first time cultivating cannabis then you are probably quite excited about the idea of trimming up your harvest and making the buds look as pretty as possible. But if like us, you have trimmed your body weight in bud, then you are most likely not super thrilled to be trimming again. To make the job easier and more enjoyable, we highly suggest going out and grabbing some specific trimming equipment. A couple of pairs of high-quality trimming scissors such as these and these work perfectly. Do not use regular scissors unless you want to get very annoyed and damage the bud. One of the OG Trim Bins makes kief collection a breeze, and you’ll want some isopropyl alcohol on hand to clean the scissors as you trim.

When trimming, try your hardest not to “shave” the bud. Us the tip of the scissors to dig down into the bud carefully and snip the base of the leaves while leaving the rest of the flower intact. Ok, so now it’s time to smoke, right? Wrong! Now it’s time to cure the bud, which can take anywhere from 2 weeks to a few months depending on the strain, the ambient environment, and how patient you are. Look, for sure you can smoke the weed as soon as you are done trimming, but the full terpene profile will not have reached full maturity or hit its peak just yet. Uncured weed will not have the full flavor or strength just yet, but if you are able to wait you will be handsomely rewarded.
How to cure cannabis
It’s really a very simple and easy process, as long as you have a few key things available. You want to carefully place the weed inside of resealable glass mason jars, and make sure to not fill past the 75% mark. Once sealed, this is placed in a dark room or area, and you want to keep the temps at around 70°F (22°C) with a humidity level of 60-65%. If possible, put a hygrometer probe into each jar to get exact readings. Don’t be worried if your buds actually feel a little moister during the first 3 to 5 days of curing. That is just the last bits of moisture escaping from the middle of the bud and rehydrating the outer layers. You should actually be worried if this doesn’t happen, as it is a sign that you over-dried your weed before curing began.

If you think this may be the case you can always grab a cannabis rehydration pack. These packs do a great job of keeping the buds at the correct humidity level for curing. We like the ones from Integra or Boveda. If the buds are still a little too moist just crack the lid and leave it open for a few days. Remember to burp the jars twice a day for the first 10 days, then only twice a week for the remaining curing time. This allows the remaining moisture to escape while controlling the rate. If you happen to notice any signs of an ammonia-like smell emanating from the jars quickly remove all of the buds and put them back in the drying room. This is a tell-tale sign of mold. After 2 weeks to six months, the terps will fully develop and mature, and you will be left with the best weed possible!

6. In conclusion
If you’re looking to grow classic strains, this Og Kush strain is a must. The world-famous OG Kush is a great strain for medicinal patients and everyone who prefers an Indica-like effect, now available in auto version, which will allow you to grow from start to finish faster than usual.
If you’ve tried this strain before and want to give fellow growers some tips to help them make the most out of their growing cycle, feel free to leave a comment in the comment section below!
External references:
- Cannabis indica. - Nash, Eugene & Wilbrand, Rainer. (2015).
- Cannabis sativa and Cannabis indica versus “Sativa” and “Indica”. - McPartland, John. (2017).

Comments