Green Crack Auto Cannabis Strain Week-by-Week Guide

- 1. Grow specification
- 2. Grow set up
- 3. Germination and seedling stage | week 1
- 4. Early veg | week 2
- 5. Mid veg | weeks 3-4
- 6. Transition (pre-flower) | week 5
- 7. Early flower | weeks 6-7
- 8. Mid flower (bulk phase) | weeks 8-9
- 9. Ripening and harvest | week 10 and beyond
- 10. The outcome
- 11. In conclusion
Green Crack Auto is a legendary cannabis strain that has become a favorite among growers and smokers alike. This strain is renowned for its uplifting and energetic effects, making it a great choice for those who need a boost of creativity or productivity. Its dense and resinous buds have a distinct aroma of tropical fruits and citrus, with a sweet and spicy undertone. Green Crack Auto is also easy to grow and offers a high yield, making it a popular choice for commercial growers. Overall, the autoflowering Green Crack is a strain that delivers both on taste and potency, and it's definitely worth trying for those who are looking for a strong and flavorful cannabis experience.
For those who plan to grow Green Crack Auto and want useful tips, look no further. This comprehensive guide provides a detailed week-by-week breakdown of the plant's growth cycle, from seed to harvest, ensuring a plentiful yield of sweet, fruity buds.
1. Grow Specification
A top-tier cannabis strain, Green Crack Auto has a Sativa-dominant composition of 55% Sativa and 45% Indica and offers a balanced and invigorating high that's perfect for daytime use. Green Crack plants grow to a large size (L) with a height of 60-90 cm (24-35 inches) and produce an indoor harvest of 350-550 gr/m2 (1.1-1.8 oz/ft2) while its outdoor production is 50-200 gr (2-7 oz) per plant. With a flowering time of 9-10 weeks, this strain is a great option for those who want a fast-flowering plant.
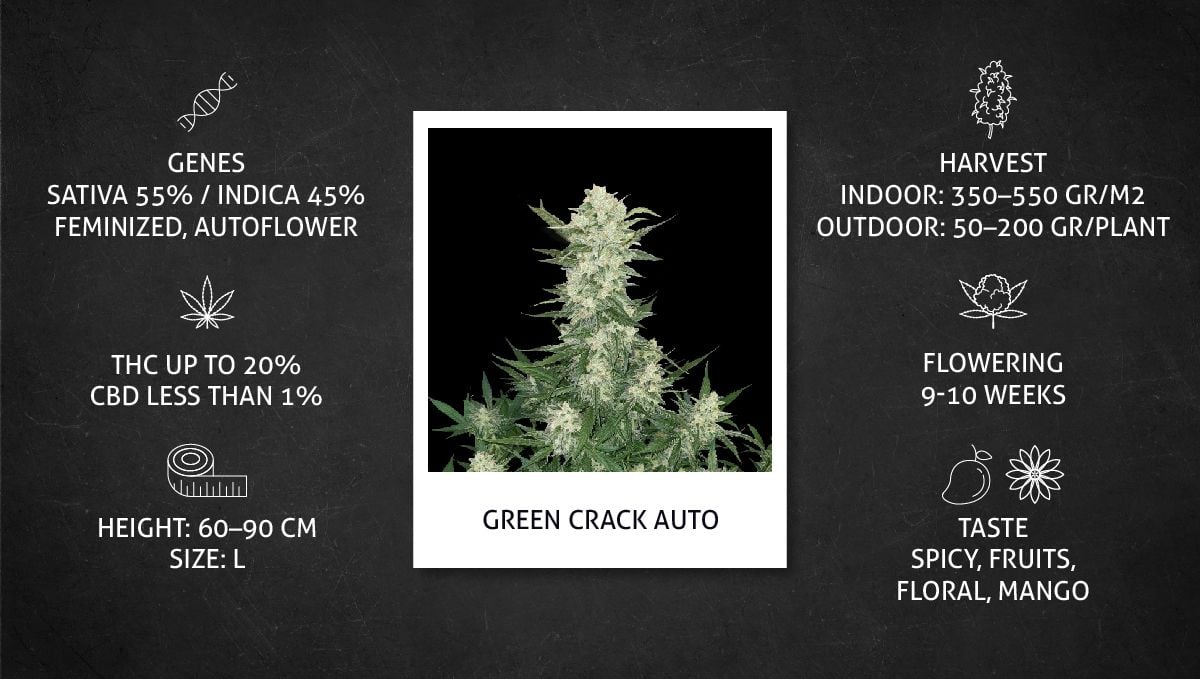
Green Crack Auto boasts a THC content of up to 20% and CBD levels below 1%, making it a strong and potent strain. Its taste is a delightful mix of spicy, fruity, floral, and mango flavors that is sure to please even the most discerning cannabis connoisseurs.
2. Grow Set Up
Green Crack Auto is one of the Fast Buds oldest creations. It has garnered significant attention from the cannabis community, and many growers have shared their experiences with this exciting genetic. In this article, we will provide a comparative review of four grow diaries and include images from other growers, giving you ample information to plan your Green Crack Auto grow.
The table below displays the setup and some specifications used by all four growers. They cultivate weed in spaces ranging from a small amateur-level tent to a huge semi-professional grow room, but they all chose a coco/perlite mix as their medium as it leads to great results once you get the hang of it.
| Grow Space | Light | Medium | |
|---|---|---|---|
| A | 0.6 m2 | 150W LED | Coco/Perlite |
| B | 1.49 m2 | 600W HID | Coco/Perlite |
| C | 100 m2 | 150W LED | Coco/Aquapot |
| D | 1.22 m2 | 150W LED | Coco |
Upon reading our week-by-week guide, you will discover that this strain exhibits remarkable vigor and yield potential, and it thrives in various growing environments and conditions which makes it a very versatile cultivar.
3. Germination And Seedling Stage | Week 1
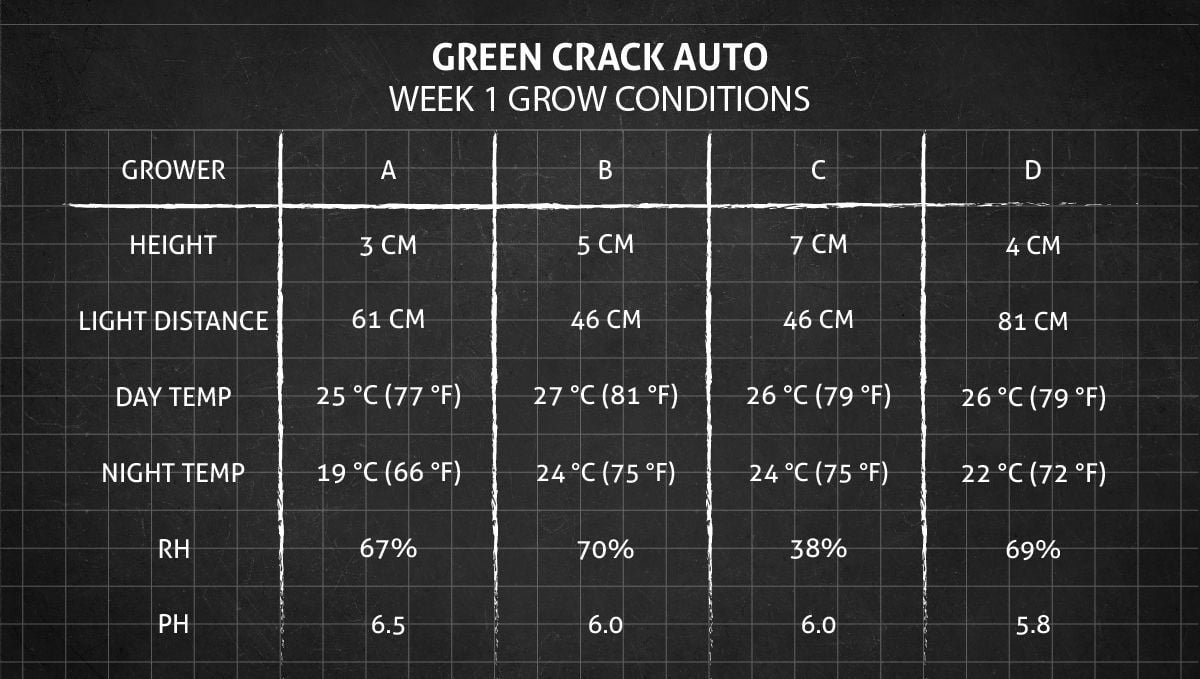
To facilitate the sprouting of autoflower seeds, it is crucial to maintain a warm and humid environment during the germination process. Optimal conditions involve a temperature range of 24-26°C (75-79°F) and a humidity level of approximately 70%. These conditions also apply for the whole first week after seeding.
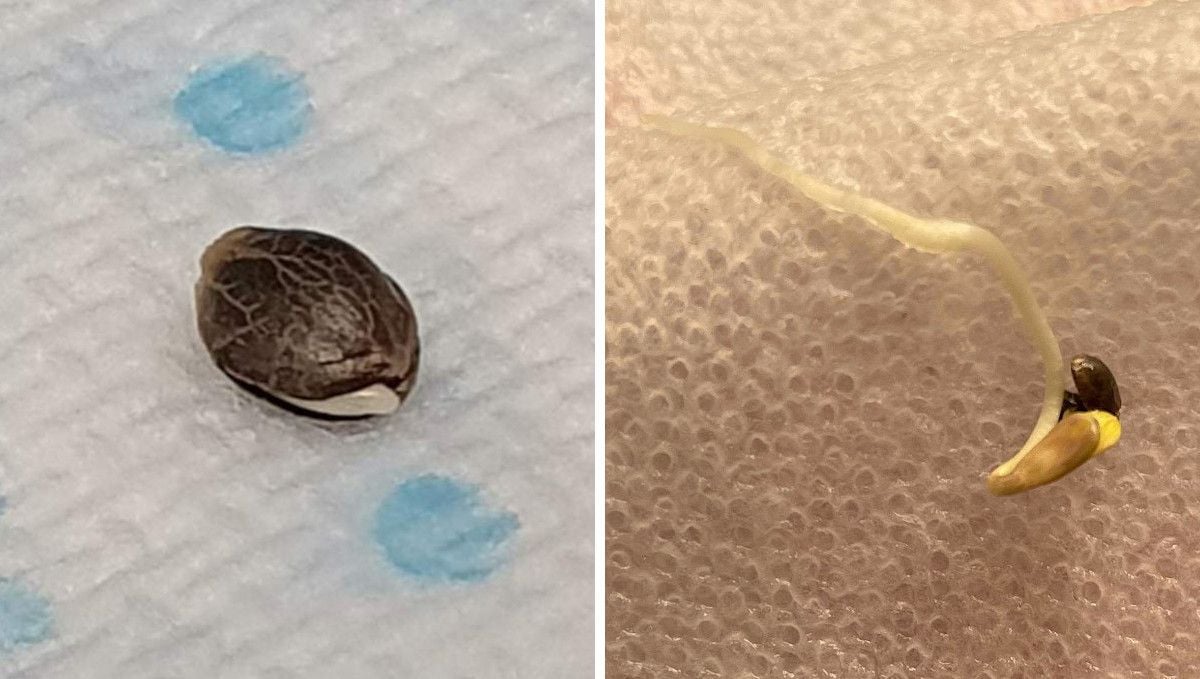
The process of germinating seeds can be effortless and uncomplicated. Many cultivators prefer to use a simple and direct method of placing the seed between moist paper towels. This method allows for constant monitoring of the seed's progress. Once you observe the seed cracking and developing a taproot, you can transfer it to the growing medium.
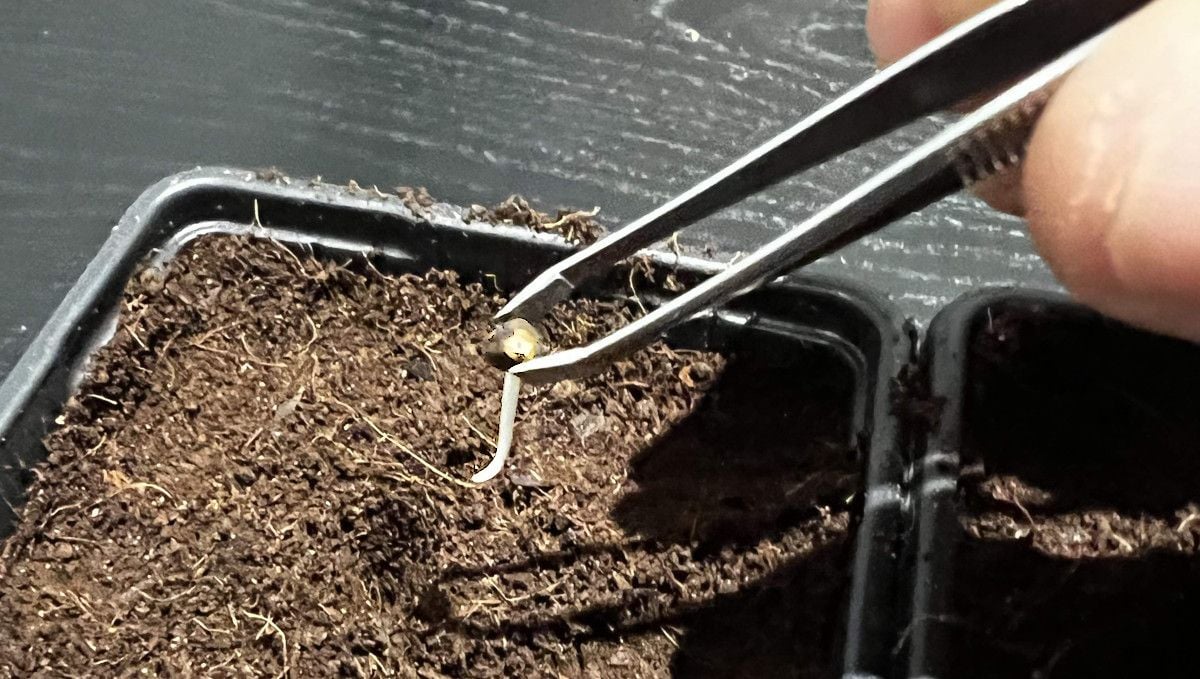
When it comes to planting your seed into the growing medium, it's essential to handle it with the utmost care. Seeds are delicate and vulnerable at this stage, and any unnecessary force or pressure can harm them. Avoid touching the taproot or seedling with your fingers, as this can damage the root system. Instead, use tweezers or a small spoon. This way, you'll ensure that your seedling has the best chance of establishing a healthy root system and growing into a robust plant.
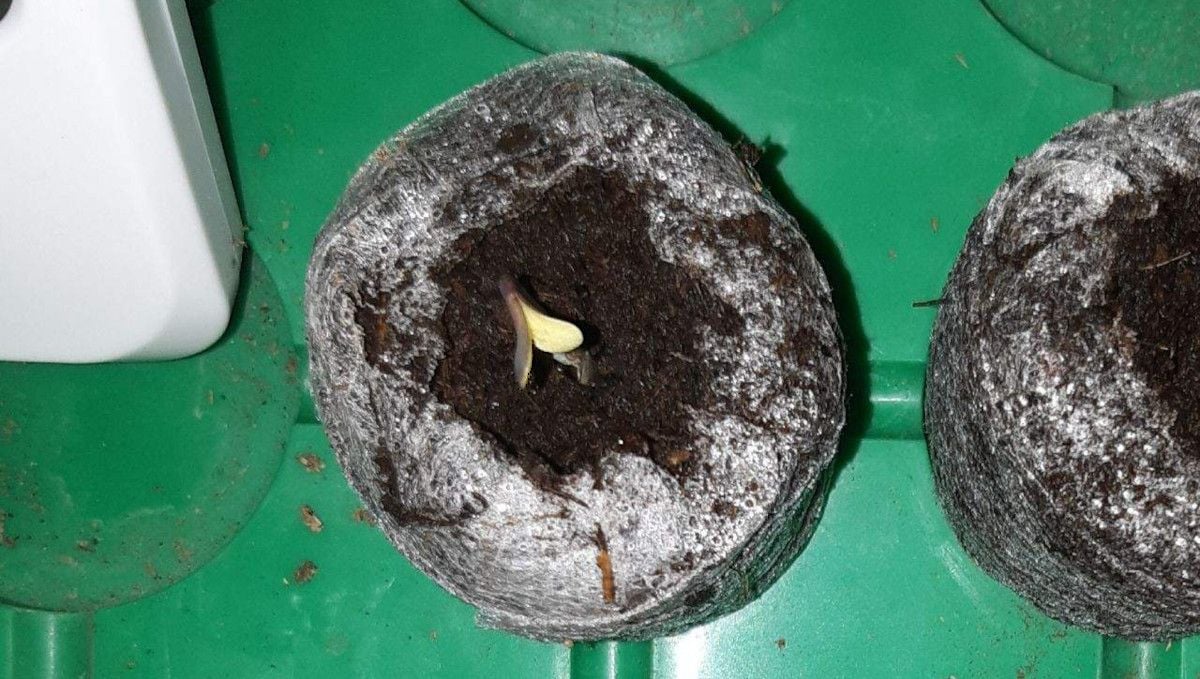
Jiffy plugs have become another popular choice for marijuana seed germination. These small compressed peat moss plugs provide an ideal growing medium for seeds, offering excellent moisture retention and aeration. They are also pre-fertilized, providing the necessary nutrients for seedlings to thrive. Jiffy plugs are easy to use and help to prevent transplant shock when it's time to move the seedlings to their final growing location.
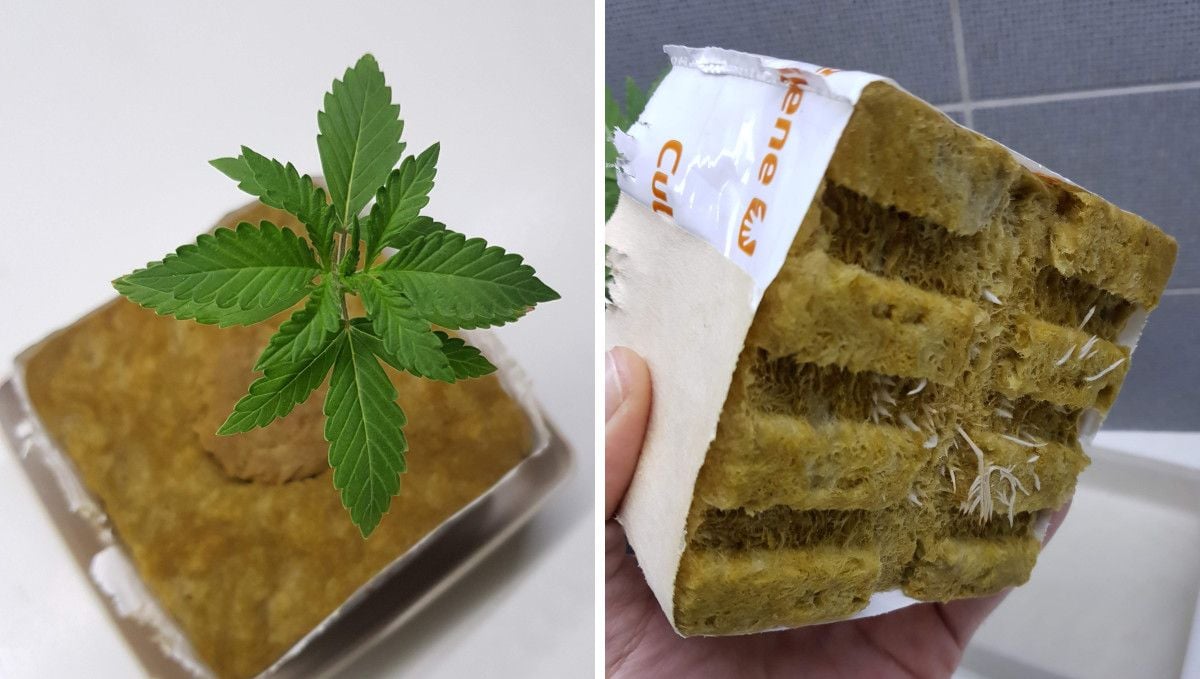
If you're a hydro grower, rockwool may be an even better choice as it has excellent water retention capabilities and provides good aeration for roots. Regularly check the down side of the rockwool cube, and when you see the roots emerging, it's time to put the cube into your DWC system.
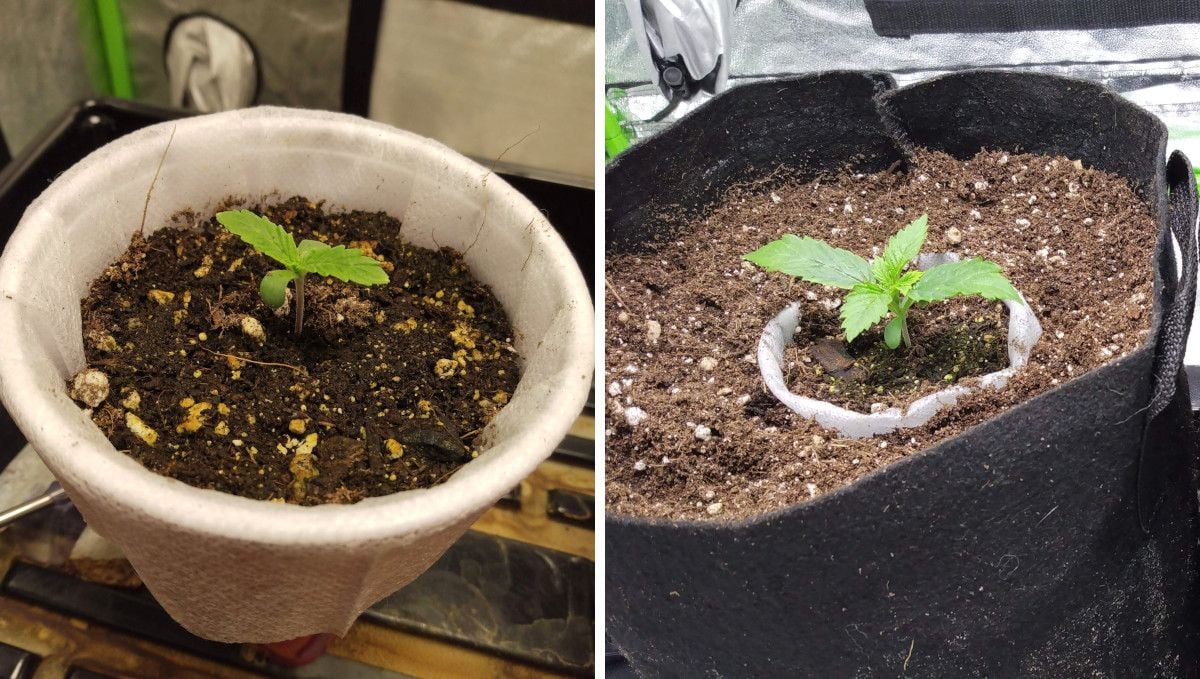
We are aware that many growers will start their autos in solo cups. You can do that too but do what you can to avoid transplant shock which can be a significant challenge when growing autoflowers. The plants of this type have a finite vegetative phase and cannot afford to waste any time recovering from severe stress. When moving autoflowers from one container to another, it's essential to minimize the shock as much as possible. See below how one grower does this: he puts an insert made out of non-woven material into a solo cup and when he later tranplants it into the final pot, the roots easily grow through the thin material.
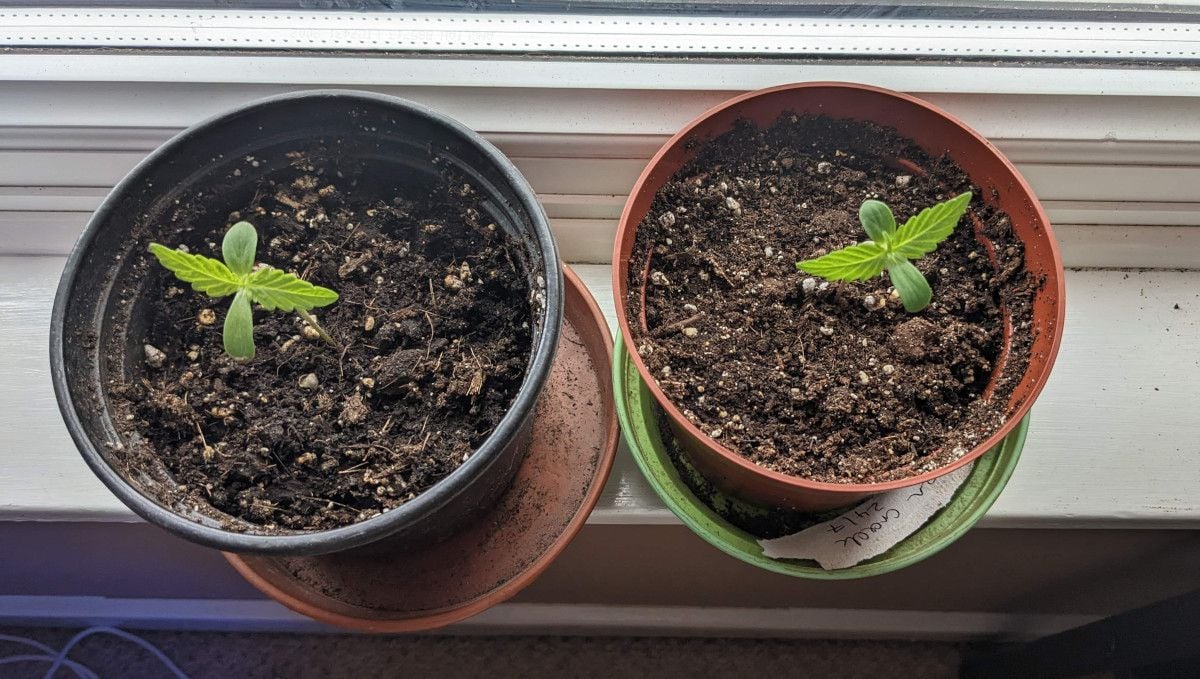
During the early stages of growth, young seedlings don't require much light, and they can be kept in a relatively low-light environment for the first few days. A window sill can be an ideal location for young seedlings, as it provides natural sunlight, which is gentle enough to prevent any light burn or stress. However, as the seedlings mature, it's crucial to gradually introduce them to brighter light, i.e. move them into a grow tent.
If you're new to cannabis growing and don't know what to expect, don't worry about the seedling's seemingly slow progress. If it's leaves are perky and there are some small changes every day, then everything is alright. It's just that the most important developments happen unseen, underground.
4. Early Veg | Week 2
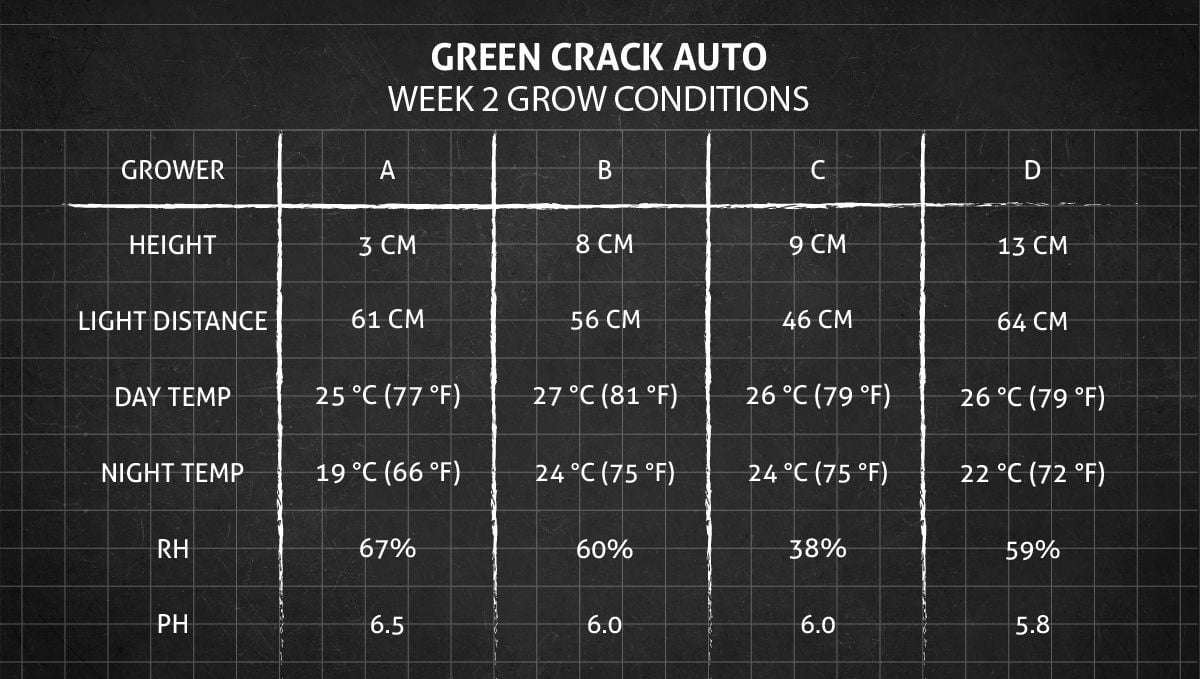
During the second week after planting, an autoflower is still in its early stages of development and can be quite fragile. At this point, the plant's leaves are growing rapidly, and they're transpiring more water than before. However, the root system may still be underdeveloped and unable to supply enough moisture to meet the plant's needs. Therefore, it's important to maintain a high level of humidity to prevent the plant from drying out. Additionally, cannabis seedlings thrive in warmer temperatures, so keeping the environment on the warmer side can help to support their growth during this critical stage.
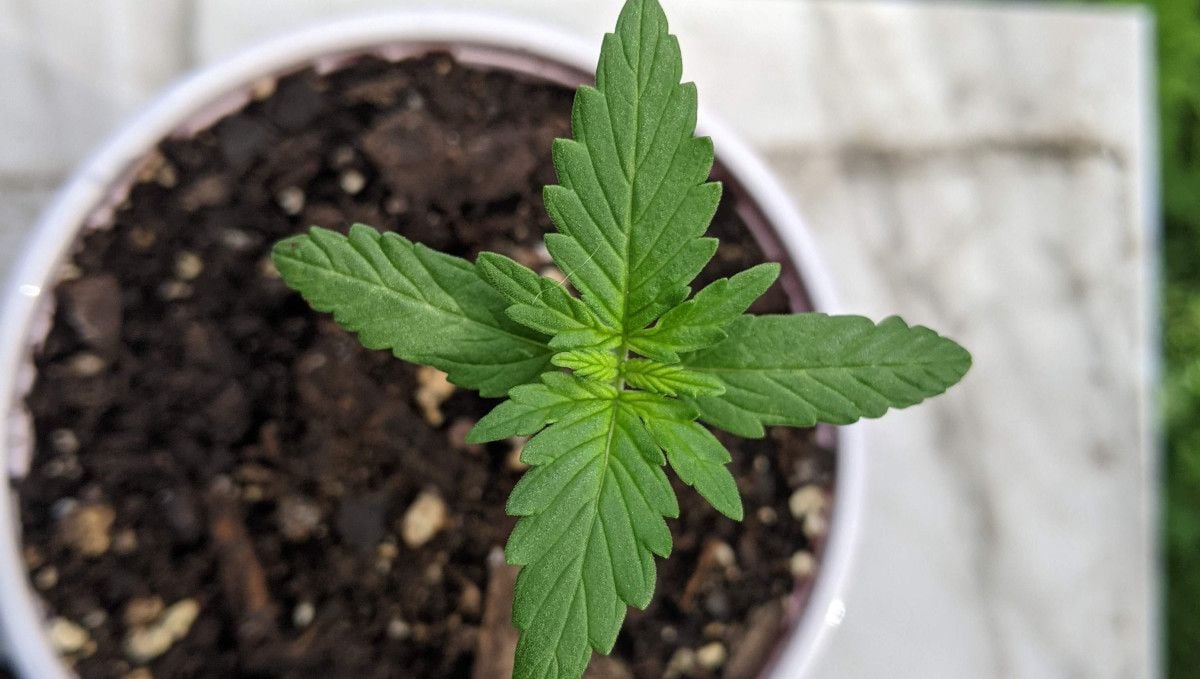
During the second week of growth, you will begin to notice significant above-ground development in your plant. The most prominent feature will be the fan leaves, which should be growing at a healthy rate. These leaves are crucial for photosynthesis, as they help to convert light energy into chemical energy that the plant can use for growth.
Giving your seedlings the appropriate amount of light is crucial for their growth and development. It's important to strike a balance between providing enough light to promote healthy growth and avoiding excessive light that can stunt growth or cause damage.
One way to tell if your light is suitable for your plants is to observe their growth. If the plants are too close to the light, they may appear stunted and struggle to develop. Conversely, if they're too far away from the light, they may stretch excessively and develop long internodes. By adjusting the distance or intensity of the light, you can encourage healthy growth and avoid potential issues.
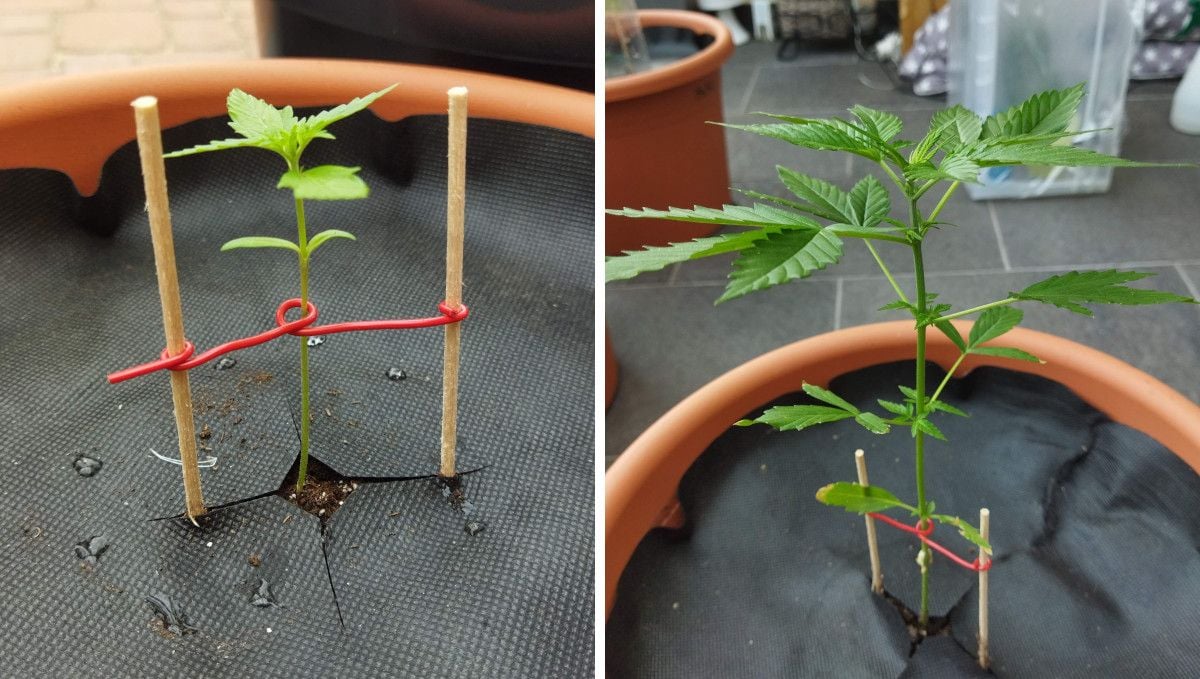
As the plant's fan leaves grow larger, you'll also begin to see new growth at the nodes where the petioles of the leaves attach to the stem. These are the plant's future side branches, and in bushier plants, they may start to develop quite rapidly at this early stage. Keeping an eye on the development of these branches can help you predict the plant's future growth pattern and plan your training techniques accordingly.
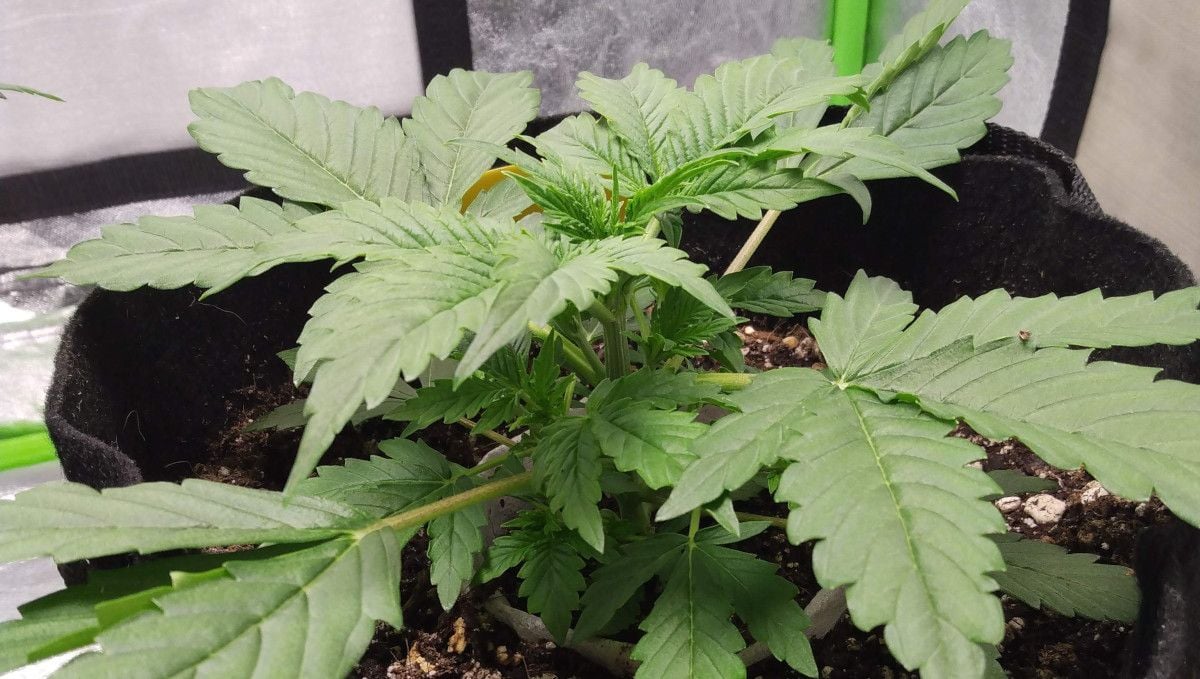
If your plants are growing in a sufficient amount of nutrient-rich medium, it's typically not necessary to feed them during this time. In fact, overfeeding the plants can potentially harm them and stunt their growth. It's important to monitor the plants closely and only provide nutrients when they're needed, based on the stage of growth and the plant's overall health.
5. Mid Veg | Weeks 3-4
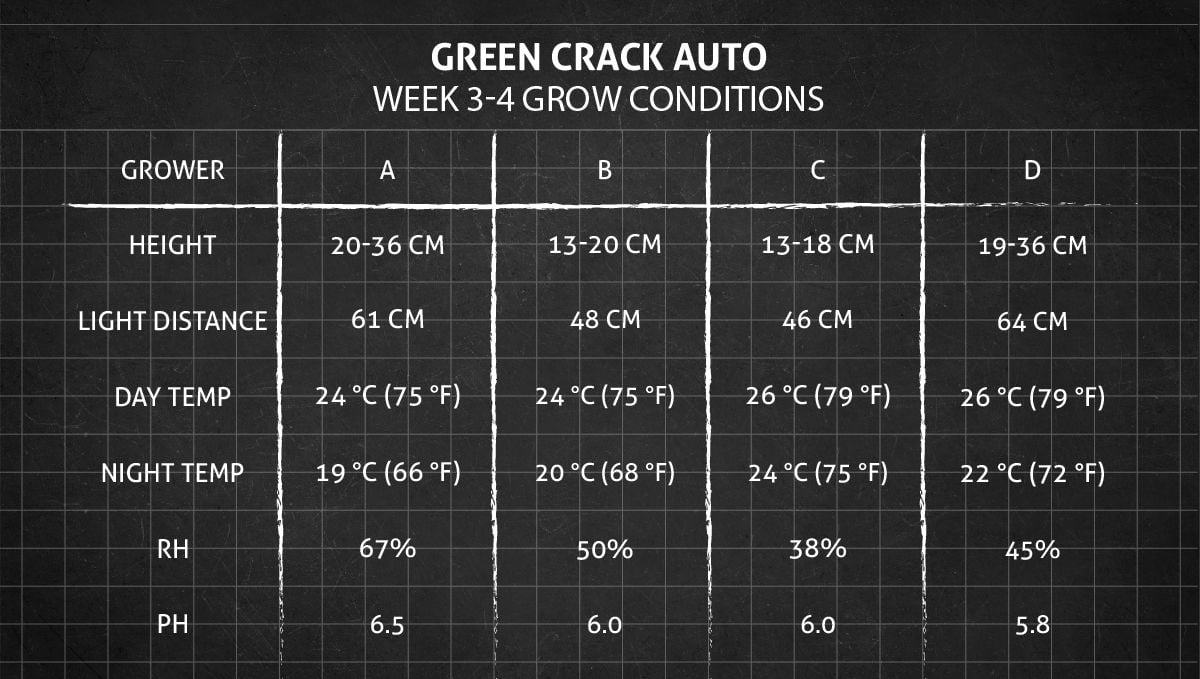
Around the end of the first month of growth from seed, cannabis plants experience their most rapid growth. This is when you'll start to see the largest fan leaves developing, and the growth of new side branches will become more pronounced. As the plant grows rapidly during this stage, it will require more water, light, and plant food to continue thriving. However, you won't need to worry as much about maintaining the perfect growing conditions since the plant will become stronger and more resilient, able to withstand a wider range of environmental conditions.
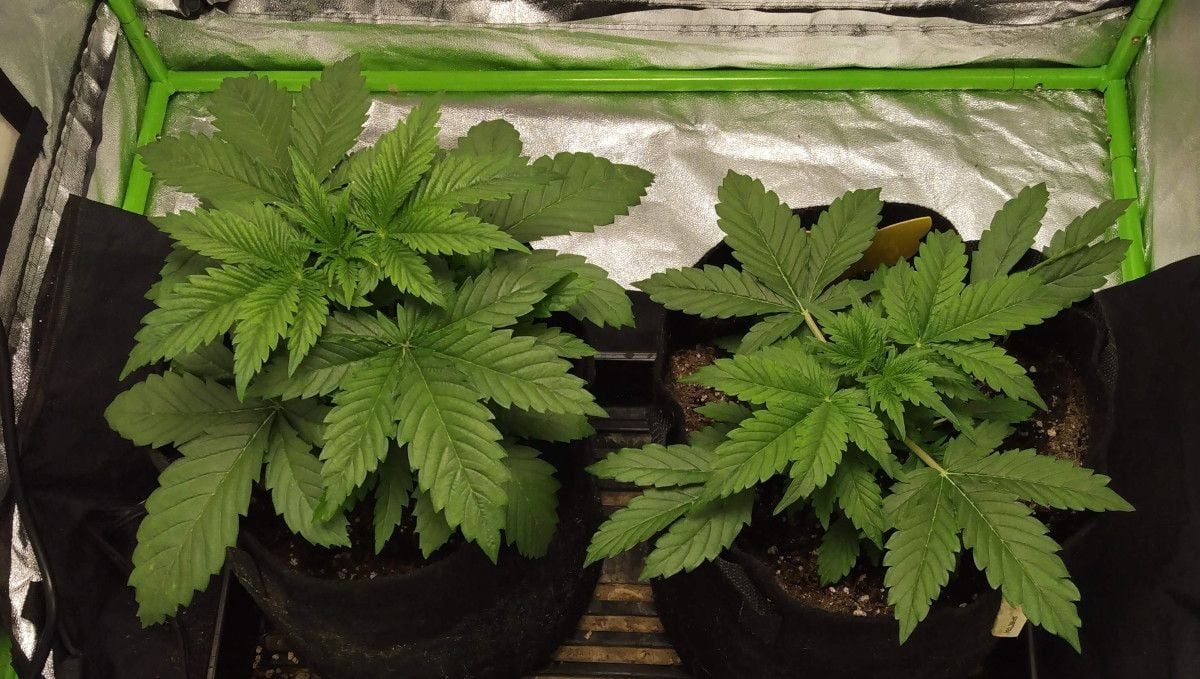
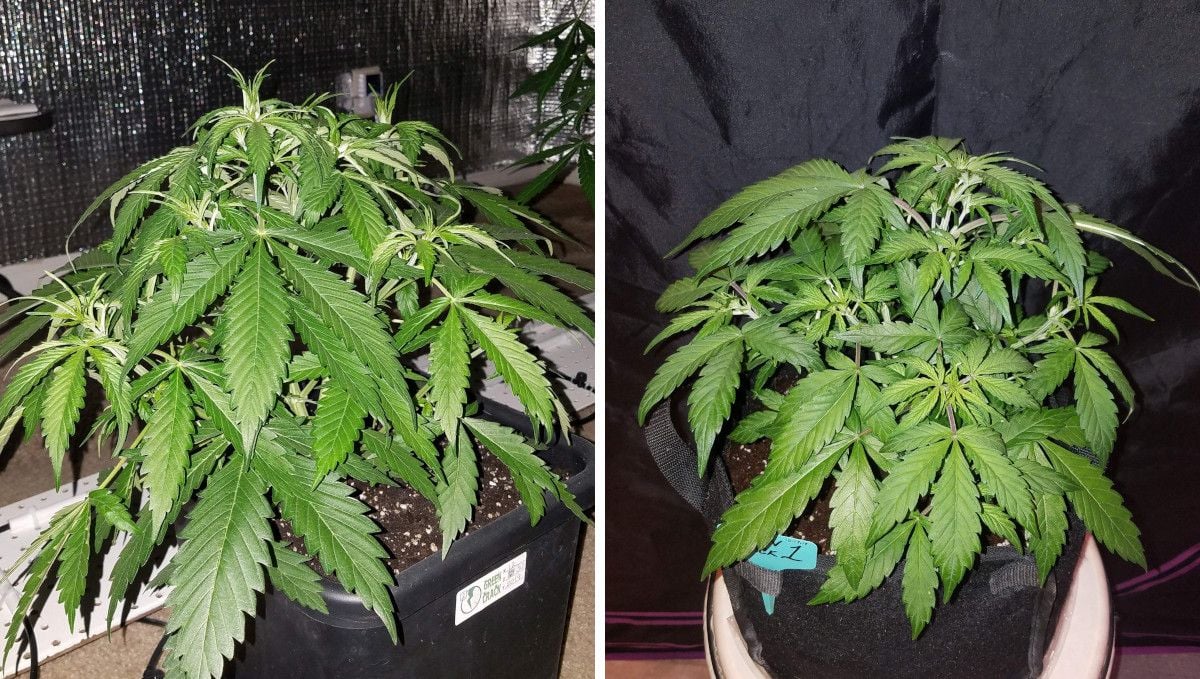
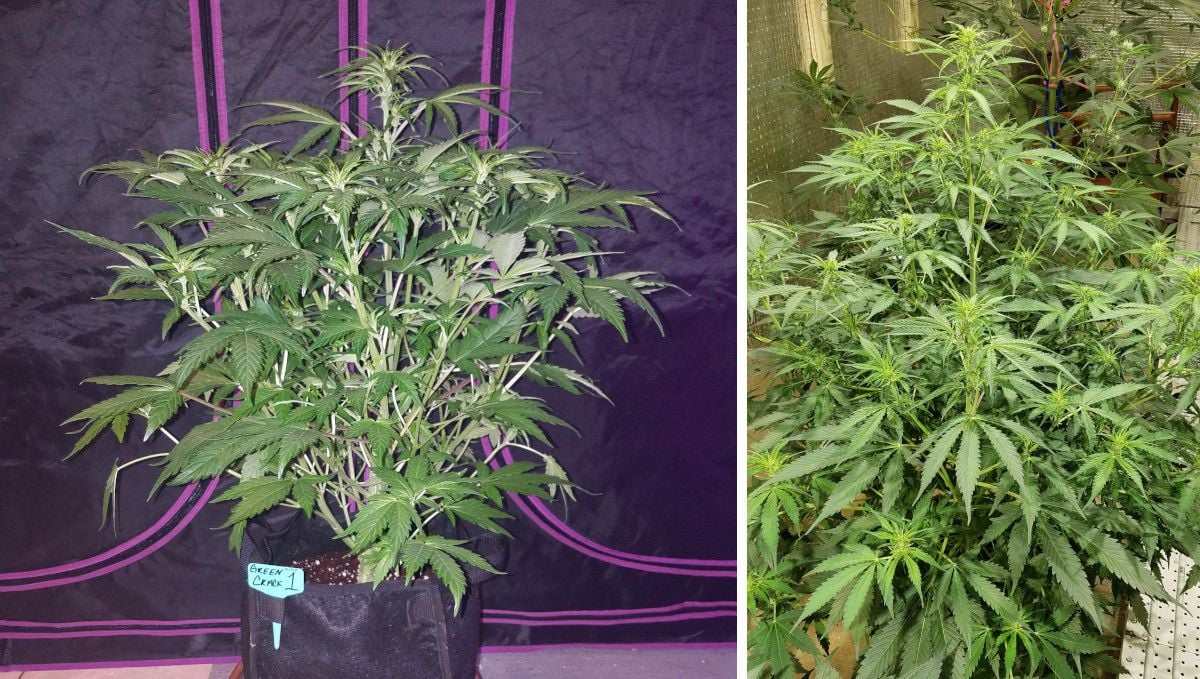
Depending on the phenotype, Green Crack Auto can have Sativa-like narrow leaves and an open bush structure, or growing into something shorter and stockier like in the pictures below.
At this stage, it's common for growers to begin training their autoflowers. This is often necessary in indoor grows due to limited vertical space, and it helps to keep the canopy short and even. By training the plant, growers can ensure that all growing points and flowers are at the optimal distance from the light source.
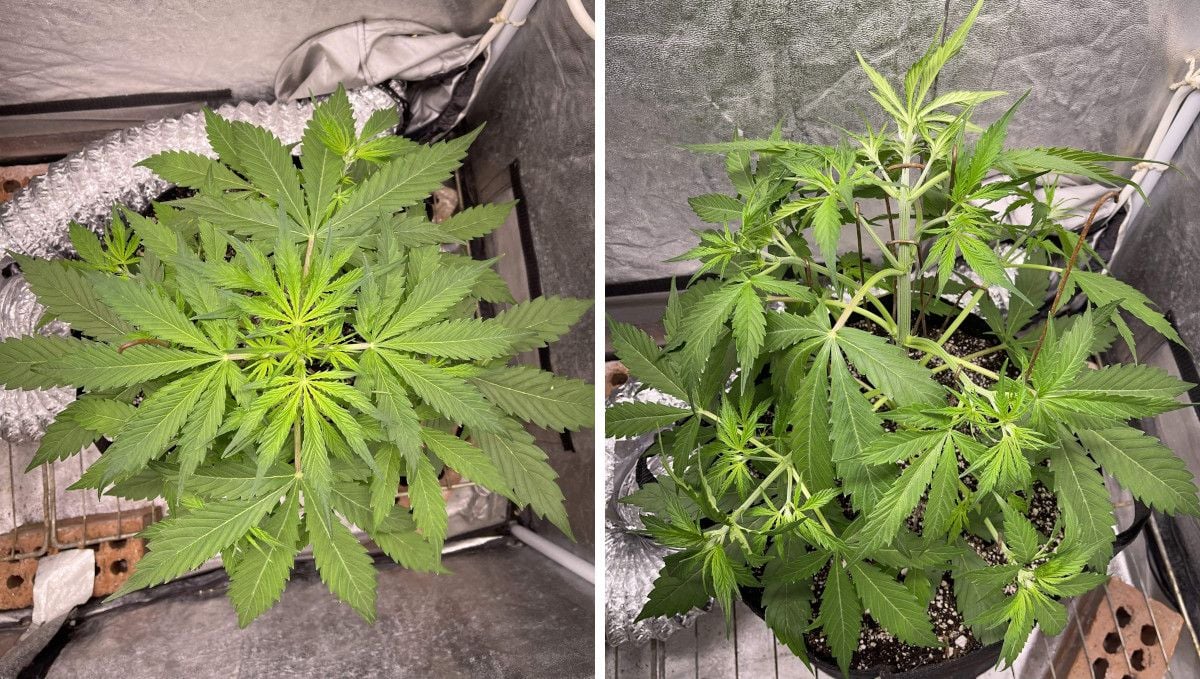
Indoor autoflower training methods range from simple to more complex. A popular method is the low-stress tie-down technique, where the main stem is gently bent and secured to redirect energy to the side branches. This method causes minimal stress to the plant and is well-suited for autoflowers. However, some experienced growers opt for high-stress training techniques, such as topping or FIMing, to encourage side growth by stopping the central stem's growth.
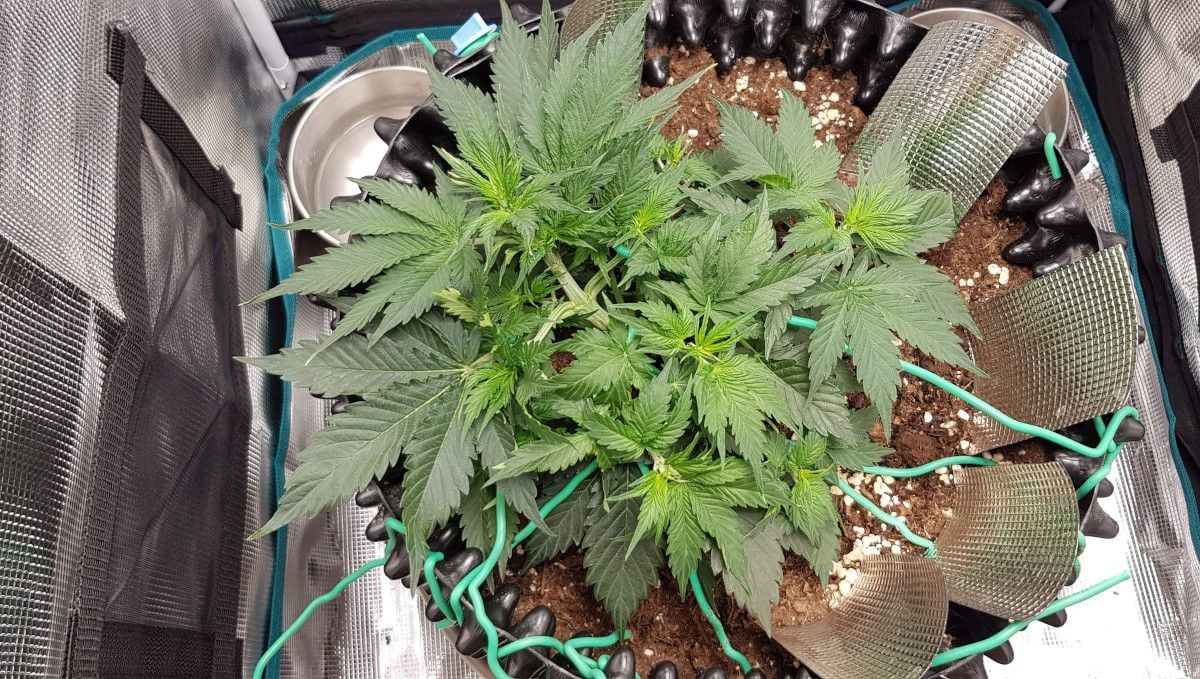
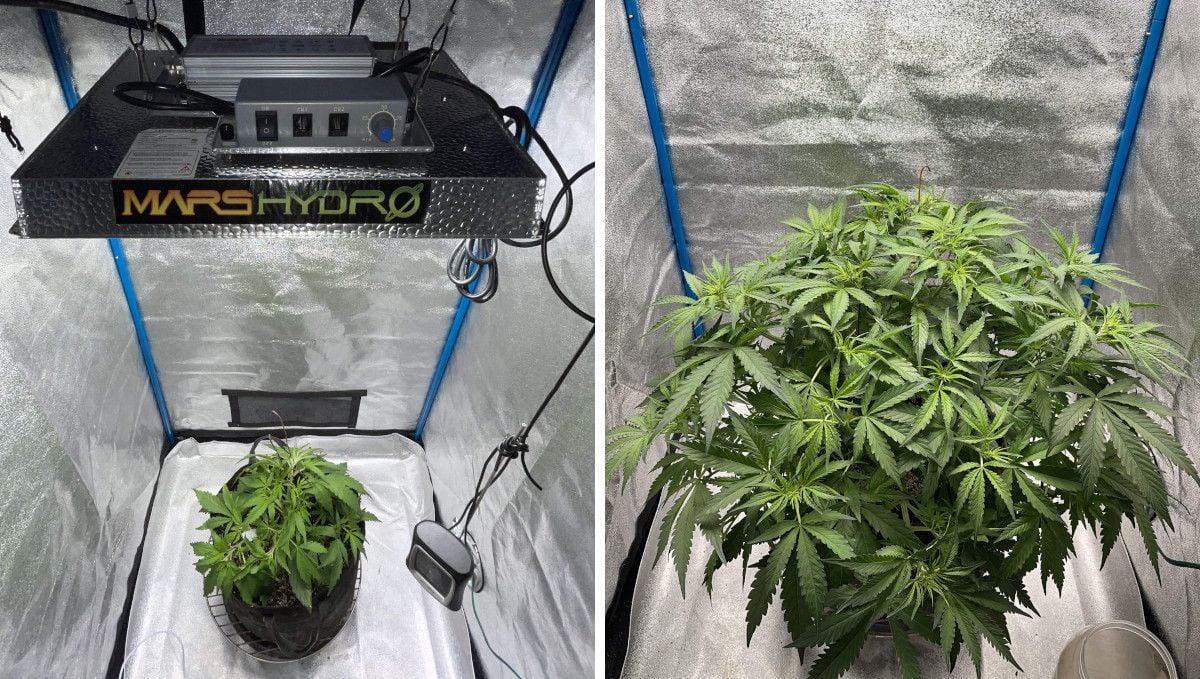
Even with heavy training, the progress of autos like Green Crack during the vegetative phase can be intimidating. If not allowed to grow vertically, they quickly fill in the available horizontal space.
To support all that vigorous growth, you should feed your autoflower accordingly. Even if you use a large container filled with pre-amended soil, additional nutrients will be required by now.
It's not necessary to purchase expensive nutrients or supplements, as two bottles - one for vegetative growth and one for flowering - are often sufficient. This approach is also the safest for beginner growers, as overfeeding can lead to nutrient burn. Once more experience is gained, growers can experiment with higher doses and additional boosters.
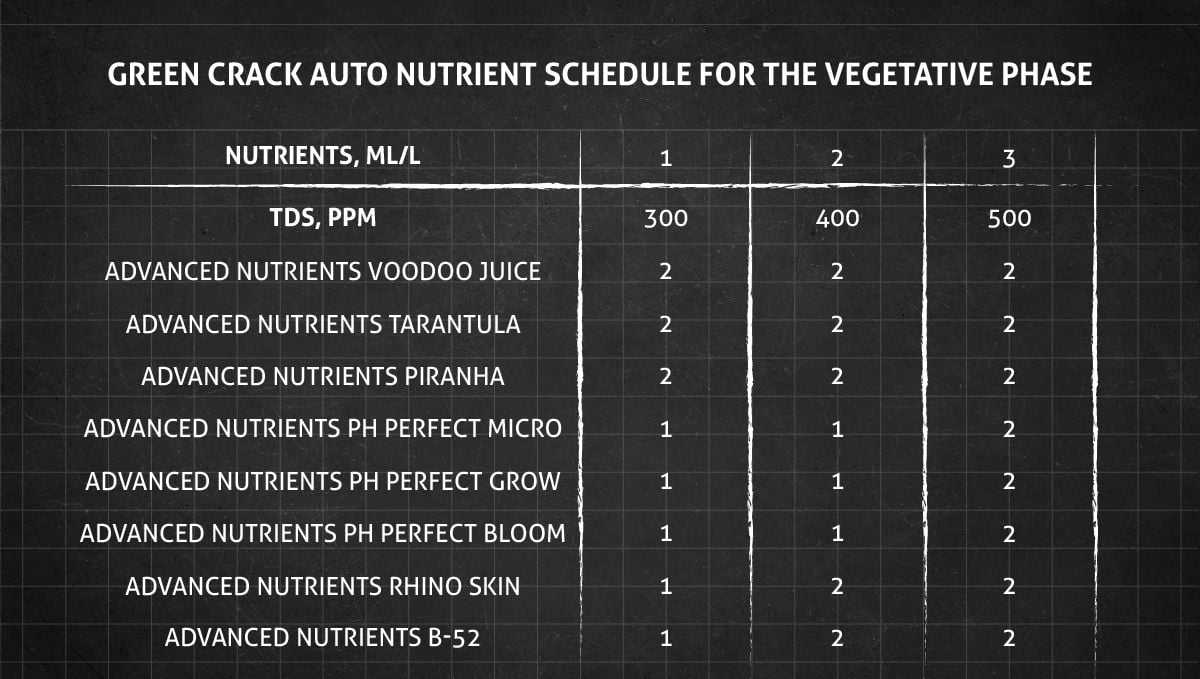
However, a Cal-Mag formula is recommended for growers of all levels of experience, as deficiencies in these nutrients are common, particularly in coco grows. The following nutrient schedule can be used as a general guideline for feeding your autoflowers.
We highly recommend that novice growers opt for organic nutrients whenever possible. There is a common misconception that synthetic nutrients yield more buds, but this is likely just a myth. Organic growing is much safer, promotes healthier plants, and reduces the risk of issues such as overfeeding and incorrect pH levels. Healthy plants ultimately result in higher yields, making organic nutrients a wise choice for any grower.
6. Transition (Pre-Flower) | Week 5
This is an exciting time for cannabis growers as they start to see the first signs of flowers on their plants. It's important to consider adjusting the nutrient schedule around this time to accommodate the changing needs of the plant. Cannabis will now require more phosphorus and potassium. However, it's also important to continue providing enough nitrogen for a couple of more weeks as the plant will still be actively growing branches.
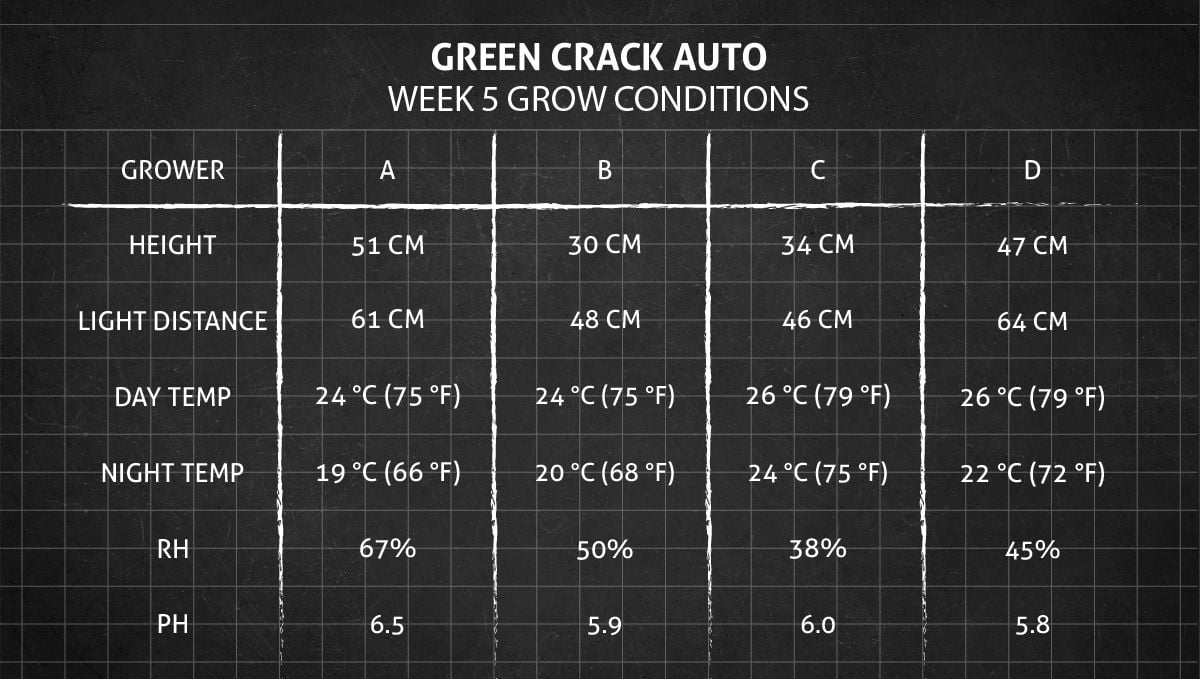
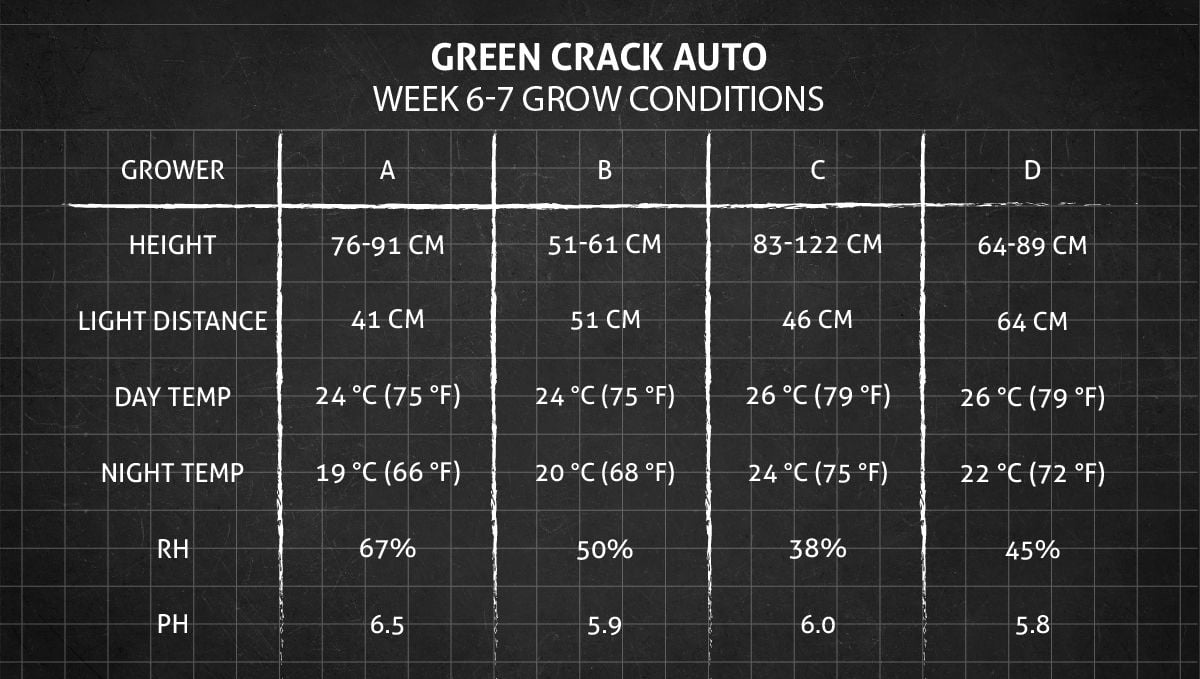
To promote optimal bud development, it's recommended to lower the day temperature slightly and decrease the relative humidity. Cannabis plants thrive in slightly cooler temperatures and drier conditions during the flowering stage.
If you observe your canopy carefully, you may notice the emergence of the first pistils at the middle nodes, followed by the white pistils at the tops. With autoflowers, there's no need to alter the light schedule, so if you previously had an 18/6 or 20/4 schedule, you can continue with it, and your plants will automatically enter and complete the flowering stage.
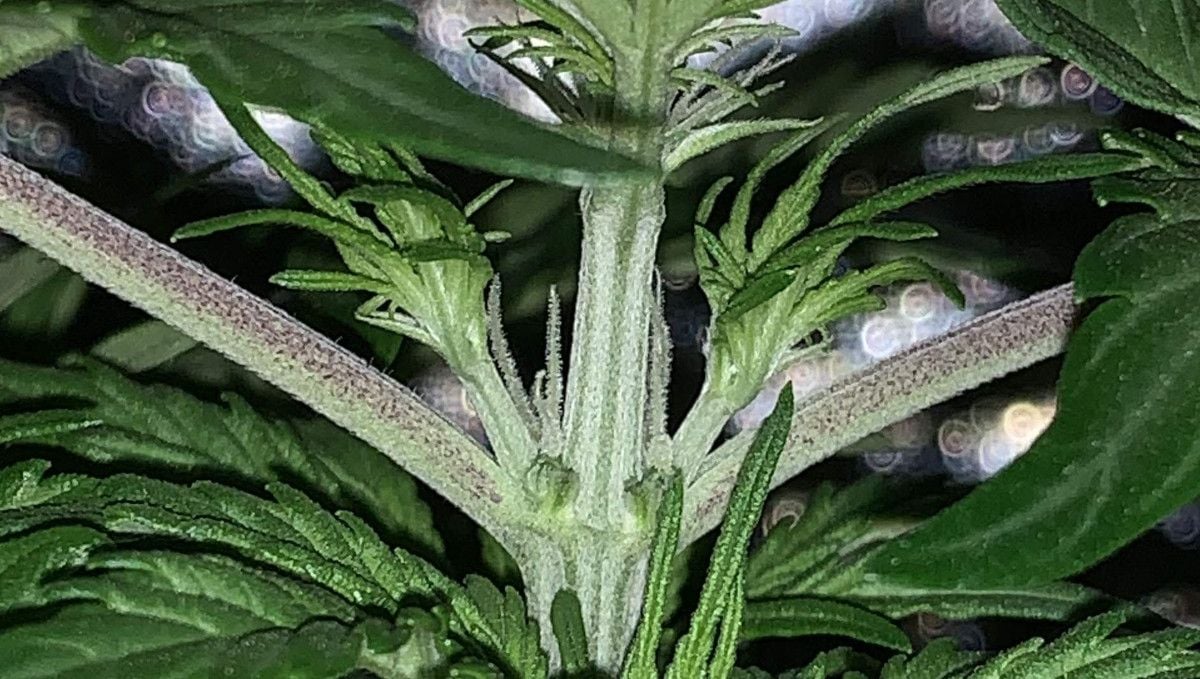
The yellowing of the plant's tops and the development of white pistils there is a clear sign that flowering has begun. These clusters of pistils will eventually become the buds. They will grow larger and denser as the flowering stage progresses, and the buds will become more noticeable and aromatic.
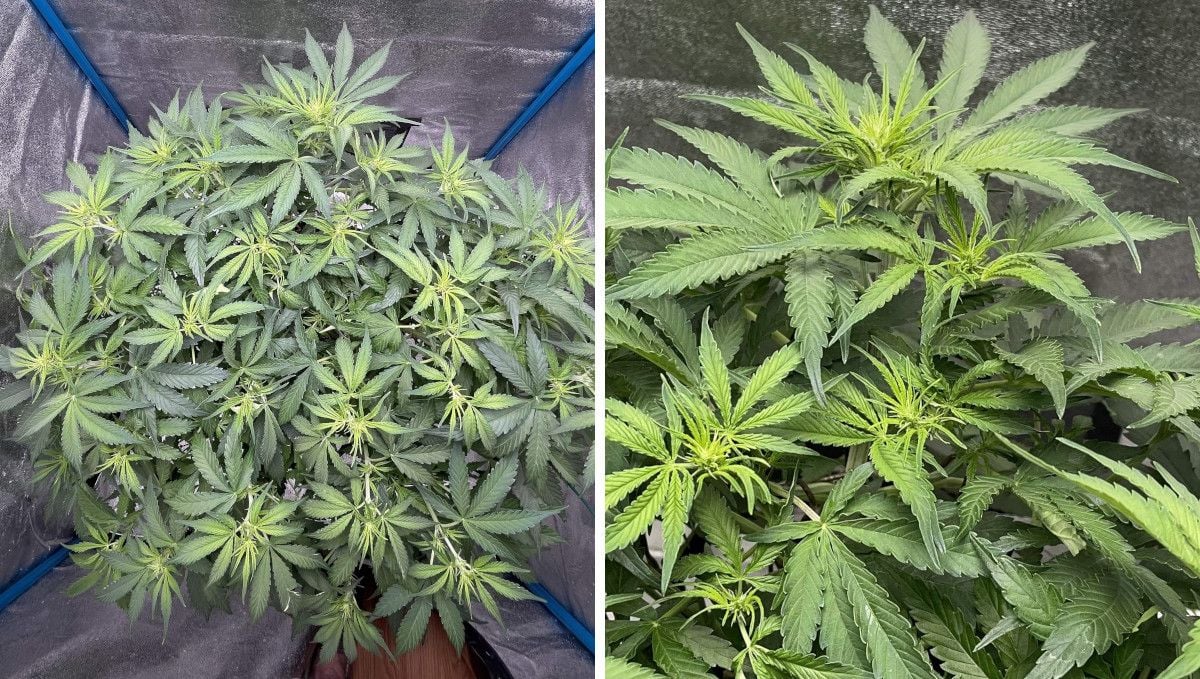
Make sure every flowering top gets direct light. Sometimes, to achieve this, you'll need to tuck in or completely remove the fan leaves that shade them. If you have several plants side by side and their sizes are different, level out their canopies by raising the pots of the shorter ones..
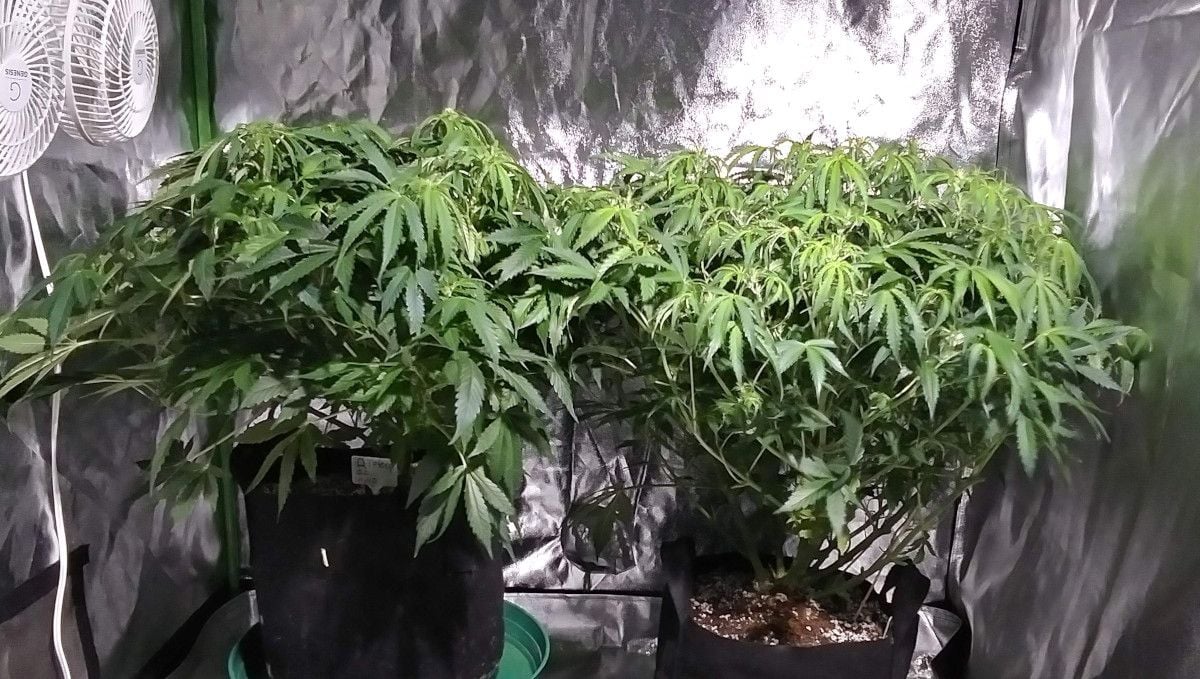
The need for light increases as the plant matures. The most obvious way of achieving this indoors is by reducing the distance between the light and the plant tops. Just avoid a sudden increase in light intensity as this may cause shock. Luckily, the plants start to stretch around this time and grow into the light on their own.
7. Early Flower | Weeks 6-7
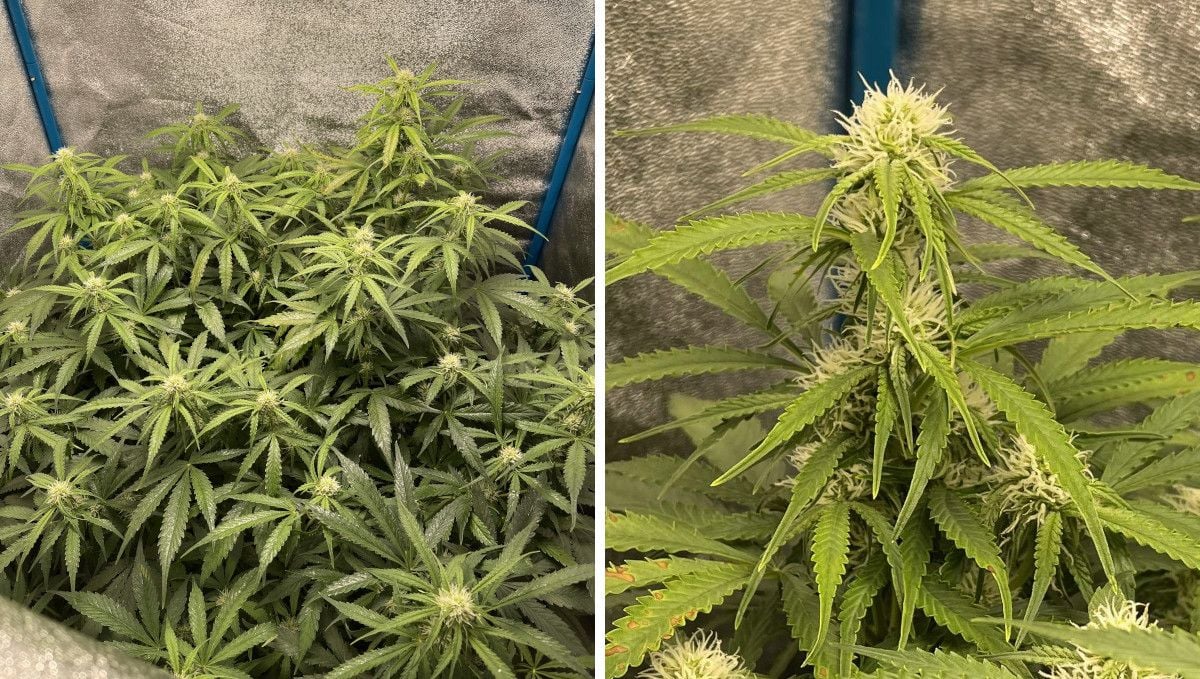
During the earlier stages of flowering, the cannabis plant undergoes a significant shift in its growth and development. The plant starts to focus its energy on developing buds, rather than producing new leaves and stems. This doesn't mean, however, that the size of the plant remains the same. On the contrary, the main stem and side branches keep getting longer, and an autoflower can easily double in size compared with what it was in veg.
The clusters of the white pistils on the tops and at every node will at first look small and insubstantial, but they will swell more and more, concealing the stems and forming those long colas that growers find so attractive.
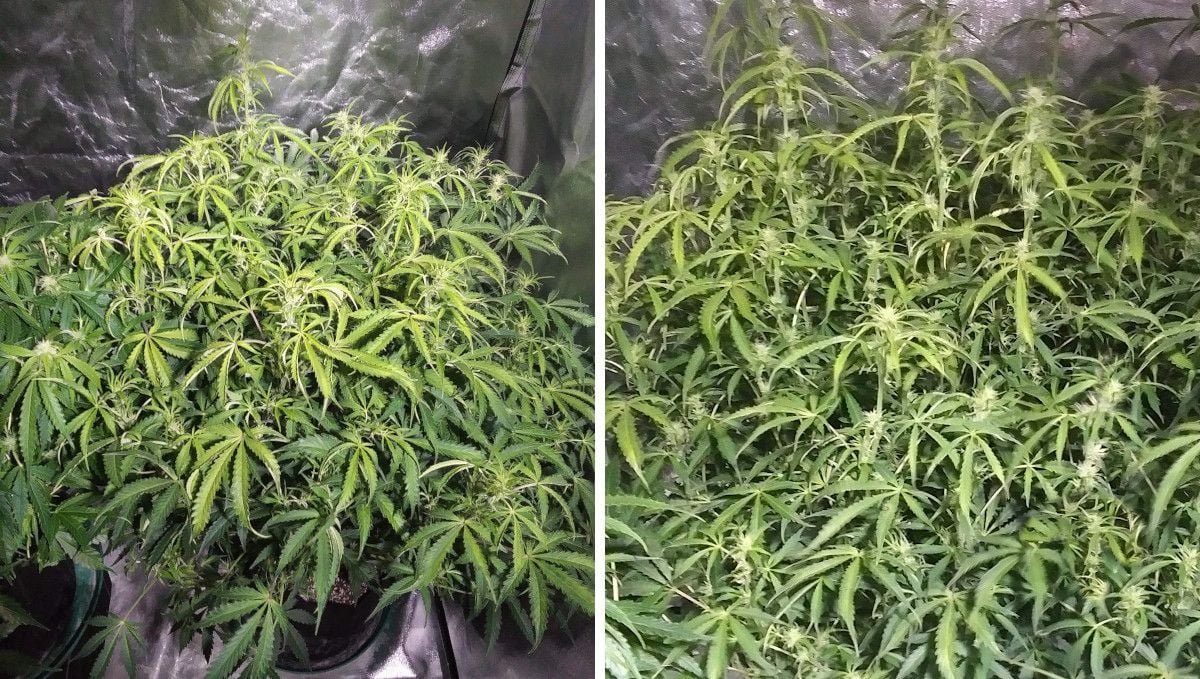
As your autoflower matures, you'll start noticing the first trichomes on the leaves surrounding the buds. These trichomes are resin glands that contain the majority of cannabinoids and terpenes produced by the plant. Terpenes are volatile aromatic compounds whose evaporation will cause a noticeable aroma to develop around this time. If you want to keep your hobby discreet, it's recommended that you purchase and install a carbon filter to eliminate the characteristic odor of weed.
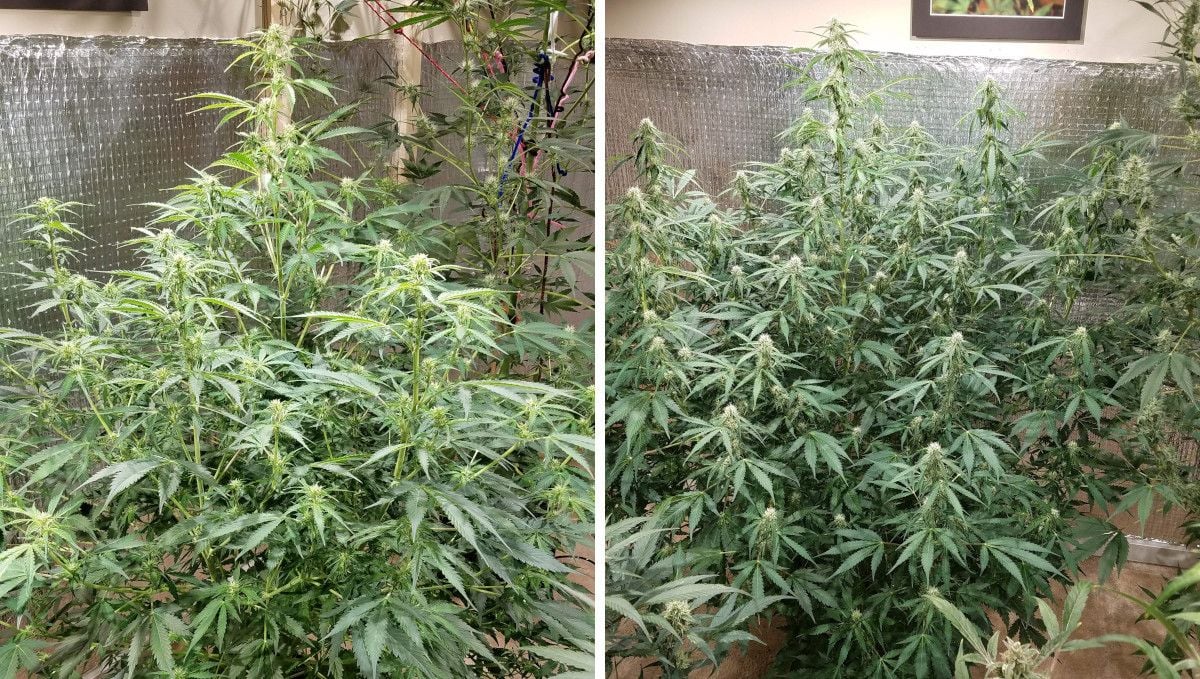
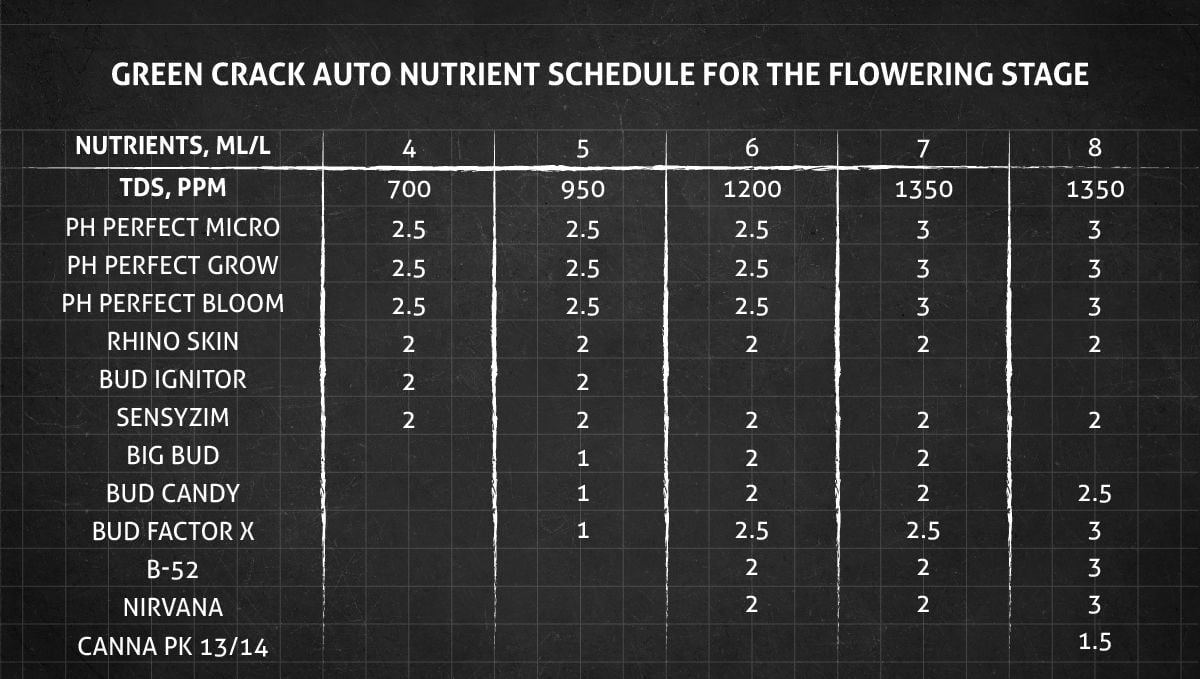
Once your cannabis plant enters the flowering stage, its nutrient needs undergo a significant change. During the vegetative phase, nitrogen (N) was the primary macronutrient required for active growth, whereas now, the plant requires more phosphorus (P) and potassium (K) since these two nutrients are essential for flower development. In contrast, excessive nitrogen can hinder the growth of buds.
Below, we provide a sample nutrient schedule for the flowering phase, which an experienced grower used with precision to calculate the concentration of the feeding solution and avoid overfeeding. For your first few grows, it may be best to stick to a simpler schedule than that and use only the fundamental nutrients from the table, reserving the fancier products for later experimentation.
When it comes to feeding cannabis, it's crucial not to overlook pH, which plays a significant role in determining whether roots can absorb nutrients or not. While monitoring pH is essential with synthetic fertilizers, it isn't necessarily the case with organic ones.

8. Mid Flower (Bulk Phase) | Weeks 8-9
As your plant enters the phase of rapid flower growth, it is essential to maintain a high level of nutrient and water supply, which may require daily watering. During this phase, the plant will focus all of its energy on developing larger and denser flowers, and you'll see a halt in its vertical growth. Now, it is more important than ever to monitor humidity levels as too high RH can create an ideal environment for the growth of mold and bud rot inside dense buds.
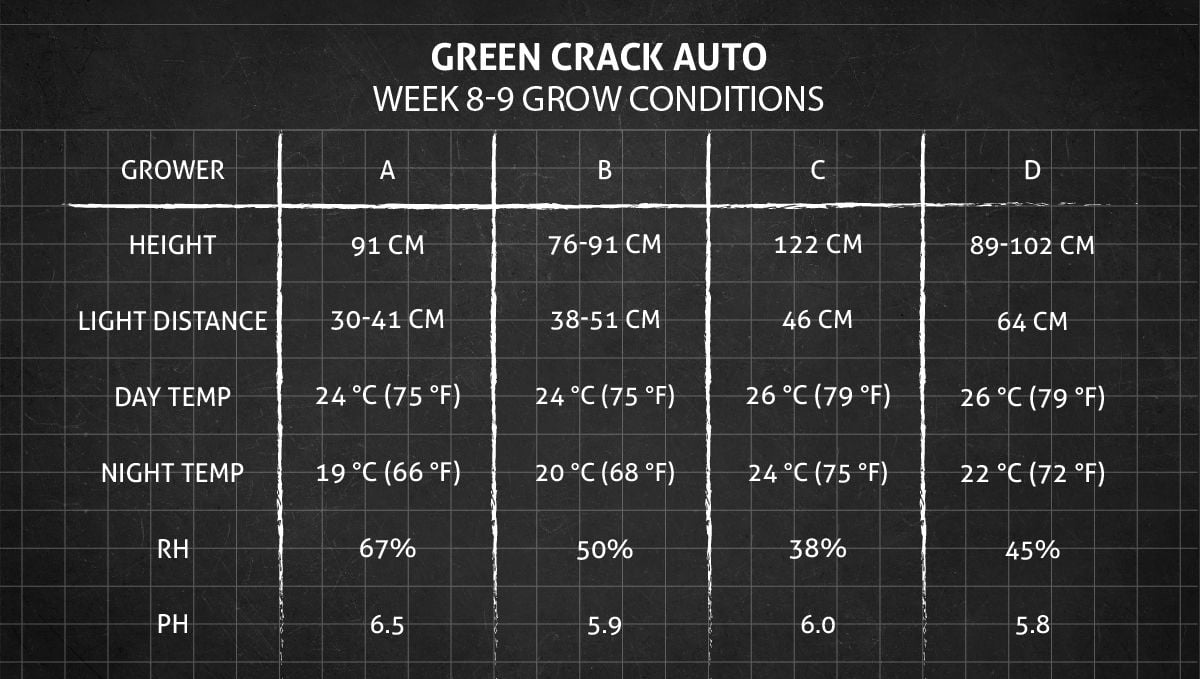
Another thing to keep in mind is temperature control. It's best to lower the day temp by a couple of degrees and also make the nights slightly cooler. It helps conserve both the terpenes and cannabinoids, including THC. The result will be a more flavorful and potent smoke.
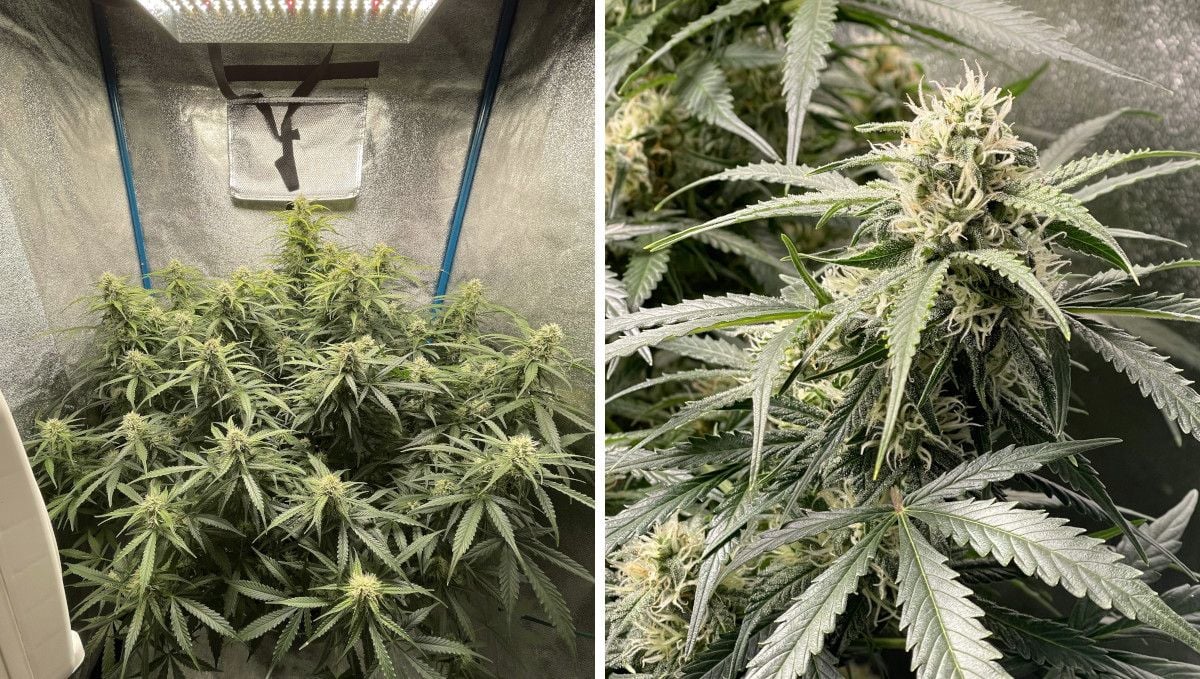
As for the size and texture of buds, the most crucial factor is their distance from the light source. The following pictures illustrate the benefit of keeping all the flower tops at about the same distance.
Also, don't ignore the feeding needs of your Green Crack Auto just yet. It will have the greatest appetite now and consume more food than ever, especially phosphorus (P) and potassium (K). You may even want to introduce a special PK supplement around this time -- there are many products of this kind on the market.
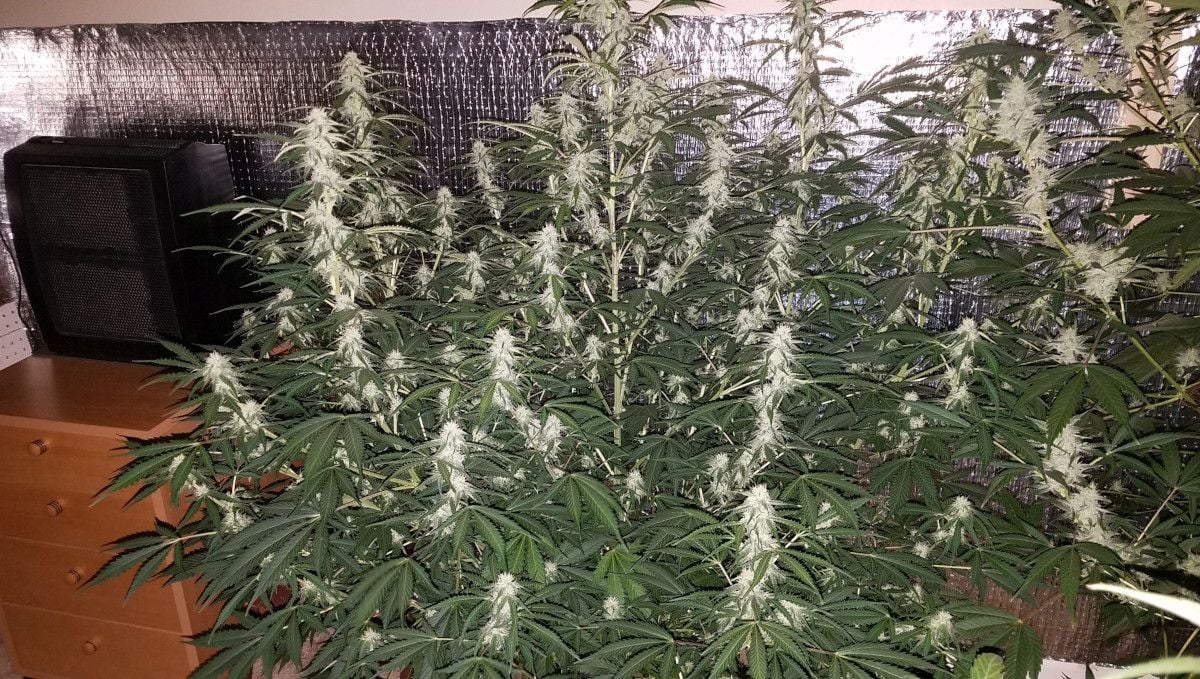
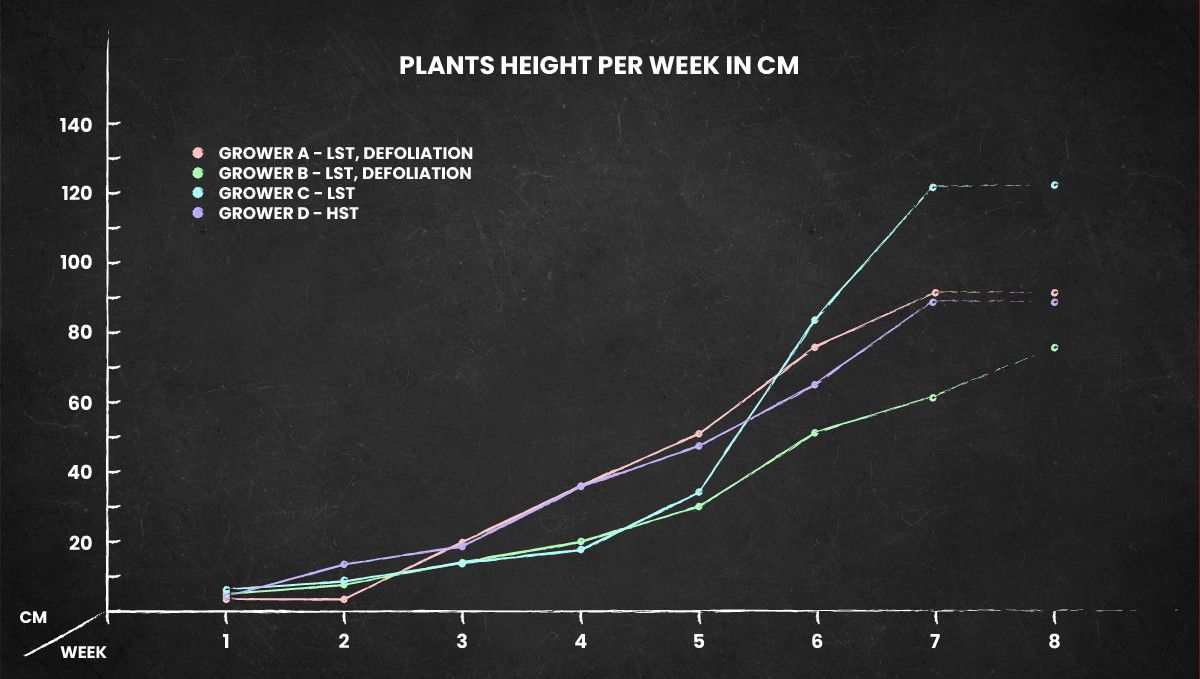
When well-fed and provided with enough light, Green Crack Auto can reach enormous proportions. Usually, the stretching of autoflowers stops around week 8, but some Green Cracks may try your patience for a little longer. Find below the height chart for our four grows for the whole life cycle -- from seed to harvest.
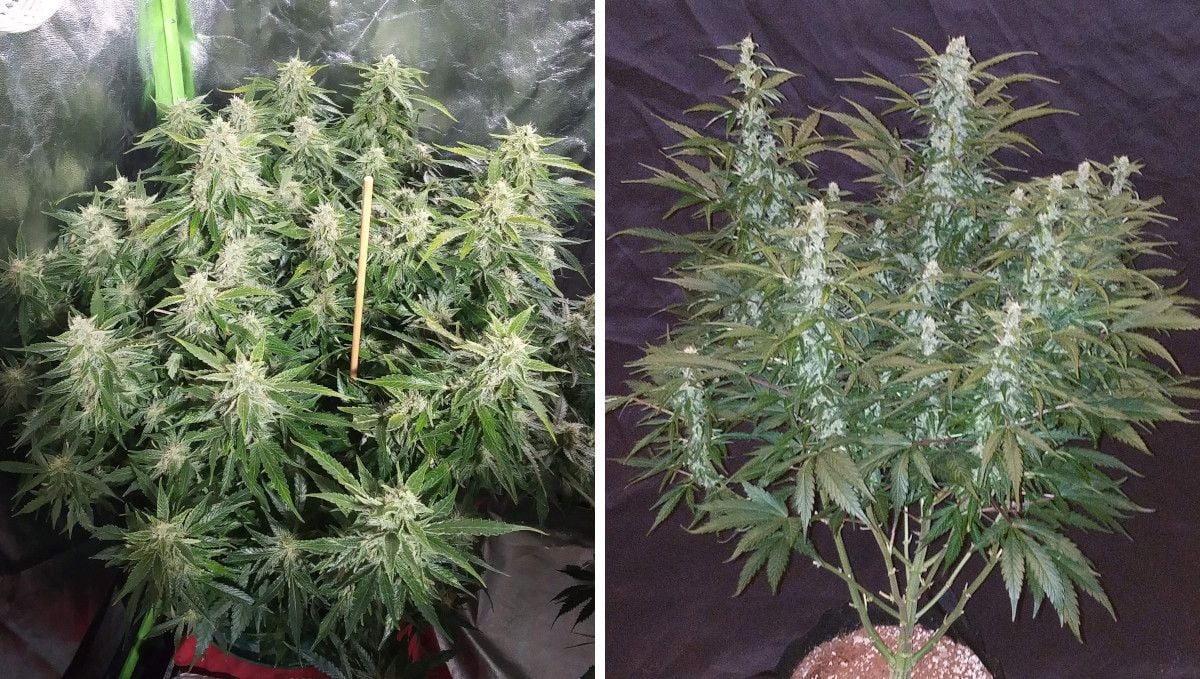
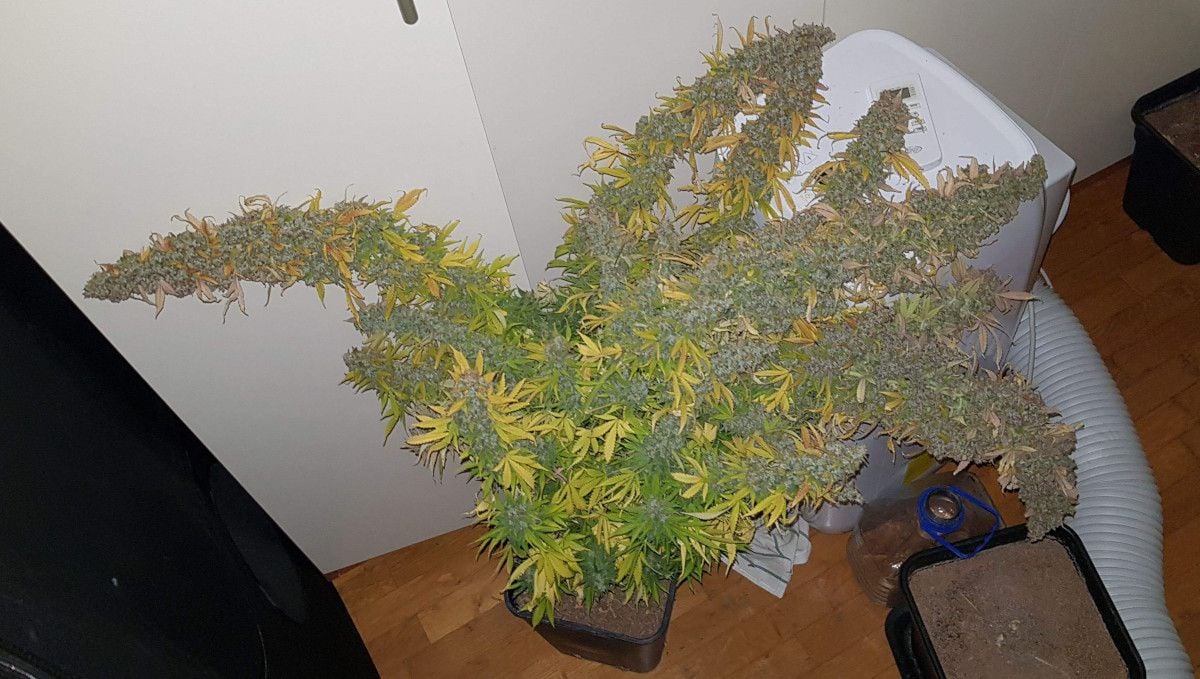
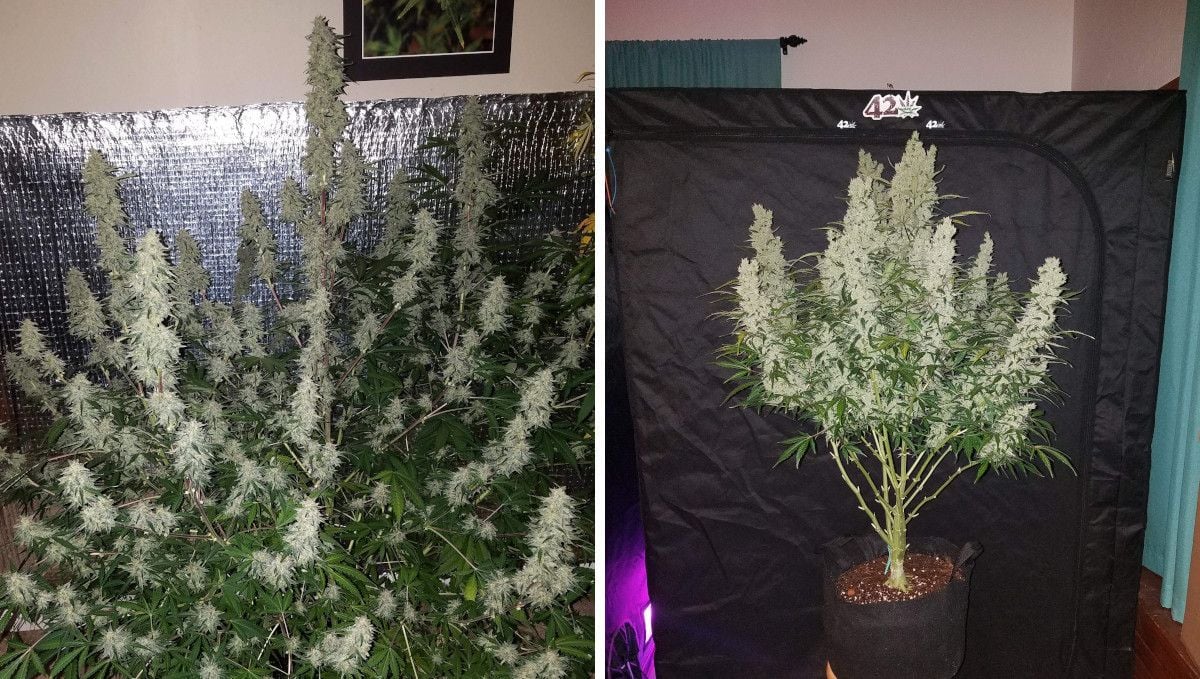
In case you've let your Green Crack Auto grow more naturally, without much training, be sure to support the branches or else, in a few short weeks, you may find your plant almost toppling over from the monstrous size of the flowers (like in the pic below).
9. Ripening And Harvest | Week 10 and Beyond
Less experienced growers often ignore the last weeks leading to the harvest and cut their plants too early -- only to lose on the productivity. Never rush harvesting your plant as it will not only become more psychoactive during these final days, but the buds will also have a chance to grow noticeably bigger. Just don't forget -- when you enjoy the spectacle of huge and dense colas -- that the bigger the buds the greater the risk of mold and bud rot.
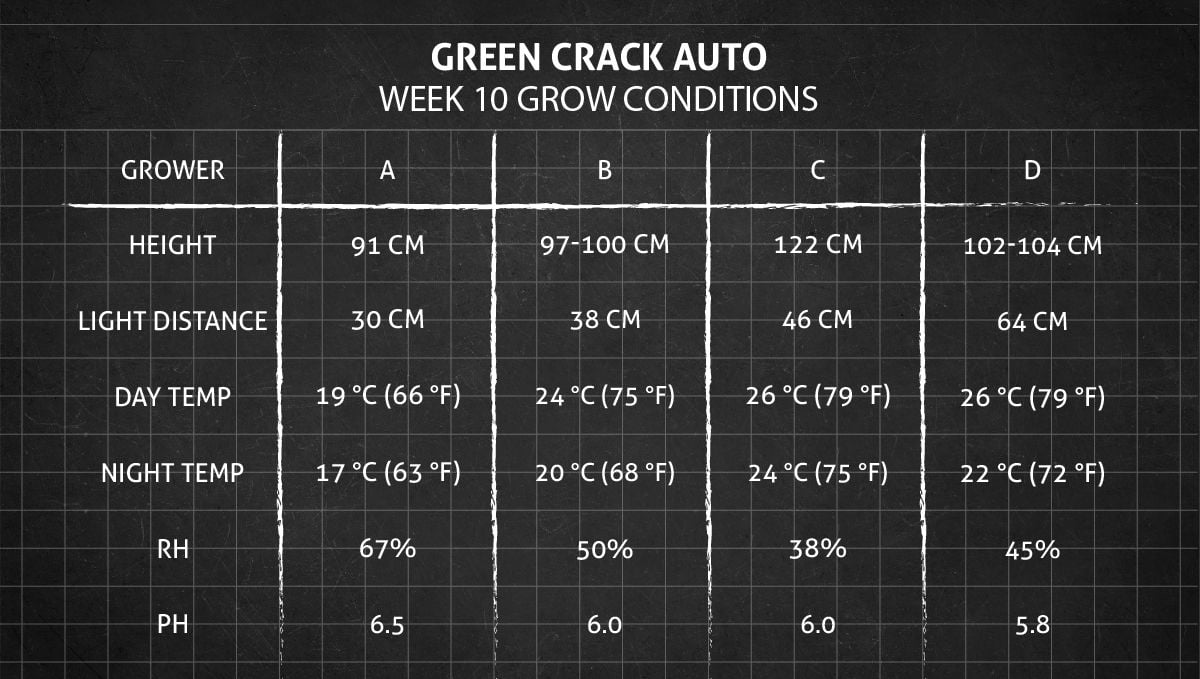
At some point, the buds of your autoflower will stop swelling, and you'll stop noticing any changes in them. You'll begin to wonder if it's the right time to harvest your bud. However, the size of the flowers isn't the only thing that you should take into account when determining the perfect time for harvesting them.
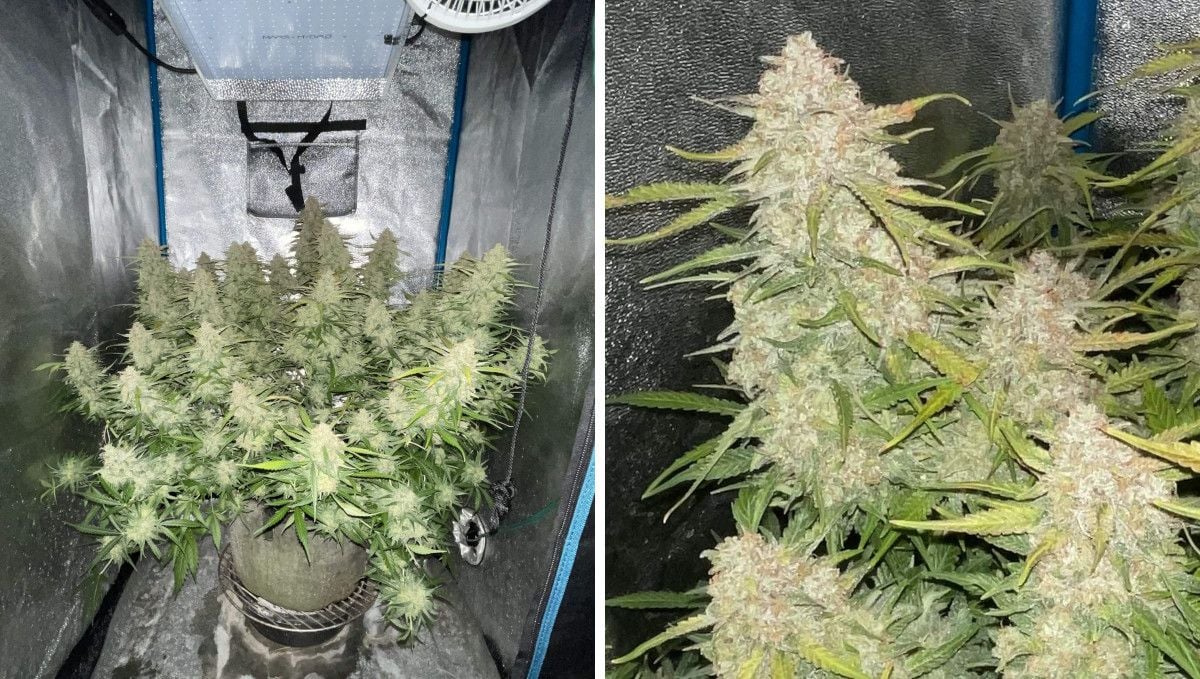
One of the things that tell you that your autoflower is approaching the final stages of its life cycle is the fading of the leaves. The oldest of them, especially those at the bottom of the plant, start to get yellow and lifeless as the chlorophyll in them degrades and the plant cannibalizes the nitrogen that has been stored in these leaves. This happens even with younger plants, but when this process moves 'upstairs', it's evident that the harvest is very near.
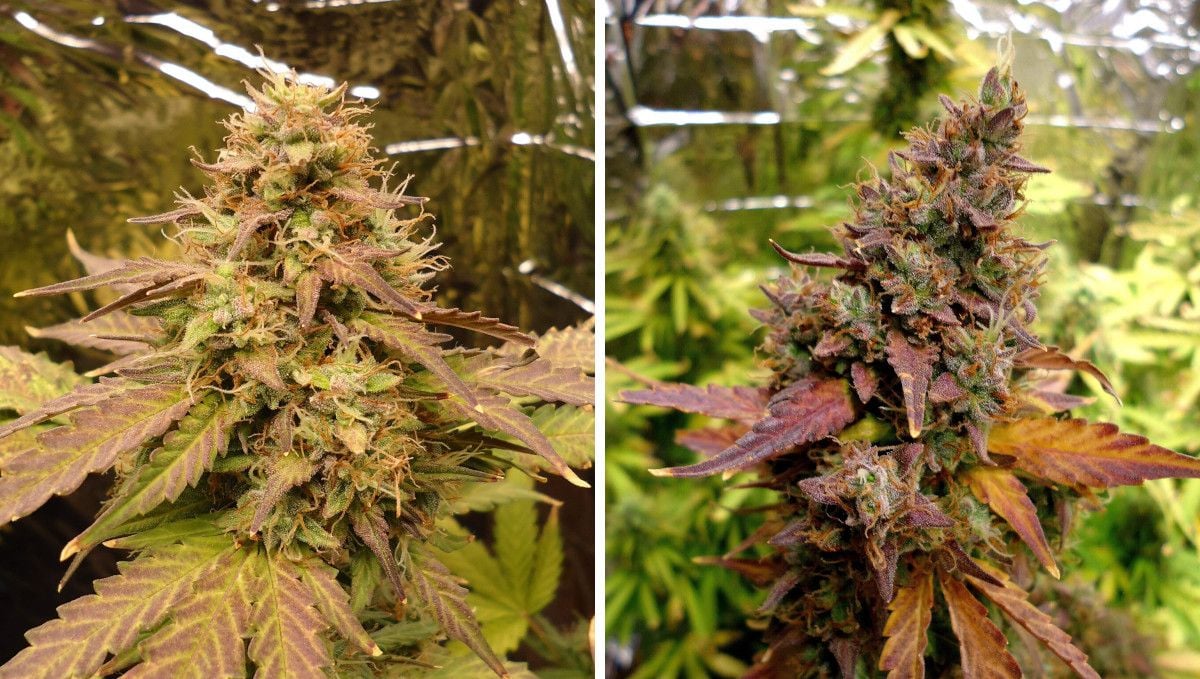
Of course, the leaves can get discolored in another way. Look at the pictures below: the leaves display deficiencies other than nitrogen (which is okay this late into the life cycle). Besides, it's evident that they are losing chlorophyll as well, and now multicolored anthocyanins come through, contributing to the beautiful 'autumn' look.
Finally, the most accurate predictor of whether it is the right time to cut down your plants or not is the color of the trichomes - those tiny things that cover sugar leaves and calyces. When most of the trichomes are clear, it means they aren't mature yet, but when they start to get opaque, it means that the levels of cannabinoids, including THC, in them is reaching a peak.
Later, the THC starts to degrade, turning into cannabinol, thus making the high less psychoactive and more sedative. It manifests in trichomes turning amber. Some smokers like this kind of a calming, sleepy buzz, but most prefer to harvest their buds when they have only a few amber trichomes.
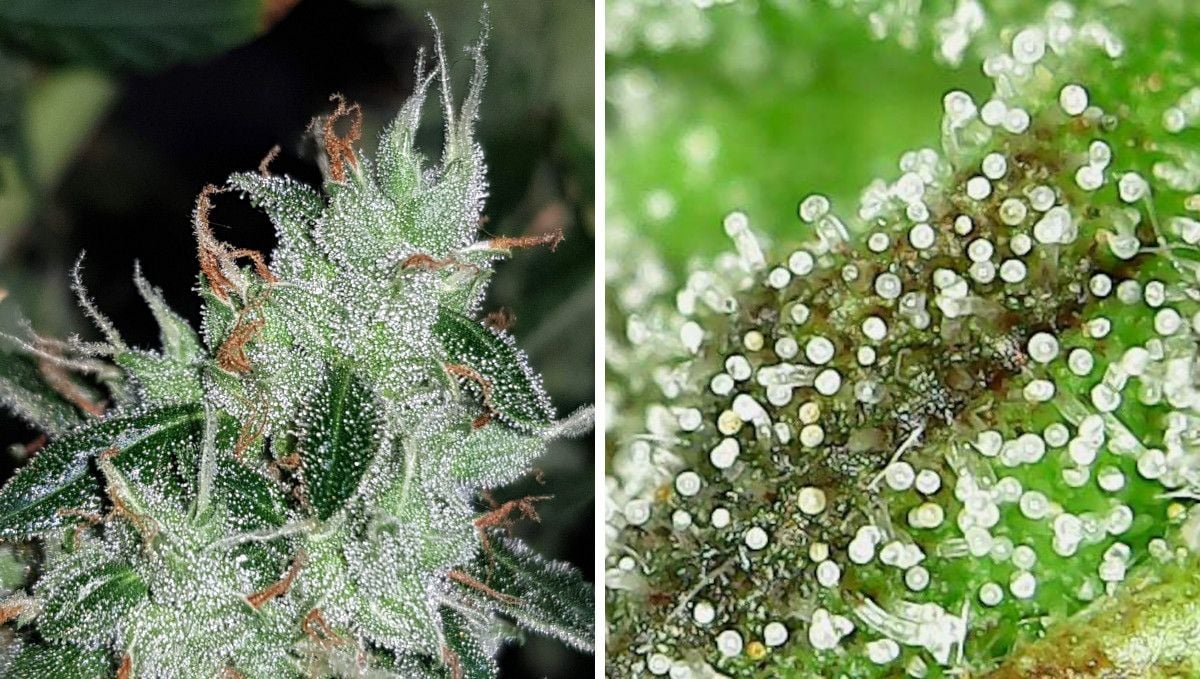
Of course, you won't see the color of the trichomes with the naked eye. For that, you'll need a jeweler's loupe (a 60x hand microscope). As you monitor the state of the trichomes, pick the right moment to start flushing your cannabis plants. Flushing simply means that you stop using nutrients and give your plants only plain water. When you grow in soil, you'll need about two weeks of flushing. This helps you to get rid of all those built-up salts stored inside the plant's tissues. For you as a smoker, it means a cleaner, tastier, and healthier product. Evidently, when you stop giving your plant any nutrients, the leaves will start to fade at an even greater rate.
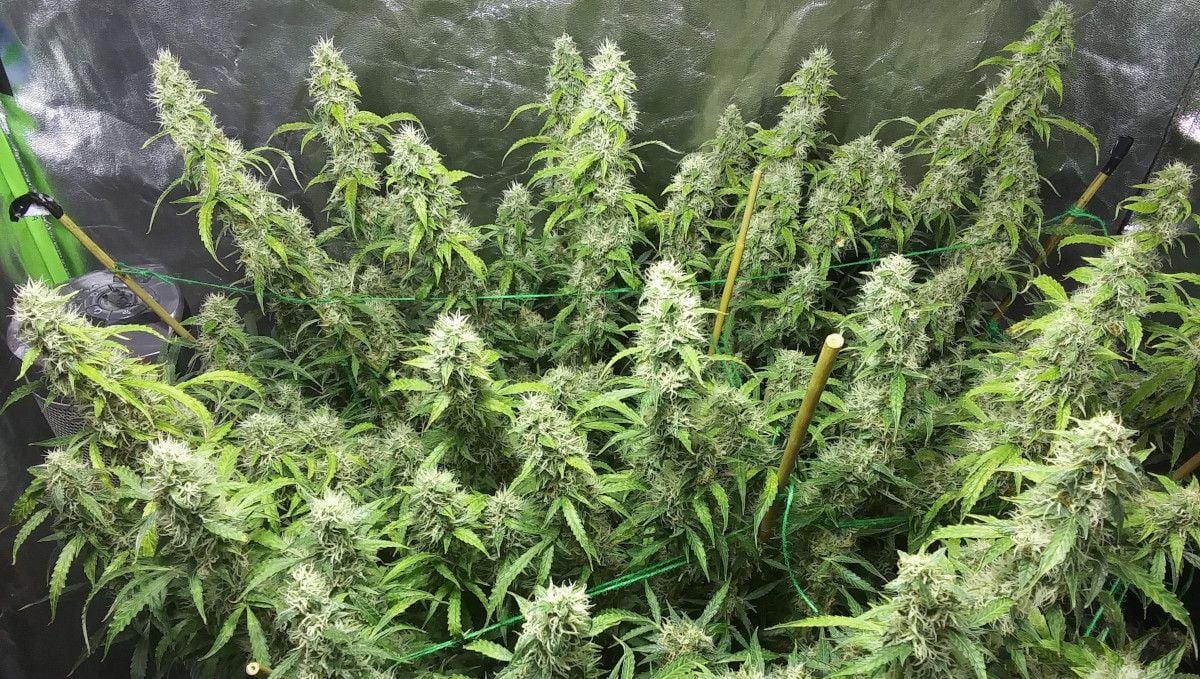
Finally, when you think that your plant has been flushed clean and is at the peak of its psychoactivity, cut it down and hang to dry.
10. The Outcome
In the grows that we've selected for the purposes of this week-by-week guide, Green Crack Auto proved a phenomenally high-yielding autoflower. However, we must admit that most of the growers had much expereince and had chosen coco as the growing medium, and coco generally results in much better yields than soil. Having said that, the production potential of Green Crack is undeniable.
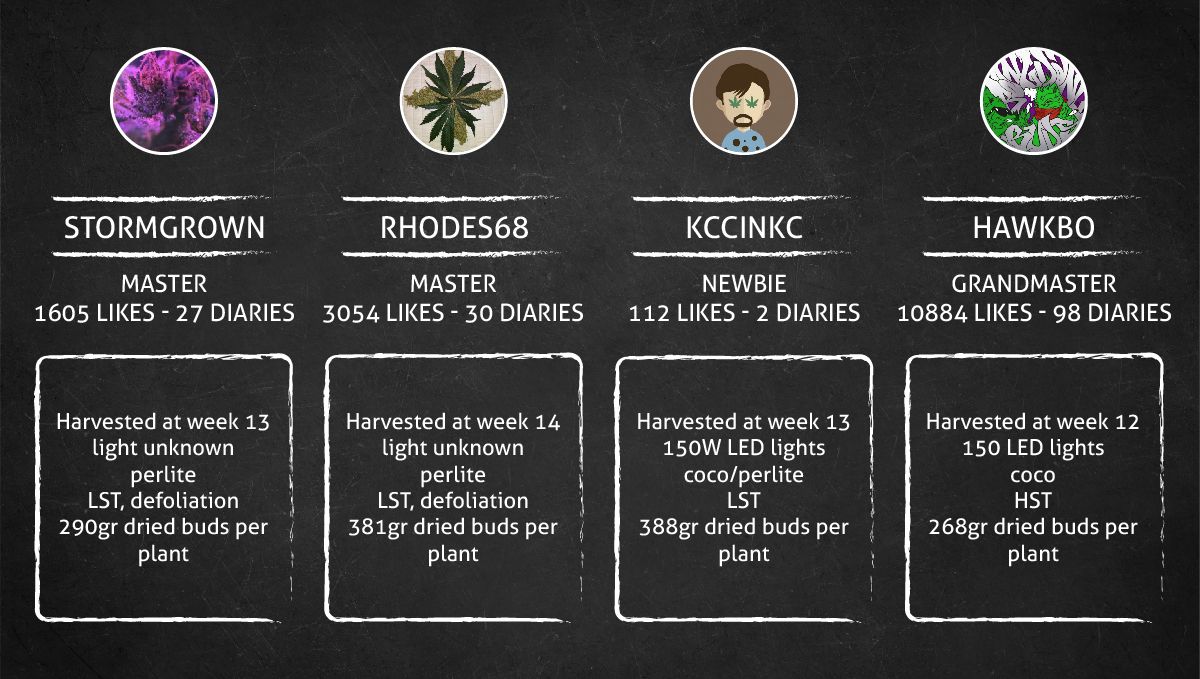
For a LED light drawing only 150W from the socket, the result from Grower A was outstanding -- 290 g (10.23 ounces) from just one Green Crack Auto plant in 13 weeks from seed. The buds might have seemed a bit spongy and leafy when dried and cured, but this what you should expect from a Sativa-dominant strain. What they lacked in texture and bag appeal, they made up in the final weight and the quality of the smoke.
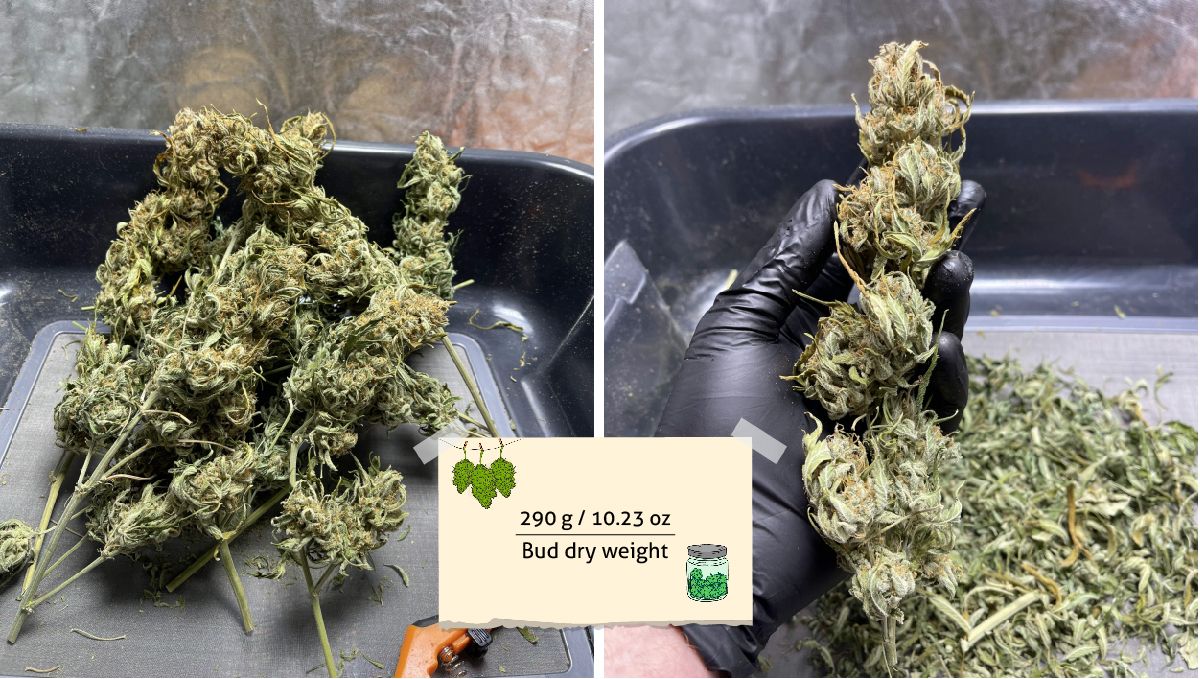
Grower B got even better results -- 381 gr (13.42 oz) of dry bud -- although we must say we don't envy many hours of trimming jail that he faced when he finally cut down his plant.
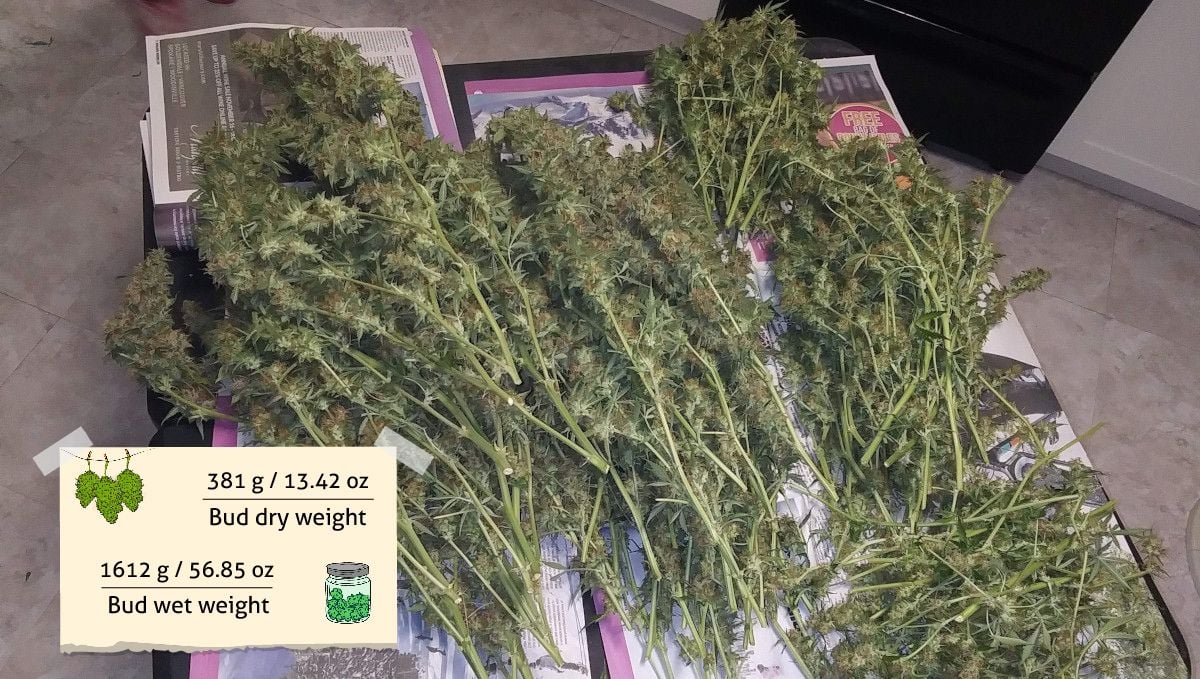
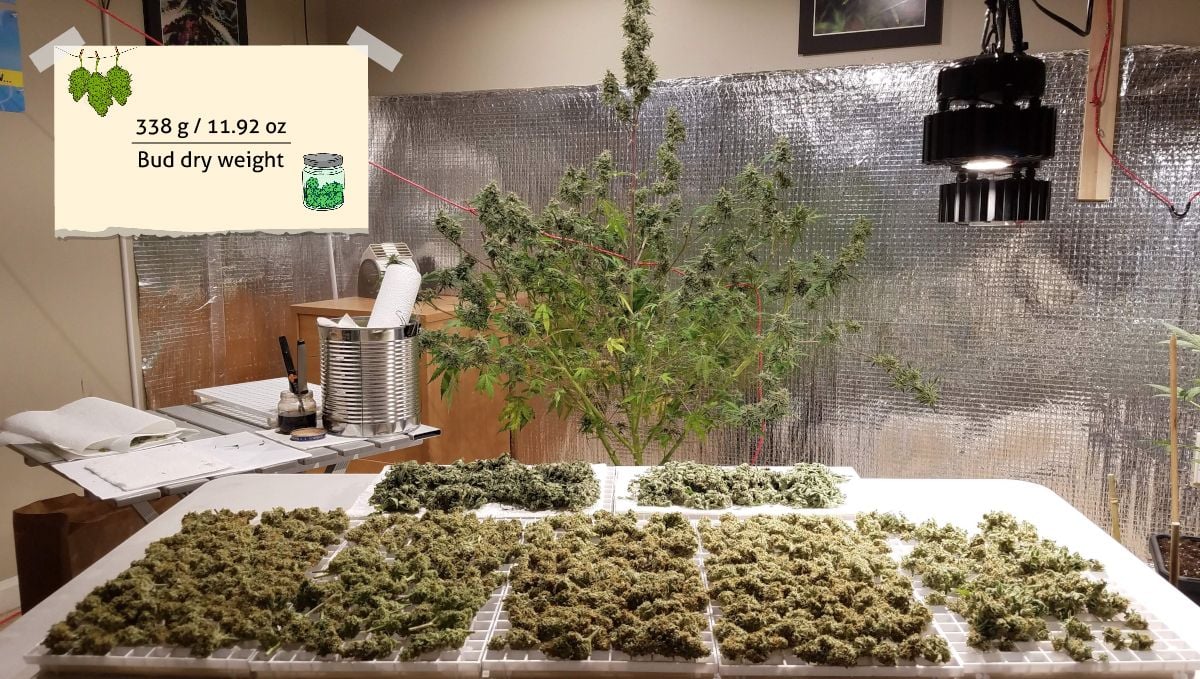
Grower C couldn't complain either -- 338 gr (11.92 oz) dried and cured. Remember that this was an indoor plant although it looked like it had been cultivated outside -- with all the soil that it could get and plenty of sun to boot.
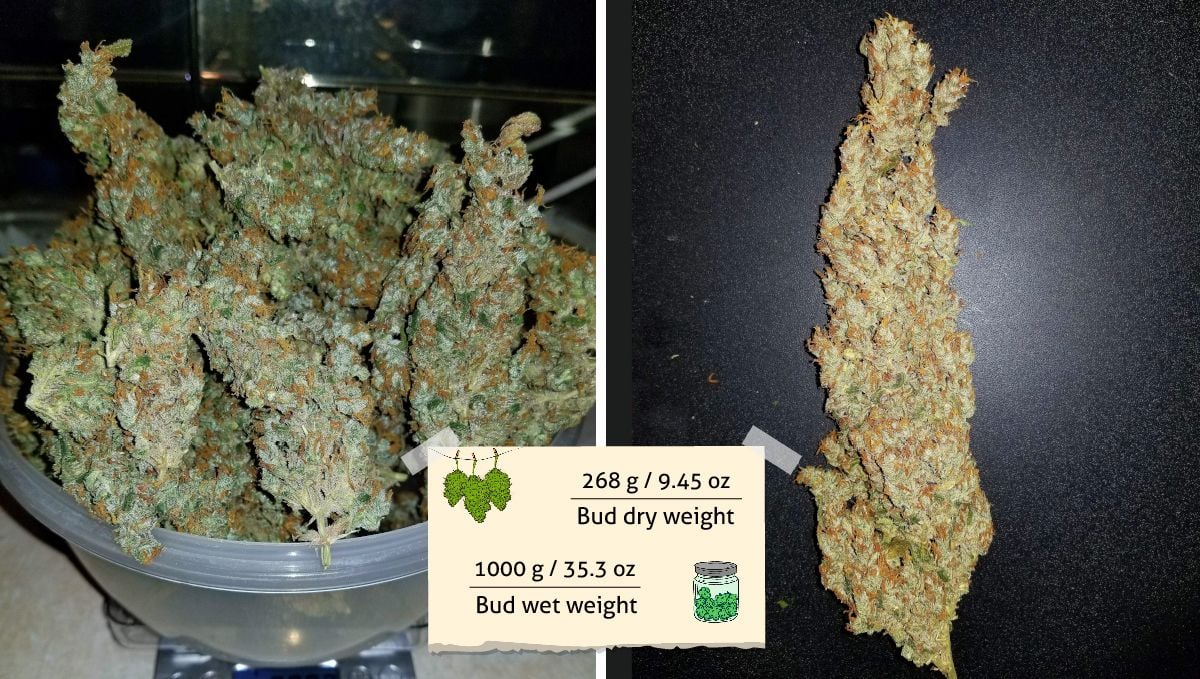
The result of Grower D was more modest -- 268 gr (9.45 oz) -- but it's amazing nevertheless.
These four reviews and all others that we have seen indicate that Green Crack Auto is a potent Sativa-dominant strain, with a strong cerebral buzz and uplifting effects that provide energy, creativity, and focus. It is best suited for daytime use and for those experienced with potent strains. The strain's aroma and flavor profile are described as citrusy, sweet, tropical, with hints of pine and earthy undertones. The strain's effects are potent but not overwhelming, making it a popular choice for those looking for a high that is energizing and focused.

10. In Conclusion
Out of four Green Crack grows in our week-by-week guide, only one had a plant that was compact and had the buds with a classic indoor shape -- roundish and dense. Another one formed a relatively short and moderately bushy plant, but its colas were super fat, bloated and were foxtailing quite a bit. The other two Green Cracks were characterized by a huge size, an insane number of branches, longer-than-usual flowering time, and long, spear-shaped buds.
When you choose Green Crack Auto for your next grow, you better prepare to have a big plant that may strain your grow tent to capacity. Maybe, this scenario won't materialize, and the plant will grow more compact, but better be safe than sorry.
Also, be patient -- although the growth rates of this strain are quite impressive, it takes time to build all that extensive structure and produce all those super-sized colas. In practical terms, it could mean a few extra weeks for you.
Having said that, Green Crack Auto is a cannabis strain that you should definitely try. With its huge and resinous buds, this easy-to-grow variety produces a high yield, making it an excellent option for commercial growers. It's also renowned for its uplifting and energetic effects, making it ideal for creative and productive tasks. Green Crack Auto will also delight you with a unique aroma of tropical fruits and citrus, accentuated by a sweet and spicy undertone. Its high THC content delivers a strong and flavorful cannabis experience, making it an excellent choice for anyone looking for a potent strain. Happy growing!








Comments