


How To Harvest Autoflowering Cannabis Plants
- 1. Why is it important to flush before harvesting?
- 1. a. Flushing periods for different growing methods
- 1. b. Factors to consider when flushing an autoflowering cannabis crop
- 1. c. Add flavor before, during, and after harvesting
- 2. When to harvest autoflowering cannabis buds?
- 2. a. The pistil technique
- 2. b. State of the trichomes
- 3. Harvesting your autoflowers
- 3. a. Low temperatures before harvesting
- 3. b. Dark period before harvesting
- 3. c. Defoliating before harvesting
- 3. d. Chop those plants down
- 3. e. Partial harvest or staggered harvest
- 3. f. Perpetual harvest
- 3. g. Multiple harvest, second harvest, or sequential harvest
- 3. h. Trimming
- 4. Properly drying your buds
- 5. The curing process
- 6. How to increase thc or cbd in the bud?
- 7. Maximize your yields with these tips
- 8. In conclusion
After months of waiting, your big day has finally arrived. A cannabis seed that was so tiny has now grown into a big bush. It’s time to bid adieu, but not before we get to our favorite part – harvesting the buds. If this is your first grow cycle, read along to learn the basics about weed harvesting and how to harvest cannabis properly. I know you want to chop it as soon as possible. You want to skip these stages and directly smoke the bud. But slow down my padawan, because haste makes waste. Now is the time you have to be careful. The stage of harvesting is critical. It can make all the difference in the world, so take some time, and understand how to harvest your autos before starting. If this is your first time harvesting a crop, we know just how exciting the idea of the big chop can be. All those months of hard work finally coming to fruition! Who wouldn’t be excited?
| Harvesting Cannabis Step-By-Step | ||
|---|---|---|
| Step 1 | Flushing | Should be done during the last 1-3 weeks with plain pH'd water. |
| Step 2 | Chopping | When trichomes are 70% cloudy or amber, depending on your preference, you're ready to chop down your plants. |
| Step 3 | Trimming | You can opt between wet or dry trimming, depending on the conditions of your drying room. |
| Step 4 | Drying | Make sure you maintain 20°C and around 50% relative humidity, ideally for 2 weeks. |
| Step 5 | Curing | Curing should take at least 2 weeks, make sure you maintain a humidity of around 50% and take the lid off to allow air exchange at least 2 times a day. |
But hold your horses, the work is truly only half done. To get the very best out of your autoflowers, you need to be patient and take all the care possible at this point. The flushing, trimming, drying, and curing processes all have a direct and clear impact on the final quality of the bud.
Flushing helps remove any and all remaining nutrients that can negatively impact the quality of the smoke. The choice between wet and dry trimming is one we all half to make as cultivators, but in most circumstances, we recommend dry trimming (more on this later, though). Drying cannabis correctly is a science all in itself, and while creating the right conditions isn’t the most difficult job, it is important to get it right. And curing, probably the most overlooked process of all is also maybe the most important when it comes to terpene profile maturation.
So, without further ado, let’s take a nice long deep dive into exactly what you need to do before, during, and after you harvest your autoflowering cannabis crop - or really any weed for that matter because at this point the process is exactly the no matter if you have grown auto or photoperiod plants).
1. Why is it important to flush before harvesting?
As a cannabis grower, you’ve probably used different nutrients to help your babies. The nutrients help the buds swell up. But if the plant hasn’t used all the nutrients, the nutrients remain in different parts of the plant. They can produce a very harsh taste when you smoke the buds and this happens even if you’ve dried and cured the buds well so flushing before harvesting is essential. Plus, the buds can produce a chemical taste if you’ve used too many nutrients.
No, it won’t taste like diesel-like you're imagining. Think of a harsh, acrid taste. So, to avoid this problem, you can flush the plants.

Flushing before harvesting is the process of using plain water to flush away all the nutrients remaining in the soil and wash the roots. Stop using nutrients just about a week or 10 days before the harvest. Use plain water and wait until some of the water drains out of the container.
But flushing doesn’t just remove ionic salts from the soil. With a lack of nutrients in the growing medium, plants are forced to use up the nutrients that they have stored in their tissue, from the leaves and main stem to the petioles and flowers. This process helps to remove excess compounds from cannabis flowers, resulting in a smoother smoke that allows the terpene profile to really shine through. Because cannabis plants rely on certain nutrients in order to build chlorophyll (the green pigments that enable plants to absorb sunlight and convert it into energy), a restriction in nutrients helps to remove excess chlorophyll from cannabis flowers. Why is this important? Because this plant pigment has somewhat of a harsh taste, especially when smoked. Many cannabis users even freeze their crude oil during the extraction process to remove this green phytochemical.
It’s okay if the leaves turn yellow – it’s expected. You can flush the plants even if you suspect something wrong with the plant. But that’s a topic for another day. Flushing also improves the quality of the buds, so don’t forget to flush them well. If you want to completely skip flushing, then switch to organic or super soil. The best part is that you can make super soil at home!
Flushing Periods for Different Growing Methods
The amount of time required for a correct flush is totally dependent on the style of cultivation you have used for your crop. It’s obviously not going to take as long to flush a crop grown hydroponically as one grown in a heavy soil medium, as the flushing water is just so much more easily available to the plants grown hydroponically and you’re immediately cutting the plants off from nutrients. Let’s have a look at the required flushing periods for common cannabis cultivation styles.
Soil Cultivation
For the majority of soil grows that have used some sort of additives a 10 to 14-day flush will be required. This can be reduced slightly if the soil is quite sandy and doesn’t retain a whole heap of water, but in most cases, 10 days should be the minimum for soil cultivation. The only time you should not flush a soil grow is if you have built a super soil before cultivation began. This is due to the fact that no synthetic or mineral nutes have been fed to the soil, so there should be no chemical nasties to wash away.
The ease of flushing a soil-based growing medium depends on the components within it. Soils that are high in clay and organic matter are much harder to flush. Both of these substances possess a net negative charge. Some plant nutrients, such as ammonium, calcium, magnesium, and potassium are cations that feature a positive charge. This means they are attracted to the surface of clay and organic matter particles. The bond between the two substances means water fails to flush out many of these cations. However, plants are still able to access them by releasing hydrogen cations into the soil that compete for binding with clay and organic matter particles. Flushing soil is easier and more successful in soils with less organic matter and high quantities and sand and silt that don’t possess the net negative charge of the clay fraction of the soil.
Coco-Coir Cultivation
Although coco-coir works in a very similar way to soil, it has a much better flushing rate and so a flush period of 4 to 7 days should suffice. If you have amended the coco-coir mix with a bunch of perlite or other materials to help the water retention capacity of the medium then 4 days should be totally fine.
Coco coir itself has no nutritional value for plants. Instead, it serves to give a growing medium structure and a place for roots to anchor into. To grow plants in this substrate, growers have to add valuable organic matter or feed with bottled synthetic nutrients. The lack of minerals in coco coir itself makes it very easy to flush compared to other types of growing mediums.
Hydroponic Cultivation
Plants grown hydroponically need the shortest flush, as you are able instantly to cut off the access of nutrients to the roots entirely. 2 to 3 days is all that is needed. Because of this, some growers argue that hydroponic growing set-ups produce the best-tasting weed. Cultivators are able to simply flush out all of the nutrition solutions and replace it with pH-adjusted water with nothing else added to the solution. However, more natural growers argue that the complexity within soil actually helps to create superior terpene profiles and therefore tastes; everyone has their own preferences.
Factors to Consider When Flushing an Autoflowering Cannabis Crop
The PH of the Water Used For Flushing
Ensuring the correct pH in the flushing water is just as important as with the feed water. Correctly pH’d water will all but guarantee a good flush. 6.0-6.8 is perfect for soil-grown plants or 5.5-6.5 for coco coir or hydroponically grown plants.
Plain Water or a Flushing Aid?
While most cultivators use plain water to flush their crops, some swear by flushing aids such as Flawless Flush. These products contain empty chelates that work like chemical “claws” and grasp onto other materials, such as nutrients, and bind to them. Some growers swear by these types of products, but in our experience, we have found clean water to work just fine.

The Temperature of the Flushing Water
This may seem like slight overkill, but the temperature of the flushing solution can have a direct impact on the efficiency of the flush. Most of the nutrients and chemicals that we are trying to flush out of the growing substrate will dissolve at a faster rate when the flushing water is lukewarm - anywhere from 23 to 27 °C will work perfectly.
The Double Flush Method
If you are growing in either soil or coco-coir and in pots, you should use the double flush method to make sure the medium has been properly flushed. Water the substrate until it can not hold any more water, wait 10 mins or so, the hit it again with the flush water.
Use Your TDS Meter to Measure The Runoff
This is the best way to ascertain exactly what is going on in the substrate. When you first begin flushing you should expect to see a number around 1400 PPM. This is fine, and to be expected at the start of the flushing cycle. Continue the flush until that number drops to below 70 PPM, or until it reaches a similar number to the flush water before you flush.
Add flavor before, during, and after harvesting
If you wish to enhance the flavor and aroma, you can start by flushing properly, this is a way to enhance the flavor before harvesting. Once you have finished flushing, you will have to maintain a good environment in your drying room, this will ensure the cannabinoids and terpenes don't evaporate and finally, you need to cure your buds properly.
To cure properly, the humidity should be around 50% and the lid should be taken off 2-3 times a day, depending on the amount of buds you're curing. Remember that it's essential you cure for at least 2 weeks but the longer you let them cure the better flavor and aroma you'll be rewarded with.
2. When to Harvest Autoflowering Cannabis Buds?
Now that you got the process of growing out of the way, you can focus on how to harvest autoflowering cannabis buds. Before harvesting marijuana there are a couple of things you should look for, even though the breeders often give you an approximate schedule, the growing environment and other factors such as pests or stress can make the growing cycle take a bit longer.
Before picking up the shears you should look at the trichomes and pistils among other things, it’s also essential you know what type of effect you want to achieve because depending on your preferences, you’ll be harvesting your plants a bit later (or sooner).
The Pistil technique
Pistils are the hairs that come out of buds and can be more easily seen in the pre-flowering stage. These hairs usually brown and wilt when your plant is completely mature but in some strains, the hairs can become brown before they’re completely mature, that’s why the pistils aren’t a foolproof method but will also aid you in knowing the exact time to chop down your plants.

Because this is not the most reliable method, it should be used in combination with the state of the trichomes. As soon as 50% of the pistils are brown you should start checking on the trichomes, which are the standard method of knowing when to harvest and when around 70% of the pistils have turned brown, you should definitely check the trichomes every day.
State of the trichomes
This is the standard practice to identify when to harvest the plants. The pistil technique can be accurate but pistils sometimes go brown or amber in color due to many issues. In such cases, you will waste your bud. For growers who don’t want to take any chances with the pistils, the trichome technique is the way to go. But for this, you’ll need a nice jeweler’s loupe or a magnifying lens that shows the trichomes in great detail.
When you focus on the buds with a magnifying lens, the trichomes resemble mushrooms. They are also known as resin glands or crystals. The trichomes are responsible for the effects you absolutely love when smoking cannabis.
If the trichomes are clear, it’s too early to harvest. If they are half milky/cloudy and half clear, wait a little more because the plant is still maturing. It’s recommended to harvest when at least 70% of the trichomes turn cloudy. At this point, you get to enjoy your auto at its peak potency.

Now if you prefer a more medicinal effect, you can harvest when the trichomes are closer to 90% amber, this means THC has turned into CBN and will provide a more sedative effect. Have in mind that this is not a rule, you can harvest with the trichome color ratio that you wish, always remembering that cloudy trichomes provide a cerebral effect and amber a body high.

3. Harvesting your autoflowers
Growing cannabis doesn’t end at the harvest, now that you have taken all the signs into consideration and are sure it’s time to harvest your autos, there’s still a bit of work to be done but don’t get frustrated, in a couple of weeks you’ll be enjoying the long-awaited buds. If you're looking for information about how to harvest marijuana, here are the main method used by most growers.
Low temperatures before harvesting
As you may have seen with purple or other colorful genetics, they can show hues or even turn completely purple (or even pink, red, or blue) during the last weeks of the flowering stage, even though some strains are genetically selected to do it without needing to do anything, some strains will show her true colors when kept at lower temperatures during flowering.
Now you shouldn't decrease the temperatures drastically if you're indoors but by having a slight difference of around 2-3°C between the light and dark period you can achieve beautiful colors!
This can also be done outdoors but because you cannot control the environment, it can be easier to achieve during winter.
Dark period before harvesting
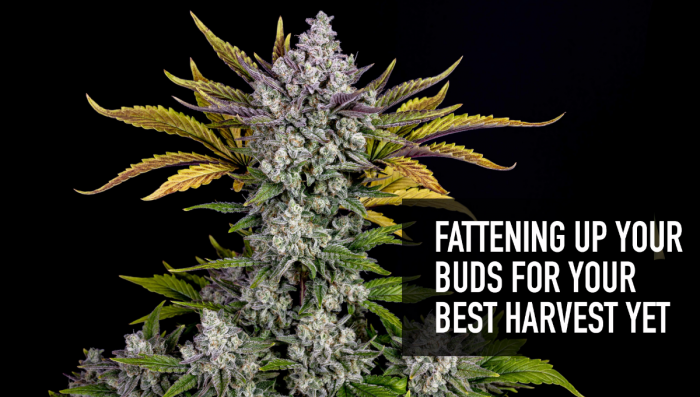
If you want to boost trichome production and fatten up the buds a bit more, you can leave them in up to 48hs of darkness before harvesting. When this happens, you're simulating the change that happens when the seasons transition from summer to winter, your plant will know that her life cycle is ending and will make a final effort to perpetuate her species by producing more trichomes and fattening up the calyxes, which results in better flowers and a bigger yield.
Defoliating before harvesting
Depending on the conditions of your drying room, you may want to remove the bigger fan leaves (aka defoliating) before harvesting, this is basically the same as wet trimming but the main difference is that it can be done before chopping your plants. As you may know, plants can store nutrients in the fan leaves so by removing them you can speed up the flushing process, although the ideal way is to flush because autos can also store minerals in the branches and stem.
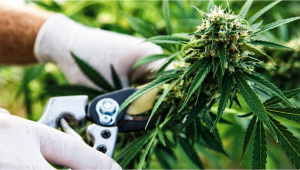
Chop those plants down
Now proceed with your happy dance if you’re at this stage! Some people do a sequential harvest, especially if they are growing autoflowers.
Even though you can use whatever you have available, we recommend using sharp shears to perform a clean cut on the stem or branches.
As you can see in the video above, the grower started cutting each branch individually but sometimes the buds at the lower part of the plant don’t swell too much if they don’t receive a lot of light, you can maximize the harvest by doing a partial harvest.
It is not always necessary to completely butcher the plants. Depending on your environmental conditions, you want to cut the main stem and leave the entire plant whole for the drying period. The larger you leave the plant, the slower it will dry (to a certain extent). So, if you live in a warm, dry climate and have trouble controlling the temps and humidity in your drying area then you may want to leave the plant whole for the drying period, as this will slow the process down and give you a better final product.
Partial harvest or Staggered harvest
As said above, sometimes your plant doesn't get enough light and this can happen indoors or outdoors. Usually, when this happens the lower buds will not get very dense and end up like popcorn buds, however, there's no need to get mad or think you did something wrong, this is quite common and there's a simple way to deal with it. When the buds at the top are ready but the lowers aren't, you can opt for harvesting partially, this way you can harvest the branches that are mature and leave the others a couple of days to fatten up. However, you can harvest the entire plant if you’re not patient to wait. Both ways work.
Perpetual harvest
If you don't want to wait too much, you can plan a perpetual harvest which will allow you to harvest every couple of weeks. A perpetual harvest is a great way to never run out of weed, and if you're growing autos is way more effective because you can do it in one tent and under one light cycle. To do it properly, you just need to start growing and after you've harvested some of them, have enough seeds to replace the ones that were chopped down, this way you will be harvesting plants every couple of weeks without even having to move them from tent to tent.
Multiple harvest, second harvest, or sequential harvest
If you have to harvest several plants like you would in a perpetual harvest, for example, you have to be prepared for a long day of work. Make sure you have alcohol to clean and sterilize the scissors or shears.
The process of harvesting multiple plants it's basically the same, just remember that the trichomes continue degrading after they're ready so if you have to harvest several plants try to finish on the same day you started, make sure you start early in the morning, put on some music, and have your trim bin ready.

You can start by slightly defoliating before trimming as seen in the pictures, start by removing the big fan leaves only, then proceed to remove the smaller leaves, make sure you don’t remove everything right now because you’ll be doing it later when trimming, also use gloves to prevent the resin from sticking to your hands, by using gloves you can later smoke that resin.
We also recommend cleaning the scissor or shears with alcohol when it’s sticky, this will allow you to perform a clean cut and don’t rip off the leaves. The next step is to cut the stems one by one. Don’t uproot the plant before you cut the stems!
Trimming
Trimming the plants can take a while. Choose the stems one after another and if you’re interrupted for some reason while trimming, you can leave the plants in the soil. But, uprooting the plant straightaway will force you to cut all the stems. Use the sharpest pair of pruning clippers or Fiskars you own. Obviously, they need to be sterilized and clean. Handle the colas carefully because you don’t want the trichomes dropping off. There are two ways of trimming those girls.

The first way is to cut the leaves before drying the buds, known as wet trimming. And the second way is to cut the leaves after they are harvested and dried, known as dry trimming. Most growers follow the dry trimming process because it’s easier to cut the leaves after they dry. For the vast majority of growers, we suggest using the dry trimming method. Really, the only time you should wet trim is if you live in a very warm and humid environment where the harvested buds have a high chance of succumbing to mold. If you are able to control the temps and humidity inside the drying area (which is pretty important and should be high on your list of priorities) then just cut the plant down to whatever size you see fit and let it slowly dry.

The next step is to get the sugar leaves. Some growers let the sugar leaves stay. However, this is a matter of choice. Sugar leaves are the small leaves that are attached to the buds. They are coated with crystals and you might be tempted to not remove them.
It’s understandable – after all, you don’t want to waste anything coated with resin. But, sugar leaves can make your buds taste harsh. Smoking pure bud sans all the leaves is an incredible experience. Don’t be dejected, though! You can still use the sugar leaves to make edibles or concentrates instead of throwing them. There’s no point in throwing away anything that’s coated with resin! Cut the stems in such a way that it gives you options to hang them to dry. If you’re not going to hang them, cut them any way you want. Just remember that the smaller the buds, the faster they dry.

Leave the colas alone. They are so majestic and beautiful that it’s worth the wait for them to dry. Place the colas and smaller buds on a clean, parchment, or baking paper. Remember that they are sticky, so prevent any dust from settling on them. Once you’ve harvested all the stems, you can uproot the plants. The final step is to dry and then cure the buds. But for now, take a good look at the buds you have grown and pat yourself on the back! It’s time for the next big yield now.
4. Properly drying your buds
The drying process consists of removing the water in the buds which can lose up to 75% of their weight so we're left with dry plant material that will be easier to burn when smoking it.

If you’ve never grown cannabis before it’s likely you didn’t know that after harvesting you still have more work before enjoying your flowers, unfortunately, it’s necessary to do it but unlike the growth cycle which can take around 9 weeks for autos, the drying and curing process can take as little as 3 weeks.
The drying process should be done in an enclosed environment, you can do it in a growing tent or a room but it doesn’t need to be anything fancy, some growers dry their buds in cardboard boxes or even in shoe boxes, there’s no problem as long as it’s light proof and you can control the humidity and temperature.

The drying process can take 1-2 weeks, during this process the temperatures should be kept around 15-20°C and the relative humidity should be around 50-60% so your buds dry properly.
Have in mind that to enhance the flavor and aroma of your buds the drying process should be done as slowly as possible, drying your flowers too fast will end up in a harsh hay flavor and will screw up everything you’ve done until that point. If you are dry trimming (which we heavily suggest) then now is the time to trim your buds! Do yourself a favor and grab some specified trimming scissors or shears. Do not, we repeat, do not use that pair of blunt scissors in your kitchen draw. Trimming is a pretty tedious job, especially if you have pounds of bud to get through.
5. The curing process
Curing is as important as the drying process, the curing process consists of leaving your buds in a glass jar and changing the air 2-3 times a day, depending on the amount of buds you have and how big the pot is. Usually, the pot should be around 65-75% full and you will have to take the lid off to refresh the air, this will not only avoid mold but will provide new air for the buds to continue curing.

During the curing process, you will be able to clearly smell the difference from one day to another and that delicious weed smell will gradually get stronger and stronger, now there’s no way to know when your buds are ready other than by smelling them.
Your flowers should be good after curing for 2 weeks but you can experiment curing for up to 1 year and see what works best for you.
When the chlorophyll (plant) smell has turned into the typical cannabis smell your flowers should be ready to be consumed, usually growers leave the buds curing for at least 10 days, we recommend a minimum of 2-3 weeks to experience the complete terpene profile your plant has to offer.

Some growers leave their buds curing for up to 6 months or more, there’s no scientific study confirming this practice actually makes the buds taste better or have a stronger effect but a lot of growers swear by it, we recommend experimenting by yourself because sometimes what is good for a grower won’t work for others.

6. How to Increase THC or CBD in the bud?
Another reason to harvest autoflowering cannabis strains at the right time is to maximize CBD or THC in the buds. THC and CBD are both cannabinoids found in the cannabis plant. The plant contains more than 100 cannabinoids and scientists are discovering positive results in treating pain and spasticity.
Those white crystals you see on the plant? Yeah, that’s what we want. THC or white crystals develop on the plant at its last stage. Your autoflowering marijuana plant will be completely covered in resin in the last two weeks.

So, if you wait until the plant develops the trichomes, the THC content will simultaneously increase, thereby resulting in some super potent buds. However, if you wait too long, the THC will degrade and you might experience unpleasant sedative effects.
You’ve got a catch here though.
There are people that actually wait for the THC to degrade. But that’s because they want to get more benefits from CBN. Like THC, CBN is also a cannabinoid, but it doesn’t produce any psychoactive effects.
CBN has more therapeutic effects and has shown promise to relieve some illnesses including schizophrenia. So, if you want to increase the CBN, wait a bit longer after the trichomes turn milky. Just don’t wait too long, though – about 80 to 90% of amber trichomes should give you enough CBN.
Also keep in mind that while Indica offers relaxing effects, Sativas gives you a cerebral buzz. So, for strains like Z Auto, Cream Cookies Auto, and Blackberry Auto that are Indica-dominant, you don’t need to wait for the buds to turn very amber. Even if the buds turn 40-50% amber, you’re good to go.
On the other hand, strains like Lemon AK Auto, Blue Dream Auto and Mexican Airlines Auto are Sativa-dominant. For such strains that make you extremely creative, you can wait until 35% of the trichomes turn amber.
7. Maximize your yields with these tips
Even though autoflowers can produce big yields, some growers like to harvest the most they can from each seed, which is completely fine. There are several techniques to improve yields, some being more difficult to perform correctly than others, it's essential you get a bit of knowledge before topping your autos but there are several low-stress training techniques suited for beginner growers.

Here are a few tips to maximize your yield:
- Make sure the plants get at least 18 hours of light indoors and 8hs outdoors, remember that more light equals more yields.
- Use the best nutrients and containers to get the best results.
- Train the plants using LST (Low-Stress Training).
- Water them well but don’t overwater them – follow the wet and dry cycle.
You can also increase your autoflowering strain yields using other techniques. If you’re an experienced grower, you definitely know when to harvest the plants. But for beginners, it can be confusing. The timing is crucial when it comes to harvesting.
8. In conclusion
Properly growing and taking care up to the end of the flowering stage isn’t the end of your work as a grower. Before smoking your buds there are a couple of processes you should follow to smoke the best possible flowers and even though it may not be as hard as training or feeding your plants, harvesting, trimming, drying, and curing are extremely important when growing cannabis.
So know that you know how to harvest weed, try it for yourself, germinate a couple of seeds and get growing.
If you have tips to facilitate this process, please share them with fellow growers in the comment section below!


Comments