


How to Pack a Weed Bowl: Do's and Don'ts
- 1. Packing a bowl: step-by-step
- 2. The basics of bongs and pipes
- 2. a. Parts of a bong or pipe
- 3. Do grind your weed
- 4. Don't overpack your bowl
- 5. Do use a screen
- 6. Don't pack the bowl on an old bowl
- 7. Do add some kief!
- 8. Don't throw away the stems
- 9. Do remove the bowl for packing
- 10. Do remove the seeds
- 11. Don't be selfish!
- 12. Regular bong maintenance
- 12. a. How to properly clean a bong or bubbler
- 13. How to roll the perfect joint (or spliff)
- 14. The bottom line
Among the various methods for consuming cannabis, smoking from a water pipe (aka bong) or regular pipe is probably between stoners’ favorites. Every frequent cannabis user will turn to the use of these objects at least once in their lifetime. However, have you ever packed your bong or pipe and found that smoking your weed turned more into a nightmare than a good time? This is because there are a few do’s and don'ts when smoking a bowl that not everyone knows of. In this article, we’ll give you all the advice you need to get the most out of your bonging/piping experience.

The most common mistake people tend to make while packing their bongs is not grinding the cannabis, which if omitted can clog up your smoking device and turn the smoking experience into a frustrating nightmare. You should also definitely use a pipe screen when lighting up your bong.
Packing a Bowl: Step-by-Step
Smoking a bowl takes only 5 simple steps:
- Grinding your weed.
- Cleaning your bowl.
- Setting a pipe screen.
- Packing the bowl, be careful not to overpack.
- Lighting it up!
However, there are a few do's and don'ts of smoking a bowl which we'll get into later. Let's cover the basics first.
The Basics of Bongs and Pipes
In case you're an apprentice stoner then chances are you've yet got a whole new language to learn in the cannabis world. To make things easier for you, we’ll explain what packing a bowl means. The bowl is basically the part of the bong or pipe where you're meant to set your cannabis flowers in for smoking. The term packing simply refers to the action of stuffing it before lighting up.
Parts of a bong or pipe
At this point, knowing the parts of a pipe or bong can be of good help:

- Bowl: so, as we mentioned before, the bowl is simply the part where you place your weed.
- Downstem: the downstem is the connector from the bowl to the base of your bong.
- Base: this is the part of a bong that you're meant to fill with water.
- Tube: the hallway of your smoke all the way to your lungs.
- Carburetor: the carb is a small hole on the side or back of the pipe or bong that controls the airflow.
If this is the first time you're smoking a bowl with a water pipe or pipe, you need to make sure you understand the way the carburetor works. In summary, what you have to do is cover the hole with one of your fingers, normally the index, while you're lighting up the cannabis and inhaling the smoke, and let go once you've had enough.
Pro Tip: Don't forget to breathe in that small bit of smoke left inside of your pipe or water pipe once you let go of the carburetor!
Now that we know the technical aspects, let's check some do's and don'ts of smoking a bowl.
1. Do grind your weed
We’ll start with the most common and at the same time, most fatal of them bowl packing mistakes: not grinding your weed enough or not even grinding at all. You’ll probably find some people who’ll try to argue that you shouldn't grind your cannabis buds when using a pipe or water pipe but they are wrong and this is why: when you grind your weed before lighting your bong you make sure that the herb burns evenly.
This way you’ll also avoid the hemp from getting completely torched and you’ll save yourself from having to turn the bud around to make sure you've lit the whole area of it.

Nevertheless, you should not overdo the grinding of your weed, or else it will result in powder-looking weed which will pass all the way through the pipe or water pipe and into your mouth. Unless you were actually going for edibles, which don't work like this anyway, then this is certainly not the way for smoking your bowl.
2. Don't overpack your bowl
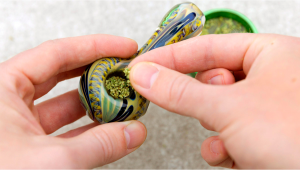
Another common mistake when smoking a bowl is packing it too much. The ideal bowl is one that’s well packed and full, covering the whole bowl's area.
| People Smoking | Amount of Weed |
|---|---|
| 1 | 1/2 bowl |
| 2 | 1 full bowl |
| 4 or more | 1-2 full bowls and more |
However, when you're filling your bowl with your ground weed make sure you don't overpack your bowl so much that you end up blocking the airflow. If you do overpack your bowl sad news is you'll probably end up torching your whole stash and being able to smoke nothing.
3. Do use a screen
This is such an important thing to do: using a screen when smoking with either a pipe or a bong. Unless you enjoy inhaling small crumbs, both raw and burned, then you should definitely place a screen on your bowl before packing it. The only exception for not using a screen is when the bowl’s hole is very tiny and there’s no way that the weed can go through, which most of the time isn't the case. When it comes to pipe screens uses, you can keep reusing your pipe screen until it gets all clogged up. So if you purchase a pipe screens pack at the nearest tobacco or grow shop it should last a while.

However, if you’re getting ready to hit your water pipe or pipe and you realize that you’ve run out of pipe screens to use there are a few alternatives you can make at home. For example, a small piece of aluminum foil can do the job for you. Just place it inside your bowl and make a few tiny holes with a needle or any sharp and thin object.
Another good pipe screen alternative is cutting out a piece of a window screen or mosquito net, but make sure that its made out of steel or some metal because burnt plastic is extremely toxic when smoked. Or perhaps you have a faucet screen somewhere at home, which also works perfectly. If you haven't got any of these, you can take a small stone or stem, which should be slightly bigger than the bowl’s hole and that should work as your pipe screen just fine.
4. Don't Pack The Bowl On An Old Bowl
Ideally, you should use a clean pipe or water pipe every time you smoke, so do yourself a favor and clean your gear as often as you can, we would say after each use but that’s perhaps a little too much to ask for. So when we tell you not to pack a bowl on top of an old bowl it just makes sense.

It will only take a few minutes of your time to get rid of the burned flowers and it will majorly affect the flavor of your pipe or bong hits. What would you prefer, a clean, green forest taste or a roasted, burnt flavor? We thought so, so quit being lazy and clean your bowl before repacking it.
5. Do Add Some Kief!
Why not turn up the piping or bonging game a notch? Go wild on special occasions, which could also turn to be every day, and add some kief to your bowl. First, pack your bowl with your ground cannabis, and then sprinkle as much kief as you'd like on top for that extra highness.

6. Don't throw away the stems
Why peel apples when you can eat the peel as well, and it tastes good! The same applies to cannabis. When rolling a joint we must get rid of stems because they clog up the cigarette and block airflow, and sometimes they even break the rolling paper. However, stems gather tons of THC stuck around them, so why not reuse them for good purposes? You can make stem-infused tea or soak them into your favorite alcoholic beverage to make THC-infused cocktails. Don't forget that to actually activate the THC to do these kinds of experiments you will first need to decarboxylate the stems, which you can do by using a vaporizer.

7. Do remove the bowl for packing
When possible, remove the bowl from the bong or pipe for packing it. Although it isn't completely necessary, you might save yourself from accidentally dropping the smoking object while doing so. The sound of a broken bong or pipe is the sound of a broken heart.
8. Do remove the seeds
So your buds are full of seeds? Yikes, we’re sorry to hear that. If this is the case you definitely should remove as much of the seeds as possible if not all of them.

These guys will not only block your airflow but also they are going to have some negative affections on the herb’s flavor, which, again, we don't want.
9. Don't be selfish!
Last but definitely not least, we’re not speaking strictly about the packing process but the smoking experience here. There are a few things worse than being selfish, and that is being selfish when smoking cannabis. Every true stoner’s life motto is or should be, that cannabis was meant to be shared. So don't be that selfish a**hole who keeps all the stash to himself. We get it, yeah, smoking alone can be great too but there is no comparison with sharing the high with a few close friends, sharing a good laugh, and gathering some new memories together.

So if you're getting ready to pack your bowl, make some calls, send some texts and invite your friends over for a nice time together. You can still go for that late-night toker by yourself afterwards.
10. Regular Bong Maintenance
Ok, so we have run through all the do’s and don’ts when it comes to smoking the perfect bowl but all of that is good for absolutely nothing unless your bong itself is in a decent state. Generally, regular bong maintenance and cleaning are a must if you want an enjoyable smoking experience. A dirty bong is a recipe for a bad time, and once a bong has become filthy it can be a total b**ch to clean, so do yourself (and your friends) a favor and clean that smoking lamp regularly!
For the rest of this guide, we are going to assume you have a glass bong. Bongs can come in all shapes and sizes, made from a huge range of materials - but for the most part, we really just recommend choosing a glass bong. They will last the test of time, are pretty easy to clean, and offer a superior smoking experience.
How to Properly Clean a Bong or Bubbler
- First things first, pour out that dirty old water and give the bong a really good wash-out. Get the tap pumping out water as hot as possible and wash away as much of the grime as you can.
- Next up, it's time to grab a cleaning brush. While under the running hot water give the whole thing a good scrub. You may find that some pipe cleaners come in super handy also.
- Now, there are multiple make-at-home recipes for bong cleaning solutions. Some people opt for pure isopropyl and rice, or vinegar and baking soda - some websites even suggest using turpentine (please, do not use turpentine!). Look, these will work, but for the best results grab yourself a dedicated bong cleaning product. Your local headshop should have a few options available.
- Pour whatever cleaning solution you bo for into your bong, and cover the openings. You could just use your hands but this will quickly turn into a pretty messy affair. A good, cheap option is micropore tape. This stuff will stay stuck even with all that solution sloshing around.

- Lots of people also throw a handful of rice or rock salt in with the cleaning solution to help scrape off any residue. Give the whole thing a good shake and make sure the entire chamber is covered with the cleaner, and then let it sit for a good 10 minutes. This will help loosen up any heavy resin. You may need to hit it with the cleaning brush and the pipe cleaners again at this point to get rid of any stubborn bits.
- Grab the bowl and put it into a ziplock bag with some of the cleaning solution, and let it sit while you are cleaning the bong. After 15 mins or so most of the resin should have dissolved away, but you may need to give it a bit of a scrub to get it totally clean. Another really handy bit of kit for bong cleaning is a magnetic scrubber.
- All that’s left to do now is give the whole thing a really good rinse with hot water, let it dry off, re-assemble it, and fill it back up with nice filtered water.
There really is nothing better than the first rip through a freshly cleaned bong, especially if you have become accustomed to smoking through a filthy one! In terms of maintenance, it’s all pretty straightforward. If your bong has any rubber elements, keep a close eye out to make sure they are in good working order. You may need to replace the bowl every now and then and keep watch for any cracks but really that’s about it.
11. How to Roll the Perfect Joint (or spliff)
So there we have it, absolutely everything you need to know about not only how to pack the perfect bowl for your bong or bubbler, but also how to keep everything as clean and hygienic as possible. But what if you just aren't a huge fan of bongs? They are a pretty clean way to smoke cannabis, but they sure do hit hard! If you're anything like us, your bong smoking days may be few and far between these days (although just a few short years ago the bong would have been my preferred method of consumption). Well then, let's have a quick chat about how to roll the very best joints or spliffs.
")
Maybe you're one of those smokers who always have a friend around that rolls great joints, or maybe you have tried in the past and unfortunately come up a little short. No worries! It's actually not that hard, and with just a little practice you'll be rolling beautiful, perfect cones in no time. But first...What's the difference between a joint and a spliff? This isn't the easiest question to answer, as it really depends on which country you are in. But, for most parts of the western world -
- A Joint is usually made of just cannabis and rolling paper. In some areas, it may refer to a smaller-sized marijuana cigarette, but in most places, it simply means one without any tobacco.
- A Spliff most commonly means a type of smoke that contains both marijuana and tobacco in the mix, rolled up in any sized paper.
Now, let's get to the main event - Rolling the Perfect Joint or Spliff! Here's what you'll need:
- Cannabis (of course)
- Rolling Papers (available in smoke shops and convenience stores, as well as online)
- A Grinder or scissors (not 100% needed as you can simply finger chop your weed, but for a spliff or joint that burns evenly it's a good idea to use one of these)
- Tobacco - if you intend to roll a spliff
- A small piece of cardboard to use as a filter -either referred to as a crutch or a roach, depending on the country
- A rolling tray - totally optional, but nice to have.
Once you have all the gear needed, you're ready to start rolling. But before we get into it, a few quick tips.
- A great joint or spliff starts with a perfect filter. If you have a filter that's tiny and not a nice cylindrical shape, it's going to be hard to roll, and it won't smoke well at all.
- If you are just starting out, you may want to go with a smaller-sized paper and work your way up to the big boys. Smaller papers are much easier to roll with.
- The thinner the paper, the harder it will be to roll (usually). For the best chance at success, grab a thicker paper, to begin with, and then once you are rolling well, move on to a thinner option. The best brands to look out for are RAW, Smoking Papers, OCB, and Rizla.., among a range of others.
- If you grind or cut your weed (and tobacco) up to finely, it can cause an air blockage. This shouldn't happen if you use a grinder, but if you're using scissors then make sure not to turn into fine dust but instead small chunks. While larger chunks usually won't cause blockages, they will burn super unevenly.

So how to roll the perfect joint?
1. Start by grinding up your cannabis, or if you don't have a grinder, simply use scissors and cut it into small pieces.
2. If you are rolling a spliff, you may want to also give the tobacco a slight chop-up. This is especially true if you are using dark, moist rolling tobacco - but this step isn't 100% necessary.
3. Next, grab your filter cardboard and roll your crutch. If you are rolling a small joint or split, you will want the cardboard to be about 1 cm wide and 3 cm long. If you are rolling a longer jazz cigarette then make the width more like 2cm and the length around 5 cm. You can simply roll it up into a cylinder, but for the best result, you will want to fold it with ways to make a small zig-zag with the first third, and then roll it up. This creates a nice aerated cylinder which will make the joint or spliff smoke much easier.
4. Now we are ready for the main event - rolling the thing! Take your rolling paper, and lay it down flat on a clean surface or rolling tray. If you are making a joint, grab some cannabis, and lay it along the paper in a neat line, making sure not to put too much and make it overly full. If you are rolling a spliff, use half cannabis and half tobacco.
5. Once you have the weed/tobacco in place, grab your filter and place it at one end of the paper.
6. Now all that's left is to roll it up, but make sure not to roll it too tightly - this will cause an air blockage. A good trick is to try and catch the rolling edge of the paper underneath the filter, this will help the roll stay in place. Once it's nice and tight, finish rolling the joint fully, tuck one side of the paper into the other, lick the gum strip slightly, and then seal the thing closed.
7. And there you have it - your own handmade joint or spliff! It may take a few goes to get your first one smokeable, but you can always rip them apart and try again.
12. The Bottom Line
Some people could possibly argue that taking that much care for performing simple tasks such as smoking a bowl could be a little bit overreacted. However, since when is caring and doing something with love a crime?
Where is the harm in putting an extra effortless effort, seriously come on, you can’t really be that lazy. All you need to do is take a few extra minutes and you’ll majorly change the whole experience of smoking with your pipe or water pipe and for the better. Besides, what’s the rush? So what are you waiting for now? It's time to put all of your new knowledge to test! Grab your favorite bowl or pipe, and pack it like an expert with sprinkles (kief) on top.


Comments